• Happy Weed Appreciation Day! 🌱🌿🌻

Pearl

Joined
Feb 14, 2015
Messages
4,231
Reaction score
1,120
Location
Iowa
I want to Thank everyone for for the helpful suggestions on my next build. I Wrestled with the idea several nights in bed. I wanted a canoe that I really like, and would be light enough for this Old Man to portage in the BWCA, and yet one that I could handle on the Iowa prairie streams, that I so often paddle.
My original Pearl has glued on gunnels. The only drawback, to use it for a male molded Carbon/Kevlar copy.

Solution, build another stripped Pearl, and use it for the mold.

A few weeks back I paddled with Alan on one of his Back yard lakes. I brought up my Pearl, and we compared to a J Winters Kite, that Alan picked up at the Auction in Minnesota. The Kite was an excellent build ! I liked it, but in all honesty, Pearl was faster, and had more cargo space.

So here I am ! I dug out the old Pearl forms, the RIGHT strong back took longer, but forms are up, aligned and the shear strips on .

As I share this build, I hope to share as much as I can, my method.
Three things I want to note !

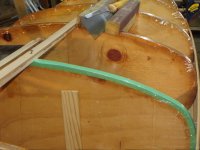
1. Masking tape is great ! Actually I think I like it better than packaging tape, as you see here. Masking tape adds a little cushion between the strips and the forms. Things don't slide off of it as easily, and the big one, you can mark on it !
2. C-clamps, I use them exclusively to hold my forms to the cleats ! I can make minute adjustments, by hand ! No power tools or wrenches needed. It took me several years to figure that one out !
3. Lastly, Alignment strips. Two on each stem form. Not only do these tell you at a glance, that they are in alignment, up and down, but left and right ! I leave these on, until I have enough strips on, that I'm sure things won't move.


IMG_1798_zpswl8a4dit.jpg - Click image for larger version  Name:	IMG_1798_zpswl8a4dit.jpg Views:	1 Size:	159.7 KB ID:	73910
 
Last edited:
Jim,
So this stripped Pearl will be a plug for another composite build?
I'm curious to hear (see, virtually) what your layup will be. Any Divinycell foam core?
 
Jim,
So this stripped Pearl will be a plug for another composite build?
I'm curious to hear (see, virtually) what your layup will be. Any Divinycell foam core?

I'd sure be up for the Divinycell, if I can find a reasonable supply of it !

Plan to alter the lay up from Vader, more S-glass, and reinforce with some carbon in the seat area.

Jim
 
Last edited:
Soooooo, maybe no glue on the gunnels this time.................

I'm thinking No glue at least for the Outwhales ! Gluing them on is the drawback to using them as plugs !

Oh By the way ! I love those straps for my Portage yoke/back rest ! Infact, used them today ! Thanks !!!

Jim
 
I will follow this build with interest Jim.

After the last round of composite builds here, my interest was piqued enough to plan out a composite build .... the breaking point was the cost of the foam (at least in my area).

My thoughts were to use the divinyl the same way as strips are used in a traditional strip build ... and then just using the regular fiberglass/epoxy layup to achieve the required stiffness in the hull.

Any thoughts on that approach?

Brian

Hi Brian
I think it could turn out to be very expensive, to use the Divinycel as a complete replacement for the strips. As commercial builders have shown, they use it in higher stress areas.

I've not settled on a layup, but starting from the mold out, MAYBE 6 oz S-glass, 5 oz Kevlar, 6 oz Carbon fiber, 6 oz S-glass, and maybe a football covering of 6 oz E-glass.
Once off the mold I would add an insert of foam, or 1/8" + Cedar. E-glass, and additional S-glass, in the bilge area near the seat.
Sounds like a lot of cloth and resin ! It would be great to put them all on at one time !
I'm open for suggestions !

Jim

We do glass, Kevlar & carbon one right after another in a continuous layup.
 
We do glass, Kevlar & carbon one right after another in a continuous layup.

I'm guessing you are using a resin with a lot longer pot life than my RAKA epoxy.

I would think the Carbon over the Kevlar, would be easier to handle, without distorting the weaves ?

Jim
 
I'm guessing you are using a resin with a lot longer pot life than my RAKA epoxy.

I would think the Carbon over the Kevlar, would be easier to handle, without distorting the weaves ?

Jim

We do use vinyl ester with about a half hour time but I do 1 batch for under and wettting out the glass and then a second batch for the Kevlar and carbon plus I'm doing half the canoe at a time. Takes 2 of us about an hour and a half to lay one up.

Yes, the carbon lays out well on Kevlar.
 
We do use vinyl ester with about a half hour time but I do 1 batch for under and wettting out the glass and then a second batch for the Kevlar and carbon plus I'm doing half the canoe at a time. Takes 2 of us about an hour and a half to lay one up.

Yes, the carbon lays out well on Kevlar.

That is cool ! To lay up a hull in 1 1/2 hr. ! Female mold Right ?

Jim
 
Have a few strips on, and thought I'd take some pics, that might be of interest to at least beginners.
I like to tape my center form, with a different color tape ! As I always start fastening strips at the middle, this keeps me on track.

Click image for larger version  Name:	IMG_1832_zpso2h8rtfc.jpg Views:	1 Size:	147.1 KB ID:	74065
 
Last edited:
I Love using C-clamps to mount my forms here's some reasons. I can use them as a glue bottle station, and a C-clamp base.

IMG_1820_zpsnumgidpj.jpg
 

Attachments

  • IMG_1832_zpso2h8rtfc.jpg
    IMG_1832_zpso2h8rtfc.jpg
    147.1 KB · Views: 7
In this pic, Note how the strips are alternated from side to side. This creates an interlock with the bead and coved strips.

Also note the card board on the floor. It catches drips, more comfortable walking around the canoe, Saves my tape measure, and staplers, when I knock them off the strongback !

The staples are not driven deep enough to Bruise the strips ! Save a ton of sanding, One reason my hulls are heavier ?

IMG_1824_zpsyosjadvu.jpg
 
Staple gun modification

IMG_1803_zps9itbunsq.jpg


I'm learning the new system ! Sorry for all those other Super Sized pics !

Jim
 
Last edited:
Brian,
I think you would like it ! I believe it's every bit as strong, and the time saving, will amaze you !
I know this isn't a race, But from the time I set up that first form until the time I put the canoe in the water, anything I can do to save time, and money to get it wet, I'll consider it !

Jim
 
Here's a a pic, of how the bead and coves interlock. A Rat tail file is used to knock down the edges of the cove, so that the bead of a strip, from the opposite side, fits.

IMG_1835_zps9owo0qwf.jpg


Jim
 
Back
Top