-
Happy National Avocado Day! 🥑💚
You are using an out of date browser. It may not display this or other websites correctly.
You should upgrade or use an alternative browser.
You should upgrade or use an alternative browser.
Light Weight Solo Tripper Build
- Thread starter Cruiser
- Start date
Hi Cruiser, I just re-read your post about strip height. Back on my first build I bought a few premium boards that were 11/16’s thick. They finished at 5/8’s, so I didn’t end up using them all. Luckily I had these and was able to pull them out later and used them to get around the tight curves on my last build. It really made a difference, but for most of the hull I would rather use the taller strips and get through that part quicker.
Good job job on your build, and thanks for all the detail. I love this canoe building thing, I can’t get enough of it. I’m really looking forward to seeing the final shape of the hull.
Mark
Good job job on your build, and thanks for all the detail. I love this canoe building thing, I can’t get enough of it. I’m really looking forward to seeing the final shape of the hull.
Mark


When I posted about making strips, I mentioned I like to stabilize knots with epoxy and then decide later what to use and what not to use. That decision is often made by the strips falling apart during cutting or handling, when they aren't stabilized.
This pic is a strip made from one of those knots, you can see it is quite viable and I think it will add a little interest to the side landscape (and it is quite solid).

I also mentioned, but didn't show, how the vertical setup of the forms was done, I used a top rail to vertical align the forms, but that was going to be in the way for the hold down system, I replaced the top rail by installing these on all forms. It works quite well and is completely out of the way.

As I turned the bilge, I swapped up the strip hold down system, there gets to be quite a bit of torque on the strips as they curve, likely made more so by the width. I have stopped stripping on one side at this point, it is a good idea to make marks (on the strips) where the inner stem ends and where you want the outer stem to end (you can see the bow marking in the pic).

It is also a good idea to draw a rough center line as you add strips, I find this easier than trying to mark it up when everything is hidden. This is a rough line, so it gets drawn so that it leaves lots of room to later mark the actual line, gives you some safety margin for cutting the rough line later.

Closing in on the center line, the bottom accent strips are in

The rough center line also gives you confirmation that you have passed center, all the way down the canoe

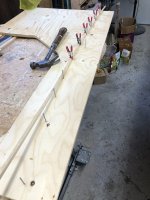
The rough cut for the center line is done with a chisel, by hand, to sneak up on the center.


I take an eraser and completely rub out any of the rough cut line, then remark the center line using this tool little jig (from Canoecraft) and redraw the line, check it by sighting. Double check by putting up a string between the bow/stern, nailed to the stem centers ... site down this and check the line .... adjust/investigate as required.

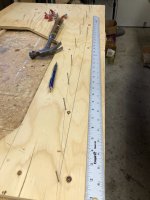
Once the final line is established, use a chisel, working from amidships to each end, carefully sneak up on the line until you get close (somewhere just less than 1/32" to 1/16"). Now we will use a couple of sanding boards to finish this up
The rough sanding board is used to smooth the cut line and get close to the final line

I made this sanding board with 60 grit paper for my last build and it works well

In practice, just pull it tight to the bottom with your hand and sand back forth to get to the line. This straightens like a jointer/jack plane and lets you get to the line perfectly and gives a perpendicular edge.

Here the center line is cut and it looks pretty good. I always sweat this step and it always seem to work out.

Now on to getting set up to make the push to close in the bottom. Have to figure out how I want to setup the hold downs, it shouldn't take too long, I do like the shape so far though.
Second thought, pictures of how much glue I use ... to answer a question asked ... this is about how much glue I am using

and when clamped, this about what I expect for squeeze out

When I add a strip, the channel is inspected for "stuff" in the cove, which seems to be inevitable

Also, a word on what glue to use, I keep several on hand and they all different properties and uses ... it is worth it to take the time to select the right glue for the job. Disclaimer ... these are all my "generalized" opinions based on reading and shop experience, not treatise on glues.
Any of the Titebond and Lepages wood glues, from a strength perspective are overkill for gluing Cedar or pretty much any of the softwoods. So strength will not be a big factor in your glue selection, other than as the glue strength rises, so does the job of trying to remove the glue you leave on and allow to dry. This can include tearing hulks of the strips out as you try and remove it. The higher the bond strength the harder the glue is to remove.
The glue does not need to be waterproof, so that also isn't a factor.
Chalk temperature may be important depending on where and when you are building, most of the regular wood glues do not like to get chilly, if you use them below the minimum temperature, they will crystallize instead of setting up and the joint will fail. So I try to stay well above the minimum recommended temp, well above. When I built my first boat in the winter, the shop temp would get down to 12C (54F) and that was too close to the min working temp for most of the "regular" wood glues, so I swapped to the express glue that is usable to 3C (38F). This worked out well as the chilly temps extended the working/assembly time. So if you are working in a chilly shop, make sure you know the chalk temp of your glue and stay above that by a reasonable margin ... or you risk a nasty surprise.
The last thing is colour, the express glues (LePages Express, there are others as well) are almost translucent and have a faint colour, as the strength rises on the regular wood glues, the colour moves through yellow (Titebond Original, LePages), amber (TB II, LePages Pro) and on to brown (TB III). So depending on the colour of your build, you may want to look at glues that are closer to the wood tones you have, which will help blend the colours and make any glue less noticeable.
So after all this, it appears that glue selection for me comes down to 1) assembly time 2) colour and 3) working temp , as the most important factors in selection. The Express glue I am using is a translucent, light yellow .... the strips are going on the boat pretty fast, just within the assembly time, I reduced shop temp to extend it a bit.
However, this next part of stripping is more finicky and it will take more time to fit and apply strips, so I will be switching glue to a "Pro" or "Premium" to get a longer assembly time. The colour shouldn't be noticeable and I just need to keep the shop up to room temp and I am good.
I included this bit on glues because I find it useful in building and I am not sure most people actually think about the fact that you can use the characteristics of the various glues to your advantage when you are building.
Brian
This pic is a strip made from one of those knots, you can see it is quite viable and I think it will add a little interest to the side landscape (and it is quite solid).
I also mentioned, but didn't show, how the vertical setup of the forms was done, I used a top rail to vertical align the forms, but that was going to be in the way for the hold down system, I replaced the top rail by installing these on all forms. It works quite well and is completely out of the way.
As I turned the bilge, I swapped up the strip hold down system, there gets to be quite a bit of torque on the strips as they curve, likely made more so by the width. I have stopped stripping on one side at this point, it is a good idea to make marks (on the strips) where the inner stem ends and where you want the outer stem to end (you can see the bow marking in the pic).
It is also a good idea to draw a rough center line as you add strips, I find this easier than trying to mark it up when everything is hidden. This is a rough line, so it gets drawn so that it leaves lots of room to later mark the actual line, gives you some safety margin for cutting the rough line later.
Closing in on the center line, the bottom accent strips are in
The rough center line also gives you confirmation that you have passed center, all the way down the canoe
The rough cut for the center line is done with a chisel, by hand, to sneak up on the center.
I take an eraser and completely rub out any of the rough cut line, then remark the center line using this tool little jig (from Canoecraft) and redraw the line, check it by sighting. Double check by putting up a string between the bow/stern, nailed to the stem centers ... site down this and check the line .... adjust/investigate as required.
Once the final line is established, use a chisel, working from amidships to each end, carefully sneak up on the line until you get close (somewhere just less than 1/32" to 1/16"). Now we will use a couple of sanding boards to finish this up
The rough sanding board is used to smooth the cut line and get close to the final line
I made this sanding board with 60 grit paper for my last build and it works well
In practice, just pull it tight to the bottom with your hand and sand back forth to get to the line. This straightens like a jointer/jack plane and lets you get to the line perfectly and gives a perpendicular edge.
Here the center line is cut and it looks pretty good. I always sweat this step and it always seem to work out.
Now on to getting set up to make the push to close in the bottom. Have to figure out how I want to setup the hold downs, it shouldn't take too long, I do like the shape so far though.
Second thought, pictures of how much glue I use ... to answer a question asked ... this is about how much glue I am using
and when clamped, this about what I expect for squeeze out
When I add a strip, the channel is inspected for "stuff" in the cove, which seems to be inevitable
Also, a word on what glue to use, I keep several on hand and they all different properties and uses ... it is worth it to take the time to select the right glue for the job. Disclaimer ... these are all my "generalized" opinions based on reading and shop experience, not treatise on glues.
Any of the Titebond and Lepages wood glues, from a strength perspective are overkill for gluing Cedar or pretty much any of the softwoods. So strength will not be a big factor in your glue selection, other than as the glue strength rises, so does the job of trying to remove the glue you leave on and allow to dry. This can include tearing hulks of the strips out as you try and remove it. The higher the bond strength the harder the glue is to remove.
The glue does not need to be waterproof, so that also isn't a factor.
Chalk temperature may be important depending on where and when you are building, most of the regular wood glues do not like to get chilly, if you use them below the minimum temperature, they will crystallize instead of setting up and the joint will fail. So I try to stay well above the minimum recommended temp, well above. When I built my first boat in the winter, the shop temp would get down to 12C (54F) and that was too close to the min working temp for most of the "regular" wood glues, so I swapped to the express glue that is usable to 3C (38F). This worked out well as the chilly temps extended the working/assembly time. So if you are working in a chilly shop, make sure you know the chalk temp of your glue and stay above that by a reasonable margin ... or you risk a nasty surprise.
The last thing is colour, the express glues (LePages Express, there are others as well) are almost translucent and have a faint colour, as the strength rises on the regular wood glues, the colour moves through yellow (Titebond Original, LePages), amber (TB II, LePages Pro) and on to brown (TB III). So depending on the colour of your build, you may want to look at glues that are closer to the wood tones you have, which will help blend the colours and make any glue less noticeable.
So after all this, it appears that glue selection for me comes down to 1) assembly time 2) colour and 3) working temp , as the most important factors in selection. The Express glue I am using is a translucent, light yellow .... the strips are going on the boat pretty fast, just within the assembly time, I reduced shop temp to extend it a bit.
However, this next part of stripping is more finicky and it will take more time to fit and apply strips, so I will be switching glue to a "Pro" or "Premium" to get a longer assembly time. The colour shouldn't be noticeable and I just need to keep the shop up to room temp and I am good.
I included this bit on glues because I find it useful in building and I am not sure most people actually think about the fact that you can use the characteristics of the various glues to your advantage when you are building.
Brian
Last edited:
I'm really enjoying following along! I'm learning so much, both from your thoughtful documentation and also the other experienced builders chipping in. Thank you everyone!
Same here. I'm also enjoying this, and I've learned alot of things from you. Thank you Brian.
Great work Brian ! The stripping looks spot on . No glue drips on the inside is a Big plus, later ! The grain looks fine !
I like your sanding jig ! I have some real coarse Belt sander belting that I'll use to make a few !
A Good quality Japanese Pull saw has always worked fine for me to cut the centerline ! I'm a little clumsy with a chisel !
I like your choice of C-clamps to hold the L-brackets ! Spring clamps are not enough around the bilge !
Love the pics also !
Jim
That looks great!
So this post continues from the last post where we cut the center line and were ready to close in the football/bottom of the canoe.
Before I get into the next portion, Jim had asked a very good question about the post 2 episodes ago, about how/why my strips had de synced from side to side. I didn't really have an explanation that satisfied me ... but as it happens, I think I stumbled on the issue. I will share here because I think it is easy to overlook in the heat of the stripping process.
When you handle strips from the racks, there is a tendency (at least for me) to leave them in the length wise orientation they are in (if they are laying in one direction, they tend to be left that way) and when using I tend to use them the same way. In this case I left a very little hangover at the bow and cut the excess off at the stern. It was only the bow that seemed to have an issue and I think I know why now.
As you bead the strips, there is a portion of the lead portion that as it exits the first guide towards the cutting head, it is free of any guide and can spring out a bit, as the strips continues on through the router table it engages the guide on the other side of the table, which then locks the strips before and after the cutter.
This is what the end of the strip looks like at the bow end ... it is irregular (and higher/thicker) in the last 1.5 - 2" and in hind sight that is to be expected.

But that lead portion can and likely will be a little irregular, the solution is to simply not use that portion, so in your planning on strips use, plan to discard a couple inches from each end and you won't run into this issue.
I think Jim also posted (busy guy) about using a Japanese pull saw for cutting the ends of the strips, i do as well, here is a pic of mine. The edge fit is dialed in with the sanding sticks I already posted earlier, they make it pretty easy to get a good fit.

As you strip up around the bilge, there is a transition from Jimmi Clamps and L brackets as you continue stripping, dropping clamps and L brackets, from each end, as each strip goes on and adding dowels and shock cord at the ends, for clamping.


The last strips are added with bands/shock cords/dowels and wedges as needed to keep it all clamped. A note about the last strip, the cove is taken off ... making the dowel a little harder to orient, I found a bit of masking tape will hold it in position enough while applying the shock cord.


That is about as far as I figured I could reasonable go with adding strips, now to do the center or "whiskey" strip. This is what we have left open, a space of just less than 2 strips.

There are different ways to do the last strip, this is what I do.. first, I need to transfer the shape of the opening to a shaping jig. If I leave both sides open, the opening is a bit larger and I will simply loft the shape), but this is a fairly narrow strip, so I will take the shape directly.
First cut a piece of cardboard (or some other stiff material you can write on) a bit larger than the opening

Slide it under the opening and move around so you have solid coverage.

Use a pencil to trace out the shape on the card board ... yes, this is a little trickier, you need to use a good mechanical pencil and will also likely have to reach under and support it near the ends. Remove the card board and make sure the shape makes sense

Next, a scrap piece of plywood, some 1.5" - 2" spiral finishing nails (either is fine), a few small spring clamps and a scrap batten. Place the cardboard on the scrap plywood and put a nail in one end, at the end of the shape, straighten and put one in the other end, again at the end of the shape. Place nails every few inches (or whatever you like, I did about 4") on the curve side and in the middle of the straight side. Don't overdo the straight side, I put one in the middle because it was a couple inches longer than my yard stick and that way I git a reference point I could use better/easier

Gently pry up the card board (tip: use a putty knife to release the card board at each nail, eases the release) and you should have this, well not exactly this, this minus the clamps and batten

Use the batten and clamps to draw the curved side, use a straight edge to make the straight side, draw between the nails and end up with this

Take some scrap stock (mine was strapping 1.5" x .75", cut to ~ 2") and place then along the curve you just made and align them with that curve. I used a screw to hold them in place, with a drop of glue to keep them from shifting.

Add some tape to prevent glue from sticking, a couple small plywood scraps (or whatever is kicking around) to hold the strips flat (when you start bending they will want to flex and turn. I am also adding an "extra" strip, just to give me some leeway on the width. So I am making a glue up with 3 strips not 2 ...

To clamp up the strips, add the glue, slide them in place and screw down the flat/bar/ply clamps lightly (make sure the strips can still move) use small scrap pieces of strips to push in the strips to bend them to the form, clamp and move along. Tighten down the flat bars when the strips are all tight against the form.

And undo it all in the morning ...

Before you move the glue up, take the time to make a mark at each end ... the last piece on the jig is the end of the opening size ... so drawing a line from each end piece gives the center line of the boat ... I recommend, making the mark, adding a bit (maybe ~1/16") and then use a straight edge to draw the line, mark to mark ... the little extra, giving you some wiggle or play room to fit


In the pic, i marked the glue up and flipped before drawing the line, simply to get the right orientation on the boat. When you cut the line, you should have the right shape on the curve side and the glue up should be slightly larger than the opening

I place the curved side in position and sneak up on getting it to fit all the way down the curve (tip: make alignment marks at the bow and stern ends of the strip, so you can easily return the glue up to the same position). Then I sneak up on the flat side ... the operative word here is SNEAK ... don't try and adjust more than half of any one side ... it takes a bit longer, but if you mess up, you may have to start over. I spent about an hour fitting this one... the music was good, so just have patience at this point and don't rush it.

Placed the tape here to help identify where the glue up is

And I couldn't resist a bit of light sanding to see how it would look, you can see the sanded area quite clearly in the pic and I think the insert fit in pretty tight

Now on to the filler strips (up to the sheer) and fitting the outer stems.
Be safe, be distant
Brian
Before I get into the next portion, Jim had asked a very good question about the post 2 episodes ago, about how/why my strips had de synced from side to side. I didn't really have an explanation that satisfied me ... but as it happens, I think I stumbled on the issue. I will share here because I think it is easy to overlook in the heat of the stripping process.
When you handle strips from the racks, there is a tendency (at least for me) to leave them in the length wise orientation they are in (if they are laying in one direction, they tend to be left that way) and when using I tend to use them the same way. In this case I left a very little hangover at the bow and cut the excess off at the stern. It was only the bow that seemed to have an issue and I think I know why now.
As you bead the strips, there is a portion of the lead portion that as it exits the first guide towards the cutting head, it is free of any guide and can spring out a bit, as the strips continues on through the router table it engages the guide on the other side of the table, which then locks the strips before and after the cutter.
This is what the end of the strip looks like at the bow end ... it is irregular (and higher/thicker) in the last 1.5 - 2" and in hind sight that is to be expected.
But that lead portion can and likely will be a little irregular, the solution is to simply not use that portion, so in your planning on strips use, plan to discard a couple inches from each end and you won't run into this issue.
I think Jim also posted (busy guy) about using a Japanese pull saw for cutting the ends of the strips, i do as well, here is a pic of mine. The edge fit is dialed in with the sanding sticks I already posted earlier, they make it pretty easy to get a good fit.
As you strip up around the bilge, there is a transition from Jimmi Clamps and L brackets as you continue stripping, dropping clamps and L brackets, from each end, as each strip goes on and adding dowels and shock cord at the ends, for clamping.
The last strips are added with bands/shock cords/dowels and wedges as needed to keep it all clamped. A note about the last strip, the cove is taken off ... making the dowel a little harder to orient, I found a bit of masking tape will hold it in position enough while applying the shock cord.
That is about as far as I figured I could reasonable go with adding strips, now to do the center or "whiskey" strip. This is what we have left open, a space of just less than 2 strips.
There are different ways to do the last strip, this is what I do.. first, I need to transfer the shape of the opening to a shaping jig. If I leave both sides open, the opening is a bit larger and I will simply loft the shape), but this is a fairly narrow strip, so I will take the shape directly.
First cut a piece of cardboard (or some other stiff material you can write on) a bit larger than the opening
Slide it under the opening and move around so you have solid coverage.
Use a pencil to trace out the shape on the card board ... yes, this is a little trickier, you need to use a good mechanical pencil and will also likely have to reach under and support it near the ends. Remove the card board and make sure the shape makes sense
Next, a scrap piece of plywood, some 1.5" - 2" spiral finishing nails (either is fine), a few small spring clamps and a scrap batten. Place the cardboard on the scrap plywood and put a nail in one end, at the end of the shape, straighten and put one in the other end, again at the end of the shape. Place nails every few inches (or whatever you like, I did about 4") on the curve side and in the middle of the straight side. Don't overdo the straight side, I put one in the middle because it was a couple inches longer than my yard stick and that way I git a reference point I could use better/easier
Gently pry up the card board (tip: use a putty knife to release the card board at each nail, eases the release) and you should have this, well not exactly this, this minus the clamps and batten
Use the batten and clamps to draw the curved side, use a straight edge to make the straight side, draw between the nails and end up with this
Take some scrap stock (mine was strapping 1.5" x .75", cut to ~ 2") and place then along the curve you just made and align them with that curve. I used a screw to hold them in place, with a drop of glue to keep them from shifting.
Add some tape to prevent glue from sticking, a couple small plywood scraps (or whatever is kicking around) to hold the strips flat (when you start bending they will want to flex and turn. I am also adding an "extra" strip, just to give me some leeway on the width. So I am making a glue up with 3 strips not 2 ...
To clamp up the strips, add the glue, slide them in place and screw down the flat/bar/ply clamps lightly (make sure the strips can still move) use small scrap pieces of strips to push in the strips to bend them to the form, clamp and move along. Tighten down the flat bars when the strips are all tight against the form.
And undo it all in the morning ...
Before you move the glue up, take the time to make a mark at each end ... the last piece on the jig is the end of the opening size ... so drawing a line from each end piece gives the center line of the boat ... I recommend, making the mark, adding a bit (maybe ~1/16") and then use a straight edge to draw the line, mark to mark ... the little extra, giving you some wiggle or play room to fit
In the pic, i marked the glue up and flipped before drawing the line, simply to get the right orientation on the boat. When you cut the line, you should have the right shape on the curve side and the glue up should be slightly larger than the opening
I place the curved side in position and sneak up on getting it to fit all the way down the curve (tip: make alignment marks at the bow and stern ends of the strip, so you can easily return the glue up to the same position). Then I sneak up on the flat side ... the operative word here is SNEAK ... don't try and adjust more than half of any one side ... it takes a bit longer, but if you mess up, you may have to start over. I spent about an hour fitting this one... the music was good, so just have patience at this point and don't rush it.
Placed the tape here to help identify where the glue up is
And I couldn't resist a bit of light sanding to see how it would look, you can see the sanded area quite clearly in the pic and I think the insert fit in pretty tight
Now on to the filler strips (up to the sheer) and fitting the outer stems.
Be safe, be distant
Brian
Attachments

Last edited:
G
Guest
Guest
Brian (and others),
My thanks for making the time and effort to photograph build sequences and provide descriptive detail.
Even from my own silly shop projects I know how much thought that takes. Just remembering to pause and take sequential photos while in the working groove, and then clearly write up the how and why process makes for stop and start time. Extra tough if you are gluing, using epoxy, gloved, making dust, etc.
In some ways that stop, photo, write pause helps me. It forces me to stop and slow down (and I’m shop slow to begin with) and think more clearly about how to finish up this step, and how to make the next step easier.
I will never build a stripper, but I’m learning a lot elsewhere applicable just following along.
Great Work Brian ! I know I've said that before ! Tracking down the strip variation, just proves there are a lot of things that can cause the same problem !
You really engineered the Whiskey strip construction. You did a fine job of describing it.
I always stop a strip or two short of the centerline opposite of the Whiskey strip. Then I'm able to make a bigger, easier to fit Whiskey strip. It also gives me one more chance to Jazz up the bottom stripping pattern.
Hi Jim, we do the same things ... I also suspect you figured I would drag out this as well ....
when i do a full insert

and the dressup ....

I agree though, it is easier when you have that extra room
Brian
when i do a full insert
and the dressup ....
I agree though, it is easier when you have that extra room
Brian
Last edited:
G
Guest
Guest
I love that “Whiskey Strip” nomenclature, and think I’d want to celebrate with a sip after it was glued snugly in place.
It might deserve a more single barrel toast than the social-distancing bottle of 101 Wild Turkey I laid into our self-quarantined stocks.
It might deserve a more single barrel toast than the social-distancing bottle of 101 Wild Turkey I laid into our self-quarantined stocks.
The last plank installed on a big boat is called the whiskey plank for just that reason. It was a time to celebrate. Way back in January we went to a planking party at the Apprenticeshop to help celebrate the completion of the planking of a big boat. Yes whiskey was consumed and a bit was poured on the bow for good luck. Although on the big boats the whisky plank was usually at the turn of the bilge.
Jim
Jim
- Joined
- Dec 10, 2017
- Messages
- 7
- Reaction score
- 0
Your tips inspire me
Last edited by a moderator:
Your tips inspire me, tell me you are making black and white photo? https://fixthephoto.com/online-photoshop-editor.html
dougd
Looking at the above poster's history it looks like a spammer.
Alan
I am certainly not setting any speed records with the stripping, but with the world situation just now, it seems there is no rush ... I will not likely be tripping in this one, for a good bit yet.
This post covers finishing the fill strips for the bow and stern and install of the outer stems.
The order of steps is a bit back and forth, mostly because of the Kootenay style I chose, the bottom of the stems will get beveled, but for the most part the tops stay plain. At some point as the strips approach the top, the width of the strips + inner stem can/will exceed the width of the standard 3/4" outer stem, so they will either need to beveled as well, or you can pad the width a bit ... padding works well for me.
Additionally, if you go straight to filler strips at this point, you will have to fit the stems at the top and bottom, in a single operation, which is just a pita. So ... the easier way is to fit the outer stem before the filler strips, and cut the top bevel as well ... so the stem is completely fitted for the bottom ... and once the filler strips are done, you only need to fit the top part you just stripped, fitting one side at a time makes this a lot easier IMO.
So on to fitting the stems. The larger sanding stick with the 36 grit sanding belt one side and 60 grit the other made the job soooo much easier ... I won't do it without one in the future (pic as a refresher).

This is what one of the ends looks like at this stage

Starting to sand the end to be level with the inner stem, this needs to stay at right angles to the center line. As you sand down, the natural tendency is to "lean" to one side or the other .... as you near the inner stem, I find it best to shift to stand in front of the stem and work one hand on each side of the stick ... this position is a little less comfortable, but it gets you in a position that your eyes will keep you square with the stem.

This is pretty much just what you want for the front part of the stem, the strips have been sanded square and we are just at the inner stem.

I start with 3/4" x 3/4" stems and bevel to 3/8" ... picking the point to start the bevel is a bit of voodoo, it's in the area where the strips start to "lean over" towards the bottom.

As an aside, I always keep the stems under tension before they get fitted ... just so there is no chance of them "springing out" at all

Once you have the bevel cut, you can slide the stem on carefully and trace the slot it needs to be fitted to

I score the the line, then carefully chisel out the slot.

The sanding stick is used to straighten the sides and make any small adjustments needed, it looks like this once near fitted

You can see here where the slot starts and what I mean by the strips are leaning over to be more horizontal.

and the fitted stem here

A side shot of the fitted bow stem, I am really happy with how well it snuggled in

The stern stem went much the same way, except with the sharper re curve, it required a little padding (the bow did not) ... about 3/16" over a 7" length, so a pair of wedges. 3/16" x &" were cut then glued at the appropriate position. I used a sanding stick to contour them to the stem .... the rest was fitted the same as the bow, which was just described, so we won't do it again.

The bow and stern stems have been fitted and are almost ready to be epoxied on, but first we need to get the filler strips done.
So first thing is the Jimmi clamps need to be modified, the polyflo tubing needs to be removed, as we will now be clamping bead instead of cove.

Looking at the sheer line on the forms, you add the filler strips back far enough to cover them. The filler strips are required because I elected to strip parallel to the water line, not the sheer line. I like the look better, but that is a personal choice .... so here we are now stripping from the bottom, which is pretty much the same as the top, just using the same clamps and jigs in a slightly different manner.

and near the ends I needed a bit extra

The filler strips are done, this a bow view, which sweeps up a bit more than the rear

The filler strips are sanded flush with the inner stem, then the stem fit is checked .... as long as you sneak up on the last bit of sanding and keep it square, like I said, being at the front seems to help, as does using both hands and not sawing back and forth, use a forward <-> back motion.
I epoxy the stems in, as I feel it is important to fill the gaps of the rough slot for strength and integrity. Unthickened, catalyzed Epoxy is applied liberally to the slot and the rest of the attachment area .... I wait 5 minutes and reapply ... in that 5 minute gap, coat the contact surfaces on the stem .... once that is complete, thicken and colour the epoxy to the consistency of peanut butter, using cabosil and wood flour (in this case cherry)

Apply the thickened epoxy to the contact surface on the boat ... I want it to squeeze out when finished, so that i know all the internal gaps are filled. Take the stem and spring it out a bit and slide it into position, check all the alignments, remove excess and leave a small fillet between the stem and boat... I just run a finger (gloved) along the joint, this is the bow

As it happens, some one is thinking, he didn't use any clamping on the bow ... that sharp thinking person is correct, it fitted such that no clamping was needed ... never had that before. Also, just a note on clamping at this stage, work out and setup all the clamping BEFORE you mix epoxy (I didn't make that mistake this time). This however was the bow and it was very close, but clamping stems can call for creativity ... I wanted this one to be snug. You can also see the wedge near the bottom area

I am pretty happy to both be done with the stripping portion, but also that I can start the sanding fairing process tomorrow.
Brian
This post covers finishing the fill strips for the bow and stern and install of the outer stems.
The order of steps is a bit back and forth, mostly because of the Kootenay style I chose, the bottom of the stems will get beveled, but for the most part the tops stay plain. At some point as the strips approach the top, the width of the strips + inner stem can/will exceed the width of the standard 3/4" outer stem, so they will either need to beveled as well, or you can pad the width a bit ... padding works well for me.
Additionally, if you go straight to filler strips at this point, you will have to fit the stems at the top and bottom, in a single operation, which is just a pita. So ... the easier way is to fit the outer stem before the filler strips, and cut the top bevel as well ... so the stem is completely fitted for the bottom ... and once the filler strips are done, you only need to fit the top part you just stripped, fitting one side at a time makes this a lot easier IMO.
So on to fitting the stems. The larger sanding stick with the 36 grit sanding belt one side and 60 grit the other made the job soooo much easier ... I won't do it without one in the future (pic as a refresher).
This is what one of the ends looks like at this stage
Starting to sand the end to be level with the inner stem, this needs to stay at right angles to the center line. As you sand down, the natural tendency is to "lean" to one side or the other .... as you near the inner stem, I find it best to shift to stand in front of the stem and work one hand on each side of the stick ... this position is a little less comfortable, but it gets you in a position that your eyes will keep you square with the stem.
This is pretty much just what you want for the front part of the stem, the strips have been sanded square and we are just at the inner stem.
I start with 3/4" x 3/4" stems and bevel to 3/8" ... picking the point to start the bevel is a bit of voodoo, it's in the area where the strips start to "lean over" towards the bottom.
As an aside, I always keep the stems under tension before they get fitted ... just so there is no chance of them "springing out" at all
Once you have the bevel cut, you can slide the stem on carefully and trace the slot it needs to be fitted to
I score the the line, then carefully chisel out the slot.
The sanding stick is used to straighten the sides and make any small adjustments needed, it looks like this once near fitted
You can see here where the slot starts and what I mean by the strips are leaning over to be more horizontal.
and the fitted stem here
A side shot of the fitted bow stem, I am really happy with how well it snuggled in
The stern stem went much the same way, except with the sharper re curve, it required a little padding (the bow did not) ... about 3/16" over a 7" length, so a pair of wedges. 3/16" x &" were cut then glued at the appropriate position. I used a sanding stick to contour them to the stem .... the rest was fitted the same as the bow, which was just described, so we won't do it again.
The bow and stern stems have been fitted and are almost ready to be epoxied on, but first we need to get the filler strips done.
So first thing is the Jimmi clamps need to be modified, the polyflo tubing needs to be removed, as we will now be clamping bead instead of cove.
Looking at the sheer line on the forms, you add the filler strips back far enough to cover them. The filler strips are required because I elected to strip parallel to the water line, not the sheer line. I like the look better, but that is a personal choice .... so here we are now stripping from the bottom, which is pretty much the same as the top, just using the same clamps and jigs in a slightly different manner.
and near the ends I needed a bit extra
The filler strips are done, this a bow view, which sweeps up a bit more than the rear
The filler strips are sanded flush with the inner stem, then the stem fit is checked .... as long as you sneak up on the last bit of sanding and keep it square, like I said, being at the front seems to help, as does using both hands and not sawing back and forth, use a forward <-> back motion.
I epoxy the stems in, as I feel it is important to fill the gaps of the rough slot for strength and integrity. Unthickened, catalyzed Epoxy is applied liberally to the slot and the rest of the attachment area .... I wait 5 minutes and reapply ... in that 5 minute gap, coat the contact surfaces on the stem .... once that is complete, thicken and colour the epoxy to the consistency of peanut butter, using cabosil and wood flour (in this case cherry)
Apply the thickened epoxy to the contact surface on the boat ... I want it to squeeze out when finished, so that i know all the internal gaps are filled. Take the stem and spring it out a bit and slide it into position, check all the alignments, remove excess and leave a small fillet between the stem and boat... I just run a finger (gloved) along the joint, this is the bow
As it happens, some one is thinking, he didn't use any clamping on the bow ... that sharp thinking person is correct, it fitted such that no clamping was needed ... never had that before. Also, just a note on clamping at this stage, work out and setup all the clamping BEFORE you mix epoxy (I didn't make that mistake this time). This however was the bow and it was very close, but clamping stems can call for creativity ... I wanted this one to be snug. You can also see the wedge near the bottom area
I am pretty happy to both be done with the stripping portion, but also that I can start the sanding fairing process tomorrow.
Brian
Last edited:
Those Kootenay stems are a challenge, doesn't matter if you go stemlees or with stems !
You did a nice job. Rushing things never works for me !
You have the epoxy bonding down pat !
I went back and looked, but didn't see how you fastened the inner stems to the forms, while stripping ?
The only thing I might have done different, was to make a very slight bevel on the inside edge of your strip ends. That should eliminate any gap between the outer stems and the strip ends.
But it looks like you did a fine job of fitting !
I've been waiting to order epoxy until it warms up, but I'm worried about this Covid stuff !
Enjoying your build and I'm sure you are to !
Jim
.
I think you are correct to worry about the covid stuff, I am as well. I got my epoxy for the build earlier and left it in the corner, it will have sat there for a month before I get to use it ... so it should be clear. I am using epoxy I have in the shop, but will swap over to fresh when I do the hull this coming weekend, if I am lucky.
And you would be correct that I didn't post how I fastened the inner stem, in fact with all the photos I shot, i don't have a good one, that shows that.
To hold it at the bottom end, there is a screw going through the form to hold the stem in place there, I add a clamp at the center and bottom to keep the stem aligned at center and top (canoe orientation), the first pair of strips will lock the center part alignment (that clamp is then removed), the screw holds till the football is closed (removed after glassing) and the bottom is removed when it gets in the way doing the filler strips.
Brian
Good technique, to hold the inner stem in place !
Looks like a lot of stem planing next. I always enjoyed shaping the stems of my stemless builds !")

")
The Kootenay stems require a lot more work from this angle ! You are doing great Brian !
Jim
Looks like a lot of stem planing next. I always enjoyed shaping the stems of my stemless builds !
The Kootenay stems require a lot more work from this angle ! You are doing great Brian !
Jim
Last edited:
Similar threads
- Replies
- 93
- Views
- 11K
- Replies
- 42
- Views
- 4K
- Replies
- 18
- Views
- 1K
- Replies
- 13
- Views
- 2K