Thanks Cruiser, that explains it fully! Thank you for the link to the last build.
-
Happy National Avocado Day! 🥑💚
You are using an out of date browser. It may not display this or other websites correctly.
You should upgrade or use an alternative browser.
You should upgrade or use an alternative browser.
Light Weight Solo Tripper Build
- Thread starter Cruiser
- Start date
Great Job Brian.
The point of prefilling cups has been standard with me !
The Use of the scale is spot on ! Pumps burp and give false quantity ! Premarking cups works if you don't have a scale !
I was going to ask if you were going to reduce the amount of epoxy used to fill the weave. A few canoes back I tried Peel Ply ! If it would conform to the hull shape, you could easily skip one fill coat..
It wrinkled on me and left pin holes. Some day somebody will come up with something !
I'd like to try the East system epoxy some time. Mostly to compare pot life to RAKA .
Did you use E-glass or S-glass ? What weight ?
I've always double layer my bottoms when using E-glass. If I went with one layer of S-glass, I would save a lot weight !
Great Build Brian !
Jim
Last edited:
Hi Jim ... thanks for the kind words,
S glass seems to be a bit more difficult (and expensive) to source up here in the great white north, so although I was willing to try it, I wasn't willing to pay over 5x the expense to do so.
I used 6 oz e glass, most of the lakes and rivers I travel are deep so rolling over rocks is not in the usual exposure, so i haven't really considered a double layer on the bottom. For this build I am loosely taking guidance from that laminate schedule I posted early on. To reduce weight I was looking at 4 oz cloth and/or thinner strips, the weight savings versus "strength" was better sticking with 6 oz cloth and going down to 3/16" strips. I could have doubled up on the inside and gone down to 4 oz cloth but it just was a lot of extra work for not a big gain.
The 3/16" strips were quite flexible prior to FGing, now they have firmed up nicely. I was very careful to squeegee carefully, to try and keep the glass application weight at a minimum, it all seemed to work really well. Today or tomorrow, i will get the stem glass layers done, then leave it to cure. Next week is sanding and removal from forms ... then I will weight the hull and at that point I will have a better idea where I am in the weight range and whether the build is on track.
Brian
Thanks DC .... I don't have your video skills (yet) and I am enjoying watching your videos as you release them ...
Brian
Brian
Your photographing of each step is priceless and will indeed be of great help to experienced and inexperienced canoe builders alike...and thanks for the kind words, but I just play around with the camera. I still have a lot to learn. Having fun with it though. Best of luck with the fiberglassing. Fully agree that prefilling premeasured resin cups is the way to go especially if you are working solo. Worked out great for me and of course Jim Dodd offered this advice to me a while back. Glad he did. I flew through that process.
Last steps to complete the outside glassing for me, is to add a double strip of FG to the stems to provide some abrasion resistance. I don't usually drive the canoe on to the shore, so I don't go for full "on" skid plates. The first strip covers the entire stem and measures 38" x 4", the second strip is ~20" x 2" and covers the bottom and then just above the waterline.
First step is to smooth down the sharp edges, at the bow and stern, created by trimming the excess fiberglass already installed. For all the smoothing I am using a sanding block with 120 grit sandpaper

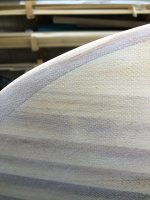
Next I want to sand an area around the stems to accept the new fiberglass strips. An area of about 3-4" either side of the stem needs to be sanded down .... in this pic the sanding isn't quite far enough, it would stick, but wouldn't be full strength ...you can see all the little shiny areas and none of that will bond

In this pic the sanding is about where it needs to be, a smooth white expanse with just a hint of the weave showing

Sanding to accept the strips is complete, a note, the little weave pattern was sanded out, I just didn't have the right pic and this one was close.

Now to get the strips cut. This isn't just cutting straight strips, we need to cut on a bias so the strips will conform to the sharp bends in the stem.
Bias cut strips are cut at ~45 degrees and will easily conform to the stems
A note on cutting FG .... a rotary cutter will do a clean, fast cut, so on things like shapes and strips it is about the cleanest IMO ( of what I have tried so far). HOWEVER, you must be use a cutting mat and if you are borrowing one to try, the cutting wheel will be useless for cloth after you finish (that was learned the hard way). Since I sew, I have a wheel and mat ... and a wheel cutter labelled "GLASS", this is the cutting layout ( I cut out a piece to form a bias hem)

Strips get cut full length, then trimmed for purpose (when I trim the strips to length, I also trim the corners to ease the corners, you can see this in the applied strip pic)

I do a tape layout on the boat, mostly as a guide and to keep the epoxy contained

Apply a light coat of epoxy on the stem area receiving the strip, carefully lay on the strip and use your palms to help it form to the stem shape. The applied epoxy will help tack it in place. Just a note, I use a 3" foam "cigar" roller to apply the epoxy and roll the glass flat.

The first strip is "wet out" pretty well to remove any air pockets, then I apply the second shorter strip, starting at the bottom end of the first strip, but offset forward a bit, this allows the "feathering" coming later, to be spread over a larger area

and a side pic of both strips whetted out and starting first coat cure

The second and third coats were applied with a foam brush and left overnight to cure. For this operation, I only cure overnight, because the epoxy hasn't attained full strength or hardness, so it is easier to feather and sand smooth. Obviously, with green epoxy you need to use a mask and gloves
Here is the scraper I use and a close up of the stern bottom section next day, the scraper is set in the direction you would pull to start feathering the edges, which is towards the new fiberglass at a roughly 45 degree angle (you will adjust angle as needed, the point is to use an angle)

Don't use a lot of pressure and use short controlled strokes, it literally took 20 seconds to to feather this area out ... now I have done it a fair bit, just take your time if you try this, you will get the hang of it quickly.

the stern is pretty well feathered, you can see about mid point on the stem, where strip 2 ends, that will get feathered a bit more and disappear

Just another shot, this one of the bow area, I got a bit messy with the epoxy

those kind of drips are pretty easy to remove while the epoxy is green, this is a pic after about 30 seconds of careful strokes

You have exposed the edges of the FG with the feathering process, so I like to seal them back up. I have had discussions with other builders and it gets pointed out that I could just leave it at this point and let the varnish stage seal it up (This would be fine as well), but I can get a bit fussy and I like to start with a fully sealed exterior ... so I put a very light epoxy coat on to seal everything back up.
Time to get the mask, gloves and sanding block to smooth/roughen the areas that have new glass on them ... this is ready for epoxy

And all sealed back up .... waiting a few days for curing, then it will be sanding time for the exterior hull.

I am getting anxious to get this hull released, then I can get some weights and see how the weight budget is doing ....
Brian
First step is to smooth down the sharp edges, at the bow and stern, created by trimming the excess fiberglass already installed. For all the smoothing I am using a sanding block with 120 grit sandpaper
Next I want to sand an area around the stems to accept the new fiberglass strips. An area of about 3-4" either side of the stem needs to be sanded down .... in this pic the sanding isn't quite far enough, it would stick, but wouldn't be full strength ...you can see all the little shiny areas and none of that will bond
In this pic the sanding is about where it needs to be, a smooth white expanse with just a hint of the weave showing
Sanding to accept the strips is complete, a note, the little weave pattern was sanded out, I just didn't have the right pic and this one was close.
Now to get the strips cut. This isn't just cutting straight strips, we need to cut on a bias so the strips will conform to the sharp bends in the stem.
Bias cut strips are cut at ~45 degrees and will easily conform to the stems
A note on cutting FG .... a rotary cutter will do a clean, fast cut, so on things like shapes and strips it is about the cleanest IMO ( of what I have tried so far). HOWEVER, you must be use a cutting mat and if you are borrowing one to try, the cutting wheel will be useless for cloth after you finish (that was learned the hard way). Since I sew, I have a wheel and mat ... and a wheel cutter labelled "GLASS", this is the cutting layout ( I cut out a piece to form a bias hem)
Strips get cut full length, then trimmed for purpose (when I trim the strips to length, I also trim the corners to ease the corners, you can see this in the applied strip pic)
I do a tape layout on the boat, mostly as a guide and to keep the epoxy contained
Apply a light coat of epoxy on the stem area receiving the strip, carefully lay on the strip and use your palms to help it form to the stem shape. The applied epoxy will help tack it in place. Just a note, I use a 3" foam "cigar" roller to apply the epoxy and roll the glass flat.
The first strip is "wet out" pretty well to remove any air pockets, then I apply the second shorter strip, starting at the bottom end of the first strip, but offset forward a bit, this allows the "feathering" coming later, to be spread over a larger area
and a side pic of both strips whetted out and starting first coat cure
The second and third coats were applied with a foam brush and left overnight to cure. For this operation, I only cure overnight, because the epoxy hasn't attained full strength or hardness, so it is easier to feather and sand smooth. Obviously, with green epoxy you need to use a mask and gloves
Here is the scraper I use and a close up of the stern bottom section next day, the scraper is set in the direction you would pull to start feathering the edges, which is towards the new fiberglass at a roughly 45 degree angle (you will adjust angle as needed, the point is to use an angle)
Don't use a lot of pressure and use short controlled strokes, it literally took 20 seconds to to feather this area out ... now I have done it a fair bit, just take your time if you try this, you will get the hang of it quickly.
the stern is pretty well feathered, you can see about mid point on the stem, where strip 2 ends, that will get feathered a bit more and disappear
Just another shot, this one of the bow area, I got a bit messy with the epoxy
those kind of drips are pretty easy to remove while the epoxy is green, this is a pic after about 30 seconds of careful strokes
You have exposed the edges of the FG with the feathering process, so I like to seal them back up. I have had discussions with other builders and it gets pointed out that I could just leave it at this point and let the varnish stage seal it up (This would be fine as well), but I can get a bit fussy and I like to start with a fully sealed exterior ... so I put a very light epoxy coat on to seal everything back up.
Time to get the mask, gloves and sanding block to smooth/roughen the areas that have new glass on them ... this is ready for epoxy
And all sealed back up .... waiting a few days for curing, then it will be sanding time for the exterior hull.
I am getting anxious to get this hull released, then I can get some weights and see how the weight budget is doing ....
Brian
Attachments
Last edited:
Great explanation of installing the Bias strips. I put mine on after the wet out coat, has gone tack free. No sanding require. I can keep the layers of cloth as close as possible, and when done ? Invisible !.
I would have added an extra fill coat, but I understand the light weight mentality.
As bad as I am, I would be sanding into the weave if I didn't !
Looking forward to Lift Off !
Good luck !
Jim
I would have added an extra fill coat, but I understand the light weight mentality.
As bad as I am, I would be sanding into the weave if I didn't !
Looking forward to Lift Off !
Good luck !
Jim
I have done it that way, but now I put the stem strips on first, before I glass the boat. Both ways work, I just like burying the edges under the full sheet.
All I can say is Fabulous! I'm learning alot watching you build this. Thank you Brian. Excellent workmanship!
Roy
Roy
Strangely ! I enjoy feathering cloth edges !
It's satisfying knowing when I'm done ? I can't find the cloth lines.
Here is a pic of my strippers done the same way you do Brian.
At bottom of the stem, there are actually 4 layers of 6 oz E-glass, and you can't tell where one ends.
I'm sure yours will be the same.

It's satisfying knowing when I'm done ? I can't find the cloth lines.
Here is a pic of my strippers done the same way you do Brian.
At bottom of the stem, there are actually 4 layers of 6 oz E-glass, and you can't tell where one ends.
I'm sure yours will be the same.
Just a small update, while I was waiting for the outer epoxy to cure, life happened. As I mentioned before, I sew all my camp gear (hammock/traps/quilts etc) and at first this seemed like a good thing, but like they say, if you sew they will come. In this case the family found out I could sew masks and that is all the rage now ... thankfully that is done with.
I also got distracted making deck blanks, which I won't go into here, just because I will do a post later on when it fits in with the build. I usually do some work on other components like seats/thwarts/decks, during waiting periods for epoxy to cure.
So last post I had made the boat all shiny again after installing the stem glass abrasive strips. The epoxy is well cured after 10 days at room temperature (at least for me), your shop and epoxy may vary, but I recommend you err on the side of past the cure point.
Normally I would just move the wheeled strongback right out of the shop onto the drive way and have at with a bagged ROS, but it is still too cold, so I used the vac attachment for my ROS and it works really well at containing the dust

That vac setup pic is actually from my last build and I did make a significant change from then to now ... you will notice the red disc on the sander, those are Diablo from HD ... I usually go through a disc about every 2 feet of canoe. They get dull fast, they retain the grit, but are dull and stop cutting. This build I ordered some NortonPro discs and I basically did a whole boat side with 1 disc ... I swapped after 1 side, simply because I didn't think it would last the whole other side. The Nortons are quite a bit more expensive, but I have been very impressed and I feel they really perform a lot better.
I don't say the above to slam the HD ones or to promote the Norton ones .... it is just an experience I am sharing, I was in a rut and comfortable with the red discs ... trying the new ones elevated my expectations of simple sandpaper.
I used 80 grit to knock most of the shine off the hull and followed that with 120 to take off the rest. The 80 grit can cut through pretty quick, so I am careful how long it stays on the hull ... once I have only those little shiny areas poking through is enough.

So inverting the hull is a little trickier because I chose to join all the forms together initially (lock in the vertical alignment), so i have to release all the forms and invert the canoe, then remove the forms. One other task I do before I actually release, is to reach under the sheer and put pencil marks to mark where each form was, this really helps later when you may need a spacer bar, you know where to put and what the width is at that point.

Starting to remove the forms

The inside is pretty clean, not too much glue and it all seems to line up okay

Time to get the inside leveled, sanded and glassed. I took 2 of my little used paint scrapers and shaped and sharpened them into inside scrapers for the hull

They really seem to work well, so next task is to scrape/sand the inside and get it ready for glassing.
One last point .. I mentioned at the first that weight was one of the goals for this build, so i was pretty anxious about getting this inverted and weighed to plug that number into my predicted weight. After fiddling a bit, I think the build weight is on target, I will also weigh again after I get it scraped and ready for glass, just to see what I removed.
Stay safe
Brian
I also got distracted making deck blanks, which I won't go into here, just because I will do a post later on when it fits in with the build. I usually do some work on other components like seats/thwarts/decks, during waiting periods for epoxy to cure.
So last post I had made the boat all shiny again after installing the stem glass abrasive strips. The epoxy is well cured after 10 days at room temperature (at least for me), your shop and epoxy may vary, but I recommend you err on the side of past the cure point.
Normally I would just move the wheeled strongback right out of the shop onto the drive way and have at with a bagged ROS, but it is still too cold, so I used the vac attachment for my ROS and it works really well at containing the dust
That vac setup pic is actually from my last build and I did make a significant change from then to now ... you will notice the red disc on the sander, those are Diablo from HD ... I usually go through a disc about every 2 feet of canoe. They get dull fast, they retain the grit, but are dull and stop cutting. This build I ordered some NortonPro discs and I basically did a whole boat side with 1 disc ... I swapped after 1 side, simply because I didn't think it would last the whole other side. The Nortons are quite a bit more expensive, but I have been very impressed and I feel they really perform a lot better.
I don't say the above to slam the HD ones or to promote the Norton ones .... it is just an experience I am sharing, I was in a rut and comfortable with the red discs ... trying the new ones elevated my expectations of simple sandpaper.
I used 80 grit to knock most of the shine off the hull and followed that with 120 to take off the rest. The 80 grit can cut through pretty quick, so I am careful how long it stays on the hull ... once I have only those little shiny areas poking through is enough.
So inverting the hull is a little trickier because I chose to join all the forms together initially (lock in the vertical alignment), so i have to release all the forms and invert the canoe, then remove the forms. One other task I do before I actually release, is to reach under the sheer and put pencil marks to mark where each form was, this really helps later when you may need a spacer bar, you know where to put and what the width is at that point.
Starting to remove the forms
The inside is pretty clean, not too much glue and it all seems to line up okay
Time to get the inside leveled, sanded and glassed. I took 2 of my little used paint scrapers and shaped and sharpened them into inside scrapers for the hull
They really seem to work well, so next task is to scrape/sand the inside and get it ready for glassing.
One last point .. I mentioned at the first that weight was one of the goals for this build, so i was pretty anxious about getting this inverted and weighed to plug that number into my predicted weight. After fiddling a bit, I think the build weight is on target, I will also weigh again after I get it scraped and ready for glass, just to see what I removed.
Stay safe
Brian
Last edited:
Those Blue Norton discs are incredibile !
I put a forty grit Blue Norton on a spin sander, and it Hogs wood like No other !
Glad to see you got those Stem forms out !
The Glue looks good ! That will save you a lot of scraping and sanding.
If we could find Carbide replacement blades, with that contour for scrapers !
Nice work as aways !
Waiting on the warmer weather is tough, especially Up North
Jim
Looks beautiful. Really nice work!
Bob
Bob
This is my least favourite part of canoe making, lol. if there was ever an excuse for drinking, it would coincide with sanding the interior hull. Looks like yours should be pretty painless though, pretty smooth hull!
Agreed, it looks like you'll have very little to remove on the inside.
So what did it weigh when flipped? You said it's as expected, but what were you expecting?
So what did it weigh when flipped? You said it's as expected, but what were you expecting?
SG, The goal is to complete at or under 30 pounds ... the hull + outer FG = 20 pounds, I am estimating about 6 pounds for the FG, so I figure the actual cedar hull weighs ~14 pounds.
I will refine this a bit when I weigh it after inner glass is done ( I figure outer =inner*10%), plus I will reweigh after I cleanup the inside ... but that weight puts me right where I hoped to be ( I have the weight budget from the last build to follow).
C&B ... thank you
Jim ... to use a english term, I was gobsmacked by the performance of the Norton Pro discs
Brian
No float chambers on this one, all I need the boat to do is to not sink and wood in FG isn't going to do that. I have some deck blanks made and they will be installed as long as I can still stay close to the weight target.
Brian
Brian
Similar threads
- Replies
- 93
- Views
- 11K
- Replies
- 42
- Views
- 4K
- Replies
- 18
- Views
- 1K
- Replies
- 13
- Views
- 2K