• Happy "Killer Rabbit" Attacks President Carter in His Paddle Boat (1979)! 🚣🏼‍♂️🐇

Light Weight Solo Tripper Build

One thing that has amazed me, is the Small space you have to build in Brian ! My Hat's off to you !

That deck is Far Out !

Early on I started using Watco as opposed to Varnish, ( Spare Urethane) on my gunnels. What I liked best about Watco, is the fact that Scratches don't show like they did in Varnish. Scratches in in varnish show as White streaks.

Looking at your beautiful wood work, it would be a shame to see scratches in it.

Had you considered Watco ?

Jim
 
Last edited:
Thank you Jim ... the epoxy really does toughen up the cherry and scratches typically are just in the varnish, which is an easy fix.

Plus using a twin does make it more difficult to hit the gunnels (I find) ... I can feel about 10 ppl shaking there heads and going TWIN ... pffft

Brian
 
So outside finishing is now complete, coming to the end of the build part.

I did a sanding to 120 grit before I removed the hull from the form to do the interior, so now it's time to flip it back and start on getting the exterior varnished.

The plan is to wash the hull with soap and water, then sand it out to 220 grit. After the little issues on the interior, I am not skipping the washing step, it is very little labour and good insurance.

However, first thing I noticed where these little areas of discolouration all over the hull .... didn't know what they were ... but they disappeared with washing

ACtC-3dvs5PYdyZdEux3oaOI3YxgjadaiwXU8GwWFudP9GxnM7T9zKyfECVncTW9_lxnf77lclBRHcEy19yyzsZfOI3klRTU8kJyJBB26IqjUaOyigGjAZnJOW8N5_mrWuNeGwL1qriwuMb4DCFuNtFCEKtt=w802-h1069-no?authuser=0.jpg - Click image for larger version  Name:	ACtC-3dvs5PYdyZdEux3oaOI3YxgjadaiwXU8GwWFudP9GxnM7T9zKyfECVncTW9_lxnf77lclBRHcEy19yyzsZfOI3klRTU8kJyJBB26IqjUaOyigGjAZnJOW8N5_mrWuNeGwL1qriwuMb4DCFuNtFCEKtt=w802-h1069-no?authuser=0.jpg Views:	0 Size:	245.6 KB ID:	113599

ACtC-3dokMoXswuHKLMn3Vk55CGwTLH_GRCVNHhGxxXY0gSuorxiih0tKCJ9IrrdC9lBkJ5royZgVOgn5Iofki11CztjHDLSrm1M5a4SyXTF2wwzQFImRGmc5JvGv9qzDCD63NM4IOGP_yZKhjDS1aoP_61S=w802-h1069-no?authuser=0.jpg - Click image for larger version  Name:	ACtC-3dokMoXswuHKLMn3Vk55CGwTLH_GRCVNHhGxxXY0gSuorxiih0tKCJ9IrrdC9lBkJ5royZgVOgn5Iofki11CztjHDLSrm1M5a4SyXTF2wwzQFImRGmc5JvGv9qzDCD63NM4IOGP_yZKhjDS1aoP_61S=w802-h1069-no?authuser=0.jpg Views:	0 Size:	115.0 KB ID:	113600

Outside washed, hand sanded to 220 grit, waiting to be vacuumed and tack clothed. The varnish regime is Epiphanes thinned 25% - 20% -15% (using 3 coats on the exterior)

ACtC-3cnINJ_YyxMiE-o-4TCyVdaOgKpygG_j7xNG10SVwuXDk0mRcYagiEkAjwf65K9ZloTURdnjmeFYBD8NNnFBr8r9rf3ULPeQrIi9cEt0ZERaqpcgZJvESbjAbYhHXUCfmY6CtF_n7rMxBZdFiUDljl0=w802-h1069-no?authuser=0.jpg - Click image for larger version  Name:	ACtC-3cnINJ_YyxMiE-o-4TCyVdaOgKpygG_j7xNG10SVwuXDk0mRcYagiEkAjwf65K9ZloTURdnjmeFYBD8NNnFBr8r9rf3ULPeQrIi9cEt0ZERaqpcgZJvESbjAbYhHXUCfmY6CtF_n7rMxBZdFiUDljl0=w802-h1069-no?authuser=0.jpg Views:	0 Size:	415.2 KB ID:	113601

Varnishing going very well, using a 4" roller, apply varnish to about 2-3 square feet at a time, with a couple inch overlap between areas, the varnish gets rolled up/down, then bow/stern direction to distribute varnish evenly. Then tipped to wet edge ... I don't baby this step as I believe speed is one of the more important points, so although I proceed carefully, I also don't waste time ... no phone calls, breaks, no pics (sorry) or interruptions .... get the varnish on, get the varnish distributed, get it tipped off.

The varnish will start skinning quickly, so to maximize the time it has to flow and level I move quickly.

After coat 2

ACtC-3fLkAuYkJCj_5-jHQvddhtUSNvRTLiOIoip7mQanM4UPTu9DvpU_jXWMGR03tuQ04PdSJHrwd9XWSarFVOHh3ymITfXIeGCxBflqyQUBsZolU6T6dY8x_GvW1aBtW88VMYhBOy5PUI8JHLqFZjqJoGY=w802-h1069-no?authuser=0.jpg - Click image for larger version  Name:	ACtC-3fLkAuYkJCj_5-jHQvddhtUSNvRTLiOIoip7mQanM4UPTu9DvpU_jXWMGR03tuQ04PdSJHrwd9XWSarFVOHh3ymITfXIeGCxBflqyQUBsZolU6T6dY8x_GvW1aBtW88VMYhBOy5PUI8JHLqFZjqJoGY=w802-h1069-no?authuser=0.jpg Views:	0 Size:	277.4 KB ID:	113602

Hand sanding the hull for coat 3, initial hull sanded to 220 grit, for coats 2 and 3 320 grit paper was used ... still using the Norton Pro paper, still totally impressed with it's performance (not a advertisement, sharing what I consider to be a superior product).

I do all the sanding outside ... in fact all the prep is done outside, to avoid introducing all that fine dust in the shop

ACtC-3dfWt7MKhux82OD6UViDgK_6Sg5VENR0Ak5Agbb_5Q3G-HpaecQl8OFVh4B5ieiu6siDOUxqx3LvIUgESVnuWvzvWQk2hzM3srMqB8xKvPV39CIbCKXZYfSVKC_ototkY-0-0ypB5Tzp7Z3tQh6lju0=w802-h1069-no?authuser=0.jpg - Click image for larger version  Name:	ACtC-3dfWt7MKhux82OD6UViDgK_6Sg5VENR0Ak5Agbb_5Q3G-HpaecQl8OFVh4B5ieiu6siDOUxqx3LvIUgESVnuWvzvWQk2hzM3srMqB8xKvPV39CIbCKXZYfSVKC_ototkY-0-0ypB5Tzp7Z3tQh6lju0=w802-h1069-no?authuser=0.jpg Views:	0 Size:	328.8 KB ID:	113603

and completed, vacuumed/wiped/tacked ready to move to the shop

ACtC-3cdpFZTeExbP_FJVcSqgkVkzIgIdTFSeNilld1_dMGURa3iiSY_WTumSXsHRSun9gNymJlKpenOnSUTySumTeHpR0bvSmfARyMkGmxUn20uufpM-fV0-T8ruT4L-UgbHRMlsZXgMSNRaURCOM8cK6G1=w802-h1069-no?authuser=0.jpg - Click image for larger version  Name:	ACtC-3cdpFZTeExbP_FJVcSqgkVkzIgIdTFSeNilld1_dMGURa3iiSY_WTumSXsHRSun9gNymJlKpenOnSUTySumTeHpR0bvSmfARyMkGmxUn20uufpM-fV0-T8ruT4L-UgbHRMlsZXgMSNRaURCOM8cK6G1=w802-h1069-no?authuser=0.jpg Views:	0 Size:	367.6 KB ID:	113604

Coat 3 went on without a hitch, after which i left the hull sit for 3 days before flipping and installing the trim stuff.

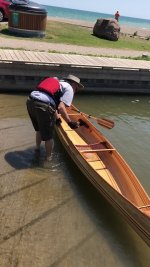
Now for a few pics of the completed project, on the racks

ACtC-3fHsac25p1mxA8C6QLMdQ-hSD6z9pAc9bV1235sn1x3N5RFhHgJVw2WHKR5OIBXUYwPZd-9r0aRyEGjrTiqHG25CJCDbpUHWIQi-NvVWWx8Zv21uIAY1zueBj7F3o47YlrMRCopL4iaBD3lcazPZ8Jz=w1426-h1069-no?authuser=0.jpg - Click image for larger version  Name:	ACtC-3fHsac25p1mxA8C6QLMdQ-hSD6z9pAc9bV1235sn1x3N5RFhHgJVw2WHKR5OIBXUYwPZd-9r0aRyEGjrTiqHG25CJCDbpUHWIQi-NvVWWx8Zv21uIAY1zueBj7F3o47YlrMRCopL4iaBD3lcazPZ8Jz=w1426-h1069-no?authuser=0.jpg Views:	0 Size:	684.0 KB ID:	113605

added the yoke in place

ACtC-3eG5D4NIkugE_zNvHwVC-NBw0N1T779QE1rWh74j2GDBLMjAe9uUlyMg-GmH7RpsW9R6ZfpeIi-IQ5dB5AnLw67plnmRmAMa_pzCBxEcl-IxgZZJ6xJkf6lC9JzwL1b0WXGDKThAoouJhAlnjizrQ67=w1426-h1069-no?authuser=0.jpg - Click image for larger version  Name:	ACtC-3eG5D4NIkugE_zNvHwVC-NBw0N1T779QE1rWh74j2GDBLMjAe9uUlyMg-GmH7RpsW9R6ZfpeIi-IQ5dB5AnLw67plnmRmAMa_pzCBxEcl-IxgZZJ6xJkf6lC9JzwL1b0WXGDKThAoouJhAlnjizrQ67=w1426-h1069-no?authuser=0.jpg Views:	0 Size:	626.2 KB ID:	113606

ACtC-3fRDDZYAnRr4zvsPvlcDCmyvIP4bFkLIXlQ-tJ2D9bKk86hhbQUmwjJeD1TbclK2G7tm1XsrCHZ2sWhGuyTEkI61hA3ggcUTuJQBDCMJLdN0ZilBBEWQo2ZAK7JadHUtV0pGEuYPOK7_cpfRFQGkTe2=w802-h1069-no?authuser=0.jpg - Click image for larger version  Name:	ACtC-3fRDDZYAnRr4zvsPvlcDCmyvIP4bFkLIXlQ-tJ2D9bKk86hhbQUmwjJeD1TbclK2G7tm1XsrCHZ2sWhGuyTEkI61hA3ggcUTuJQBDCMJLdN0ZilBBEWQo2ZAK7JadHUtV0pGEuYPOK7_cpfRFQGkTe2=w802-h1069-no?authuser=0.jpg Views:	0 Size:	252.2 KB ID:	113607

ACtC-3fRI28bbYJbLKBhF_-WY7zxhkz08_HiaXEO4XO43Fer2hsietZjBP63dMPYidTHmkfUuIGq1AmwQsy39JJgOglntB_7rpqnLaa4QeLf9ZpIOU6e2X_jMZw4gIC2jptPii9rS7ILaaaBez-67ubZb80A=w802-h1069-no?authuser=0.jpg - Click image for larger version  Name:	ACtC-3fRI28bbYJbLKBhF_-WY7zxhkz08_HiaXEO4XO43Fer2hsietZjBP63dMPYidTHmkfUuIGq1AmwQsy39JJgOglntB_7rpqnLaa4QeLf9ZpIOU6e2X_jMZw4gIC2jptPii9rS7ILaaaBez-67ubZb80A=w802-h1069-no?authuser=0.jpg Views:	0 Size:	363.4 KB ID:	113608

Bottoms up

ACtC-3ecmZ9SOY6hRT7pfH_KaDQk31DF6iugWY78d07aGkO2cVU8N18fNoHD3qW24i9pLSHsyfDryWZVC7RekZV5mjELGa3DCma8ZnjOWlOEll7emd_mnhjpGDMybUeumOpGDt4kTVlCPabC4bJe-neO9I3G=w802-h1069-no?authuser=0.jpg - Click image for larger version  Name:	ACtC-3ecmZ9SOY6hRT7pfH_KaDQk31DF6iugWY78d07aGkO2cVU8N18fNoHD3qW24i9pLSHsyfDryWZVC7RekZV5mjELGa3DCma8ZnjOWlOEll7emd_mnhjpGDMybUeumOpGDt4kTVlCPabC4bJe-neO9I3G=w802-h1069-no?authuser=0.jpg Views:	0 Size:	341.9 KB ID:	113609

ACtC-3ej6ifTOc_3tyKPa8ipRPzCYWVoxBCWxUnrKnuq5BkGm3ukzfztvDLrJjwF7oxjI8pdpfpMOCJrQoFqpnrR1KSi_DOAnNgKvwLNXWflUPVGSzmPt4jhlwx7tZGFRb049-D8MvSnTOIbZXlNCjmbSkHP=w1426-h1069-no?authuser=0.jpg - Click image for larger version  Name:	ACtC-3ej6ifTOc_3tyKPa8ipRPzCYWVoxBCWxUnrKnuq5BkGm3ukzfztvDLrJjwF7oxjI8pdpfpMOCJrQoFqpnrR1KSi_DOAnNgKvwLNXWflUPVGSzmPt4jhlwx7tZGFRb049-D8MvSnTOIbZXlNCjmbSkHP=w1426-h1069-no?authuser=0.jpg Views:	0 Size:	611.2 KB ID:	113610

A few thoughts at this point, the varnishing went a lot smoother than usually, with no real issues with dust. I have a theory that most of previous dust issues were related to one thing, the fluorescent lights in the shop. Last few builds I have taken to using a leaf blower to blow out the shop, then hanging plastic to create a dust free zone to varnish in, spraying down the area with water before I bring the canoe back in etc. ... you get the idea.

This time, I decided to do coats 1 and 2 with no plastic, because they would be sanded down anyway, however what I found was they were coming out glass smooth, no nibs, nothing. The only real difference I can figure, was the conversion I did to LEDs last year, I know that fluorescent create static and will attract dust when on, release when turned off ... apparently LEDs don't

Coat 3 went on without any precautions or other dust prevention and again, glass smooth ... in any case it was smooth enough for me and I am thinking that is really what matters.

The project came in over weight budget at 32.5 pounds ... target was 30 pounds, I know part of that overage was the decks I added and likely some more with the decision to increase the thwart size.

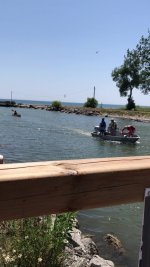
Hopefully I will get it on the water, so one more post on impressions and how I intend to mount the yoke (when not in use), which I decided not to do until it was tested on the water.

Brian
 
Last edited:
Beautiful! All the details come together in an awesome looking boat. Can’t wait to hear home it paddles and portage.
 
Wonderful build and wonderful documentation. The boat looks fantastic. Can't wait to hear how it performs on the water.

32.5 pounds is impressive even if it was over your goal.

Alan
 
Wow ! Would like to send my finish work your way Brian !
An old friend who refurbished Chris Crafts, among others. Wets the floor down around the work area, prior to applying Epiphanes. 14 coats !

I remember taking a new canoe to the BWCA. The outfitter we always dealt with, came out and said "Do you want me to scratch it now, before you go in, and you can get the crying over with ? " I laughed, No I want that pleasure !

That is amazingly light !

Looking forward to your test evaluation !

Again that is Awesome !

Jim
 
That’s a beautiful canoe, what craftsmanship, thanks for taking the extra effort to document the build and sharing it here. Great pictures throughout the build with excellent explanations, a real plus for the website and future builders.
Thanks
 
Clint, Jim, Alan Mem, Robin - thank you for the kind words ... sharing stuff is a good way to also learn new ideas from comments

Weather forecast is hot through the entire month, i have the maiden dip planned for Monday when the launch area should be less populated.

Brian
 
Beautiful work Brian! Stunning! I really appreciate all of the extra time and effort you spent documenting the build and your willingness to share your process and techniques. I admire your disciplined, logical approach. Your research, great eye and awesome skills have produced a one of a kind, functional work of art. Thanks for letting us share the journey! Congratulations!
 
What everyone else said. You are a master at your craft. Thanks so much for sharing all the details.
 
Well, today was a the big day .... time to get wet ... the boat that is.

Drove down to a nearby beach with a boat ramp, with the intention just launching from the beach, however there was a pretty stiff breeze and Lake Ontario can kick up the waves, so I changed the launch point to the harbour side (just moved over 50 feet or so).

When i got in, I felt the seat was a little higher than I am used to, this was confirmed when i got home, it's dropped 4" instead of 5" ..... it's funny how little a difference you can notice.

I was worried the higher seat might make it a little less stable, but surprise, it is a rock, well not really a rock ... nimble, responsive, but it feels fully in control and stable. The balance seems to be good unloaded and once the foot braces where adjusted it was a very comfy fit.

A little bit of gas and pause, it tracks straight, until the breeze adjusts the direction, a bit more gas and it is moving well ..... step the stroke up and it is really moving, this thing is a bit of a rocket.

I am not really one to put myself in pictures, but when you are testing a boat, most anything of a test nature will have you in it .... my wife said she might like to take the boat after me, so in this short clip, I am explaining the easiest way into the boat, then the little fussing at the beginning is adjusting the foot braces.

Here is a link tot he video, having issues posting it: https://photos.app.goo.gl/puP2FLabnwesypjW9

ACtC-3d0OEaYmb6kh3mteecrRYImBECbQ1RlaLKG7BTHiLc4R0lgrZiQXcRj00oHBn0Eu-MGhprhtyThWgP_TlpnDk_VzCb861mDMMeHtWIx9Q7LLoG3vRwWe8i58JhJ61GRC0g7ccnhWJJqWNXBSJNFq9WU=w602-h1069-k-no?authuser=0.jpg - Click image for larger version  Name:	ACtC-3d0OEaYmb6kh3mteecrRYImBECbQ1RlaLKG7BTHiLc4R0lgrZiQXcRj00oHBn0Eu-MGhprhtyThWgP_TlpnDk_VzCb861mDMMeHtWIx9Q7LLoG3vRwWe8i58JhJ61GRC0g7ccnhWJJqWNXBSJNFq9WU=w602-h1069-k-no?authuser=0.jpg Views:	0 Size:	156.6 KB ID:	113725


I took the boat up to the channel mouth to the lake, it was getting pretty choppy for an unloaded boat, so I stopped when the waves got to about 2 feet, the boat was fine ... but I wasn't going to push on out to the open lake with the wife watching and worrying, she took this clip of the return and boat was really motoring with the wind, you will see why I suddenly stopped paddling and slowed

same with this one: https://photos.app.goo.gl/gCx4qaDi4BVWQ2zC7

ACtC-3d0OEaYmb6kh3mteecrRYImBECbQ1RlaLKG7BTHiLc4R0lgrZiQXcRj00oHBn0Eu-MGhprhtyThWgP_TlpnDk_VzCb861mDMMeHtWIx9Q7LLoG3vRwWe8i58JhJ61GRC0g7ccnhWJJqWNXBSJNFq9WU=w602-h1069-k-no?authuser=0.jpg - Click image for larger version  Name:	ACtC-3d0OEaYmb6kh3mteecrRYImBECbQ1RlaLKG7BTHiLc4R0lgrZiQXcRj00oHBn0Eu-MGhprhtyThWgP_TlpnDk_VzCb861mDMMeHtWIx9Q7LLoG3vRwWe8i58JhJ61GRC0g7ccnhWJJqWNXBSJNFq9WU=w602-h1069-k-no?authuser=0.jpg Views:	0 Size:	156.6 KB ID:	113725

darn slow arse power boats

So, on to thoughts ... it is more stable than I thought it would be, it is quite fast, faster than I thought. It likes to track straight, so not as nimble as I thought a 15 footer would be, but I mostly go straight so it is a bonus for me.

Base trim empty is about as good as it gets (at least in my book), handles wind and choppy water pretty well .... overall, I am happy with the design and the handling and can't wait to get it out for a longer test

As i said before, I think I will keep it ... thanks for coming along on this build, I enjoyed the feedback and comments, I am just starting a batch of paddles, so I may cover those as well.


Brian
 

Attachments

  • ACtC-3dDT6f3CXRlGJVmxyv8Rg8_tQlLdKhhfD2uz9O1K7DqKURdcaLmu7KQRExIXVcz7wxhuk5MbsUL3T3EF_hjnVCnIx...jpg
    ACtC-3dDT6f3CXRlGJVmxyv8Rg8_tQlLdKhhfD2uz9O1K7DqKURdcaLmu7KQRExIXVcz7wxhuk5MbsUL3T3EF_hjnVCnIx...jpg
    69.7 KB · Views: 3
  • ACtC-3c0W8giH3xvDKj5y5jgV43r7W98mr4bGGEDgZ78eMuhAEDW3KTkMUMzcjvrL3UNlHpboRHk7TtIgPkGCGbXuztdj5...jpg
    ACtC-3c0W8giH3xvDKj5y5jgV43r7W98mr4bGGEDgZ78eMuhAEDW3KTkMUMzcjvrL3UNlHpboRHk7TtIgPkGCGbXuztdj5...jpg
    131.8 KB · Views: 3
Last edited:
Those may be the prettiest decks I have ever seen. Not just the stylized bulls eye pattern, but the way the deck edges taper into the outwales.

Altogether a beautiful piece of craftsmanship.
 
Back
Top