• Happy Weed Appreciation Day! 🌱🌿🌻

How one guy makes an axe sheath.....

Joined
Jul 25, 2012
Messages
838
Reaction score
5
There may come a time when you need to make an axe or hunting knife sheath. Maybe it got lost or damaged or perhaps it wasn't much good at the start. Anyway here is how I go about doing a sheath. Just about all my work in leather has been done with Tandy Leather and tools; there may be other sources of supply, I just don't know of them. I'm sure there are better ways to work leather but this one works for me.
The words that go with a photo are printed under it, just so we're clear. I'll try to limit the blab but some will be required.


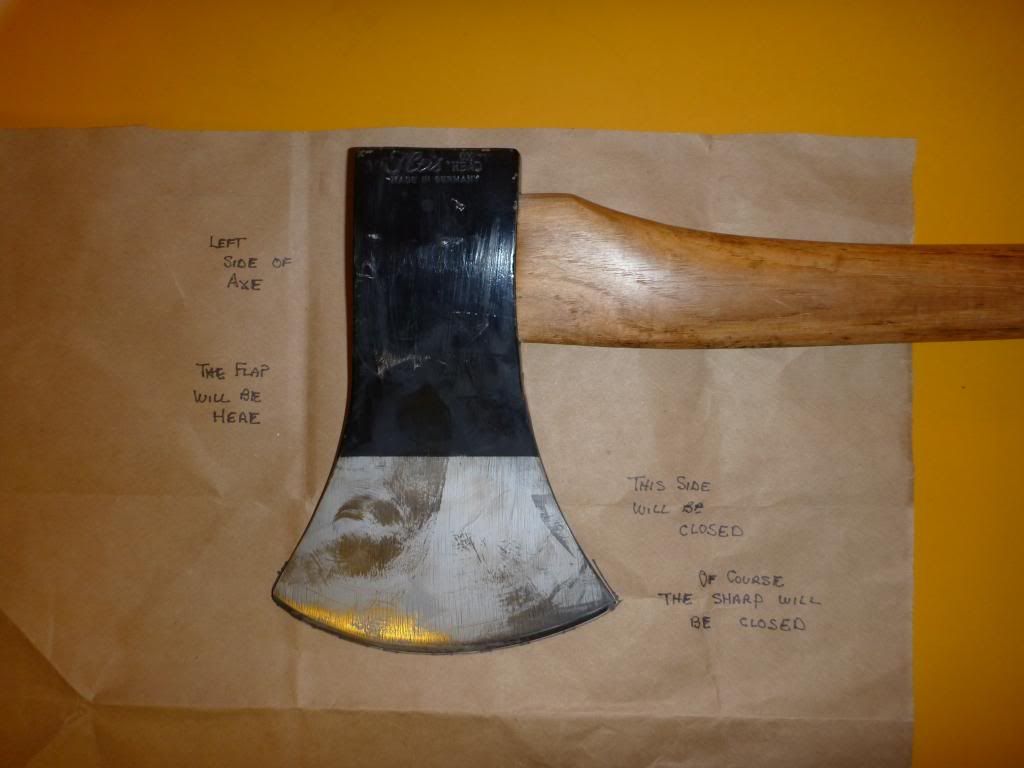
Here is the axe we will be working on. The pattern is made from a brown paper bag, this is the left side of the axe and a pattern has been made of the right as well. Notice the curves on the sides of the axe, they will present some problems for us.


The left and right patterns have been matched up and stapled across the sharp and also one on the lower edge. What we're making is a "pocket" where the axe can be positioned and we can start defining where the sheath will go and what is extra and can be trimmed off.


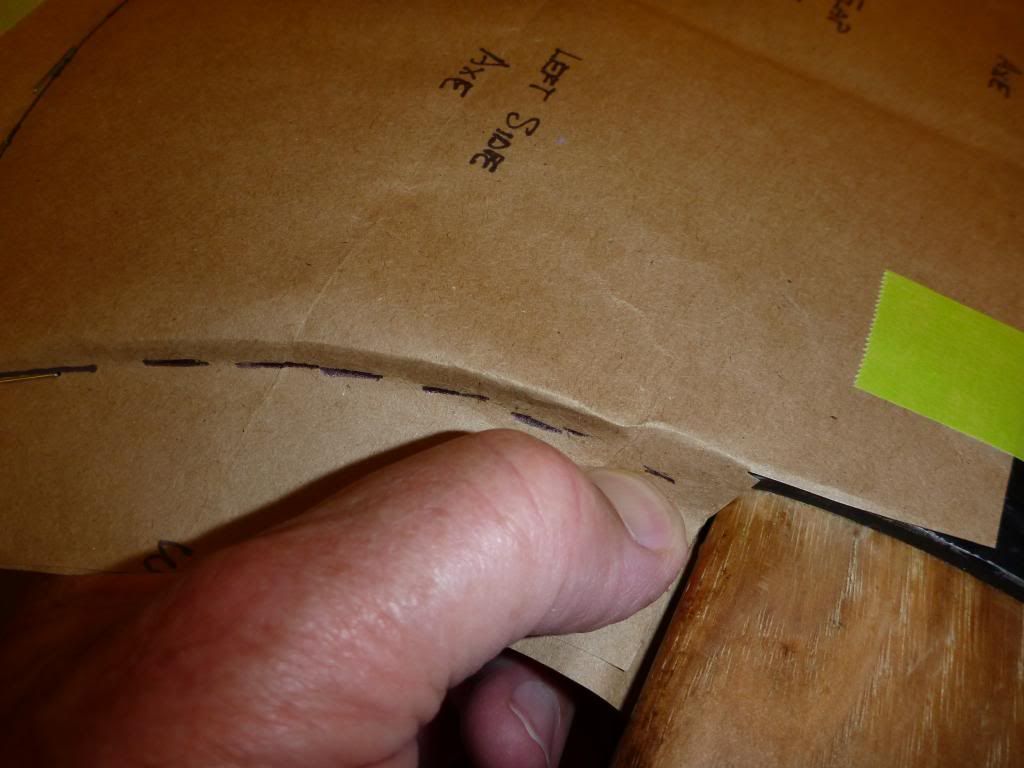
Study the photo, it may be a little confusing. That's my left thumb nail pressing the paper closed to what will be the bottom closed part of the sheath. I'm trying to get the crease to fall half way, some from each side. Left and right, then marked with those black dashes. The paper where I'm squeezing will be where the stitching will be in the leather to hold it closed. I've marked both left and right sides.


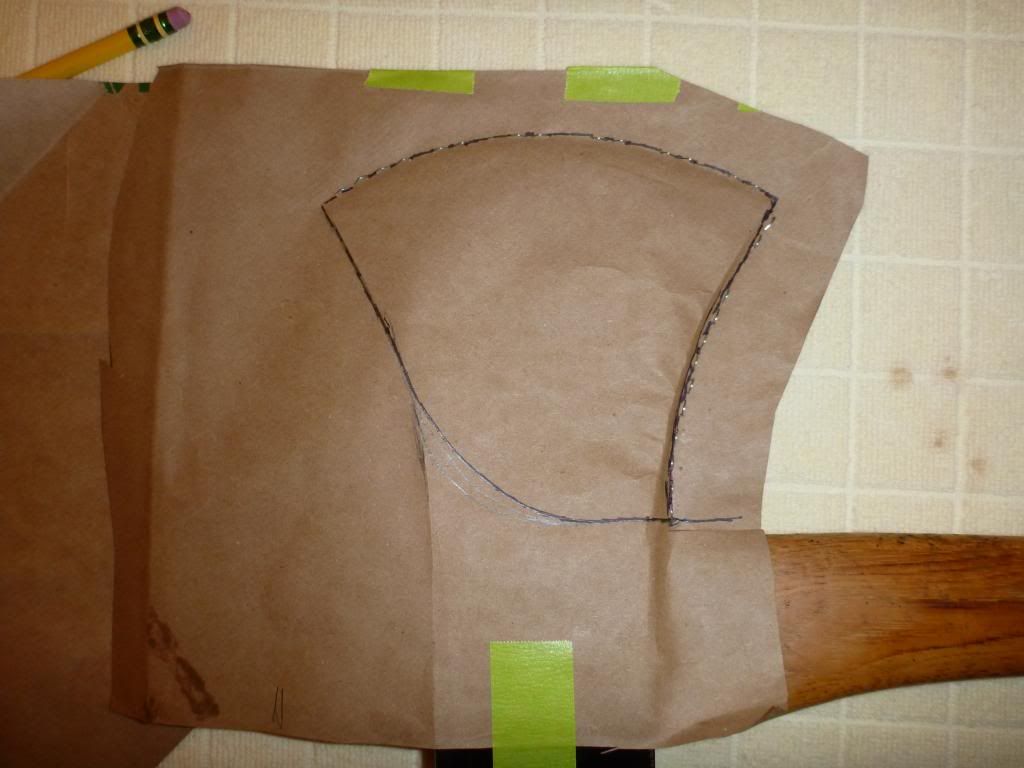
Now we can see progress! We're looking at the right side of the axe; you can see that the bottom edge where we were pinching it is now stapled closed. I've marked a graceful line that will be the top edge of the right hand side. That green tape is holding the axe snug in the "pocket" we made with the staples.


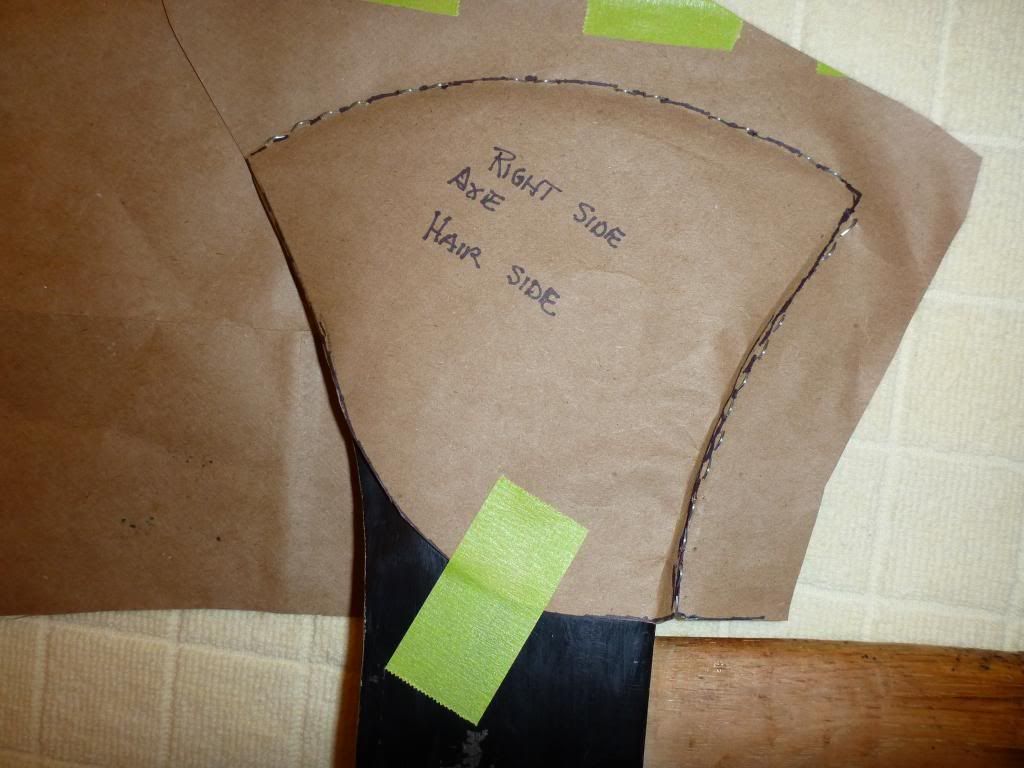
The excess has been cut off and the pattern has been labeled. Leather has two sides "hair" and "flesh". I always over do labels, but it's so easy to get screwed up and cut the leather the wrong way. $$$$ down the tube!


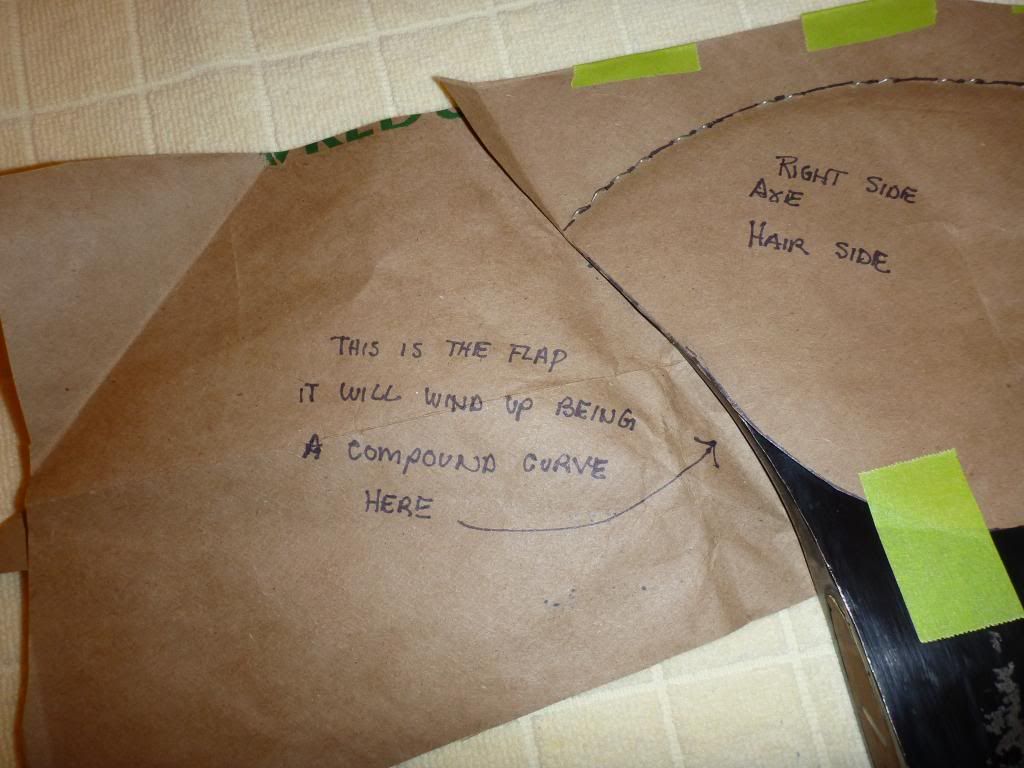
You see my note about the compound curve: all the leather I've used has a unique property. When you want the leather to mold to the article, in this case an axe, if you wet it, it becomes moldable. Think of strong wet cardboard crossed with really stiff modeling clay. That's maybe close. I'm guessing here but maybe the fibrous layers deep in the hide are able to move some when wet. Now once it's dry the hide will retain the molded impression pretty well.


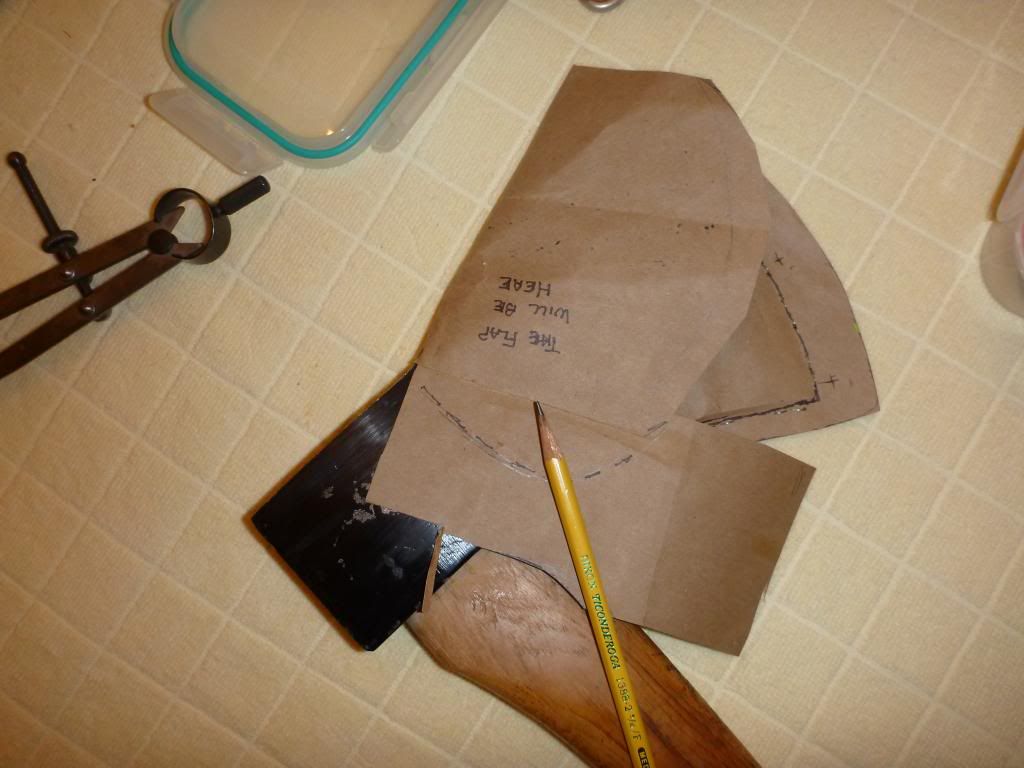
That's the flap but it won't mold for beans, it's just paper. Right by the pencil point I glued on some more paper, I cut off too much and when we get to the real leather I don't want to come up short for the flap.


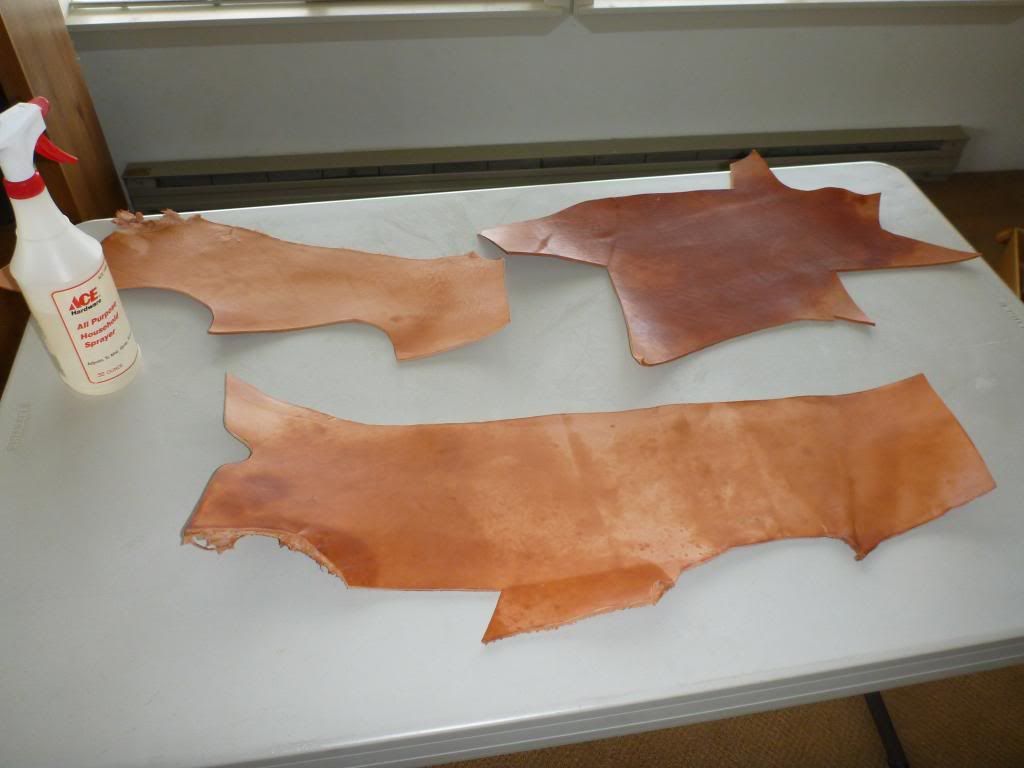
This is the leather I've got to pick from; it was tied up in a roll so I sprayed a little water on it to get it to lay flat. I didn't buy the best and it's been picked over from other projects. I really need to look at both sides and see what imperfections I can work around and what must be avoided. Leather comes in Backs, Sides and Belly. By and large backs are the very best. Then sides. Maybe for your first projects you might try some really good leather; it would be just one less thing to worry about.

Now I'm going to pause here and post this off to the site. I'll start in again right away but I've lost everything three times so far and really get cranky when it happens.
Rob
 
Part Two....

Part Two....


Now things are really starting. I've established a border on the bottom and along the sharp; the copper rivets require 1/2" and the space needed for the stitching is 3/8" plus we've got that little "bump" that will be used lashing the flap closed. Except for the as yet undecided flap those patterns that you see are what we will cut. The staples have all been removed.


Getting ready to mark out patterns on the leather. Getting serious.


This piece cut off the left side will become a center section that is sandwiched between the left and right sides. It will have stitching along the bottom and the sharp side as well as four copper rivets that will protect the stitching on the sharp side. Both left and right sides patterns have been marked out on the leather.


Starting to cut out the pieces. Now you can see a "fold" that was in the piece of leather where the flap will come down, I don't know what caused it but I'm betting that it won't matter because that's where the fold of the flap will go. This is what I was talking about working around imperfections.


The cutting out is done. What we are looking at is the flesh side of the hide and the areas where I'll be spreading the contact cement have been marked to keep it contained where we need it. That center piece will be coated on both sides.


The little pallet knife is my favorite when spreading things that can be messy and you want to keep the area clean.


Glued up, no stitching yet, but that how the axe will go in.


Looking at the edge, I was careful but still it's kind of rough but we've got a cure for that!


That's my drill press with a small drum sander that works very well to smooth off the edges.


You will note our old friend the right side pattern; now that the edges have been cleaned up we can mark the leather as to where the stitching and rivets will go. The two awls are marking the far and near copper rivet holes, I'll get the center ones in a minute.


This cute little tool rounds off the sharp edges of the leather so that later wear will be less evident and the leather will be pleasing to the touch.


Scribing a neat line along the edges that will receive stitching, note the mark for the rivets to come.


Marking where each stitch will go, whoops! Got off the line there, it's the first time I ever made anything while taking photos at the same time. Do you see how nice and rounded off the edge of the leather is?

I think we are at a reasonable pause, so I'll send this off and get started on part three.
Rob
 
Part Three....

Part Three....


Now what in the world is that thing? Well may you ask, it goes by different names, the one I use is Saddle Makers Horse. What it does is to hold the parts of leather being sewed and allows the maker to use both hands to do his best sewing. I made this one cheaply and I only regret all the years I worked on leather without one. The tub is full of ready-mix concrete, the two 2x4 sunk in the concrete have all kinds of screws and nails to hold the sticks in the concrete. At the beginning I tried to use it setting, now I stand, for me it works better. The black knob tightens on a screw which closes the jaws. The hinge allows the one side to pivot out.


My favorite awl and a necessary block of wood that has no name; what it does it to receive the point of the awl as it pierces the leather and at the same time it acts to keep the piece of leather from being bent over from the force of the awl. What we will be working to do is provide a straight hole for the thread to go though. The straighter and more uniform the nicer will the stitching look.


As you will note the hole must be tapered, as I press the awl from left to right the narrowest part of the hole is on the right. The thread when we introduce it will have two needles each going in the opposite direction. If we used just one needle and sewed you would see the thread as a series of dashes. We overcome that by using two needles and sew in opposite directions.


We need to keep the linnen thread well waxed to ease the passage and protect the thread. That's real bees wax.


The thread is passed through a hole and two ends are brought together and the needles threaded on the two ends then the free ends of thread are doubled back nearly all the way to the leather. The needles are under my thumb and you can see the free ends near the leather and canted to the right. Every time the needle with the thread passes through the leather the thread is slightly worn. We want to minimize this as much as possible; we want a single thread stitch but soon unless we move the needles we will be doing a double thread stitch. So we move each needle about two inches and continue sewing. The whole point is that we will be wearing the thread only slightly and then it's time to move the needles. You see, if a thread breaks the method of repair will be there to see and we would like to have our sewing look as professional as possible.


What you see is one half of what I'd be doing; my right hand is taking the photo. What I would wish you to see is both hand gently pulling the threads on opposite sides of the leather, gently, evenly, pulling the stitch home. Watch the loop as it sinks slightly into the hair side of the leather. You want the loop snug but not cutting down into the top of the leather. The strength of your stitching doesn't depend on just one or two stitches but the whole line that you've sewed.


I started sewing about three stitches from the end and went to the end and will double back; what that gives us is extra stitching to help the end resist being torn out. Notice the thread going down the center of the photo, it passed from right to left, the first thread in this hole, remember the taper of the hole? That was a very small hole that thread went through but it would have been worse if we had passed the first thread from the left to the right. It would still have been a very small hole and one with a thread already in it. We will continue sewing down, for three stitches it will be the double thread and then from then on single thread.

I'm going to call it a night and finish this off in the morning.
Rob
 
Part Four...

Part Four...


Now we're coming back down and it's double thread time. What I often will do is start a needle from the wider side (in my case the left) and force open the hole a little and also press the existing thread to one side. The leather sewing needles are very blunt so that helps. I'll pull the needle you see back out and go on and sew the thread that goes from right to left.


The double stitching has been done now and the remaining stitching is single thread all the way down. You can see where we did the two threads and then went to a single one. As time passes the threads will become more regular as unequal stresses work out. Also when we wet the sheath to mold it the holes will close down just a little bit.


The second thread is about to be passed through the hole; I'm pulling the first one off out of the way of passage so that the second thread will have an easier time of it. Doing so makes the work easier and less chance of damage to the thread.


Well RATS!! Just when we were in the home stretch one strand of the five strand thread broke. Maybe a faulty thread or maybe I got it caught between the needle and pliers and hurt it, who knows but now I've got to replace it. The procedure is the same as if we ran out of thread and needed more to finish. The two threads on the left are what's left of the old threads, I've got them pulled over to the right hand side of the work. What I think of as the "bad" side. It's the side that just looks a little worse than the left side (when you sew as I do) After I've sewed on past them the stubs will be cut close and you will really need to look close to find them. I've passed a new thread two stitches back and am about to start sewing with them. The new thread is rigged up just like when we started at the beginning. As I sew past the old threads I'll make sure they don't loosen up as the new thread is sewed past them.


How about that! We're done sewing. To finish off the thread I depend on the simple friction of two, two threaded stitches, so far all my things have held together and not come apart. If something did happen it's a simple repair job to fix it.


Now comes the really fun part, molding the leather to the axe! Using warm water I've weted the leather well and am now pressing the lower part of the sheath up tight to the axe, it needs both of my hands to get it closed up.


Now the flap is at last in the proper position, it wasn't easy but with a vigorous kneading and pushing the flap is down and tight as it should be. For a little bit there I was worried that I wouldn't be able to get the leather to mold that far.


That is what the flap will look like once I've got the extra trimmed off.


There you can see the molded shape of the axe retained in the leather. There won't be any slop in that sheath.


Perhaps you can see the compound curve; it will be retained by the leather even after oil or boot grease has been worked into the leather.


The sheath has dried somewhat overnight, and the edges of the leather burnished using that dark wooden wheel.


Well there it is. Notice the darker area on the flap; that's where I wet it to allow the boot lace to press down into the leather and make it's own notch to hold the lashing. Several times today I'll re-lash it to make many impressions blending into one smoother groove. The copper rivets will need to wait until the leather is dry and shrunk down so there isn't any looseness.

This is a hard thing to do, this teaching by computer, probably I've left you with questions, please ask me and I'll do my best to answer.

Best Wishes, Rob
 
Wow, I'm speechless! That's an amazing amount of work, for both the presentation of it on the internet, and the leather work. I'm going to look around later this summer for some supplies, and then I'm sure I'll have lots of questions. I'm thinking I'd like to do this with the kids at school in my Outers club. I'm sure if they put that much work into a sheath, they'd be less likely to leave it under a stump when we're out in the bush. Thanks again!
 
The grandkids were here this weekend (yahoo!), hence I was up at 3 am enjoying your first installments on this leather project. They’ve only just left (yahoo!), and now I can get back to this excellent DIY thread. Until now I’ve had every excuse for wrapping my axe in a woolen sock (can’t have too many of those), but not now. Your clear and concise how to project gives me the confidence to give it a try.
Thanks Rob, the post is great and the project is superb.
Just one question, what kind of thread do you need for this?
Thanks again, and take care.
Brad
 
OM,

I wish you'd go over to BushcraftUSA and post that up... there are a bunch of axe/sheath-crazy guys over there who'd LOVE to see it... NICE work. I like how you mounted your stitch horse/pony in concrete... never would have thought of that.

I do have a question... What is that most-excellent-looking pack in the background of the first picture in Post #3? Looks like some sort of Duluth/Frost River model...
 
Hi Brad, I bought the thread a long time ago, it was 100% linen thread. When you gently unwind it five strands are there. For something like the axe sheath you need all five, but if you were doing something finer you can unwind the twist and use just three or two strands. An electric drill with a reverse can be used in the winding. Just don't wind it up too tight or it will kink back on it's self and require very careful un-winding. Dress it after with bees wax. You might want to spend some time on the Tandy Leather web site. Bunches of info. Check out their how to do it books; you might be able to get them through inter library loan. I ought to do that too; find out how the real craftsman do things! Those guys are really the experts.

Hello Seeker, I just barely got it up here at what I regard as my "home" I wouldn't have a clue how to go the the bushcraft site. But that said; I don't regard it as mine, I've been given so much through out my life by open handed men who offered help unasked when needed, sometimes badly, I open my hands and any who could use it please make free use of it.
About the pack; that's Swiss Army Issue, got it surplus for fifteen dollars. When I got it the leather drank in the boot grease it was so dry. Otherwise it is in dandy shape. I turned right around and got two more; that's my plan with things like that, get all you think you will ever need right now because sure as the world they will disappear.

Best Wishes, Rob
 
Hey, Rob - thanks a bunch for posting this tutorial! I have a hatchet and a double-bit axe that both need a cover, and this will make a great winter project.

...that's my plan with things like that, get all you think you will ever need right now because sure as the world they will disappear.

I hear that!
 
Hey Oldie Moldy, Great Post, I really appreciate you taking the time to explain all that in such great detail. I'm sure it will be read by many here now and in the future...I'm almost thinking that's going to put us over the top...where else are you going to see such a complete explanation on how to protect your trippin' ax or make a knife sheath for canoe travel.
No short cuts, but doable by anyone who wants to invest the time....pretty much like canoetripping.
Thanks, Muchly Appreciated by many I would say, Me for sure.
 
Rob,

Thank you for taking the time and effort to capture and post that fantastic info! Posts like that are eye opening tutorials and make me think, " I should give that a try!" Very neat work to be proud of. It's something I can try my hand at with my boys so we can all learn something new together.
 
Friends, a little post script here: I was over on the Tandy Leather web site and looking at the various types of leather offered. My stars there are a bunch of ways leather can come to you! I'd forgotten there were so many methods of tanning.
The leather I've used in all my projects has all been tanned in a way that it's able to be tooled. That's the word to look for in the description. A rough description is that by pressing the surface of the leather down with special punches an impression is left in the surface of the leather that will be retained for the life of the leather. These impressions are used to make some very beautiful decorations on the surface of the leather.
This same property that allows the leather to be tooled is the same one that lets me mold the leather to the axe (or what ever) and have the impression remain there.
Once the project is done and boot grease or oil is introduced to the leather the ability to mold it further is lost, but what ever molding you've done remains with the leather.
I guess this may seem to be "beating a dead horse" or in this case a dead cow but I'd hate to have you buy a bunch of leather that wasn't tanned to be tooled and find it wouldn't mold worth beans.

Worry wart Rob
 
I believe the leather from Tandy that you tool is called "Vegetable Tanned". An added benefit is that the vegetable tanned leather is easier on the metal surfaces. The chemicals from the other tanning processes ( such as chrome tanned leather) will attack the metal. Dave
 
Back
Top