• Happy Weed Appreciation Day! 🌱🌿🌻

(Finally) starting from scratch.

Wood is very pleasing to look at. I'm to cheap to fork over big money on a canoe. When we are in Knoxville TN I stop at an outdoors store that sells the nice sleek carbon and space age material canoes. They hate to see me coming because they know they'll have to clean the slobber and drool off of the boats after I leave.

I'm looking forward to see how the sumac looks. You ever worry that you might screw up? Lots of time goes into one.
RoyScreenshot_20230428-010250-061.png
 
I'm looking forward to see how the sumac looks.
If I had to guess, I'd say the Sumac is still a couple of years from being built (trees are tiny, very few are worth even cutting up, it takes awhile to air dry, etc).

You ever worry that you might screw up?
Nope. I'm pretty sure I'll screw up. I'll try not to make a habit of it.
 
I'm almost the exact opposite of Idiot Savant. I have exactly one build under my belt, and have started the trim work for a second. I've been working with wood for well over 40 years. The skills and techniques are challenging for the most experienced woodworker, yet can be done by a novice. You can use virtually every tool in a well equipped shop, or make do with fairly minimal tools. I'd be reluctant to do a build on a short timeline, and I can't envision doing it as a way to make money, though I know people that do. Each build (again I only have one) you can choose to stick with tried & true, or get creative.

That being said, I also make my own fishing rods, forge my own knives, and several other activities that I could most likely buy cheaper, if I factor in the time involved. I guess I just like tinkering & building stuff.
 
Gamma: If you're still cutting strips, I think it was Cruiser that posted this suggestion in his solo tripper build thread. While the strip material is still in plank form, assess any knots that you want to try to keep in the final strip material. Outline with a little painters tape, leaving a hole where the actual knot is. Put painters tape on the bottom side. Put a few drops of epoxy on the knot, wait for it to green cure, then scrape flush.

I did this, and don't remember losing a knot that I treated.
 
Kliff, I cut some of the strips (Aspen & Cherry) last summer and the rest in February (in the backyard... I caught a nice day). I'm not too worried about breaking out or losing knots but I'll keep what I can. These are trial runs but, so far, the biggest trial has been getting the chaos to stop so I can actually work on it.

As for rushing through... I'm going to have to really push if I'm taking it to Ontario in July. (I'm already figuring I'm taking the Sawyer but I'll try)
 
Well, I've managed to steal a day here and there...

I went to my local lumber yard and bought 2 sheets of 3/4 plywood (or what passes for it these days... likely the metric equivalent...) for the strongback and 2 sheets of 1/2 inch for the station molds.

In hindsight, I may have been better to buy the 3/4 at a big box and pay them to cut it or found someone with a table saw and ask for help but I did neither. I figured I could use the edge of one sheet as a saw guide and get straight cuts by myself... that could have gone better.

DSCN1212.JPG

Knowing that I have more boats to do, I left the guide on the circular saw I'd used to cut strips and grabbed one of my other ones. The blade kept walking away from the "guide" and I swapped blades a couple of times before determining that the issue was the saw... The bearings were shot. On the bright(?) side, I only had a couple more cuts to do when I changed saws but, of course, the cuts I had already made were somewhat rough.

Canoecraft says to allow the better part of a day to build the strongback and mine took pretty much 8 hours by the time I swapped saws & blades then shimmed it to correct for the irregularities of the cuts, unevenness in the floor etc but I got it done and I am pleased that it is both straight & level.

DSCN1222.JPG

Almost 2 months would pass before I could get significant time on the project again and June looks like it's shaping up to be my best chance to make headway. I had cut the 1/2 inch plywood sheets in half lengthwise (with the good saw) and I spent a couple of nights transferring the plans onto the plywood. I played with a couple of different ways to line it all up but, in the end, I found that it seemed easiest to cut small windows in the plans, draw the centerline onto the plywood and then trace the station line with carbon paper (Bear Mountain included some really good paper with the plans). As this canoe is asymmetrical, I had to flip the plans to mirror the other 1/2 of the station but the paper is really thin and easy to see through and the windows cut into the center line made realignment pretty easy.

IMG_20230603_133400.jpg

One part of the plans that I found funny was the stem shape. I'm building stemless (because I'm lazy, I'm more concerned with trying out the hull shape than making it last forever and I've always been a fan of cutting corners 🤷‍♂️ ) but I wasn't sure how to adapt the plans so I contacted Bear Mountain.

Their response wasn't terribly helpful as they seemed incredulous that I could be so sacrilegious as to even think such a thing and chided me that "you wouldn't build a house without a frame, would you?". I responded that I actually live in a (frameless) plank house which were fairly common in Appalachian coal country a hundred years or so ago and that, while they present some unique challenges (especially when remodeling), it seems reasonably habitable and would be even more so if I were better at cleaning.

The response made me smile. It was a somewhat terse: 'OK, so the house was a bad analogy. Others may tell you that building without stems is ok but we certainly won't as what you will wind up with is a flimsy boat.'

Undaunted, I decided I'd have to figure it out myself and dutifully set about to ignore their advice. After all, they've successfully built hundreds of canoes and were, no doubt, set in their ways... What could they possibly know? This being my first boat, I was more open to new methods. (actually, I think it will be pretty durable but, as stated above, I'm not too worried about it if it's not)

I traced the stem pattern, added 3/4 of an inch to simulate the missing stem and ended it with a vertical line where it will meet the 1st or 15th station. It won't surprise me much if the epitaph on my stone reads "eh... that should work".

IMG_20230603_143754269.jpg

Among the reasons that I've struggled to find canoe-building time is that I have a friend staying with me while she heals from some medical issues. When she has a lot on her mind, she finds it helps to have busy hands and she claims that she enjoys cleaning so she's been steadily working her way through the house and making piles for me to sort out when I get home. As I do not want to (in any way) discourage her from cleaning, I dutifully sort the piles regardless of how tired I am and I'm trying to be a little neater on a day-to-day basis.

I mention this because I've lacked adult female supervision for the past decade or so and thought nothing of moving a recently acquired band saw into the dining room where I experimented with some seat configurations over the winter. After she organized that room, she pensively wondered aloud if there might be someplace else for the saw to live as the sawdust was a bit difficult to get out of the carpet.

This should go far in explaining why I carried a band saw out into the yard this past Saturday afternoon where I cut as close as I dared to the lines while making certain to stay slightly proud.


IMG_20230603_160223428_HDR.jpg

IMG_20230603_165800_01 (1).jpg

I then loaded the saw onto my trailer and took it to the "canoe shop" upstairs of my friend's garage. As it was a gorgeous day and I liked the idea of not sweeping up sawdust, I set up my new oscillating belt/spindle sander and went to work sanding the forms down to the lines. It went surprisingly fast and I'm reasonably sure I had more time tracing the patterns onto the plywood than I had cutting them out or sanding them flush with the lines.

Screenshot_20230604-205618.png

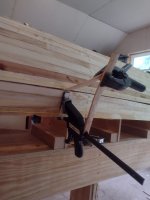
At that point, the saw, the sander and all plywood pieces were carried upstairs. I attached rough cut Hemlock 2x2s to the strongback at 12.75 inch intervals as instructed in order to make the 16' 2" version of the boat, attached and leveled stations 1 & 15 (first and last) then attached uprights to the center line and stretched some mason's line between them. Station #9 was the tallest so I attached it next and worked my way toward either end while aligning the center line of the station mold with the center line on the strongback and the string line above (I gradually lowered the string on the uprights as the forms became shorter). It went well and took about an hour to get all stations attached and ready for tape and strips.

IMG_20230604_172944516.jpg

As I was packing tools, I realized that my laser level was in the bag (I'd looked for it earlier) and I was very pleased that the string method appeared to have worked with a high degree of accuracy (certainly good enough for me).

IMG_20230604_183830408_BURST000_COVER.jpg

The final step Sunday was to arrange onloading & offloading stations around the shaper and attach a beading bit. I played around a little trying to get the depth of cut correct but that will have to wait until next time. I have at least three 12 hour days this week so I'm hoping to get all strips cut this weekend and start gluing them in place. I'm certainly looking forward to doing something that doesn't require as much precision and I'm really thinking I can pretty much just slap the hull together once the strips are machined... I guess we'll see...

IMG_20230604_191648439.jpg
 
So on the Bear Mountain plans, did they not show a line for the form, and a line showing the stem on top of form? The plans I get for the J Winters designs from Greenval usually include those lines, so if you want to build stemless, you can basically just trace the stem line. I could be wrong, but that's what my memory is telling me.

If you are used to working 12 hour shifts, I'm betting you could plank the hull in one shift, maybe even with a lunch and supper break thrown in. Then a couple of hours to sand, 3 hours to glass, then either flip it the next day, or wait five days and sand the glass on the outside hull before flipping. If you cut corners on the inside sanding (highly recommended), probably two more hours, then around 3 for glassing, and then add another ten to completely finish....gosh, you are really only about two twelve hour shifts away from finishing.

Speaking strictly as an efficiency expert (how to do things fast and ugly), pull your friend away from cleaning the house and teach her how to sand.
 
I like Mem's idea for enlisting help for sanding ! Tell them it's " Therapeutic "

Cruiser is right on with the Jimmy clamps.
Here's the link.


As for the strength Stems, verses Stemless ?
Don't let anyone tell you Stemless is inferior ! I've lost enough canoes off the top of my trucks, to give you real life experience !
One hull ( A Wee Lassee type) was run over. I picked up the pieces, basically two, from the Highway. Neither stem gave way !

If you are really concerned about the strength of your stems ? Add a fillet, before glassing the interior. It will be as strong as the best laminated stems out there, and will take only a little epoxy, fillers, and minutes to do !

You have a great start Gamma !
I got by for years, with a minimum of tools. It's nice to have every power tool out there, but in reality ? You can do a great job without !

It appears you are building a Freedom solo. What length are you going for ?

Looking forward to more of your build !


Jim
 
Last edited:
Oops accidentally hit send before I was done.

Yep moved a woman in. Reminds me of the Queen song, Another one bites the dust. Next thing ya know brother IMG_20230604_115354333_HDR.jpg
It'll be new windows going in. Yep take a good look at how your shop is going to end up, home repairs.

Ha, just cutting up on you. Awesome to get back started on your project. I'm looking forward to seeing it.
Roy
 
So on the Bear Mountain plans, did they not show a line for the form, and a line showing the stem on top of form?
The plans show the stem lines for the shorter version but they include a different stem design for the longer hull (green line visible on the far right here)
IMG_20230603_142925578.jpg
I think I'm close enough. If not, I'll adjust it on the fly. Either way, it should plow water.

And, yes, I'm hoping to get the strips milled on Friday, I've got commitments on Saturday and I'm hoping to glue the better part of the hull together on Sunday. (I rarely eat lunch so, once started, I'll stop when I start making too many mistakes or I run out of places that need strips).
 
It appears you are building a Freedom solo. What length are you going for ?
Yes, it's a Freedom solo & I'm building the 16' version as suggested by Cruiser.

I started acquiring power tools a couple of years ago in preparation for this project. Shaper & band saw were Marketplace buys (before I got booted for reasons unknown) and IIRC, were about $200 each. The sander was new & on sale at Harbor Freight last month.

Any reason to buy tools is ok by me but I try to be frugal when possible.
 
Another one bites the dust.
Not a chance. We get along great as friends but we'd kill each other with prolonged exposure.

...pull your friend away from cleaning the house and teach her how to sand.

I'm sure she'll help sand if I ask but I'm not figuring on sanding much (I gotta plan... are ya scared yet?) but she'll almost certainly be taking a shift mixing epoxy.
 
The best laid plans of mice and men...

This build is not progressing as I'd hoped and I'm afraid I've already failed at one of my stated objectives; namely allowing the reader to see me screw up in almost real time. Don't get me wrong; I'm screwing up plenty but I'm not getting them posted in a timely manner.

Since the last post, I've run the Cherry and the Aspen strips through the shaper, first cutting beads onto all boards and then setting up the featherboards (fingerboards?... sorry, I'm not sure what they're called... as stated previously, I'm not a woodworker) 7/8 of an inch from the bit while cutting the coves into the Aspen and just shy of an inch for the Cherry. (The Aspen was not nearly as consistent in thickness or straightness which will prove problematic fairly soon).

IMG_20230611_142314479.jpg

In all, it took about 6 hours to mill the strips and I spent almost that much time making fingerboards. I initially made huge ones out of Cherry, tried some from leftover plywood from the forms and finally made 2 from some 3/4 pine. The pine worked nicely with the undersized Aspen but the plywood was a disaster. There was just not enough strength to allow them to flex without breaking and they quickly began to break down.

image.jpg

That done, I began stripping (meaning the boat, Glenn). The plans said to place the first strip just above (will be below on the finished boat) where the tumblehome began. I have no explanation as to why I heeded the instructions in this respect while completely ignoring Bear Mountain's advice relative to the stems, but I did. I considered stripping both ways from that but I couldn't think of a good way to cut a fair curve along the gunwale edge. I decided to place the second strip along the gunwale and reasoned that, given the uplifting nature of the bow and stern, I would run out of room in the middle of the boat and I would just be fitting a total of 5 "whiskey strips" (hey, more whiskey, right?)

image (2).jpg

(oh, in case you're wondering... the string was to help pull the staples because they were too short to get adequate penetration with a piece if strip taped to the bottom of the stapler. Didn't work as they were also too short with just string & almost all have since been re-stapled using the 1/2 inch staples. Anyhow...)

Milling the strips and getting the starters in place took about 8 hours and the next time that I had to work on it was this past weekend. I actually cleared a whole day and I got a bit done.
In hindsight, I should have spent more time getting the stern form beveled more consistently. I knew that they'd need more taper at the bottom of the form than on the top so I grabbed a horseshoeing rasp (same as a woodworking rasp I think, except that I have dozens of them) and eyeballed some taper.
I'm very pleased with how the bow is turning out, fitting each strip individully as I go, but the stern was not as even. I decided to let the strips run a bit long on the stern and I'll cut them in place and glue them tight later.

image (3).jpg

The strips went reasonably quickly as long as I was working side-to-side. I am using Gorilla Wood Glue which seems to tack up quickly and, by the time I got one side scarfed, fitted, stapled in place and pulled tight, the glue had set up enough on the other side that I could pull the clamps and lay the next strip there.

When I reached the top of the end forms, I laid another Cherry strip as an accent and started working on one side only. I've noticed that the Cherry, even though a bit thicker, seems to flex more evenly and be a little easier to pull tight into the cove (since the bend is running away from straight, I've resorted to using "Jimmy clamps" between the forms and often need 2 or 3 per station to keep it pulled tightly together.
The Aspen strips are more twisted which makes them a little harder to work with as well but I'm really liking the color variation as it's coming together.

IMG_20230625_195925249.jpg

Working the football, I needed additional time before I could pull the clamps on the previous strip so I dropped down below the gunwales and started stripping there. It was difficult getting the glue bottle in that tight space let alone getting a thin, uniform glue line and I often resorted to getting a glob the strip and then spreading it using my fingers. I was pleasantly surprised by the lack of splinters using this method.

A trip to the local Tractor Supply yielded some syringes and a package of 16 gauge hypodermic needles and, while the needles were too small to suck up the glue (no worries, I filed the point a little... safety first), the syringe worked well to get into the tight places and also did great as the strips levelled out on top. Splicing strips was particularly difficult on this section and creative clamping was sometimes required.

image000000 (35).jpg

About 10 hours of stripping and I had one side of the football done and the tumblehome sections almost to the really PIA part of fitting the strips. I think I'll run the strips within 7/8 of the starter strip, cut a swath parallel to the bottom of the strip and fit the final strip in. If it doesn't work smoothly, I can expand the size of the cut a little and try again as the Cherry is slightly wider.

I had started with an Aspen strip so I could disguise modifications when doing the final fitting but I think this plan is solid. One drawback is that it seems a little arbitrary at that point as to which would be the "whiskey strip" on that section of the boat so I may resort to just drinking throughout that process.

IMG_20230626_183638598 (1).jpg

I'm hoping to have all stripping finished this weekend and possibly get the first layer of glass on. I've decided not to go experimentally light with the 2.5 oz glass & I'll be sticking with the usual 4 oz. Ordering epoxy & glass (enough for the 1st two boats) from Raka in the am.

Notes:
1) There were no additional costs this time except glue & veterinary supplies. To this point, I've used about a bottle and a half of glue for a total of about $12 and 3 syringes (and a box of too small needles) for a total of $10.

2) The syringes mentioned above are clearly marked "for veterinary use only". In the event that the cops come, I request that Glenn edit this post to remove any admission of guilt. Thank you and carry on...
 

Attachments

  • image000000 (35).jpg
    image000000 (35).jpg
    77 KB · Views: 2
I learned from making a lot of mistakes ! I only wish at the time, I had a great Knowledge base like there is here !
Make use of it.

Glad to see, you don't have glue running down the sides, like I did on my first canoe ! That will save time when it comes to sanding the inside !

Keep at it ! I hate dead lines, as I always seem to mess up !
Jim
 
Back
Top