• Happy Marine Mammal Rescue Day! 🐳🐬🦭🦦

(Finally) starting from scratch.

...Make use of it.
Thanks, Jim. I agree that there is an abundance of knowledge here and I won't hesitate to ask questions if I have any that I haven't already devised solutions for. I've read so many build threads over the years that I am pretty comfortable with the process.

I DO wish I'd paid more attention to tapering the "stem" forms and fitting the strips on the stern but it is, after all, just wood so I can cut it & file it to fit as needed (at least, I think I can).

I am curious what others do to cut in the tapered pieces caused by the fact that the gunwale & that 1st strip (is that the "chine"?) are not parallel. The more I think about it, I think I'll fill in the ends and shape them somewhat close to that 1st strip then mark a line 3/8- 1/2 inch below it. If I cut that line with a utility knife & file it smooth, I should be able to fail 3-4 times (cutting slightly larger each time) before I exceed the width that I can cover with a Cherry strip. I'd prefer to have it covered by Aspen and I expect that I'll be able to get it close enough on the 1st try but does the plan seem reasonable? What do others do?

(It's certainly possible that I missed an easy solution... I DO have a tendency to be a "ready, fire, aim" kinda guy at times)
 
Thanks Jim but not quite what I was looking for... I saw your posts about trimming stems & I've been doing that your way (although not as cleanly). I'll also (probably) fit the football pieces as you do but what I was wondering is if there's an easier way to close in the upper portion of the hull as it broadens toward the stems. Bear Mtn said to place the 1st strip (just below the Cherry strip in the pic below) more parallel to water line than the gunwales are so that leaves 4 additional spaces that require custom-fit strips.

What I'm specifically wondering is how others fill these... At mid-ship, the gap is currently about 3/16 but, at the bow, it's almost 3 inches. I'm pretty sure it will work as I described above but just wondered if there is an easier way. IMG_20230626_172003386.jpg
 
Wood butcher method

So slide your full strip into the gap until it will not move any more. Put a pencil mark on the strip above and below it. Pull the strip out and put the end at the place where the narrowest part stops. Draw a line on the strip where the other end crosses your two pencil marks. Then get a long straight edge and go from the very bottom corner of the end of the strip to the top of the pencil mark. Then cut, sand plane or do whatever you use to get it down to just above your long pencil line. Start dry fitting it, and taking more off as you go, but only take a little bit at a time. Eventually, it will slide right in. Let the unmolested part of the strip carry on to the bow. Then repeat the process again until you fill the entire gap.

If the narrow part is really narrow, work with a short piece doing the same thing, it will be much easier.

This works a lot easier with strips that havent been bead and coved, but it will still work with the cove, just drop the strip a bit when you are doing your initial marking.

I'm not sure if my explanation makes sense, but this is the same way you fill in the top as well, if you cut a center line. There is no fast way, it takes time, and it can be frustrating, but remember, you can fill the imperfections, if the gaps are on the biggish side, I take slivers of strips and cram them in with glue. Then afterward, there are some really nice wood fillers out there that are easy to colour match.
 
I managed to get some time this weekend and put in a couple of hours on Saturday, stopping when I reached the midpoint.

IMG_20230627_121102123.jpg

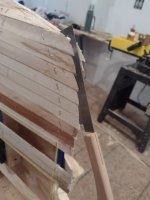
Sunday, I cut out the centerline and started fitting strips into the football. It takes a bit for the glue to set sufficiently so I was also working on closing the sides of the tumblehome area and fixing my screw-up on the stern. The strips hadn't been aligning well (I suspect the taper wasn't consistent on the "stem" form) so I'd let the strips run out long on the stern. To fix it, I took my pull saw and cut through the strips & slightly into the form.

IMG_20230702_111357222.jpg

After 2 passes, the strips started aligning pretty well so I pulled the staples from the form, spread the strips (using wood chisels as prybars),

chisels as prybars.jpg

squirted glue in the opening and clamped tightly.

clamped stern.jpg

By cutting them together, I felt that the cuts would be uniform, if not parallel, and when spreading the strips, I found the cut surface was almost an inch wide. While I would think this joint will be a lot stronger than the bow (where I was more successful fitting the strips as I went), I do not think I'm brave enough to deliberately close the bow and stern in this manner on future builds.

With the stern mishap repaired, I started tapering pieces for the sides. I lacked the courage to just cut the whole side out of the boat to a uniform width below the starter strip so I treated those pieces as whiskey strips and tapered them individually. I also found that, on the left (port?) side, I had not gotten the gunwale strip all the way to the bottom of the forms on 2 adjacent forms.

gunwale oops.jpg

I pulled the staples out of all 3 strips and was pleasantly surprised that they had enough flex to pull them down to the correct position.

gunwale fixed.jpg

Overall, I put in another 5 hours and I'll admit to being disappointed that I didn't have the football closed up. Fitting the strips was very time-consuming and clamping to keep them tight became tougher as the football closed. (Turns out I must not have gotten a picture but I wound up flipping the rubber handled clamps upside down & using the handles to push the strips)

I'll share 2 more screw-ups: When fitting the football strips, I found that the Cherry lined up well at the stern but not on the bow end. It turns out that I had gotten off to one side of the centerline while cutting.

DSCN1380[1].JPG

I debated trying to disguise it using some of the darker Aspen but, in the end, I decided to just fill it in. I figure it will hold fiberglass and I DO have the excuse that it was my first...

The other I found on Tuesday and it was where I had misaligned one of the "whiskey strips" on the sides. These strips often involved some creative clamping and I had not gotten enough pressure to hold it in place. I cut the glue line with a utility knife, re-glued and clamped it properly. (it seems to have worked and it turns out that wood is pretty forgiving)

DSCN1365[1].JPG

I had work and other commitments on Monday so the 4th was my next opportunity and I got started early determined to get the hull closed up. The football went quickly and the whiskey strip there was done by 9:30 (a bit early for whiskey IMO).

DSCN1370[1].JPG

All that was left was the sides and I spent all day on those! I'll tell you, I'd better really like paddling this boat (or find an easier way to close those gaps) for this to be the one that gets rebuilt in Sumac.

Without the guts to just cut out the side, I wound up tapering strips (often to nothing) and sliding them in from the wide end.

DSCN1368[1].JPG
DSCN1361[1].JPG

Most of the strips tapered to nothing and there just did not seem to be an easy way but by evening I had them all closed in.

DSCN1378[1].JPG

I had finished gluing at the stern so I went to the bow and started pulling staples. As stated previously, I am not a woodworker. I am, however, a farrier so when I need something level, I do not reach for a scraper but, instead, I grab a rasp.

I'm tellin' ya; a good, sharp rasp makes short work of glue globs, high spots and uneven ends of strips at the bow (sorry, I somehow forgot to take a picture of the finished bow). In all, I "sanded" about 1/2 of the boat in about 20 minutes. I'll probably hit it quickly with 150 on an orbital and glass it. Sure, there will be scratches but it'll be pretty dinged up after a few paddles any way and this is, after all, a practice boat.

DSCN1381[1].JPG

Hoping to start (and finish) glassing this coming weekend but, unless I delay my Canada trip (I'm told the route is currently on fire), this boat will not be going North in 2 weeks.
 

Attachments

  • IMG_20230702_111357222.jpg
    IMG_20230702_111357222.jpg
    76.9 KB · Views: 8
  • DSCN1352[1].JPG
    DSCN1352[1].JPG
    129.7 KB · Views: 5
  • DSCN1354[1].JPG
    DSCN1354[1].JPG
    79.3 KB · Views: 6
  • DSCN1355[1].JPG
    DSCN1355[1].JPG
    75.3 KB · Views: 7
Thanks Bob. Reading through yours and SO many other build threads on here, I really felt that I had a good handle on the (normal) process. The little bumps of where I would inevitably make mistakes weren't very concerning as I figured I'd come up with a work-around or just post here for help.

I try to share the mistakes so others will know that this is not rocket science and they'll try it themselves. Even if it looks horrible, it will still float, right? (and, of course, there's always paint)

Mem: glad to hear that you're getting rain & cooler temps. I'm still tempted to delay the trip North to see if they'll lift the fire bans... just not sure if the trade-off of lower water levels for campfires is worth it (though fewer bugs might be a nice bonus... When do the leaves change in that area?)
 
Leaves start changing early September. Keep in mind, it is the land of yellow autumn, there are very few reds up here. Nice in it's own way, but not as spectacular as areas with hardwoods.
 
Some of the best Lessons I learned , were from mistakes I made !

I think I've made about every mistake out there ! Ha !

My concern about cutting open the stems as you did.
I hope any extra glue doesn't bond the stems to your hull. Keeping my fingers crossed.

How do you like those inner tubes on the spring clamps ? I love mine.

Jim
Oh, a tool recommendation.
A Shinto Saw Rasp.
Saw Rasp
 
Nice progress! I've built a couple of small boats, and repaired more than that. Launch day is a rare treat, getting afloat in a boat you built.
Yes, you will always remember the challenges and see the imperfections, but no one else will. They'll just see a beautiful boat that you built.
 
My concern about cutting open the stems as you did.
I hope any extra glue doesn't bond the stems to your hull. Keeping my fingers crossed.
Yeah, I thought about that when I did it. The "stem" form is screwed to the last station from the side toward the center so, if it turns out that the form is now solidly attached to the stern, I'll unscrew it, cut it down as much as I can (or dare) and bury what's left inside a float chamber. Absolute worst case, I'll slap a deck over the whole mess and fiberglass stations 1 & 16 in as the float chamber bulkheads (I'd probably have to cover the plywood with Aspen strips for aesthetics) but I'm pretty sure I can get it apart again. (Doubtful I'll stay under 50# if I have 1/2 of the strongback glassed in)

a tool recommendation.
Those might get into the corners on the inside... I buy these by the case. They're a bit more pricey (like $35ish each) but even when they're "dull" by farrier standards, they'll still hog wood off of a boat. In fact, I'm not nearly bold enough to use the rough side on a canoe even when dull. If you have a farrier in your area (trust me, you do) he's got a few "dull" ones in the back of his truck that he'll probably just give you.

...not as spectacular as areas with hardwoods.
We usually hit peak leaf color around the 2nd week of October so I'd have lots of time to get home for hardwood leaf looking here. Maybe even a return trip down the Conemaugh...

...and see the imperfections, but no one else will.
Thanks John, among myriad other faults, I'm a recovering perfectionist. I used to stress over all the imperfections (and I still see them all) but I've come to embrace an "I didn't achieve perfection yesterday, I might do it tomorrow but I'm not going to do it today" mentality.
 
The Shintos have two grits, one on each side.. The smoother side leaves a pretty fine finish.

They stay sharp ! I still use the one I bought over 30 yrs ago.
 
I was pretty pleased with the finish I got from the rasp but it won't work well for the curve of the tumblehome. BTW Jim, sorry I didn't answer your question:
How do you like those inner tubes on the spring clamps ?
I really like them but I will have to redo most of them before the next build. If pulled tightly, the inner tube stretches & you can really get a good squeeze on the joint. Problem I found was that most of the tubes had some kind of white powder in them that, while it made it easier to get the clamp into the tube, it also allowed the tube to back off of the clamp so I would often have to tug them back on before using them (like going down a waist size or two and not owning suspenders... not a big deal to tug the drawers up but after doing it all day, I want smaller pants.)

I think the solution will be to take them all apart and either clean the tube or turn it inside out before reassembling the Jimmy clamps. They will, however be reassembled as, although the Larch strips are much straighter (I expect that they'll bend uniformly like the Cherry), I'll still be clamping between stations, I'm sure.
 
I didn't manage to get any fiberglass on this past weekend. I had originally planned to glass the hull with 2.5 oz e-glass and add a layer of 4 oz s-glass to the football figuring it would be experimentally light (and, possibly, disposable) but I'd have a build under my belt and know how the hull paddled.

As it's coming together, however, I'm liking the colors so I decided to go the more conventional route of 4 oz e-glass on the hull and see if I could actually keep it around. I had ordered epoxy and enough 50 inch wide e-glass to cover the hull 3 times (2 layers outside & one in) from Raka but they did not offer any s-glass. After ordering, I found 30 inch wide s-glass available through US Composites so I called to order some figuring I could use the extra abrasion resistance (especially after seeing what the Conemaugh did to the nearly pristine Summersong a couple of weeks ago).

I quickly ran into 2 problems. First, the items I wanted (I ordered some 30 inch e-glass also... more on this later) came to $90 but shipping, if I wanted to glass the hull on Saturday, would cost $220 and no guarantee the glass would arrive in time. I'm not terribly patient but I am fairly frugal so I went with the $30, slow boat shipping option and the glass arrived today (Tuesday).

Second, the tech guy at US Composites about freaked out when I suggested 4 oz s-glass. He assured me that even surfboards (emphasis his) use 2 layers of 6 oz s-glass and that 4 oz was certainly insufficient. He also assured me that I should have extra support on the bow and stern because I was building stemless (I wonder if he's related to the lady at Bear Mountain) and I ordered a couple of yards of 10 oz e-glass to reinforce the "stems" figuring I could extend it below the "stems" and basically use it as skid plates. (I've since decided that I'll roll the dice and use some cut-off of the 6 oz s-glass in those areas but the 10 oz e-glass will remain unused at this time.

With glassing delayed, I decided to work on other things. I pulled the rest of the staples, rasped the bow and stern as well as rest of the hull, and then went over the more contoured areas with some 60 grit just to knock off the high spots and glue squeeze-out. In all, I spent about an hour and a half pulling staples, a half hour with the rasp and (probably) 45 minutes with the 60 grit.

This is the cleaned up bow

IMG_20230707_165009775.jpg

and I'm very pleased with how the stern shaped up (assuming it's not permanently glued to the form)

IMG_20230707_195747508.jpg

My buddy who owns the garage where I'm working is a little upset that I'm not using a sanding block to smooth the hull and remove as many scratches as possible (he nearly had a stroke when he found out I used hand held, folded, 60 grit) but I'm figuring the high spots are gone and the rest just adds character. (I mean, he's seen my Ranger... WTH did he expect, right?)

That done, I cut out some seat parts. I'd experimented over the winter with some Hemlock hoping it would be strong enough (It's really light but fails catastrophically when it fails) and I'd come up with a design I though would work. I cut some Cherry to make some 1x1 cross rails with 1 inch of drop on the rear rail and 1 1/2 on the front. I used some scraps to make two 8 inch long spacers between the rails but figured they could be much thinner as they were more critical for spacing than for weight bearing. They came out to be 5/8 of an inch. I cut out the cross rails to accommodate the spacers, sanded a radius on all the edges to strengthen them and glued it all together.

IMG_20230707_212312163.jpg

Sunday I made a couple of attempts at weaving before coming up with one that worked. I didn't want to drill the seat frame as that would weaken it and I figured, if I was already weakened beyond what was sustainable, I could prevent a catastrophic failure by wrapping the webbing. I used 50 feet of 1/8 inch paracord pulled tightly and wrapped over and under the seat fame. I had a few feet left over but wound it around underneath figuring that, in the event of a wilderness failure, I might need the extra to cobble something together for support.

It was probably not a very scientific test but I placed the finished seat on two kitchen chairs spaced 31 inches apart, picked up two 50 lb bags of cat litter and sat down with them on my lap. I bounced around a little and, while it did flex a little, I didn't wind up on the floor so I figure I might be good to go.

The finished seat frame weighs in at 2 lbs, 5 oz and is 32 inches wide. Max width of the boat is 30 inches so it can be mounted wherever I wish when the time comes.

IMG_20230711_205752194.jpg

The rest of my glass arrived today so, after work this evening, I went over and laid the glass on the hull. I'll laminate both layers onto the hull at the same time and I was surprised by how much heavier (like noticeably, physically, heavier) the 6 oz s-glass was than the 4 oz e-glass. I'm hoping to get it epoxied tomorrow but, at this point, this is when it sits tonight.

IMG_20230711_205716315.jpg
 
M
Looking good! A lot better than my first canoe, which I ended up giving away. You might want to put a plastic sheet under the canoe at this point, unless your buddy is a real good buddy, as the resin will often drip off the canoe and form a canoe sized permanent pattern on the floor.

That’s just an index mark so he knows where to build the next one.
 
I know there are two main camps…1/2 layer under main layer or over. I’m in the under layer myself, but that’s here nor there.
Be sure to trim your excess at the sheer, too much overhang can sometimes cause the glass to lift off at the sheer.
And I’m sure you’ll trim back the glass at each stem. And try to get your stem glass strips as close to 45 degree cut as you can, you’ll have much better conformance.
All in all you’re looking great, I’m sure you’ll be thrilled when you can paddle it.
Nice work!
 
Back
Top