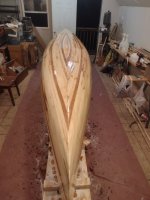
• Happy Marine Mammal Rescue Day! 🐳🐬🦭🦦

(Finally) starting from scratch.

Thanks guys. I'm laying paper on the floor to protect it & I was figuring on trimming the sheer somewhat close. To be honest, when I was using all e-glass, I was going to put the 1/2 layer under (to avoid the loose threads from the edges and to get Jim to post his "avoid the void" graphic... hey, I'm an instigator... what can ya do?) but, since I'm using the s-glass on the football, it will provide better abrasion resistance as the outermost layer.

1st shift (of mixers) is due momentarily and I'm figuring on wetting out both layers at once. I would have preferred to have tested some epoxy on scrap but it'll be ok (probably lol)
 
I think that the 4 oz S glass is about equivalent to 6 oz e glass in "strength", but everything I have read suggests it will have a bit more flex. I intend on adding an extra inside football layer to address that, on the build to start this summer.

If you are going to laminate 2 layers at once, I would suggest you get one of those rolling tools to help insure you get the air out and the epoxy fully saturated. Something like this https://www.amazon.ca/Fiberglass-Ro...ocphy=9000753&hvtargid=pla-906090134614&psc=1


Hard to tell if that seat is bent laminated or just cut from stock. If it is just cut, that will create weak spots along the arc and not to be overly critical, but the deep dado for the side bars cut into the top will really reduce the load capacity, might of been better to use a smaller dado and fit that cross member on the inside. That would leave a lot more of the main strut intact that way and give you a much stronger seat.

I really like the colour on the wood and the streaks make it really interesting, the fine entry on the bow should be nice on the water as well ... good looking boat, good luck on the glassing.

Brian
 
Brian, the seat was just cut but I did choose a piece that allowed the final cross pieces to be quarter sawn. I hadn't really intended for the spacer cuts (those are called dados then, right?) to be that deep and I considered doing dovetail notches but I was 1/2 expecting the seat to break when I sat down & squirmed around with 100 lbs of cat litter on my lap (I weigh 200 lbs). Since it didn't, I'll probably use it as is and look at refining the seat structures for the Raven this Fall.

I did sand radiuses (radii?) into all the seat pieces to help them flex instead of breaking but, honestly, there's not much flex even with 300# and the extra 2 inches of length...

As for the glassing...

My youngest daughter wasn't busy today so she agreed to help and, after gathering various supplies (mixing cups, popsicle sticks and, of course, coffee, we went over around noon (college kids :rolleyes:). There was a slight delay as I trimmed away some of the excess cloth along the strongback (thanks for the timely tip @stripperguy) and while Bridget drew a trillium on the hull in pencil. (she had sketched it earlier, we used carbon paper to transfer it and then she retraced it with pencil... I thought it pretty clever) Trillium has always been a favorite flower so it seemed appropriate.

DSCN1383[1].JPG

That done, we started glassing around 2 pm and, while it was hot in the upstairs of the garage, the humidity was low. We were a little concerned about warming the epoxy so we stored it in the fridge downstairs while we trimmed glass and she decorated the hull. I trimmed the glass at the bow about an inch longer than the boat and wrapped it around the bow as we wet it out. (not sure how this is typically done... I really didn't find much to show / tell how to trim out and glass the "stems")

I saved a couple of the s-glass cut-offs and cut them about 10 inches wide and 2 1/2 feet long. After we wet out the bow, I laid one of these strips on the hull & epoxied it around the bow for extra strength & abrasion resistance and later finished glassing round #1 by doing the same to the stern. I hope that it will essentially be a skid plate as there are 3 layers (2 s-glass and 1 e-glass) on the bottom in the bow and stern.

DSCN1384[1].JPG

Overall, the glass wet out easily and we got faster as we started to get braver about just pouring the epoxy onto the hull and spreading it around. The frayed edges of the s-glass stressed us out a bit but seemed manageable as long as we didn't squeegee too much right on the edge. It seemed like it worked best to hold the squeegee against the hull just below the football layer, pour some epoxy onto it and gently smear it as it was soaking in. We then pressed the glass firmly against the hull as we removed the excess and continued down across the chine.

I'm not exactly sure how to clean up all those edges (I'm considering burning them off with a propane torch) so I'm open to suggestions.

DSCN1389[1].JPG

It took us about 2 1/2 hrs to get the 1st coat on, I'm very pleased with how it came out and I'm not seeing that the e-glass is more clear than the s-glass... they, honestly, look about the same to me. There are some places where it would have been easier to get solid wood-to-glass contact with everything perfectly smooth but we worked some extra epoxy into the uneven spots and I feel it will be adequate. I'll take a little more care on the next one but this seems to have worked fine.

We used about 1/2 gallon of epoxy and 1 quart of hardener for the first coat and I returned the epoxy to the fridge while my helper retired and I put brakes on my spare vehicle.

2 hours later, I was back with round #2 helper. My friend Cathy mixed epoxy for me this time and I used a foam roller to roll on a fill coat. This went much more quickly and I probably didn't need a mixer for this. Pot life seemed like forever with the epoxy and we didn't have to work fast at all even with 84 degrees in the upstairs of the garage (my penance for not getting on this when it was cold outside).

1st fill coat took about 45 minutes and I'm undecided: the foam roller seemed to make a ton of small bubbles and I was wishing I'd taken a heat gun with me. I guess I'll see how it turns out when I go back over around 9:30 for what I hope will be the final fill coat. Any last minute suggestions?

BTW: While I'm open to changing most parts of this process, I'm thinking her stylized trillium will probably be a keeper.

DSCN1388[1].JPG
 
Thanks Brian. Would it have been best to use it between wet-out and the 1st fill coat or will it rip through the epoxy well enough after it's cured?

Finished the 3rd fill coat at 11:30 (no mixer so it took a bit longer) and I went back to the squeegee as, although it is messier, I felt it leveled better, created less bubbles to stress over and seemed to fill the weave more completely. Overall, I'm pleased but there are a few areas that should be touched up... maybe this weekend but I'm hoping to glass the inside (just a wet-out coat and 1 layer of 4oz e-glass) Saturday afternoon or Sunday.
 
I wish I had explained more clearly about trimming back at the stems…
Most of us trim the cloth back at the stems 1/2” or 1” following the shape of the stem. Trimming ends where the cloth wants to naturally lift off at the keel line, or rather trimming starts there.
To wrap the stems, you cut 3” to 4” wide pieces of glass, cut on the bias, at 45 degrees to the weave. This allows the cloth to easily conform to the compound curves as it wraps around the stems. Additionally, the 45 degree cut greatly reduces stray fibers that want to pull out of the weave.
If you browse through some of my build threads, you’ll see the stem strips featured.
As far as bubbles in the resin from your roller, yeah, some epoxy resins are more prone to that than others. The higher the viscosity the more likely it will entrain air. Avoid over rolling and slop on as much resin as possible without dripping, minimize the rolling action both when saturating the roller and when applying the resin. Yes, localized heat can help to eliminate those bubbles as the appear.
As was already mentioned, a scraper can blend those stray fibers and cloth overlaps.
Overall you’re still looking good, beautiful color and grain.
It’s a fun process, isn’t it?
 
Thanks Brian. Would it have been best to use it between wet-out and the 1st fill coat or will it rip through the epoxy well enough after it's cured?

Finished the 3rd fill coat at 11:30 (no mixer so it took a bit longer) and I went back to the squeegee as, although it is messier, I felt it leveled better, created less bubbles to stress over and seemed to fill the weave more completely. Overall, I'm pleased but there are a few areas that should be touched up... maybe this weekend but I'm hoping to glass the inside (just a wet-out coat and 1 layer of 4oz e-glass) Saturday afternoon or Sunday.
Green epoxy (lets define that as 36 hours and less) is always easier to scrape, but cured epoxy is not that much more difficult, just requires a bit more patience. You don't need to add more pressure to your strokes, on cured epoxy, just do a few extra strokes.

Rather than repeat ... this link has pics of scraping/feathering the bow/stern strips to give you an idea of the scrapers capabilities. The small glass strands will just disappear with 1 or 2 strokes, that part is really easy.


Brian
 
OK, thanks! (to both of you). I'll probably be unable to get back to it until mid morning Sat so the epoxy will no longer be green but I'm really hopeful those stray strands will clean up.

Honestly, now that it's mentioned, I guess I do remember seeing people cut the stem pieces on a bias (no idea why I forgot about that)

As for fun: yep. so far I'm really enjoying it although I feel guilty for not sanding much (I understand it's the part that people hate so I pretty much skipped that "sucky" part). As a 1st build, I knew it will float, I'm pleased that it looks as good as it does and I'll try to make it more than the throw-away, hull test that it was originally meant to be.

I'm even thinking of re-doing the seat to see if I can do something more aesthetically pleasing (and, if I'm laminating, maybe thinner & lighter). I want to try wrapping the paracord differently anyway so that it looks better but that starts down the slippery slope of wanting to keep it nice. I prefer things that simply work and looking good is optional (have ya seen my truck? :LOL:) but I don't want to go out of my way to make it the rat rod of the canoe world either.

I know for sure that the loose ends will have to be easy to clean up (or I'll need a better way to minimize them... maybe buy 50 inch s-glass for the football & trim it out on a bias?) or I'll be buying full width s-glass & putting the football layer under it for future builds. (UGH! it's above waterline... I'm not supposed to care!) :)
 
I'm even thinking of re-doing the seat to see if I can do something more aesthetically pleasing (and, if I'm laminating, maybe thinner & lighter). I want to try wrapping the paracord differently anyway so that it looks better but that starts down the slippery slope of wanting to keep it nice.

Why not use polypropylene webbing? It wouldn't require drilling any holes in the frame and would be less saggy than paracord. Unless you don't like the look of webbing.

I like the assymmetrical colors and different woods. It looks improvisationally aboriginal rather than a meticulously planned and executed pattern.
 
Why not use polypropylene webbing?
A couple of reasons: I don't really care for the look, I can pull the paracord tight enough that I don't think it will sag, wrapping the cross rails (in theory) should hold the seat together in the event of a catastrophic failure (I wove a few this winter using Hemlock and mason's line, then piled weight on them until they broke. Even broken, they seemed to remain functional enough to help me get home) and, by using a single piece of paracord, if I'm wrong about remaining functional, I'll have another uncut piece of paracord with which to "MacGyver" something.

...a meticulously planned and executed pattern.
Trust me, there was no planning except where I debated (and decided against) using some of the darker (heartwood?) Aspen to disguise the mismatched Cherry toward the bow. I just grabbed a piece from the top and, unless there was a bad twist or other defect that would necessitate an extra scarf, I glued it on.
 
I used to use paracord and a variety of other string type things for my seats. Then I tried webbing once, and have never went back to the hours of weaving string through holes. If you use a pair of vice grips to pull the free side tight before you staple, you would be very surprised at how tight you can get it. I use a heavyweight polypropylene webbing, 1.5 inches wide. I can web a seat in about a half hour.
 
a good flat carbide scraper is your friend
Well Brian, I'm not sure mine was good or carbide but it tore the crap out of those loose threads (in a good way).

I had a new(ish) paint scraper with a reversible blade so I spun it around to the unused side & scraped away at the loose threads and the overlaps of the football. I was really surprised by how well it worked but it may have worked a bit too well... (I'll explain in a minute)

In addition, I'm unsure why but the roller left an orange peel texture and the last squeegee coat did not fill it completely. I'd have probably just lived with that except that there were a couple of places that the weave was not completely buried and, as mentioned, the edges had smoothed up so well that I decided to feather all of them and see if I could get them to disappear. (didn't I tell you that caring what it looked like was a slippery slope?)

The problem, of course, was that I skipped the "sucky" sanding part so now I had high spots that buff off quickly and low spots that are unlikely achieve a mechanical bond unless they are roughed up. Sanding blocks, orbitals, etc were pretty much useless because I'd have to cut through the glass to level the wood... the sucky sanding part was about to get BAD... (that's ok though... I'm Catholic so I know all about penance...)

In order to better conform to the irregularities of the strips, I wound up hand sanding with folded 60 grit to knock down the orange peel, then going over it again with 150 grit and, finally, scuffing it up with scotchbrite pads. It worked pretty well and I'm hoping I'll just need the scotchbrite when I'm ready to polyurethane.

Overall, I spent about 6 hours levelling the glass edges, sanding off the orange peel scuffing it up. I painted on a fairly thick layer of epoxy with a disposable paint brush and another 3 hours later (thought process here was: since I'm back to chemical bonding, why not an extra coat?). For the final coat, I (briefly) tried a foam brush but it was, again, causing bubbles and actually started to get sticky like the epoxy was starting to kick. In general, I'd found that, despite the temperature (it's been mid-80s F up there for most of the gluing and all the epoxy work... like penance in heck. 🤷‍♂️ ) the working time has been extremely long so I've concluded that foam (anything) is not my friend and I finished with a cheap (bristle) paint brush. I extracted 3 bugs from the surface before I turned out the light so I'll hope that I won't have too many when it's cured.

3 observations at this point. I really liked the way the Aspen planed when making the football and, given the colors, I will definitely consider using Aspen in the future. While trimming the excess from the sheer, I found that the s-glass was much harder to cut with a utility knife than the e-glass was (possibly due to being 6 oz instead of 4oz but I doubt it) and, finally, given the fact that the epoxy was really resilient when hit with 60 grit, I'm feeling really good about the boat's chances when rubbing rocks.

I may find out soon. I'm debating a July 29th departure for a trip but that almost certainly means I'm coating with polyurethane after the trip. Think 2 weeks is enough cure time?

I'll include a picture of the feathered loose strands in the next installment as it was late when I finished & I've got work tomorrow... for now, this will have to do...

IMG_20230716_222623743.jpg
 
Curious about the problems, you had with foam as you applied resin?
First there are different grades of foam brushes, as well as rollers.
I have had great luck with Cigar foam rollers, rated for varnish application.
Same for foam brushes. Quality counts !

Looking at your pic. Is that seat broken, that is leaning against your band saw ?

Spar urethane is recommended, instead of Poly. I'm told Poly is more brittle, and will crack in time.

I use measured cups for epoxy. Pumps have a tendency to burp, throwing off your mix ratio.

Good feeling to get the glass on ! Now for the sanding. Yeah ! Not the fun part for sure.
Stay with it !

Jim
 
I’ve had good luck weighing multipart resins and paints with a postage scale when mixing large quantities for what it’s worth.

I agree with the varnish vs poly as well.

You’re making great progress! Looking good.

Bob
 
Jim, I think the roller issue was due to not saturating the roller before starting but the foam brush (which I wet thoroughly) made small bubbles as well and just seemed to get heavier as I used it. I suspect it was holding extra epoxy and the volume within the brush was what helped it kick early. At any rate the dollar store ($1.50 store now) sells cheap paint brushes that seemed to work well and the epoxy seemed self-leveling enough that I didn't see brush strokes. I'll likely just brush from here on out.

Is that seat broken...
Yes. it's one of the testers that I built from Hemlock and mason's line. I found it was a very light wood but when it broke, it shattered without any warning. That one, however, convinced me that wrapping the string around the seat frame might keep the seat together enough to get me home if one fails on a trip. PS: I guess I should clean up before taking pictures. :LOL: (not gonna happen... with limited time, I try to keep it decent as I go but I'll clean after I'm done)

Bob, for whatever reason, Raka says to mix by volume and not weight so I used their pumps. I did see an air "burp" once in awhile but just ignored it as part of the design.

Bob & Jim, I knew to use spar but I've always thought it was spar polyurethane... I was going to wait until I got back from the first trip but I guess I'll be coating the seat, thwart(s) and gunwales anyway so I may scuff up the hull & do it as well... we'll see...
 
I think you'll find that the varnish will help disguise imperfections. I know that's not true on a flat surface, but yours has compound curves and plank lines. The canoe in my avatar was a dead wood canvas boat that was later stripped and glassed. It's not fair, the planks have humps. Close up you can see them, in use not so much. I think if it were painted a solid color, those humps would stand out. With the varnish over clear fg, the wood grain shows instead.
 
At the temperatures you have described, the hull should be cured enough to varnish after four or five days. I sometimes take a heat gun to the hull the morning after the final fill coat and give the hull a quick warm up just to help the process along. You have mostly finished the fun part, sanding the inner hull will make you appreciate things like bad rashes or hemorrhoids or mother in laws.
 
Bob, for whatever reason, Raka says to mix by volume and not weight so I used their pumps. I did see an air "burp" once in awhile but just ignored it as part of the design.
Raka site says they specify using volume because it is "simpler" for the user. They also go on to outline steps to test and ensure those volumes are delivered. I suspect most folks don't complete the steps to actually test the delivered volumes .... this creates a potential issue when the pumps or operator don't actually deliver the right quantities.

Volume ratio for Raka is 2:1, weight ratio is 43:100 ..... the epoxy I use is a little different, but I took the values for mine and made up a table of what the batches made up from using "multiple pumps" should weigh. Now when I make up a batch, I drop it on a kitchen scale to make sure it weighs what it is supposed to ..... this a very simple, fast way to double check each batch. On a multiple pump batch, it is easy in the "heat of the rush" to miss a pump or as you said, have a "burp" ... the weight check lets you know something happened and the batch is off.
Epoxy isn't cheap, the project materials aren't cheap, your time has a lot of value ... a bad batch of epoxy can creates a lot of waste and time to remedy ... it is worth a few seconds to double check the batch. Last batch of paddles, I missed a resin pump, but had implemented the weight check, it was obvious when I checked what had happened and adding the pump fixed the issue, before it was an issue.

Foam rollers and foam brushes are not created equal ... most are not epoxy friendly. Those foam brushes that seemed to get heavier, I would wager they also got quite "floppy" .... use them long enough and they can also start to shed bits of foam as they are not suitable for epoxy. The only ones I found that hold up at all are the "JEN" brand ones and even those will let go after awhile. Same goes for the rollers, you need to make sure they are epoxy compatible.
As far as foam rollers creating bubbles, if you are using epoxy rollers (if not try them, something like this http://www.noahsmarine.com/rol-resin_resin-roller_md.html ), then maybe take a look at how "fast" you move the roller, typically you want a slower roll as you are trying to move epoxy around and create a level surface. If you are using a fairly standard 3 coat regime, the first 2 coats get squeegeed and bubbles shouldn't be much of an issue ... that leaves the 3rd "flood" coat which needs to be pretty well free of bubbles, you can "tip off" as you go or use something like a heat gun to "pop" those bubbles as you go along. I like to just tip-off that 3rd coat and let the self leveling of the epoxy look after the rest.

As far as the varnish goes, the varnish coat is just a vehicle for the UV protection it contains. The hull is waterproof, but UV susceptible. So high UV protection is the goal, whether that is many coats of cheaper varnish (lower UV additives) or a few coats of premium varnish (higher UV protection) or even a layer of paint.

Brian
 
I'd promised a pic of the scraped loose threads on the stern and I had a hard time getting one where you could even see them.
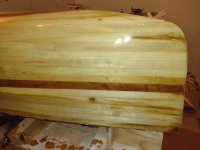
image000001.jpg

They're a little more visible in person but I'm extremely pleased with how well they cleaned up.

2 things that I'd forgotten to mention: While sanding for the last round of epoxy, I'd found 2 places where I'd left an air pocket under the glass (one where I'd wrapped the glass at the bow and 1 where the strips were particularly uneven on the chine).

I still had a clean syringe from gluing as I'd found that I could reuse the same one by running a small drill bit through the tip. While the wood glue had been too thick to suck up through the needle, the epoxy was not and I used an 18 gauge hypodermic needle to inject the epoxy under the glass & fill the cavity. Now that it's cured, it seems to have worked well and both places are solid. (I'd neglected to take "before" pics and "after" is, happily, invisible.)

The other thing I'd forgotten was that I'd built 2 (approx. 20x26 inch) Aspen panels to use as bulkheads for float chambers & hide the mess I'll likely make glassing the inside of the stems. I built them on scraps from cutting the forms, rasped them, sanded lightly and epoxied them when I did the final coat on the boat.
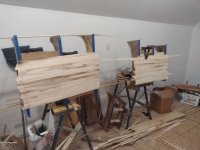
image000000 (37).jpg

In hindsight, I should have laid the forms for these on the bench & epoxied them there but I didn't. I laid down paper to keep from permanently attaching the bulkheads to the plywood beneath and there were many places where the epoxy seeped through. As a result, the paper had to be scraped, rasped and sanded off the back of the bulkhead panels and I can hardly wait to get the hull off of the forms and see what a disaster is waiting for me inside my boat (yes, feel free to assume sarcasm... I'm rather fluent)
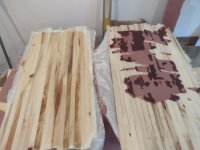
image000003.jpg

Getting the paper off was a PIA but 1) I am, again, pleased with how tough the epoxy is, 2) it's probably smoother than I'd have bothered to get it if not for the paper and 3) it really came out pretty well.
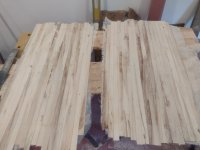
image000002.jpg

The plan is to cut them to fit inside the hull and epoxy them in place immediately after I coat the inside of the hull.

Next, I took a shot at laminating a seat. My reasoning was that, if lamination is truly stronger than a solid piece, I could bump up the color a bit by using strips of Aspen; kind of offsetting the poorer strength of the wood with the superior strength of the construction (I mentioned that I'm not an engineer, right?).

I used left over strips of Cherry & Aspen, made a form from a rough cut Hemlock 2x4, glued it together with wood glue & clamped it down. In the process, I clamped it to the railing by mistake and squeezed one of the clamps so hard that it broke. It was, however, broken in a way that it still held so I left the seat rail clamped to the outside railing overnight.

image000004.jpg

The drop on the front rail (shown) is 2 inches and I made another (not clamped to the exterior railing and using large c-clamps) for the rear with a 1 inch drop. Not sure yet which will make it to the final seat but, after the front rail dried, I placed it on 2 milk crates 32 inches apart (the seat rails are 36 as I'm hoping I can universally use them in all future builds) and I sat on it. My reasoning was that, if it held my weight as an individual rail, I could probably fall onto it from a standing position (always possible for me) and it would hold once integrated into a seat.

Sadly, It did not.

I was pleased with how the glue held as it ripped the wood strips apart along the grain but I should have paid more attention to how the grain was running through the strips and I'll also replace the Aspen with White Oak for the next test. My preference would be to only use 2 woods for each boat but I have the white oak, the weight penalty isn't a deal breaker IMO and, if I must pay a weight penalty, the seat may be the best place to invest. I'm headed over to the farm this afternoon to retrieve a white oak 1 x whatever I grab first and I'll make more rails tomorrow.

Oh, yeah, while the hull was still on the forms, I sanded it with 100 grit so it's roughed up for the spar varnish. 100 is probably a bit rough but (so am I sometimes and) it did pretty well removing runs and the few bugs that had gotten stuck while I glassed at night with the doors & windows open. I'll be starting the next build so that all of this can be done in the winter for sure. I'm itching to get it on the water but I did delay the big trip until the end of summer so I should have it done in time.

I plan to get it off the forms and see what catastrophe awaits inside later this week. After seeing the paper on the back of the bulkheads, I'm almost expecting epoxy stalactites in there.
 
You're making good progress and learning a lot along the way. That's the way to do it.

There's always epoxy that leaks through. After the first round of rough sanding I look up from the bottom and put tape over any cracks or holes where I can see light coming through. The bigger cracks and holes then get filled with thickened epoxy before the final 2 round of sanding.

Alan
 
Back
Top