• Happy Weed Appreciation Day! 🌱🌿🌻

Elevated thwart Tower for spray deck cowling?

Joined
Jul 6, 2021
Messages
643
Reaction score
555
Location
The Hereford Zone along the Mason-Dixon Line
I’ve been pondering Johnny 5’s Y webbing strap tower concept, and am intrigued with the idea of an easily attachable thwart tower.

https://www.canoetripping.net/threa...-own-removable-yoke.127250/page-2#post-132620

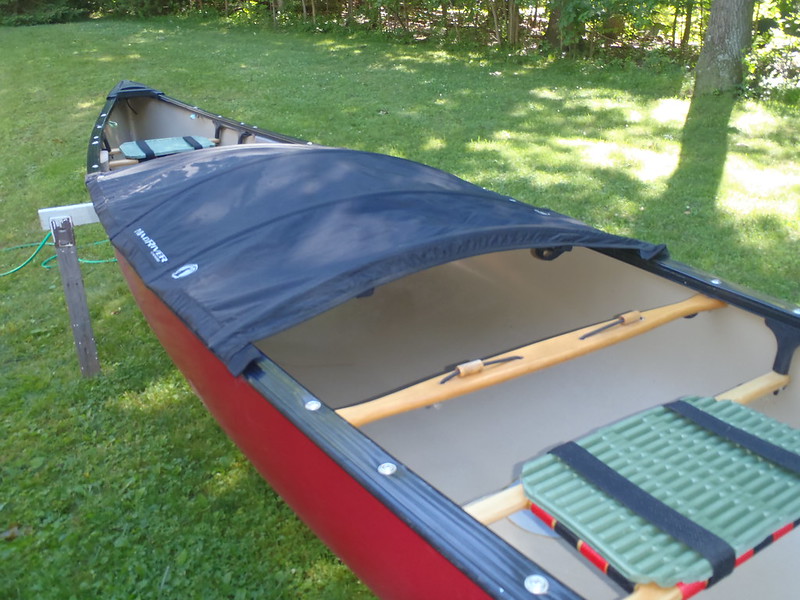
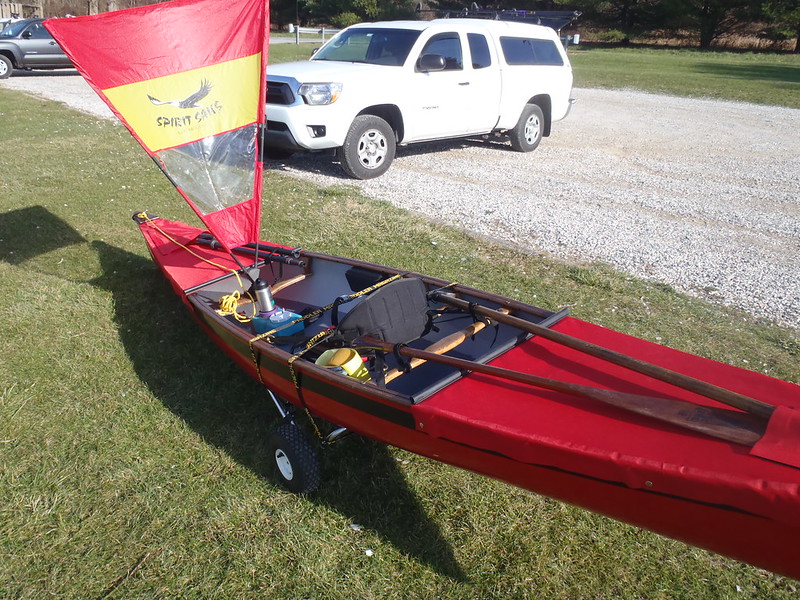
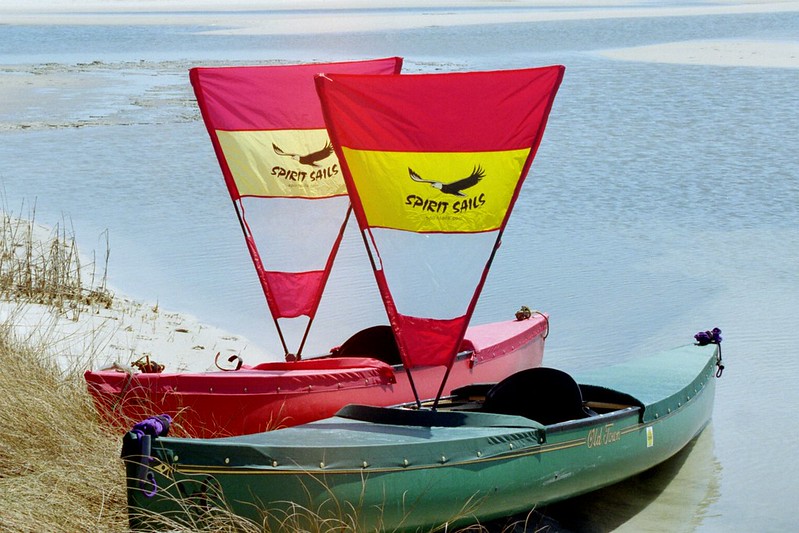
Not for a multi-point strap yoke, but for DIY spray cover reasons. The first two spray covers I made both had a (crude) raised “cowling” on the front cover. Crude as in section of old hula hoop in a sleeve, or Velcro attached.

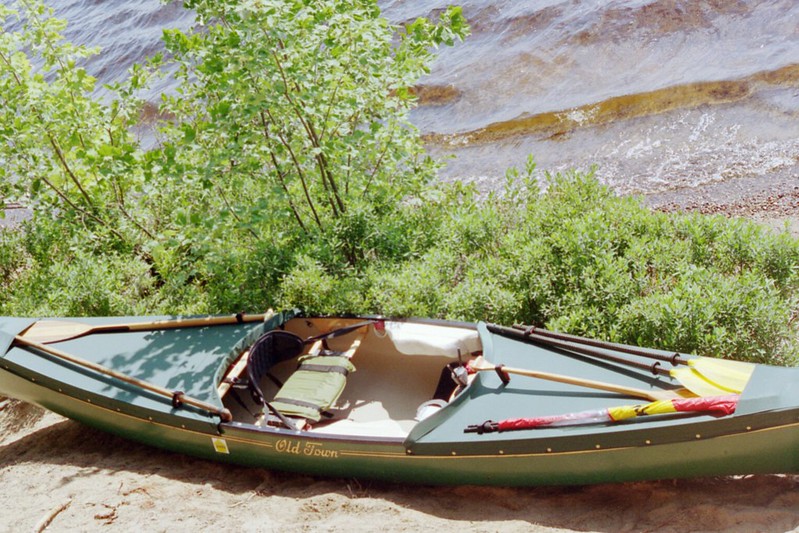
When our OT Pack became a dedicated duck hunting marsh canoe it got attachable brush/pin oak holders, a gun rest, and waxed canvas camouflage covers; flat-ish in the stern, but hoop-raised in the bow for easier access to gear and decoys, better drainage from paddle drips or rain, and a bit more “hide” when sneakboating downriver.

That worked so well that one son’s first solo canoe, a 10’ OT Rushton, got the same raised bow cowling design, in lighter-weight coated nylon materials.

It worked, but the hula hoops, attached through PVC pipe clips on the inwales, were ugly and overly flexible.

A clamp-on center thwart tower has skirt raiser potential. I’m thinking a vertical tower, maybe 5” tall, with a rigid curved cowling piece at the top. That curved piece wouldn’t need to span gunwale to gunwale and be anchored though pipe clips to form the shape, it could just have 10 or 12 inches of curved arch sticking up, to form the top shape drape down to snaps.

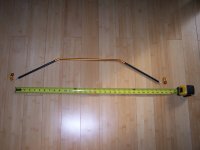
Hard to draw on a keyboard, think this, (-- , stood upright.

I want to try an attachable thwart tower for a bow cowling arch the next time I DIY partial spray decks. Hey, maybe something with attachments I can festoon with my Go-Pro, GPS, cell phone and I-Pod ;-)

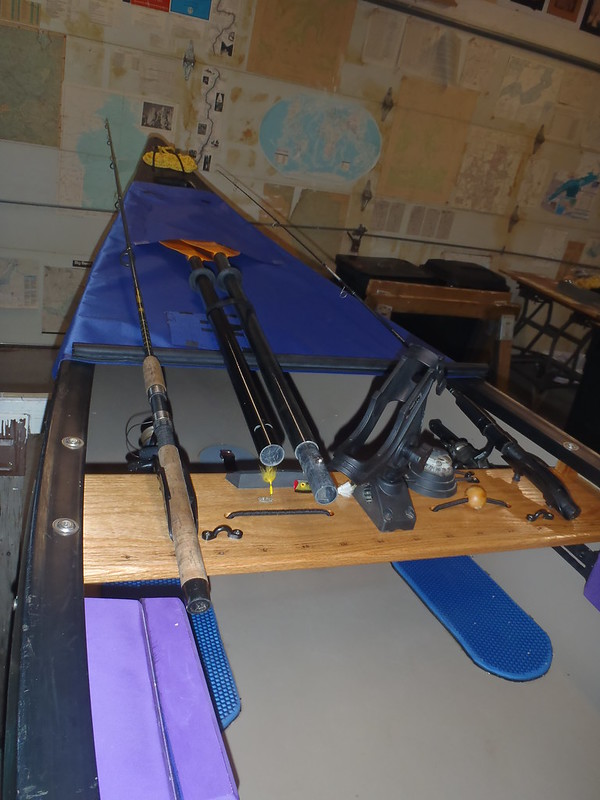
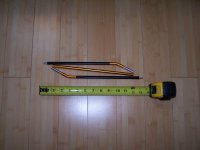
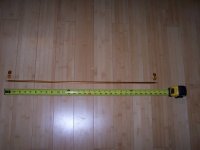
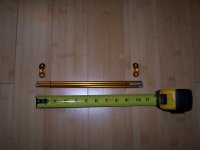
I have a variety of old, unused clamps, and have some long-unused pieces of steam bent wood to use for the top arch in lieu of colorful plastic hula hoops.

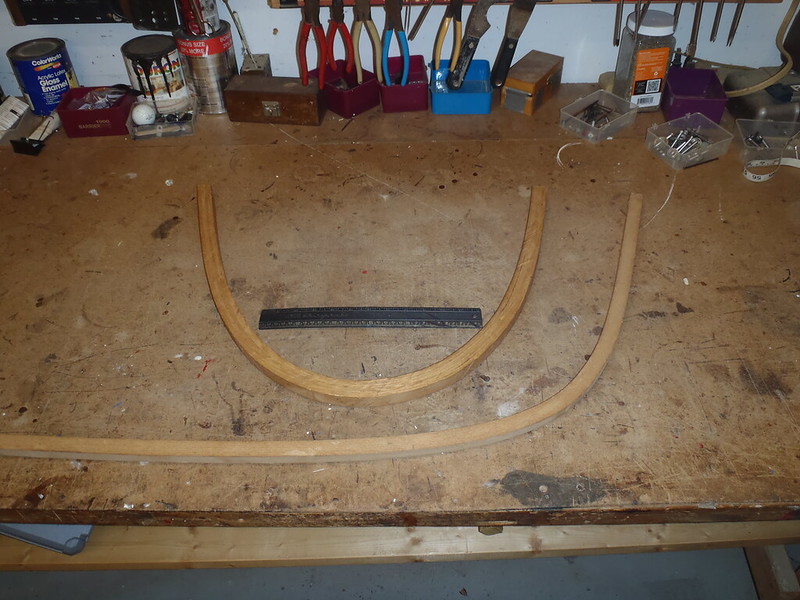
P1030014 by Mike McCrea, on Flickr

Those hula hooped cowlings were made 30 years ago. Who would have thought that I’d still have pieces of hula hoop in “shop stock”? I never doubted it, and there they are.

I have a feeling I’ll be reinventing the wheel; there must be designs for DIY clamp on thwart “towers”, or even some manufactured versions from which to copy.

Eh, on further thought, along my don’t like stuff above the sheerline, I’d want something that wouldn’t rip out the thwart in a capsize, or get stuck in a strainer mid rope retrieval. Anything sticking up above sheerline becomes potentially problematic in pinned rope drags.

Or even in boat-over-boat rescues; I was totally stymied by a bleach bottle bailer, thwart tied to dumped Magic; dangling attached on a short cord it prevented repeated effort at bow-over rescue, and was finally, laboriously, WTF I give up, bullnose plowed to shore inverted.

Maybe the flexible/sacrificial hula hoops weren’t such a bad idea. I still want to try again.
 
Mike, fiberglass or aluminum tent poles could be used to make raised spray cover hoops that are compact, lightweight and easy to install. I custom cut and assemble poles for many projects. The poles could be collapsed for convenient carry and storage and you can make or purchase the mounting hardware to fits your application.
 
Last edited:
Another source for bendy supports would be sail battens. They come in many sizes and tapered thickness in some cases. For this purpose a constant thickness is what you should look for. I’ll look around and see what I can find.
Jim
 
I don’t think Mike will like this idea, since he mentioned improving visibility into the under cover area. The idea is shape a 3” thickness of closed cell foam into a little arch that sits atop the thwart and holds up the cover. On the underside cut out a 1” deep groove in the shape of your thwart. This piece of foam could be held in place by the cover, and easily be knocked away in rescue scenarios. But, it wouldn’t help at all in access or visibility to the below deck area.
 
“Another source for bendy supports would be sail battens. They come in many sizes and tapered thickness in some cases. For this purpose a constant thickness is what you should look for. I’ll look around and see what I can find”

I like the sail batten idea. Eh, I probably like it; we have and have had MRC IQ covers. Those had flexible stays sewn into the covers. The arched IQ bow cover was great at rain and wave shedding.

PB081340 by Mike McCrea, on Flickr

The arched tandem belly cover was efficient in design, and would be dead simple to DIY on a tandem if not desiring full tandem tunnel covers,; a KISS solution for rain, splash and paddle drip.

P6100011 by Mike McCrea, on Flickr

Except. . . . . .the stays on all of the IQ covers stay bent, so the covers have a weird ) shape, and are floppy awkward to pack, either in the truck or at home. The CCS covers stuff into a ditty bag, and the DIY covers have flat rigid drain baffle “stays”.

P1200025 by Mike McCrea, on Flickr

Those flat, rigid supports are sleeve attached to the covers, and roll up, store and transport compactly in an old camp chair bag.

P1200024 by Mike McCrea, on Flickr

Question - Do sail battens return to flat, or stay arched once bent?

I’ve tried fiberglass tent poles, in several guises. Without some kind of tent pole spider X cross additional support they were too flexible, and I never liked any of the pole end brackets/stops I tried. The most successful tent pole “arch” I installed is on (under, not attached to) the CCS front cover on the Penobscot.

That is a single fiberglass tent pole. One end plugs into a receiver hole in the deck plate carry handle, the other end plugs into a hole in the front edge center of the utility thwart. Bent slightly and plugged into place it provides a bit of keel line arch, but only when the nylon cover is saggy rain damp. Which is a right when I want it raised arch good thing. The Cooke drainage baffles work equally well soggy arched or drum tight flat.

P1240475 by Mike McCrea, on Flickr

When the cover becomes nylon shrunken drum tight that keel line pole arch, under cover tension, auto-slides off to one side, and the cover is again flat. Also not a bad thing. And it is a single two ferrule/three piece shock corded pole section, which is a very good thing for transport and storage.

That single keel line pole might work for an always vee arched bow cover with non-nylon materials, and I just happen to have five bags of intact glass tent poles from which to choose. I want to try to incorporate some semi-adjustable arch in the next DIY covers, but I need to find the right derelict to rebuild first.
 
Quick answer is the go back to flat. They have to be able to flex in both directions when used in a sail.
More later.
Jim
 
I could easily configure the shape, height, strength and attachment hardware of tent poles to meet multiple application.
 

Attachments

  • 101_0108.JPG
    101_0108.JPG
    183.6 KB · Views: 23
  • 101_0109.JPG
    101_0109.JPG
    81.1 KB · Views: 21
  • 101_0106.JPG
    101_0106.JPG
    95.8 KB · Views: 18
  • 101_0113.JPG
    101_0113.JPG
    195 KB · Views: 15
  • 101_0116.JPG
    101_0116.JPG
    82.9 KB · Views: 15
  • 101_0115.JPG
    101_0115.JPG
    76.3 KB · Views: 16
Last edited:
“I assembled an arch support with some spare tent pole parts and installed it in my canoe for evaluation.”

I’ll be curious about your evaluation with a spray cover actually in place, not just a stay waggling in the air supporting nothing. The lateral hula hoop and tent pole stays I installed for spray cover arch were secured via two points of contact on either side; tight “sleeves” on the side of the inwale, and a “socket” epoxied on the side of the hull below the sleeve.

Those provided some added measure of rigidity to the hoop/poles, but tent poles were still too floppy to be effective. Those covers used only a single arched stay at the open end of the bow cover, and might have worked better had I used a series of arches, something like Dogbrain installed here (post 103)

https://www.canoetripping.net/threads/decked-kruger-seawind-style-build.101143/page-6#post-106057

Even with a series of stays those are the “standard” design, flat rectangular stays as on Kruger Sea Wind covers, and if the simplicity of tent poles had been a viable alternative those would have been the standard instead.

“I don’t think Mike will like this idea, since he mentioned improving visibility into the under cover area. The idea is shape a 3” thickness of closed cell foam into a little arch that sits atop the thwart and holds up the cover. On the underside cut out a 1” deep groove in the shape of your thwart. This piece of foam could be held in place by the cover, and easily be knocked away in rescue scenarios. But, it wouldn’t help at all in access or visibility to the below deck area.”

As of a few days ago I really like that idea*. I have less need to access day gear ahead of the foot brace/front thwart, that was mostly handy in the duckhunting rig as a taller camo “hide”, and to access decoys & shotgun in the bow.

All of our (partial) spray covers have open space behind the seat for easy-access day gear. The arch would be purely for better rain or wave drainage. One run of haystacks simply poured water over the flat bow cover, hit me in the torso and ended up in the canoe. Those waves might still have come over the bow, but some arch couldn’t hurt.

*As of a few days ago I have two large slabs of white ethafoam, one 27” x 60”, one 25” x 25”, both 2” thick. Three chucks of that stuff, cut out with an arched top, and glued together with a thwart width center groove would be dead simple to make.

Not quite the same stuff as Chip’s black blocks

P2040001 by Mike McCrea, on Flickr

These sheets of Ethafoam are softer textured and a tiny bit squishier, neither of which would be a bad thing in a dislodgable-in-capsize foam stay.

I should have enough left for ALSG to play with when I’m done. Or even before I begin.
 
A secure freestanding arched support could be assembled with the use of intersecting pole connector fittings. However, the spray cover itself if attached to the poles will secure them in place and in MHO be a simpler option.
 
Last edited:
Johnny, no offense, but I have installed manufactured or homemade spray covers on a dozen canoes, the first of them DIY’ed 30 years ago.

A single arched hoop tent pole at the open end, even dual sleeved and pole end socketed at each side to form a slightly raised “cowling”, has not worked well enough alone on the covers and guises I have tried. In theory that single pole looked good, in practice not so much.

An X or Y of tent poles, with connectors/spiders has better possibilities, and the five bags of tent poles I have are mostly from MSR Hubbas, Hubba Hubbas or similar tents, all of spidered connector design.

Now that I have bags of sacrificial poles it might be worth trying poles again on the next DIY spray cover. Experimenting with the pole configuration, wanting a slightly raised open end cowling to help drain water, with drainage sloping towards the stems, would be interesting. I don’t think it is an X or Y of connected poles, but maybe better a T. Actually a ---|, long leg keel line centered, crossbar arched across the open end.

The right angle edges of the little brass socket you have attached to the top of the inwale would bother me, and chew off rack bits when sliding canoes on or off storage racks or roof racks. Top mounted flange washers are chewy enough.

I’d rather have a pole end connector/sleeve attached to the inner side of the inwale. I’m not sure how those brass doohickies would work mounted on the side edges of the inwales, might be worth a look. What are those brass pole foot connectors called/from where?

My stumbling block in any of the DIY’ed hoops has been the sleeves and pole end sockets, and both have proven necessary; a single pole receptacle on either side proved to be a wobbly failure. But I have some ideas, the inwale “sleeves” could be a short piece of webbing, pop riveted on either side the edge of the inwale with enough slack to push the pole through, and the pole end sockets a narrow webbing pouch in which to seat the ends. Easy to make, easy to slip poles through/into, not in the way, not sharp or hard edged; that last hard edge bit proved a detriment on previous pole attachments.

You have me thinking about spidered pole configuration possibilities. I just need to find the right rebuild first, and DIY another cover.

If you enjoy DIY’ed, modified or retrofitted gear making spray covers is an education in design and function. We have, or have had, spray covers on a dozen canoes, and I’m still learning.

Old Town Pack – DIY waxed canvas camo hunting cover with hula hoop cowling for decoy/shotgun access.

Old Town Rushton – DIY Urethane coated Nylon cover with tent pole cowling. I should scan in old photos of those two.

Mad River Independence – Heat sealable fabric DIY cover

PC110013 by Mike McCrea, on Flickr

Old Town Pathfinder – Heat sealable fabric DIY covers

P3250016 by Mike McCrea, on Flickr

Nova Craft Cronje – Heavy duty coated poly full cover with tunnels, modified to fit

P7140018 by Mike McCrea, on Flickr

Mad River Freedom Solo – DIY covers

P1130039 by Mike McCrea, on Flickr

Old Town Penobscot – Cooke Custom Sewing covers

P2180691 by Mike McCrea, on Flickr

Wenonah Wilderness - Cooke Custom Sewing covers, same design as the Penobscot

IMG019 by Mike McCrea, on Flickr

Bell Yellowstone Solo - Cooke Custom Sewing covers

PB260044 by Mike McCrea, on Flickr

Mad River Revelation – Unmodified IQ covers

P6100017 by Mike McCrea, on Flickr

Mad River Malecite – Modified IQ Covers

PB081339 by Mike McCrea, on Flickr

Mad River Explorer - Modified IQ Covers

PB081340 by Mike McCrea, on Flickr

Mohawk Odyssey 14 - Modified IQ Covers, same set as the Explorer.

When Mad River was experimenting with IQ spray cover design we got a bunch of different prototypes to test, and later received improved versions of those covers from our feedback. The addition of waterproof zippers was a huge improvement in the initial design; unzip, pull out gear, re-zip.

Spray covers, especially something DIY’ed, are one of those things you need to make, install and repeatedly test paddle/trip with, then alter and modify as experience indicates. Even our CCS covers, as good a design as it gets in partial covers, were later modified at our request by Dan Cooke to incorporate an additional (stern) paddle pocket, additional lash straps, and center storage covers.

I obviously do like spray covers, and use them often. I may not “need” them in the need paddles and PFD’s sense, but find that covers are beneficial for a variety of reasons. Obviously shedding rain, waves, splash and paddle drips. With paddle pockets and lash straps covers are an excellent, kinda necessary with covers on, place to store paddle/spare paddle/sail/push pole/etc when the canoe is full of gear.

Base camped without gear carries I may want to bring a variety of propulsion; bent shaft, straight shaft, double blade, a pole, a sail. Dual paddle pockets and multiple lash straps are handy.

IMG020 by Mike McCrea, on Flickr

One hot sunny weather/desert trip oddity with partial covers; the covered areas inside the hull stays much cooler from shade and water temp on the hull. Keeps my pale feet and ankles from getting sunburned as well.

P5081006 by Mike McCrea, on Flickr

I hope to be paddling coastal next week, despite a rainy forecast. Not sure which canoes to take, but they will have spray covers. Even if it doesn’t rain covers are a help in open water wind and wave. Don’t need them, do want them.
 
Well jeepers, look at what showed up in the shop.

20220306_094347 by Mike McCrea, on Flickr

More giant slabs of that 2” thick soft ethafoam. Thanks Jane.

I’m thinking Chip’s idea for closed cell foam spray cover arch support, sleeved around a thwart, is in the cards next DIY spray cover.

With 36 square feet of it I might even have enough scrap for ALSG to cut 6” wide sawhorse crossbar canoe cradles. I could trade him for old YAER seats or thwarts.
 
I stopped in at Hamilton Marine store yesterday and bought a 40” batten to try out. It was under $5 so what the heck I might make a spray cover sometime. This is what I bought.
8CB91789-B8F0-4BED-A078-460823326019.jpeg
Flexed down to 36” raises the hoop 8” it will easily flex down to 20” and didn’t break. And it went right back to flat. It’s very light weigh and a very shallow diamond shape you can see in the pic. I say very promising.
Jim
 
Back
Top