In an effort to button this up by Friday, I spent a couple of decent days in the shop.
I'd stopped over at my buddy's woodshop last week and we re-did the seat. Now that the cross pieces were glued in again, we cut them off, ran the dado up & down while sizing it to fit some Sassafras scraps Dewey had laying around. We left a support tab underneath (primarily to compensate for the cut-out area on top) and sanded the finish off the old seat parts.
I made sure that the dadoes had a loose fit this time despite Dewey's objections. (Machinists are funny... apparently, "loose" is not a specification and we had to determine an appropriate amount of "clearance" before the dadoes could be cut. I can't recall what number we settled on but it fits loosely so we should be fine)


I then thickened some epoxy and glued it together, clamping it lightly and making sure that it was square.

I had intended to test paddle in order to find the ideal seat placement but I didn't. I think Alan said that it was designed to be similar to the Raven so I placed the seat similarly to where I put my Raven seat but cheated it an inch forward as a compromise to those who like the seat more centralized. (IIRC, I wound up 11 inches behind center.)
I used a contour gauge to match the hull shape and will mount the seat directly under the gunwales (I like the seat 9 inches off the floor but, with the drop I have on the seat, I'll be closer to 8. Should still be OK... one way to find out...)

I had quite a few Sassafras & Catalpa scraps from making paddles (I cannot visually tell the difference between those woods), so I transferred the contour to some scrap & started fitting.

With the failures piling up on the floor of the boat, I eventually stopped sanding the sides until I'd gotten the fit that I wanted.

I cut the thwart to fit (I'll only have one since the seat will serve as the rearward... should be enough... sure hope so lol)

and I cut up an earlier seat failure to make grab handles. (I like the slight upward arch but it wasn't the best idea)

I then drilled 1/8 inch pilot holes through the gunwales and into the thwart and handles, then used a 1/4 inch drill to make divots in all mating surfaces so that they'd have a little more contact area, increase the grip and eliminate twisting.

I mixed up some thickened epoxy, put some tape on the bottom of the seat cross rails and glued everything into place.

I installed a 1 3/4 inch deck screw into each end of the thwart and both ends of the grab handles, drawing the screw tight below the surface of the hull's exterior. (note: I'd opened up the pilot hole on the exterior with a 1/4 inch drill bit so that the screw would sit below the level of the glass. In the future, I'll have to remember to drill the 1/4 inch "divot" first so that it doesn't try to catch when it gets through the glass. With the pilot hole already there, the bit tried to follow the pilot the whole way through the hull)

This morning, I removed the seat & grabbed my jigged trim router.

Remember those sexy-looking, arched grab handles? They threw off the jigged router and wreaked havoc on the cut but I carefully removed the overhanging inwale material, smoothed the rough areas with a rasp and then the long board (40 grit). (have I mentioned that I love working with Sassafras... not only does it sand well but it smells terrific!)


After that, I started fitting the outer gunwales. I do this by cutting opposite corners flush with the hull and allowing the other side to run past the end.

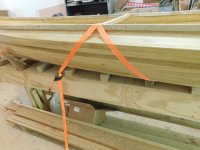
Once done with that, I thicked up some epoxy, generously buttered the backside of the outwale and clamped them in place (you'll see why the Merlin is sticking out the door in a minute... Looks really weird from outside...)

Once all pieces were clamped in place, I slid the Bloodvein to the off-loading table to dry and brought the Merlin inside on the cradle. (I'll update that thread tomorrow... probably... gotta bale hay, trim a few horses and build boats too... too many irons & not enough hours...)


")