Looks real nice, curious to see what it looks like compared to a wood canvas Chum...nice work.
-
Happy National Sunglasses Day! ☀️🕶️😎
You are using an out of date browser. It may not display this or other websites correctly.
You should upgrade or use an alternative browser.
You should upgrade or use an alternative browser.
Jack's Special/ Chestnut Chum
- Thread starter memaquay
- Start date
Never seen the shear done that way before on a stripper. Do you always do it this way?
On a traditional canoe with a lot of rocker and high stems, that is the method that seems to have evolved as being the easiest way of dealing with the sharp angles. On all those ugly asymmetrical hulls that I built, it was not necessary, as the curves were fairly moderate.
mem,
Hmmmm...I don't know, it might be too pretty to put in the water.")
After seeing yours and Alan's stripping patterns, I have a few new plans for my next build! Thanks for sharing.
Hmmmm...I don't know, it might be too pretty to put in the water.
After seeing yours and Alan's stripping patterns, I have a few new plans for my next build! Thanks for sharing.
That has a really nice curve to the hull, it should be very responsive for you in whitewater. Perhaps a little tender at first with the round bottom though, but with the loads you generally take it should nullify that.
I too like the dark strips above the light. Nice touch.
I too like the dark strips above the light. Nice touch.
Well, been plugging away, skipping lunch and stuff. Got one side totally planked today, the other is about 2/3.
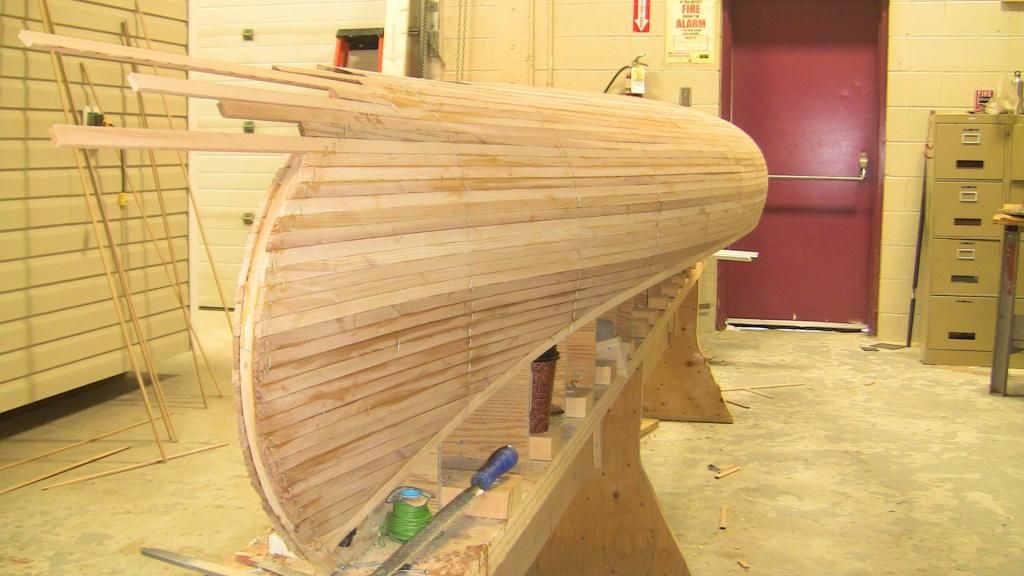
View from the top.
Chalk-line shennanigans...
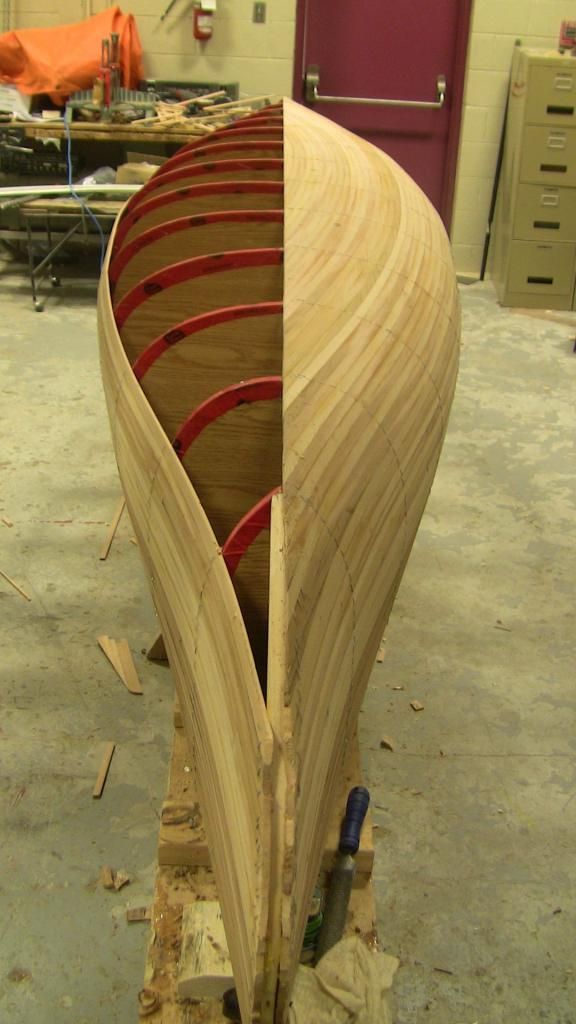
Cut the center line.
Since I'm going with two layers of six ounce on the bottom, I ordered my old favorite, system three clear coat for the wet out coat. The stuff is so thin, it's like water, perfect for wetting out. Using general purpose system three for fill coats.

View from the top.

Chalk-line shennanigans...

Cut the center line.

Since I'm going with two layers of six ounce on the bottom, I ordered my old favorite, system three clear coat for the wet out coat. The stuff is so thin, it's like water, perfect for wetting out. Using general purpose system three for fill coats.
I might have to try that finish one side and cut down the middle method. It's so time consuming doing those tapered cut to fit strips. Eliminating one side would be nice. How do you cut and trim the center? Wide of the line with a circular saw and gently shave it back with a plane or sandpaper?
Alan
Alan
Can you feel it Mem? Anticipation, dreams, trips, all on that strong back. I can feel them through my computer screen.
I can feel it too. It looks fantastic.
Those strips have quite a curve to them. I'd say that they seem to accentuate the shape, but that last time I said that, I got smacked. We're all friends here right?
Keep it up Mem!
Those strips have quite a curve to them. I'd say that they seem to accentuate the shape, but that last time I said that, I got smacked. We're all friends here right?
Keep it up Mem!
Can you feel it Mem? Anticipation, dreams, trips, all on that strong back. I can feel them through my computer screen.
LIKE
Yup, I'm doing a lot of dreaming about this one.
Alan, I just use a jig saw and an exacto knife. Then I take a wood rasp and file each section sort of straight. I'm one of those good-enough guys. You still have to taper each strip to fit the straight line as you plank the home-run section, and that last piece is usually about as fun as an STD. I'm liking the looks though!
Alan, I just use a jig saw and an exacto knife. Then I take a wood rasp and file each section sort of straight. I'm one of those good-enough guys. You still have to taper each strip to fit the straight line as you plank the home-run section, and that last piece is usually about as fun as an STD. I'm liking the looks though!
Looks like a real traditional canoe, enjoying seeing it come together.
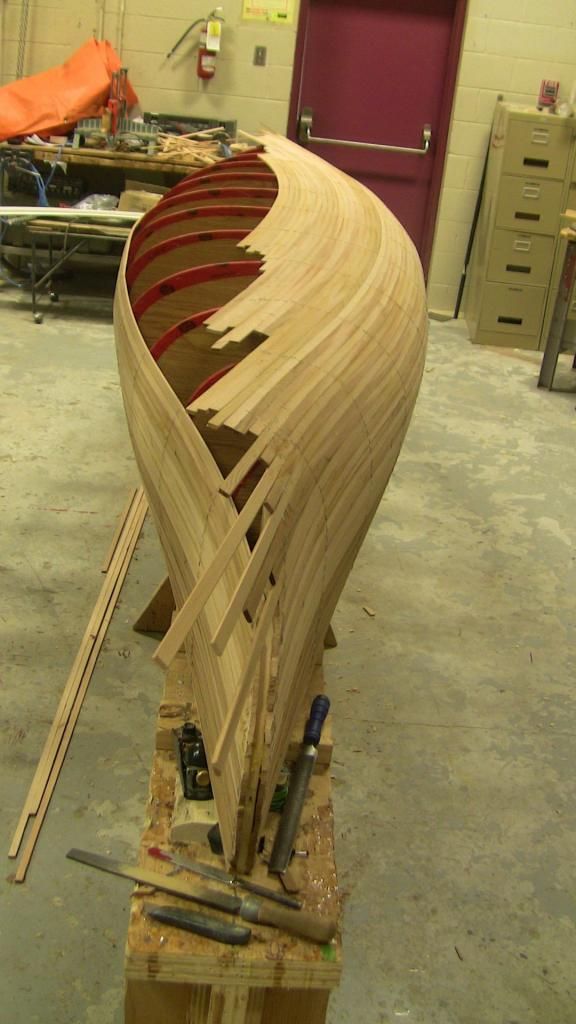
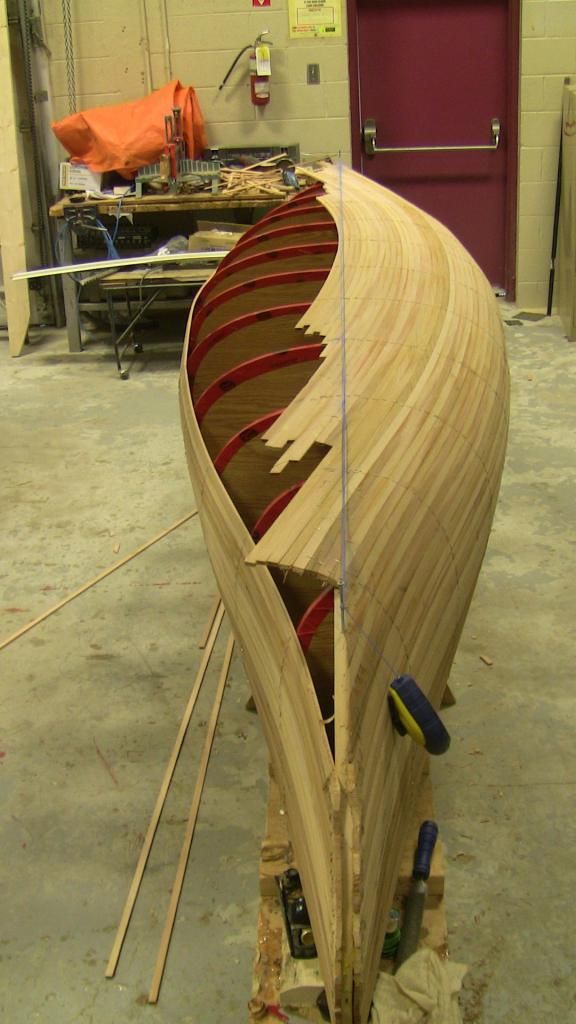
Almost finished planking. Should have quit two strips ago, was reaching that point where "good enough" was becoming pretty ugly. Anyway, I realized i had to quit before I put that last piece in, save that for tomorrow.
This shot gives you a good look at the lines. Very sexy!

This shot gives you a good look at the lines. Very sexy!

I know what you mean about good enough. The definition seems to drift depending on how long you've been working on a given task and how much you're still enjoying it. I don't think I would have been able to quit with just one piece left though.
It sure looks good from here. Looking forward to seeing it with the staples pulled and sanded down.
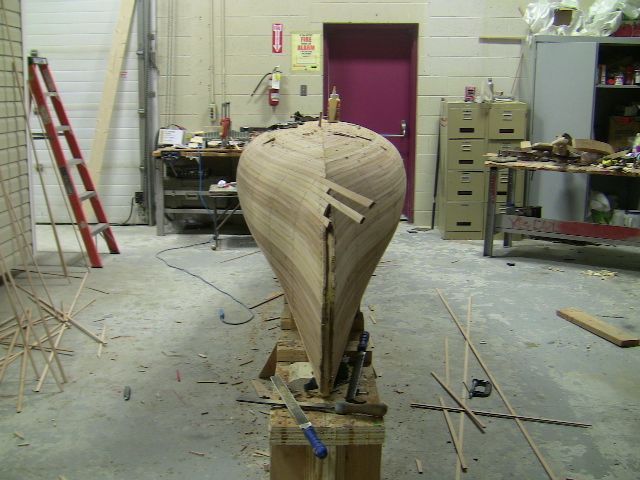
I'm having a hard time telling how much flare there is in the bow. In some of the pictures it looks like there's hardly any at all and others look like there is. On which are my eyes deceiving me?
Alan
It sure looks good from here. Looking forward to seeing it with the staples pulled and sanded down.
I'm having a hard time telling how much flare there is in the bow. In some of the pictures it looks like there's hardly any at all and others look like there is. On which are my eyes deceiving me?
Alan
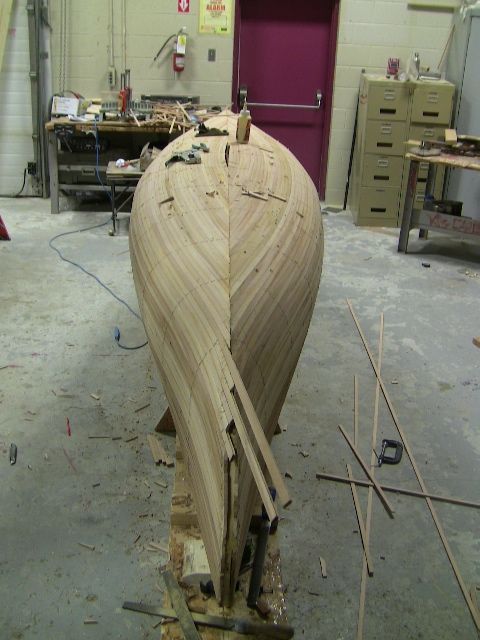
I'm not sure what the proper nautical term is, but there is a kind of "cheek" between the last station and the stem. In other words, the strips become slightly concave as they flow from the last station to the stem. This seems to create an impression of flare, but I won't be sure until I flip it upright. The entry points are very narrow, more so than the asymmetrical canoes I have built. It should be very interesting to paddle.
I noticed that sharp entry that starts to flare at the first section. Don't recall seeing that on a canoe before but it sure looks sexy. Trying to imagine if that sharp entry will knife through waves or if there's enough flare above the water line to ride over. Or maybe there's enough volume starting at the first station to ride up and over? Looking forward to you getting it on the water to see how it paddles!
Alan
Alan
There's some nice work there! I'm sure your "good enough" is fantastic, and I am sure that like most craftsmen, you are much harder on yourself than any one else would be.
I really want to see this one in it's upright position.
Keep it up Mem.
I really want to see this one in it's upright position.
Keep it up Mem.
Stem day has finally arrived, I've been lazy lately, but figure I better get a move on. I use fill epoxy to glue them on. In this case it's system 3 general purpose. I use system 3 clear coat for wet out, it's probably the best wet out epoxy out there, thin like water. Great for coating externals like gunwales too. For any Canadians, I get my stuff from http://www.compositescanada.com/. Cheaper than Noah's, and nicer to deal with in my experience. I moved to mixing cups instead of pumps for the last few builds, I find it faster than pumping. My mixing cups are left over from Friday night's party, some cheap shot glasses. I have learned over time that one shot of tequila is somewhat pleasant, but that several shots is no good for any form of humanity.
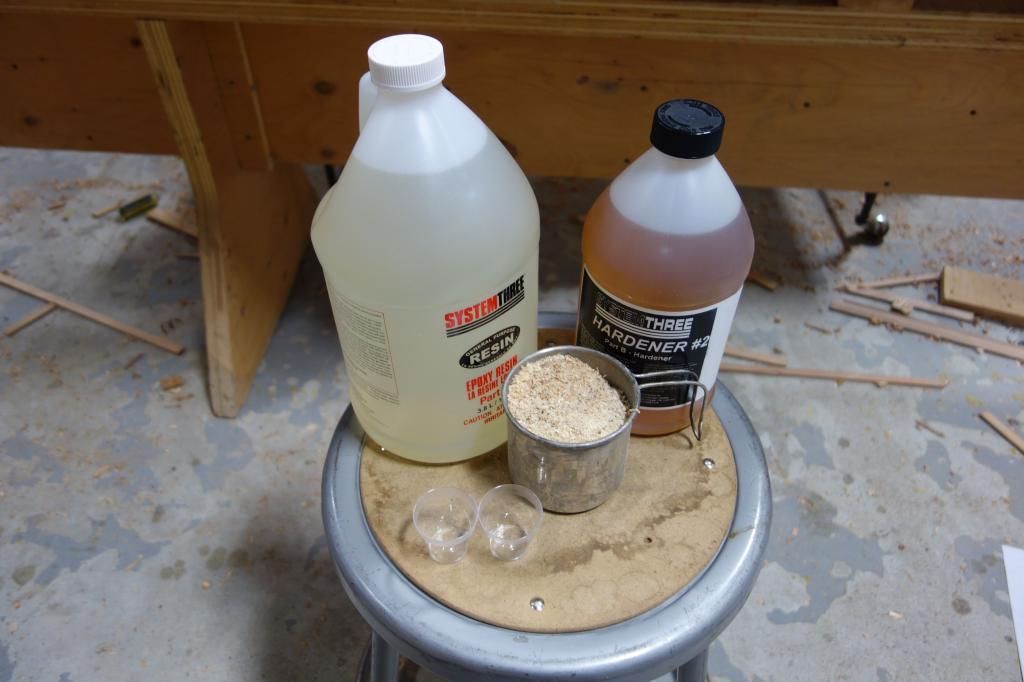
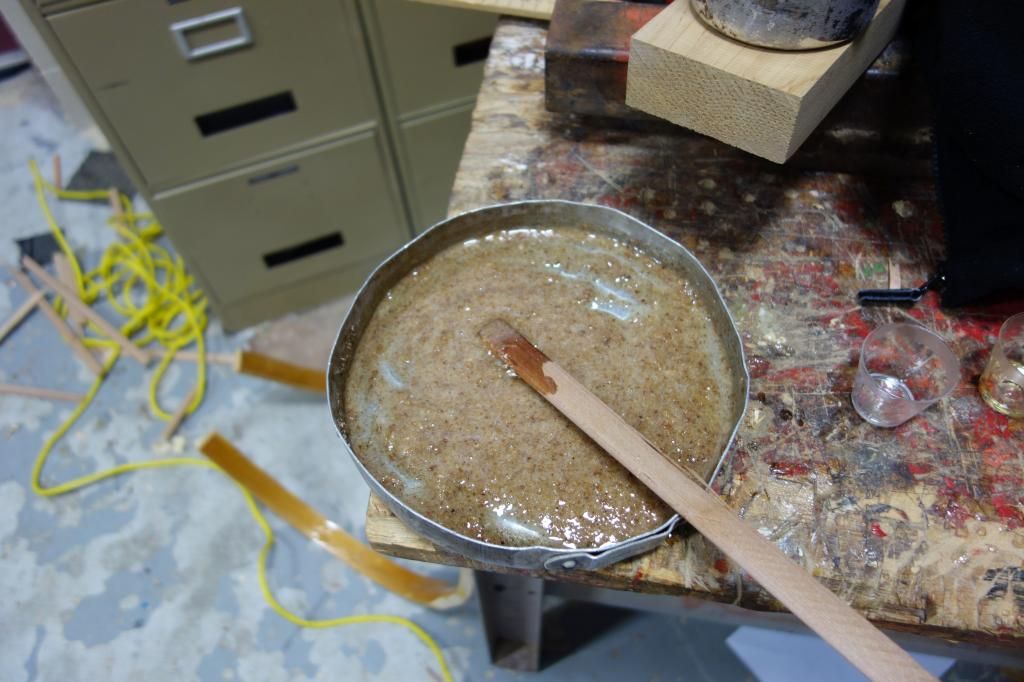
Anyway, I thicken the epoxy with sawdust I grab from the collection bin, I haven't spent money on epoxy thickeners, ever. The sawdust impregnated epoxy tends to fill all gaps and holes with something resembling the colour of wood. I put a coat of clear epoxy on both surfaces first, then slap the sawdust pudding on.
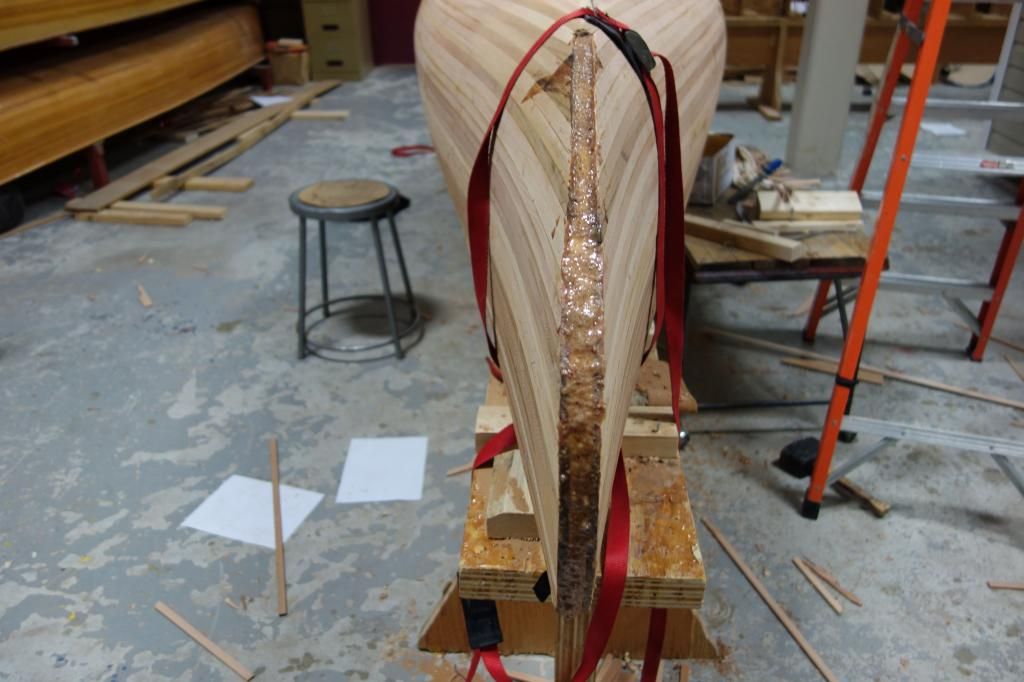
A couple of tie down straps and strategic screws and the outer stem is on.
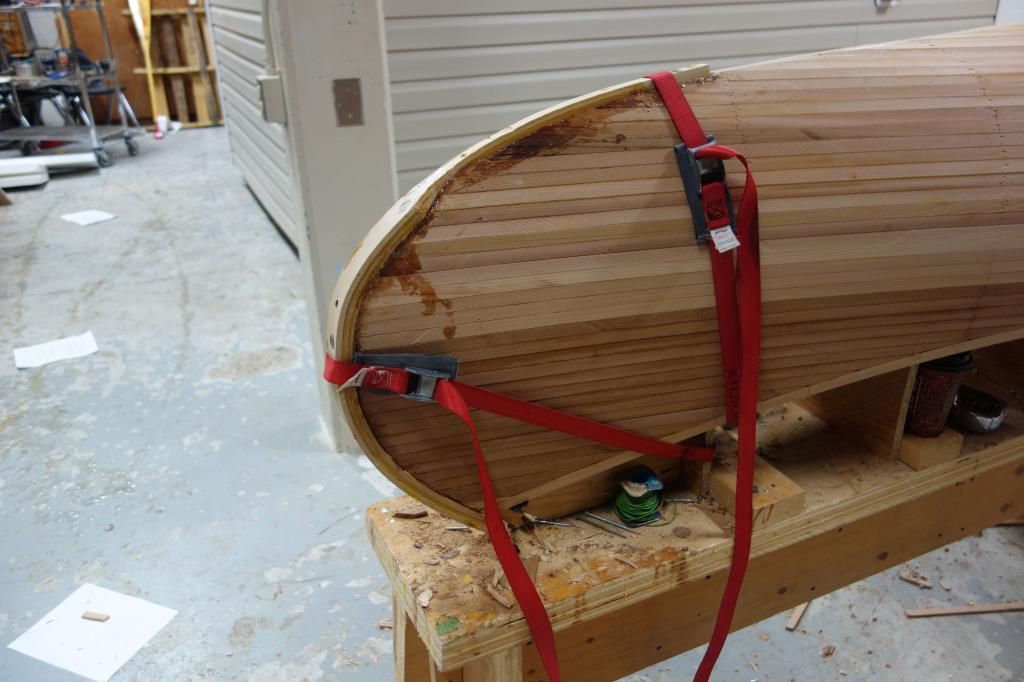
I think of this as the ugly stage of the canoe. It's rough looking with clunky stems and gaps and glue everywhere. Tomorrow if I get time, I will plane the stems fair and start sanding, start to transform the ugly duck into to something not so hard on the eyes.


Anyway, I thicken the epoxy with sawdust I grab from the collection bin, I haven't spent money on epoxy thickeners, ever. The sawdust impregnated epoxy tends to fill all gaps and holes with something resembling the colour of wood. I put a coat of clear epoxy on both surfaces first, then slap the sawdust pudding on.


A couple of tie down straps and strategic screws and the outer stem is on.

I think of this as the ugly stage of the canoe. It's rough looking with clunky stems and gaps and glue everywhere. Tomorrow if I get time, I will plane the stems fair and start sanding, start to transform the ugly duck into to something not so hard on the eyes.

Can't wait to see the finished product. Also can't wait for your review of the same. I hope it's the one you've been waiting for.
Similar threads
- Replies
- 42
- Views
- 3K
- Replies
- 170
- Views
- 13K
- Replies
- 90
- Views
- 14K
- Replies
- 13
- Views
- 2K