G
Guest
Guest
I stumbled onto this plan last night. Would you all consider this a canoe? Why or why not? It seems that it would make a durable if heavy boat.
This section is from the book "Woodworking For Beginners: A Manual for Amateurs", by Charles G. Wheeler.[h=1]Skiff Or Flat-Bottomed Canoe[/h]
This section is from the book "Woodworking For Beginners: A Manual for Amateurs", by Charles G. Wheeler.
A double-ended skiff, batteau, or flat-bottomed canoe (Fig. 426), known by various names, can be easily made by simply carrying the process already described a little further, and drawing the sides together at the stern as well as at the bow, thus forming a boat sharp at both ends. This is an excellent type for the amateur, whether in[COLOR=#009900 !important]the formof a small canoe or a quite good-sized boat for rowing, or even light sailing. Such a boat is light, easily propelled, buoyant, does not pound the waves when meeting them so much as thepunt, and the sharp stern is good when[COLOR=#009900 !important]running[/COLOR]before a sea.
 Fig. 426.
Before beginning work read carefullyMarking,Rule,Square, Saw,Plane,Nailing,Painting, inPart V., and look up any other references.
Care must be taken to select clear, straight-grained[COLOR=#009900 !important]stock[/COLOR], free from knots, checks, and other defects, and thoroughly dry.Pineis excellent, but almost any goodwoodcan be used for a boat of this sort.
The sides can be bent into place around a mould in the middle and brought together at both ends and two end-posts fitted. In other respects the process differs so little from the preceding that complete description is needless.
The two stem-pieces, which you can fit in the manner already shown, will, theoretically, be alike. Practically, there should not be more than a very trifling difference required in their[COLOR=#009900 !important]shape[/COLOR]. Having found theshapefor one, get the other out just like it. If it does not fit perfectly, it can be trimmed until it does fit; but if the first one fits right and the second fails to do so by more than a trifling degree, you had best look the boat over and verify your work, and you may find that you have cut something too long or too short or got something in the wrong place.[COLOR=#009900 !important]Paint[/COLOR]the ends of these sides where they will be in contact with the stem and stern with white lead.
The sides and ends can be put together as follows: Take either side, screw it securely to the stem-pieces at each end. Dip the screw points in white-leadpaint. Next screw either end of the other side to the corresponding stem-piece, which will leave the sides separated at an acute angle, with one end of one side not yet fastened to its corresponding bow- or stern-post. The ends being alike it does not matter which is called the bow or stern. To fasten this remainingjoint, it will be necessary to spring or bend the sides. If you have someone to help you, you can easily put the midship frame into position and bend the sides around it until the unfastened end comes into the correct position against the stem-piece, to which it can be held and screwed firmly. If you can get no help, you can hold the sides in position by using a rope doubled and inserting sticks at top and bottom by which the rope can be twisted and shortened (seeClamps).
Another way is to put a box orjoist, perhaps a couple of feet long, between the sides, to prevent making too much strain on the end fastenings, and, having secured the unfastened end, the frames can then be laid flat, the sides drawn farther apart, and the midship frame forced into position. The latter will be in position when it agrees with the lines previously drawn on the sides and when the bottom is flush with the inner corners of the lower edges of the sides.Nailthe sides to it with 1 3/4" or 2" nails, or it can finally be removed if not needed for stiffness.
The remaining details do not differ from those previously described. The rowlocks can be placed wherever desired in the way already described, but if the boat should be too narrow for this arrangement, they can be fastened to outriggers, which the blacksmith can easily contrive.
A flat-bottomed canoe can be made on this same principle, the only difference being to have less beam and to use a paddle or paddles instead of oars.
A very successful small canoe, suitable for quiet waters, can be made of quite thin wood (perhaps 3/8" to 1/2" in thickness), the outside being covered with canvas. In case of building so light a craft as this, however, it is best to insert regular ribs at distances of about a foot to give the necessary stiffness, and to lay the bottomboardslengthways. The ribs can be bought in any large town on the water, or you can fashion them yourself. Natural bends are always preferable, but you can make knees (on the general principle shown in Fig. 433) of straight-grainedstock, which, though clumsier and not so strong, will serve the purpose. Care must be taken in fastening on the bottom not to split either the bottom or the sides. But the canvas will be the main reliance in keeping the boat tight. The canvas can be put on in three pieces, first the sides, and then the bottom. Cover the sides down to the bottom and let the bottom piece lap up over the sides two or three inches and the edges be turned under. Stiffen the gunwale by a strip.
A light, removable board, or grating of slats, should be laid inside along the bottom, on the cross-frames.
If well made and kept well[COLOR=#009900 !important]painted[/COLOR]so as to protect the canvas from wear at the exposed points, a light canoe of this sort will last many years and be a very useful boat. It must be kept out of the water and under cover when not in use.
 Fig. 427.
A simple and cheap flat-bottomed canoe (Figs. 427 and 428), but not canvas-covered, is not difficult to make by the process already described. First make the frames and the stem- and stern-posts, then get out the sides. These parts are put together and then the bottom is put on, the well-hole coaming fitted, the boat decked, and finally the minor fittings added.
 Fig. 428.
First make the centre frame like Fig. 429, the bottom strip being of 7/8"stock, 1 1/4"deep, and the side pieces of 3/4" board. Screw the pieces together with two screws at each angle. Care must be taken to make this frame symmetrical or the boat will be onesided. You can draw the outline of the frame carefully on a piece of stiff brown paper, drawing a vertical centre line and measuring both ways for[COLOR=#009900 !important]accuracy[/COLOR]. Lay this pattern on the bench top, or on a smooth floor, and place the pieces for the frame on the drawing so that the outer edges just coincide with the outline of the drawing. Hold them firmly in position and screw the angles securely together.Tacka waste piece across near the top to help keep the frame inshapeuntil in position. Next get out two frames like Fig. 430, taking the dimensions from your plan, two more like Fig. 431, and two like Fig. 432.
 Fig. 429.
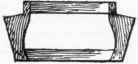 Fig. 430.
 Fig. 431.
 Fig. 432.
To make the stem- and stern-posts, take two pieces of joist, about 2" x 4" and of sufficient length, and with thechiseland saw cut arabbeton each side of each piece, on the principle shown in Fig. 424. Give these rabbets a good coat of white-leadpaint.
The sides are got out in the way already shown. On them mark the position for the centre mould. Insert and nail into place the two next largest frames, at the proper places, and so on until all are in position. All, except the centre one, will require to have their edges slightly bevelled with the plane to fit the sides. You can do this best as you put them in place.Paintthe edges of the frames with white lead before nailing them in position. Next fit pieces of \" board to form the coaming around the well-hole, and fasten them to the three middle frames. The details of this you can easily arrange for yourself. The general idea is expressed in Figs. 427 and 434.
Before proceeding further with the deck, thoroughlypaintthe whole of the inside of the boat with white lead, working it well into all the joints andcracks. After giving it a few days to dry, look the inside over carefully for any holes or defects to be stopped. After filling any there may be, give the entire inside another coat, working it well into all crevices as before. Do not neglect this part of the work, as it will not be easy to get at the inside (except in the middle) after the deck is put on.
On the middle of the deck[COLOR=#009900 !important]stretch[/COLOR]strips of 1/2" wood about 4" wide from the coaming of the well to the stem- and stern-posts, tapering the pieces as they approach the ends and resting them on the tops of the frames, to which they should be firmly nailed.
If you wish to sail, a stiff brace or thwart can be put in for the mast, with ablockfor a step.
One or more strips, 1"x1/2", can now be placed longitudinally on each side of the deck and nailed to the frames.
Additional deck-beams, running from gunwale to gunwale, and having the requisite arch or convexity, can be put in if needed. A few brackets can also be put under the deck, reaching from the sides to the coaming, if needed.
A keel about one inch square, or deeper at the centre, if desired, can be fitted along the entire length of the bottom. It had best be fastened on with screws. If your boat is to be used in deep water only, you can make the keel 3* or 4" deep in the middle, rockering it up towards the ends, and the boat can be sailed without a centre-board.
Cover the deck with canvas, fastened with small tacks to the coaming and to the sides. The edges of the canvas can be drawn down over the gunwale for about half an inch, the edge being finally covered by a gunwale strip screwed from stem- to stern-post. A piece of half-round |" moulding is good, although any small strip will do. Dampen the canvas and then give it at least two coats of paint. A wooden deck can be put on if preferred.
[/COLOR]
This book was published before 1936 (1899) which places it in the public domain.
I Was thinking of making one without a permanent deck. Maybe adding bows and a canvas deck later.
Before beginning work read carefullyMarking,Rule,Square, Saw,Plane,Nailing,Painting, inPart V., and look up any other references.
Care must be taken to select clear, straight-grained[COLOR=#009900 !important]stock[/COLOR], free from knots, checks, and other defects, and thoroughly dry.Pineis excellent, but almost any goodwoodcan be used for a boat of this sort.
The sides can be bent into place around a mould in the middle and brought together at both ends and two end-posts fitted. In other respects the process differs so little from the preceding that complete description is needless.
The two stem-pieces, which you can fit in the manner already shown, will, theoretically, be alike. Practically, there should not be more than a very trifling difference required in their[COLOR=#009900 !important]shape[/COLOR]. Having found theshapefor one, get the other out just like it. If it does not fit perfectly, it can be trimmed until it does fit; but if the first one fits right and the second fails to do so by more than a trifling degree, you had best look the boat over and verify your work, and you may find that you have cut something too long or too short or got something in the wrong place.[COLOR=#009900 !important]Paint[/COLOR]the ends of these sides where they will be in contact with the stem and stern with white lead.
The sides and ends can be put together as follows: Take either side, screw it securely to the stem-pieces at each end. Dip the screw points in white-leadpaint. Next screw either end of the other side to the corresponding stem-piece, which will leave the sides separated at an acute angle, with one end of one side not yet fastened to its corresponding bow- or stern-post. The ends being alike it does not matter which is called the bow or stern. To fasten this remainingjoint, it will be necessary to spring or bend the sides. If you have someone to help you, you can easily put the midship frame into position and bend the sides around it until the unfastened end comes into the correct position against the stem-piece, to which it can be held and screwed firmly. If you can get no help, you can hold the sides in position by using a rope doubled and inserting sticks at top and bottom by which the rope can be twisted and shortened (seeClamps).
Another way is to put a box orjoist, perhaps a couple of feet long, between the sides, to prevent making too much strain on the end fastenings, and, having secured the unfastened end, the frames can then be laid flat, the sides drawn farther apart, and the midship frame forced into position. The latter will be in position when it agrees with the lines previously drawn on the sides and when the bottom is flush with the inner corners of the lower edges of the sides.Nailthe sides to it with 1 3/4" or 2" nails, or it can finally be removed if not needed for stiffness.
The remaining details do not differ from those previously described. The rowlocks can be placed wherever desired in the way already described, but if the boat should be too narrow for this arrangement, they can be fastened to outriggers, which the blacksmith can easily contrive.
A flat-bottomed canoe can be made on this same principle, the only difference being to have less beam and to use a paddle or paddles instead of oars.
A very successful small canoe, suitable for quiet waters, can be made of quite thin wood (perhaps 3/8" to 1/2" in thickness), the outside being covered with canvas. In case of building so light a craft as this, however, it is best to insert regular ribs at distances of about a foot to give the necessary stiffness, and to lay the bottomboardslengthways. The ribs can be bought in any large town on the water, or you can fashion them yourself. Natural bends are always preferable, but you can make knees (on the general principle shown in Fig. 433) of straight-grainedstock, which, though clumsier and not so strong, will serve the purpose. Care must be taken in fastening on the bottom not to split either the bottom or the sides. But the canvas will be the main reliance in keeping the boat tight. The canvas can be put on in three pieces, first the sides, and then the bottom. Cover the sides down to the bottom and let the bottom piece lap up over the sides two or three inches and the edges be turned under. Stiffen the gunwale by a strip.
A light, removable board, or grating of slats, should be laid inside along the bottom, on the cross-frames.
If well made and kept well[COLOR=#009900 !important]painted[/COLOR]so as to protect the canvas from wear at the exposed points, a light canoe of this sort will last many years and be a very useful boat. It must be kept out of the water and under cover when not in use.
A simple and cheap flat-bottomed canoe (Figs. 427 and 428), but not canvas-covered, is not difficult to make by the process already described. First make the frames and the stem- and stern-posts, then get out the sides. These parts are put together and then the bottom is put on, the well-hole coaming fitted, the boat decked, and finally the minor fittings added.
First make the centre frame like Fig. 429, the bottom strip being of 7/8"stock, 1 1/4"deep, and the side pieces of 3/4" board. Screw the pieces together with two screws at each angle. Care must be taken to make this frame symmetrical or the boat will be onesided. You can draw the outline of the frame carefully on a piece of stiff brown paper, drawing a vertical centre line and measuring both ways for[COLOR=#009900 !important]accuracy[/COLOR]. Lay this pattern on the bench top, or on a smooth floor, and place the pieces for the frame on the drawing so that the outer edges just coincide with the outline of the drawing. Hold them firmly in position and screw the angles securely together.Tacka waste piece across near the top to help keep the frame inshapeuntil in position. Next get out two frames like Fig. 430, taking the dimensions from your plan, two more like Fig. 431, and two like Fig. 432.
To make the stem- and stern-posts, take two pieces of joist, about 2" x 4" and of sufficient length, and with thechiseland saw cut arabbeton each side of each piece, on the principle shown in Fig. 424. Give these rabbets a good coat of white-leadpaint.
The sides are got out in the way already shown. On them mark the position for the centre mould. Insert and nail into place the two next largest frames, at the proper places, and so on until all are in position. All, except the centre one, will require to have their edges slightly bevelled with the plane to fit the sides. You can do this best as you put them in place.Paintthe edges of the frames with white lead before nailing them in position. Next fit pieces of \" board to form the coaming around the well-hole, and fasten them to the three middle frames. The details of this you can easily arrange for yourself. The general idea is expressed in Figs. 427 and 434.
Before proceeding further with the deck, thoroughlypaintthe whole of the inside of the boat with white lead, working it well into all the joints andcracks. After giving it a few days to dry, look the inside over carefully for any holes or defects to be stopped. After filling any there may be, give the entire inside another coat, working it well into all crevices as before. Do not neglect this part of the work, as it will not be easy to get at the inside (except in the middle) after the deck is put on.
On the middle of the deck[COLOR=#009900 !important]stretch[/COLOR]strips of 1/2" wood about 4" wide from the coaming of the well to the stem- and stern-posts, tapering the pieces as they approach the ends and resting them on the tops of the frames, to which they should be firmly nailed.
If you wish to sail, a stiff brace or thwart can be put in for the mast, with ablockfor a step.
One or more strips, 1"x1/2", can now be placed longitudinally on each side of the deck and nailed to the frames.
Additional deck-beams, running from gunwale to gunwale, and having the requisite arch or convexity, can be put in if needed. A few brackets can also be put under the deck, reaching from the sides to the coaming, if needed.
A keel about one inch square, or deeper at the centre, if desired, can be fitted along the entire length of the bottom. It had best be fastened on with screws. If your boat is to be used in deep water only, you can make the keel 3* or 4" deep in the middle, rockering it up towards the ends, and the boat can be sailed without a centre-board.
Cover the deck with canvas, fastened with small tacks to the coaming and to the sides. The edges of the canvas can be drawn down over the gunwale for about half an inch, the edge being finally covered by a gunwale strip screwed from stem- to stern-post. A piece of half-round |" moulding is good, although any small strip will do. Dampen the canvas and then give it at least two coats of paint. A wooden deck can be put on if preferred.
[/COLOR]
This book was published before 1936 (1899) which places it in the public domain.