-
Happy National Sunglasses Day! ☀️🕶️😎
You are using an out of date browser. It may not display this or other websites correctly.
You should upgrade or use an alternative browser.
You should upgrade or use an alternative browser.
Cedar Strip Build "The Experiment"
- Thread starter sailsman63
- Start date
No Title
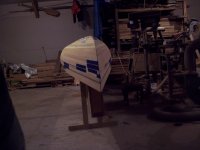
Sorry about the delay! was planning on posting earlier this week. Things are going a little slower since I realized there was no way I would make it to the water this season. Details of the sanding kept getting to me, Thought I was done and would have to go back over something.
Should be ready to glass, though, assuming that the shop is warm enough tomorrow & other stuff gets done.
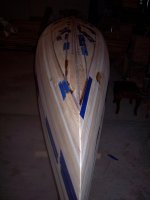
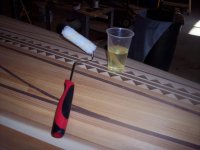
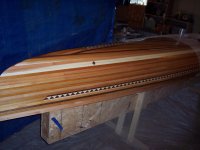
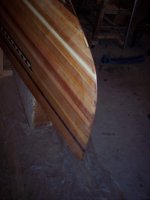
Pics of my last fill pass, the stems, and rough-trimmed glass. Looking like a real canoe.
Last pic is my intended layup.
- Inner reinforcement bias cut on the stem
- one layer of 6 oz laid straight.
- two rub layers, just near the ends, bias cut.
I'm going to saturate the strips with SystemThree Clearcoat (water thin) and then lay the inner bit and the main layer while it is still wet, saturate with silvertip.
Question: would I get better results with laying the rub layers in the same layup, or should I let the big bit green cure, and then use the tape trick?
Off to work, maybe more later.
Sorry about the delay! was planning on posting earlier this week. Things are going a little slower since I realized there was no way I would make it to the water this season. Details of the sanding kept getting to me, Thought I was done and would have to go back over something.
Should be ready to glass, though, assuming that the shop is warm enough tomorrow & other stuff gets done.
Pics of my last fill pass, the stems, and rough-trimmed glass. Looking like a real canoe.
Last pic is my intended layup.
- Inner reinforcement bias cut on the stem
- one layer of 6 oz laid straight.
- two rub layers, just near the ends, bias cut.
I'm going to saturate the strips with SystemThree Clearcoat (water thin) and then lay the inner bit and the main layer while it is still wet, saturate with silvertip.
Question: would I get better results with laying the rub layers in the same layup, or should I let the big bit green cure, and then use the tape trick?
Off to work, maybe more later.
Attachments

I have had better luck, putting the bias strips over the main cloth. When done, you can feather the edges, without scraping, or sanding into the main cloth layer.
I put the widest bias strip on first. This tends to make them invisible. I've goofed up enough over the years !
Good luck ! And have everything lined up before mixing that first batch .
Jim
I put the widest bias strip on first. This tends to make them invisible. I've goofed up enough over the years !
Good luck ! And have everything lined up before mixing that first batch .
Jim
I'd be a little leery of laying out the full layer over wet epoxy. Not saying it can't be done but it makes it a lot more difficult to get it properly positioned and smoothed out. I don't know how much fiberglassing experience you have so maybe you're comfortable with that.
I bury my extra reinforcements at the stems, assuming they're the same material as the rest of the hull is getting, and usually wet everything out at the same time. Wetting out two, and even three, layers of fiberglass at once isn't that big of a deal. Just lay it on heavy and give it time to absorb into all the layers before taking off the excess with a squeegee. This lets you place all the cloth when it's dry and easy to move around. Once in a while the bottom layer will pick up a small wrinkle. Just pull back the top layer enough to give the bottom layer a little tug. Not a big deal.
Another option is to wet out the main layer and as you get to the stems pull it back enough to place your reinforcement layers. Wet them out and then lay the main cloth back over top. By this time the majority of the cloth is wetted out and "stuck" to the hull and straightening out that last little bit of cloth at the stems isn't very hard.
Alan
I'd put the rub strips on in the same layup. It's easy to feather the edges once its all cured. You'll be stressed for the whole layup, but the rub strips become a nice cap to the job. You'll feel better to have it done all at once instead of waiting.
Been a while since I've done a layup, so experience is in short supply. If any of the following seems off to you, let me know:
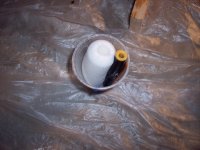
On thing that I've sort of been counting on is the clearcoat stuff seems to have a very long open time. Back in mid-summer, I had 6 oz mixed in a cup (With some cabosil) and it sat for over 20 min without kicking off. Thick paste filler made with the stuff is still spatula-workable a couple of hours later, if spread out into small batches (like the photo above) Is part of this due to the fact that I had filled it? Or can I count on that open time to be similar with pure resin?
The intent here is to have the strips soaked as deeply as possible, but still have a chemical level bond with the thicker resin I'll use for the cloth wet out. Silvertip is not the best thing for right-on-wood coating, but it saturates cloth well.
Once I add some silvertip, I expect that to kick off faster, but I will probably be at the lower edge of working temp, even there, so not all that fast.
I think that I want the abrasion strips on the outside, so that if they... get abraded... I'll still have a full intact layer to work with.
Jim Dodd That one strip, if I put it in first, is going to be well and truly buried, with the rest overlaying it by a fair amount.
Muskrat I would not have thought that feathering would be easy, but when I was cutting the glass (have it all laid out, in order of use) I noticed that Bias cut edges, or even a slight angle off of straight, are a lot less mess than the lengthwise/crosswise edges.
Now I'm getting a little scared. This would also be my first attempt at a glass layup solo. No handy family to make things easier... and that knuckle will need special attention.
Do you guys usually start at one end, or the middle? I see advantages to each.
"Do you guys usually start at one end, or the middle? I see advantages to each."
I have no where near the experience as most here but in the 3 wood / glass kayak kits I assembled, the instructions always say start in the middle. I think it keeps the glass aligned on the boat, I can see starting at the end and having the glass creep one way or the other as you are applying the epoxy. This may not be a problem if you already have the wet epoxy fill coat on first though as the glass will stick to that. I did read that you will be applying the glass to the still wet fill coat right?
Jason
You always need to start amidship and work your way towards the stems, as you also spread out from keel to sheer line. The goal is to work any wrinkles, folds, etc towards the free end (stems) of the hull. Working from one end only forces you work the cloth in a diverging, then converging fashion...not the most desirable method.
No matter how careful you may be in laying the cloth on the hull, it invariably wiggles around during wet out. So much easier to work this movement toward the stems.
Also, I generally put a seal coat of resin on the hull and let it cure for a day, before laying on the cloth. I have done wet outs without a seal coat, but there is always the danger of the wood sucking the resin out of the cloth. This would result in a weak laminate and possibly a not crystal clear laminate.
Better for you that resin will be slow to kick, working alone can be tough. Just be sure to have all of your supplies on hand ahead of time.
And I wouldn't sweat the knuckle, it will be easier than you may think. My Kite has a very prominent knuckle and was a complete non issue during wet out.
Thanks for the thoughts, guys. Must have been a bit tired last night, I see exactly what you are saying with not working end to end. I'll be thinking a bit about trying to let the seam coat set. I have had some resin starvation issues in the past, once I also tried sanding while too green. Would like to avoid that this time.
One of the things that may push me into laying on wet sealcoat is that I have a 20 mile drive to the shop, and can't get out there every day. If I don't lay glass the same day, the sealcoat will be way past green cure...
One of the things that may push me into laying on wet sealcoat is that I have a 20 mile drive to the shop, and can't get out there every day. If I don't lay glass the same day, the sealcoat will be way past green cure...
Good advice ! I'm with Stripper guy.
I've never laid cloth on wet epoxy. But I've watched Dennis Davidson do it in his shop. He is using a different resin, than what you have. I used to use System Three's Clear Coat, and loved it. It has a decent pot life also. Just got too expensive.
If you choose to seal coat, and I do, as soon as it's cured past the tacky stage, with a gloved hand. Go over the surface. Any speck of dust or imperfections you feel, scrape with a razor blade ! If you don't these will lift your cloth, and you will not be happy with the results ! ! Once you are satisfied with the seal coat, lay on your cloth. I've never experienced any bonding issues doing it in this manner
Good luck ! Wish I was there to lend a hand !
On my next build, I'm NOT going to seal coat. That's if I don't have any voids. It will save resin, and weight. The only drawback, is those staple holes WILL suck the resin. I'll have to fill them first.
Jim
If you check the specs for system three epoxies, you might be surprised at the safe times for re-applying coats. Most system three stuff has a 72 hour re-application "OK" window. So if you put your Clear Coat down, you can come back the next day and reapply. I often take two or three days to fiberglass if I use three fill coats. Putting a full sheet of glass on a hull where the resin is still green could prove to be fairly frustrating.
If you check the specs for system three epoxies, you might be surprised at the safe times for re-applying coats. Most system three stuff has a 72 hour re-application "OK" window. So if you put your Clear Coat down, you can come back the next day and reapply.
I always felt the less time you delayed, the better. I sealcoat, and in less than 8 hours, I'm wetting out cloth. Temperature in which you are working, varies cure time greatly. I always loved applying when it was 90 degrees.
After you have the first wet out coat, allow that to set at this time of year, 12hrs or so. But when you the start the fill coats, I'd wait no more than an hour or two between coats. You will find if the previous coat is still tacky, it will hold the resin a lot better, eliminating runs. And resin RUNS can be a lot of extra work !
You need to stay with it ! I usually get up two times in the middle of the night to apply fill coats!
Again I wish I was there !
Good luck !
Jim
No Title
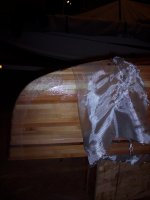
Jim Dodd You asked to see the wet out?")
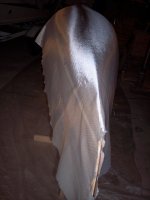
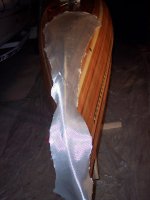
Ended up going with a bit of a hybrid approach to the wet-out.
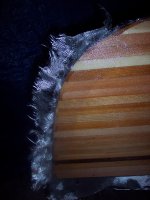
The bias strips that I put in the ends, under the main layer, laid beautifully. Instead of trying to fold the glass end under itself (something that has not gone well on my other builds) I let it do this mohawk thing. I'll give it a trim, then lay the rub plates over the top.
The foam roller worked well. It seemed to work resin through the glass, better than a squeegee ever did, and it didn't try to drag the cloth around, the way a squeegee tends too. In another thread, someone said that they squeegee after rolling to remove excess resin. I tried a little bit, as I had a couple of points that needed more personal attention, but I did not seem to be able to pull more than a very little bit of resin out.
Has anyone else had issues with a foam roller cover falling apart during an epoxy session? Mine sort of disintegrated, I'll not be making a grooved roller out of it, the way I saw in another thread... there is not enough of the roller left.
Figure that with the current weather and environment in my workspace, I'll be able to do a couple of fill coats Wednesday, and the base will still be in very late tack, or more likely partway through the green stage. Before you say that contradicts my comment about why I didn't wait for the wet-out:
Jim Dodd You asked to see the wet out?
Ended up going with a bit of a hybrid approach to the wet-out.
- Skim coat the bare hull with clearcoat. Took about 400 ml. The fabric roller came with the roller frame, so I thought it could work for this part. Save a foam roller for later.
- Let that sit for lunch and a run. maybe two hour in all. It absorbed really well into the cedar. You might not be able to see in the pics, but the early-wood, especially, drank it all. Still very flow-ey, though the viscosity was higher than fresh.
- Since the last was to allow the cedar a head start on absorbing resin, rather than to create any sort of barrier coat, I took a deep breath, and laid glass on wet epoxy. (Sorry, Not interested in sanding a seal coat, and was not certain I would be able to schedule to get back to it at the better stages of tacky)
- Used Silvertip for the actual wet-out. I wish I had bought more clearcoat, as that stuff handles like a dream, but the Silvertip certainly works, and will be a better fill layer. Guessing about 1200-1300 ml here, almost a quart and a half. 6oz glass.
- Did not put the rub plates on the ends, It was taking a while, and I figured that it wouldn't hurt to have them somewhat separated from the main layer, in terms of structure. Muskrat
The bias strips that I put in the ends, under the main layer, laid beautifully. Instead of trying to fold the glass end under itself (something that has not gone well on my other builds) I let it do this mohawk thing. I'll give it a trim, then lay the rub plates over the top.
The foam roller worked well. It seemed to work resin through the glass, better than a squeegee ever did, and it didn't try to drag the cloth around, the way a squeegee tends too. In another thread, someone said that they squeegee after rolling to remove excess resin. I tried a little bit, as I had a couple of points that needed more personal attention, but I did not seem to be able to pull more than a very little bit of resin out.
Has anyone else had issues with a foam roller cover falling apart during an epoxy session? Mine sort of disintegrated, I'll not be making a grooved roller out of it, the way I saw in another thread... there is not enough of the roller left.
Figure that with the current weather and environment in my workspace, I'll be able to do a couple of fill coats Wednesday, and the base will still be in very late tack, or more likely partway through the green stage. Before you say that contradicts my comment about why I didn't wait for the wet-out:
- I'll have time for the fill coats, not so sure I would have been able to do a full wet-out.
- If I had wet out Wednesday, I definitely would not have gotten back to it until it was hard-cured.
Attachments
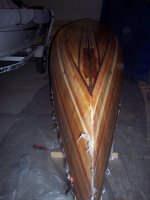
Looks great! People tend to get pretty anxious about fiberglassing, but with products like System 3, as long as you are mixing at the correct ratio, it's pretty difficult to mess it up. I have used clear coat as my main wet out resin for years. Silver tip is a great fill coat too, better than the general purpose. I also use clear coat on my trim as the seal coat, before I put varnish.
Very pretty canoe!
Very pretty canoe!
G
Guest
Guest
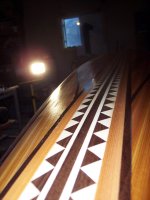
Nice Feature strip. The epoxy really brings it to life !
I use the "cigar" type foam rollers, and haven't had trouble with RAKA stuff. But Epoxies vary in the chemical make up, and cheap foam is a curse!
How many bias strips did you put on each end ?
Good luck with your fill coats ! Give us another update when you're done.
Jim
I use the "cigar" type foam rollers, and haven't had trouble with RAKA stuff. But Epoxies vary in the chemical make up, and cheap foam is a curse!
How many bias strips did you put on each end ?
Good luck with your fill coats ! Give us another update when you're done.
Jim
No Title
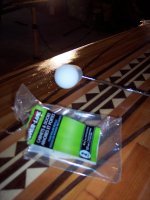
Well, my rollers are the same brand that My local Yellow-Smiley-Place carries, so that makes sense. Happened again! the foam... detaches from the hard plastic bearing core. Pic included. I usually do my solo contemplating when away from the shop, so my best use of shop help is to bounce my musings off of them. My Dad, Brother and I all approach projects from different angles, and the fusion solutions that result from cooperating are usually superior to anyone's first attempt.
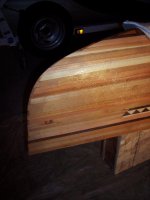
Got two fill coats in, before I ran out of time Wednesday. Second went on when the first was still tacky enough to take a fingerprint. I'm of the school of thought that believes that the high parts of the weave also pick up some resin in the fill stages, so a sanding session after a couple of fills is a good thing. Just enough to knock the tops off the resin, not into glass.
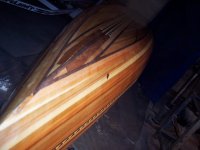
Also laid in a second layer of bias cut on the ends, more of a partial football thing.
Jim Dodd One layer under the main glass, now this wide abrasion strip. May add a slimmer rub strip later, if I decide I need it. Just for perspective, this is the first time I have done anything other than fold the ends over/under.
Resin use was Higher than I expected. In all, I used another 600ml of resin to place two skim coats, and wet about a square yard of 6 oz glass. does this seem wrong to anyone? Looking at the resin I have left, I will definitely be using clearcoat resin to saturate the inside layup.
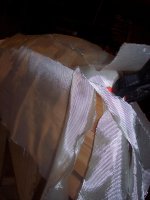
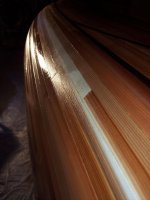
Also have an odd bit of... something... in the layup. There appears an area that seems to have saturated deeper in the cedar than surrounding. I'll tag the pic, as the camera emphasizes it more obviously than when seen with the naked eye, but remember that this whole hull was saturation coated, then allowed to gel before I laid glass...
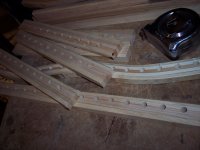
between fill coats, I worked on seats a bit. Frames are trimmed, and started placing holes for the lacing. 1" spacing, Seats are 12"X18"
I have, especially with cheapo WallyWorld or Harbor Freight foam rollers.
And sometimes less is more. Sometimes I just need to sit and stare at some shop puzzle, contemplate, mock something up, discard that solution, take a break, come back and look at it with a fresh beer.
Sometimes slow is good.
Well, my rollers are the same brand that My local Yellow-Smiley-Place carries, so that makes sense. Happened again! the foam... detaches from the hard plastic bearing core. Pic included. I usually do my solo contemplating when away from the shop, so my best use of shop help is to bounce my musings off of them. My Dad, Brother and I all approach projects from different angles, and the fusion solutions that result from cooperating are usually superior to anyone's first attempt.
Got two fill coats in, before I ran out of time Wednesday. Second went on when the first was still tacky enough to take a fingerprint. I'm of the school of thought that believes that the high parts of the weave also pick up some resin in the fill stages, so a sanding session after a couple of fills is a good thing. Just enough to knock the tops off the resin, not into glass.
Also laid in a second layer of bias cut on the ends, more of a partial football thing.
Jim Dodd One layer under the main glass, now this wide abrasion strip. May add a slimmer rub strip later, if I decide I need it. Just for perspective, this is the first time I have done anything other than fold the ends over/under.
Resin use was Higher than I expected. In all, I used another 600ml of resin to place two skim coats, and wet about a square yard of 6 oz glass. does this seem wrong to anyone? Looking at the resin I have left, I will definitely be using clearcoat resin to saturate the inside layup.
Also have an odd bit of... something... in the layup. There appears an area that seems to have saturated deeper in the cedar than surrounding. I'll tag the pic, as the camera emphasizes it more obviously than when seen with the naked eye, but remember that this whole hull was saturation coated, then allowed to gel before I laid glass...
between fill coats, I worked on seats a bit. Frames are trimmed, and started placing holes for the lacing. 1" spacing, Seats are 12"X18"
Attachments
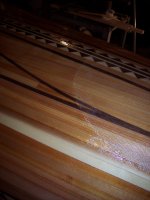
Also have an odd bit of... something... in the layup. There appears an area that seems to have saturated deeper in the cedar than surrounding. I'll tag the pic, as the camera emphasizes it more obviously than when seen with the naked eye, but remember that this whole hull was saturation coated, then allowed to gel before I laid glass...
I believe you answered your own question. It appears you allowed that resin to run, when you should have hit it with a roller.
Jim
I believe you answered your own question. It appears you allowed that resin to run, when you should have hit it with a roller.
Jim
Not sure what caused your 'run'. When using a roller it's sometimes easy to get a thick line along the edge when pressing hard, perhaps something like that. Either way I doubt it will be noticeable when you're done.
Isn't that the truth. More than once I've only noticed things when reviewing the pictures. Usually I have to walk back to the shop to verify if they're actually real or an optical illusion. Most often they're real.
The boat is really looking nice. Very attractive design and it looks like you're getting a nice finish so far. Are you getting pretty anxious to flip it over?
Alan
the camera emphasizes it more obviously than when seen with the naked eye
Isn't that the truth. More than once I've only noticed things when reviewing the pictures. Usually I have to walk back to the shop to verify if they're actually real or an optical illusion. Most often they're real.
The boat is really looking nice. Very attractive design and it looks like you're getting a nice finish so far. Are you getting pretty anxious to flip it over?
Alan
Similar threads
- Replies
- 170
- Views
- 13K
- Replies
- 42
- Views
- 3K
- Replies
- 34
- Views
- 3K