• Happy Marine Mammal Rescue Day! 🐳🐬🦭🦦

Cedar Strip Build "The Experiment"

No Title

Nearly two weeks. Been busy IRL, so not so much canoe work.

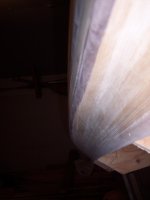
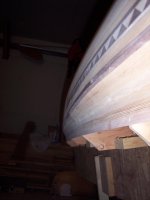
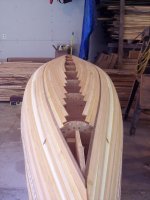
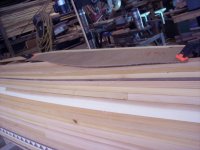
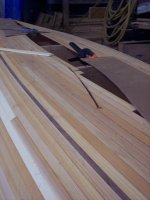
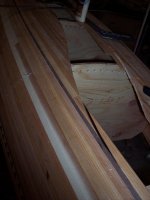
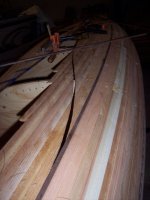
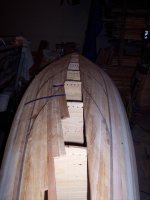
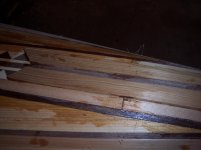
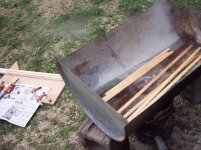
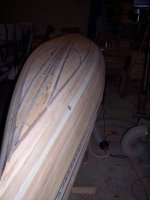
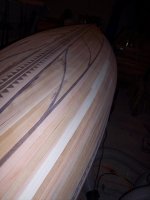
Did get most of the stripping done, and have pulled all the fishline. Boy, she is starting to look like a canoe! still have a hole in the bottom, as I have something special planned there.

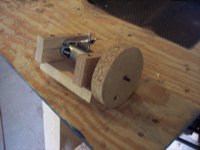
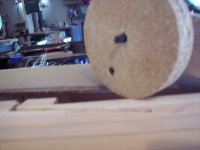
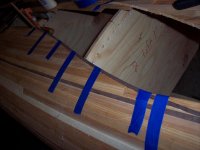
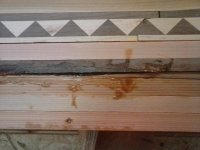
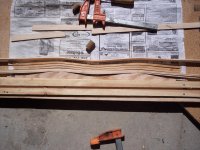
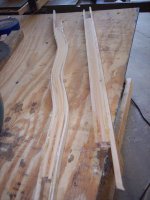
But first, I have one more thing to do to the part of bottom that I have already stripped. Got templates and a router jig (real router is way too powerful/awkward for this job, as I found out the hard way.)

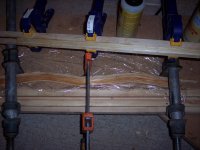
Cutting this slot is not going well. I think part of the issue is that my router bit is very dull. (need to replace)
The idea is that I then slip in a 1/4" walnut strip, and presto! pretty pattern. Any other thoughts on how to cut such a slot? I really don't want to give up that design element.

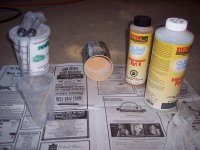
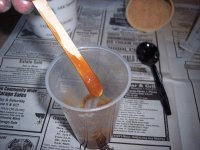
Also did a test glue-up with my first bit of Cabosil, just to see how it would handle. That stuff is going to be handy! The container says "Strength: Good, Sanding: Poor." Is this something I have to watch out for? Will I be able to sand squeeze-out and drips?
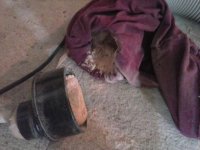
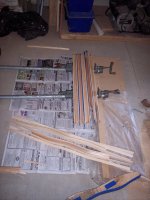
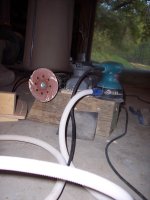
 

Attachments

  • photo2670.jpg
    photo2670.jpg
    245 KB · Views: 0
  • photo2671.jpg
    photo2671.jpg
    224.7 KB · Views: 0
  • photo2672.jpg
    photo2672.jpg
    223.4 KB · Views: 0
  • photo2673.jpg
    photo2673.jpg
    173.8 KB · Views: 0
  • photo2674.jpg
    photo2674.jpg
    227.4 KB · Views: 0
Looks good. It's always fun to see different ideas and patterns surface !

You won't have any trouble sanding the Cabosil. I mix in some ground glass, for a little extra strength, and wood dust for color.

Your router rig looks cool. Hope you can get a smoother cut. I tend to favor hand cutting center lines and shearlines. If you can find a fine tooth keyhole saw, that might be safer, as far as splintering strips.

How did you like the fish line method ? I've used staples all my life, but that fish line method intrigues me !

Jim
 
Jim Dodd Thanks for the info.

I'm less enamored of the fishline method than I was when I started this build.

Pros:
- Fastenerless.
- Holds on to the hull even once you start fairing the outside. The only way I'm able to work on the bare hull with that center still unfilled is the dozens of fishline loops that are stuck in the gluelines, holding the strips onto the forms.
- I believe that it is faster than other fastenerless systems that I have seen.

Cons:
- Time. You need to cinch down each line, and this is not as fast a grabbing a staple gun, or even tacking in a brad.
- Takes a fair amount of force , and you then need to hold the tension on the line while tying off. (I use a couple of tight wraps, and then a half hitch. If you do it right, the line will bite on itself as it tries to spring back to is normal length.) I have managed to break 20# test line from over-tension. This was with 1/4" strips. If you're doing ultralight, you will have less issue there. Calluses on the hands are handy for this part.
- Re-setting attachment points/adding line is rather annoying.

Overall, I really am trying to think of a better way to do this, but it works for now. If you do not consider fastener scars to be a defect, stick with staples or brads.


I probably could use a fine saw to get a nice fair curve, but I don't think I could do two parallel ones at exactly 1/4" apart, unless you have a trick for that as well?
 
The one we have built, we put the cove of the strip up, which eased putting down the glue, but also allowed having a 1/4" dowel in the cove then used fibre tape wrapped around the hull to pull the strips tight. Less fussy than fishing line and more than adequate to hold the strips in place. After the glue sets, pull the tape, set aside and lay down more strips, re-use the tape until it won't readily stick anymore then replace. For one boat, one roll of tape was sufficient. No fugly fastener holes in the strips either. Having a groove routed into the mold stations allowed using spring clamps to hold the strips to the molds as well.
 
I use tape on my builds as well, it works well but you have to get the green 3m tape. It extra sticky and has some stretch so it keeps squeezing the joint while its drying. I use hot glue to hold and plywood to hold everything to the forms.

Good luck routing the 1/4" groove. I probably would have stripped one side,cut the pattern then tape a 1/4" spacer in place and stop the other side up to it. For where you are at now, I'd make a fully captured pattern out of 3/4 ply. Then set up a laminate router with a3/16 bit and a guide bushing. That way you can cut one side at a time cutting both sides at onc will not work. I think you'll have problems with the router though any little wobble will cause divots in your cedar. I think I'd rough cry with a razor saw and pare to the line continuously checking width with a piece of 1/4" scrap. Good luck! It will take a while, go slow.
 
Just read my post, i should have said "if I were to use a router I'd make a fully captured template..." My real recommendation is to cut it by hand.
 
Been away from the canoe for a bit - Real Life (tm) got in the way.

I probably would have stripped one side,cut the pattern then tape a 1/4" spacer in place and stop the other side up to it... I'd rough cry with a razor saw and pare to the line continuously checking width with a piece of 1/4" scrap. Good luck! It will take a while, go slow.

The first bit is specifically what I'm intending to avoid. Been there, done that. Not doing again. I'm also thinking hand cut is... not going to do well. I always end up over-cutting the wrong part. I'm going to try my mini-rig again with a sharp bit (the one I had was a lot duller than I'd realized. It was pulling down the RPM on a 1/3HP router, just trying to move through the strips.) If that does not work well - then I'll revisit. Have a little bit to patch anyway.

A captured template sounds good, but I'd need four of them, and the template rig. Never used one before, and it would probably not get any other uses.

So far, it sounds like everyone who uses tape waits for the glue to set before moving it, and makes other arrangements for holding on to the frames. Might have a way around that, but I'll have to experiment.
 
No Title

Made a bit of progress this week.

​First: wysedav was right. A new router bit cut a lot faster, but still did not like the downhill side of the cut. I pulled out the strips in that spot, and patched back. Cut just one side by hand, and laid my accent strip.

Then I cut the next two by hand, using a 1/8" bit to break it open (none of the saws I have would work well here) and then paring with a chisel. Figure it takes 30 min to cut one 1/4" groove. Not as quick as I had originally hoped, but I think still better than building up, setting the accent, then butting the next set of strips to match.

For future, a captured template sounds good, IF:
- you can make one that twists around the hull. (the outer end of that accent is 45 deg. off horizontal)
- you can line it up precisely enough.

Decided to play with some thickened epoxy, both to fill some gaps, and to get a feel for how this Cabosil stuff handles.

For that, I needed some cedar dust. Did I mention that one of the advantages of the fishline method is I can work on the outside of most of the hull while it is still tied down? Thanks to Alan Gage for pointing out that a vacuum on a RO sander picks up most of the dust. How did I live without that? The Cabosil, as advertised, made for a smoother handling paste than just sanding dust.

Questions for the guys that are more used to Cabosil:

- Is it normal for the stuff to have some clumps that need to be stirred very well to break up?
- I've heard the consistency called "Peanut Butter." Mine sure looked like peanut butter, but I thought it handled more like stiff-ish whipped cream. Could I have used more thickening?
- Any known way to get a "blonder" color, closer to the color of cedar sapwood or maple? the Peanut Butter is not a good match for everything.
 

Attachments

  • photo2764.jpg
    photo2764.jpg
    292 KB · Views: 0
  • photo2765.jpg
    photo2765.jpg
    223.9 KB · Views: 1
  • photo2766.jpg
    photo2766.jpg
    240.5 KB · Views: 1
  • photo2767.jpg
    photo2767.jpg
    288.9 KB · Views: 1
  • photo2768.jpg
    photo2768.jpg
    255.4 KB · Views: 1
  • photo2769.jpg
    photo2769.jpg
    292.5 KB · Views: 1
  • photo2770.jpg
    photo2770.jpg
    275.4 KB · Views: 1
  • photo2771.jpg
    photo2771.jpg
    353.8 KB · Views: 0
No Title

Okay, Okay. I have been working on this canoe, just not posting. Some of the bits and pieces are just taking forever.

Got all the strips done, and now should be ready to sand. Due to some weirdness with how the stem area is shaped, I'll still have to add a bit of material from the inside. Floatation bulkheads, here I come! (Not looking forward to what the inside of the stems will look like) I'll take a picture when it's done, just could not get strips to lay in place.

Also, laid up the front member of one of the seats. Decided I wanted a little shaping to it, so another experiment. The one you see in the pics is not going to be used, I built a replacement that turned out much better. Will picture next time. Its a sandwich of maple and cedar, and the long dimension of the cross section is going to be vertical. (Think 2x4 sitting on the 2" edge) Section 5/8" x 1 1/4" Three 1/8" Maple, to give a hard surface when I round off that top edge, then 3 1/4" Cedar, light beam thickness spacing, then another 1/8" Maple, tension member and hard surface. Once the sandwich cools, and dries a bit, I'll take it apart. Eventually, it will be laminated with thickened epoxy. I probably could have dry-bent & laminated that way, But it would have taken more force than I wanted to apply.

I also experimented with a lighter filler. Got myself some pure maple sanding dust. The filler did turn out lighter, will merge much better with cedar strips, but still not as light as I had hoped. SystemThree Clearcoat resin also takes Forever to tack up, I'm wondering if it dislikes the high humidity that we have been having. (80-95%) Any thoughts on getting an even lighter filler? If done with just cabosil, it seems to be mostly clear, and have light disappear into the joint, showing blackish.
 

Attachments

  • photo2929.jpg
    photo2929.jpg
    237.1 KB · Views: 2
  • photo2930.jpg
    photo2930.jpg
    226.3 KB · Views: 2
  • photo2931.jpg
    photo2931.jpg
    235.6 KB · Views: 2
  • photo2932.jpg
    photo2932.jpg
    276.6 KB · Views: 2
  • photo2933.jpg
    photo2933.jpg
    272.7 KB · Views: 2
  • photo2934.jpg
    photo2934.jpg
    276 KB · Views: 2
The lightest weight filler is micro balloon fairing compound. You'll lose some strength and abrasion resistance compared to cabosil, but it should be as strong as the wood flour. It makes the epoxy white, so you'll still have to color it if that's an issue.

Edit: oops, read that wrong. I thought you're were talking about fillet density. Like Jim said, aspen would be lightly colored. You could try birch or balsa too.
 
Last edited:
Aspen should give you the lightest colored saw dust in a mix. At least in my experience.

Looks cool !

Jim
 
I'd recommend getting rid of the blue tape. Look for the green 3m high adhesion tape (not frog tape) It work great and has some stretch so it pulls the joints tight.
 
Sorry forgot to say the stripping pattern look great...that's a lot of work!!
 
wysedav Thanks. The taping is done, and I only used it for a little bit of the finish-up anyway. Blue seems to work well enough in limited amounts, as long as you don't need to re-use the same pieces...
 
No Title

Well, you've got a two-fer here. I got an extra day in, not a lot of accomplishment there, but finished filling in the ends. This required removing the end stations from the inside. Not the neatest job there, I'm afraid, but I'll put in a pair of bulkheads for flotation, and everything will be fine.

wysedav may notice that I'm showing a little flatsawn grain on the ends. It's the only thing that would fit in that space!

Doing a lot of sanding, and it's coming along. I normally use red resin coat, at about 60 grit. Tried something new, my supplier had some "Black Zirconium" that is supposed to stay sharp 3x longer & not load. (For a price bump) Got some in 50 (what they had other than 80/120) It doesn't seem to load, but then my red stuff isn't loading bad either, now that I have a dust collector connected directly to the RO Sander. (must get a pic next time - looks funny, but it works) OTOH, It's hard to be sure without a side-by-side test, but it feels like the red resin is lasting longer, even in terms of material removed. No surprise, but that hardest part is getting saw/burn marks off of my maple accents.

The more I see of this hull (getting down below, etc.) the less satisfied I am with how well the fishing line thing worked. It will do, but not what I had in mind. The last hull, I did not notice the same issues, but there I had other things showing from the bevels, and I think the lines on this one have found some creative new ways to torture cedar strips.

The only thing I have not been able to sand at all with the RO is the part that will be above the knuckle line. Have a different gadget for that, pic next time.

The seat frame project is going satisfactorily, the sample versions came out light and stiff. For scale, those samples are about 20" long for the cedar part (The maple over-runs rather longer. Still need to trim them.) I'll have to weigh the parts when finished, but much lighter than any all-hardwood frame. Only thing I changed was that top and bottom of the curved part are 2x 1/8" Maple pieces each, rather than 3 & 1. The straight members have 1/4" maple top and bottom. Need to drill for the lacing and break the edges. Top of the front piece is getting a round over. Then, Epoxy and pins to assemble the full frames.

One thing that I would like to improve is my method for applying the thickened epoxy. Anyone who uses the stuff, Perhaps Jim Dodd or Muskrat What do you use as an applicator? I have been using a thin wooden spatula type thing, and let me tell you, its a good thing that my epoxy has such a long open time! Pot life for 3/4 oz was >45 min, and an hour after being set in place, it was still just starting to gell up.

One reason for asking this is I have another plan that requires even thinner layers. (1/16" - I'll be using a bandsaw and drum sand rig to prep those) That Means even more epoxy per piece, and this is getting long...
 

Attachments

  • photo2982.jpg
    photo2982.jpg
    294.3 KB · Views: 0
  • photo2983.jpg
    photo2983.jpg
    281.7 KB · Views: 0
  • photo2984.jpg
    photo2984.jpg
    286.2 KB · Views: 0
  • photo2985.jpg
    photo2985.jpg
    293.8 KB · Views: 0
  • photo2986.jpg
    photo2986.jpg
    238.3 KB · Views: 0
  • photo2987.jpg
    photo2987.jpg
    253.4 KB · Views: 0
I try to have everything set up and do a mock run through before I ever mix any epoxy. It may seem stupid, but just act out the whole process first. As for dispensing, you can load your thickened epoxy into a Ziploc bag and cut a corner off and then squeeze it out like you are icing a cake, or you can get special icing bags and tips that might have a flatter opening if you want a wide flat bead. Some guys that are doping out a lot of epoxy at one time, not really canoe builders, will use empty caulking gun tubes that they fill with epoxy and then use with the gun.
 
I don't use epoxy when building my laminated seats, I just use Tightbond or such since the rails will get 4 or so coats of varnish. Only the mortise and tenon joint gets epoxy. Just my 2 cents...

Karin
 
I use a brush to apply my thickened epoxy for laminating. Either a foam, or cheap bristle(chip) brushes.

I always have a mess, and left overs that make small hockey pucs.
I'm open for a better technic for sure !

Jim
 
No Title

Sorry for the long absence, Guys. Last week, I didn't have any worthwhile pics, though sanding is getting there. Realized that I do not have a Pic of the bottom, now that it is cleaned up. Will need to grab one before glassing.

Jim Dodd Muskrat Thanks for the tips, those both sound like great ideas... for different types of job! So, I will probably be testing them both out in the future.

Bit of a grab bag today, Tried standard blue masking tape to keep separate laminations from sticking together when gang-gluing with one set of clamps. Turns out, it works with epoxy, but you'd only want to use a piece once. It kind of pulls up when you take the bits apart. Mihun09 Thanks for the thought. I've sort of sworn off titebond unless it is encased in epoxy. Had some scarf joints (finished, too) that didn't take well to long term wear, even when the canoe was stored inside.

Got the knuckle on one side cleaned up, which I was worried about. Going to be great, but takes some time and care.

Also, you get a look at my sanding system. (Calling it a system is kind of like calling a collection of independent Guerilla Partizans a "Stable Government," but seems that everyone needs a 'system' these days... :) ) That tube on the RO is thin, but when hooked up to a shopvac or dust collector, it works pretty well. Using the others, under the knuckle, has reacquainted me with the joys of cedar dust in my hair... have missed that while working on the convex areas--- Not!
 

Attachments

  • photo3064.jpg
    photo3064.jpg
    263.6 KB · Views: 1
  • photo3065.jpg
    photo3065.jpg
    123.1 KB · Views: 1
  • photo3066.jpg
    photo3066.jpg
    180.9 KB · Views: 0
  • photo3067.jpg
    photo3067.jpg
    262.3 KB · Views: 1
Back
Top