Given one of the goals for this build is to maintain the same weight, while extending the original 15' design to 17'. Weight is going to be part of every idea/decision made along the way and sometimes you try stuff that is a bit out there, which also means there is a chance something is not going to work out like you plan.
Thwarts aren't a big part of the weight budget, but since every part is being considered ... I had an idea for them ... BALSA and fiberglass
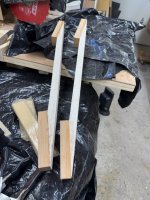
So here is my chunk of balsa 2" x 3" x 36", very light, very pale and very boring from a wood visage vantage

First issue is that balsa is quite soft and these are going to be bolted to the gunnels, so i will need some hardwood, at least where the thwart terminates and it gets bolted. So the balsa gets milled up to 1.5" x .75" pieces, a taper cut just over 4" long is added and cherry blocks to fit those tapers are cut (FYI that is more than a 10:1 skarf, so it is structural)

Standard epoxy procedure, to glue the blocks on, coat with unthickened epoxy, followed by a thin layer of thickened epoxy

after clamp up we have a really awkward looking balsa/cherry piece

The extra cherry is taken off with the radial arm saw and then passed through the planer to get it perfectly flat. I think using my bandsaw would have been easier and safer for removing the chunk, but I discovered that using the blade on brass (as the package says is fine) really dulls the blade for wood, it needs to be changed and I got lazy.

The radial saw was setup to rip the chunk down the middle

and then make the cut, the pic shows what I was after ... the cut on the left side and each piece rotated 45 degrees on the right, giving a nice symmetrical triangle cut on the planer flattened surface (so ready to glue)

There were a few cherry strips from another project laying around, so I added one to the middle, just because it was needed visually IMO

Spring clamps are a nice method for epoxy clamping, they don't over pressure the joint

One side gets roughly flattened, then on through the planer to finish the job

Small taper added with the radial, this is both to trim a little weight and I think it looks better


A quick round over on the router and the blank is ready for sanding


and now the final step, adding the fiberglass. This 2 oz sleeve material I picked up along with shrink tube for epoxy layups .... this was quite expensive, but I wanted to make this work

and after setting. 1) I ordered the wrong shrink tubing 2) the glass sleeving doesn't get fully clear .... both learning points, but frustrating


I am not going to use these, so I have to make another set. You have seen the general construction technique I am going to use, so I will skip through the second set in less detail. These will be a conventional set with no fiber glass and will use red cedar, ash and cherry.
This is the assembled glue up and tapers already cut. The thin white strips are ash and the taper is cut to just end at the strip and not cut it. The ash strips are basically the weight bearing rails, so leaving them intact is the priority, the inner cedar strip is thicker to allow for sufficient hardwood territory for the eventual bolting on.

and a few more cherry blocks

where I discovered the dull bandsaw blade

and back to the radial for the trim instead

cleaned up in the planer

Setup and cut in two (again), you can see a small saw cut line on the right pair, that is from the band saw wandering, fortunately it will disappear with the epoxy glue up

You can see how even the wedge shape is here

Dry fit for glue up, adding cherry rail to centre

and the epoxy glue up ...

Quick sand with 80 grit on a flat sander to get a mostly flat surface

then clean up with the planer and taking them to the final 5/8" thickness

Rounding the edges with a 1/4" round over bit


adding in the edge taper detail using the radial saw

and the finished product after sanding with foam block (80/120/180/220), ready for finish


This was an interesting experience, I had high hopes for the balsa fiberglass experiment, but visually it just didn't work with the sleeve I picked and the I doubt the shrink sleeve would have made much difference to the cloudy presentation. Weight wise the 2 thwarts produced weighed 135 and 150 grams (4.7 oz/5.3 oz), the difference likely epoxy application rate. These appear to be quite stiff and strong, but I won't be testing then to breakage to find out.
The replacement conventional pair was interesting, I like the general appearance more and the weights came in at 137.8 g and 137.8 g (4.9 oz), so pretty much identical. These are also quite strong, with just a little more spring ... quite suitable for purpose IMO. The outside rails are rounded over, but leaving the edge entirely covered in hardwood, this is for wear ... the hardwood will stand up better to hands and ropes that get slung around the hand holds from time to time.
The second set was made from saved scraps of other projects and did just as well as the made for purpose (read that expensive) versions, lesson for me is to not get too clever, there is not a lot of weight saving to be had in this area, so just do a simple plan for hardwood placements and don't over size and you will be in light weight territory.
Brian