• Happy National Telephone Day! 🔔☎️📱📶

PC Y-Stern

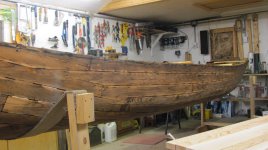
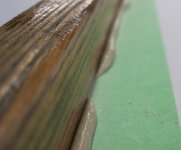
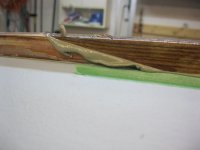
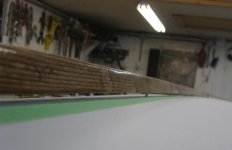
It said mineral spirits or paint thinner so I used some varsol that I had. It seemed to work ok but the wood is really dry and sucked it up. That was the idea though. Another full coat this week, maybe 3 or 4 on the gunwales.

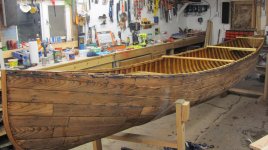
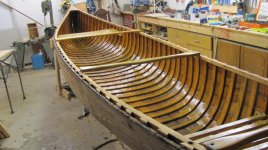
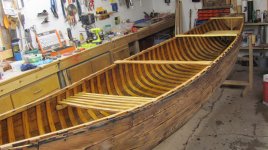
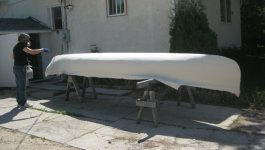
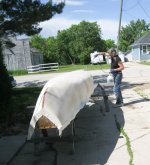
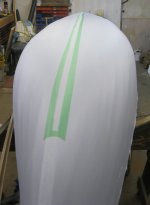
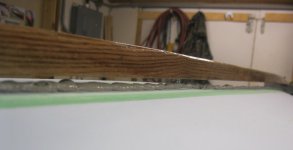
Yeah the idea was to only do the repairs that were absolutely necessary. No cosmetics. I had debated painting the interior but opted for varnish. It is looking good. I need a good paint scheme though.

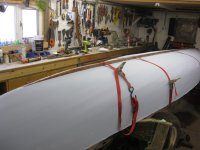
In case you were all wondering....the PC in the title stands for Port Colborne...that is where the boat came from.


Christy
 
Last edited:
Enjoying this thread. Please keep the pictures coming. Wish I could hear the stories that canoe could tell!
 
We are still toying with the idea of "glassing" this instead of canvas. Considering we need to wait until it warms up consistently, we have time to ponder it further.
 
If you glass it, you will be the red-headed step daughter of the canoe building world. However, the tremblay that i glassed is still doing great after ten years. I put wide masking tape down first over all the outer hull so the glass wouldn't stick to it.
 
Seriously, can we have a brief and basic list of Pros and Cons of glass vs canvas. Or has that been done?
 
Last edited:
Pro's for glassing.....can be finished in a few hours. Depending on how you do it, it can be cheaper too. I used one piece of ten ounce glass on my tremblay and painted it red.

Con's.......most people glass directly on to the wood. Epoxy resin sinks into and bonds the glass with the wood. Because the wood is open on the inside hull, moisture will expand and contract the wood, causing damage to the wood and eventually the hull. Even if you think you have really sealed the inside hull with varnish, water will get in.

With canvas canoes, the wood is able to shift as it pleases as water performs its swelling and shrinking games.

My masking tape theory is that because the outer skin did not bond to the wood, it will be fine over the long run. I'll tell you in 20 or 30 years, if I'm still around.
 
Considering the planking thickness the usual damage from water saturation and movement is less likely to occur if we glassed it. The PO at some point filled all the gaps with polyfilla so that did not help much. It would be pretty cool though, clear finish on the outside? Only bad part is the gaps are pretty wide and may load up with resin.
 
No Title

That is the entire point Mem....the wood has to be able to move around as it soaks up water and then dries repeatedly. If you introduce glass into the equation then only part of the wood can move freely and it begins to twist and buckle and just generally make a mess out of things. Eventually the boat may pretzel out of shape.
A lot of frieghter guys use epoxy on the bottom, but they use canvas first and epoxy the canvas. That may be an idea here too. We did some tests on scrap canvas and the older polyester resin seemed to do better with not sticking to the wood but it did make the outer surface brittle and prone to cracking. That aint good. Soooooooooo even though I like the look of it now, it will in all likelihood get canvas.

More varnish before anything though.

Christy
 

Attachments

  • photo6137.jpg
    photo6137.jpg
    288.8 KB · Views: 0
  • photo6138.jpg
    photo6138.jpg
    297.3 KB · Views: 0
  • photo6139.jpg
    photo6139.jpg
    298.5 KB · Views: 0
  • photo6140.jpg
    photo6140.jpg
    227.8 KB · Views: 0
I like the looks of that! I wonder, since the gaps were plugged up, if someone had previous ideas about fiberglassing it. I would tape that sucker up, and have it glassed in an hour and a half!
 
The last Y-stern I did, the Y-stern fell off due to the rot from the glass trapping moisture. The other problem with glass is it is pretty much a one time deal, especially epoxy filled glass. Canvas on the other hand is infinitely replaceable.

One technique I have tried is filling the canvas weave with epoxy filled with talc. The talc allows the epoxy to be sanded and because it thickens the epoxy, the epoxy will not penetrate the canvas and will not glue the canvas to the hull. This resulted in a very durable skin. Canvas filled with traditional filler is likely almost as durable or equivalent, so the biggest benefit was that the cure time for the epoxy coating was a couple of days maybe rather than 6-weeks for traditional filler.
 
One technique I have tried is filling the canvas weave with epoxy filled with talc. The cure time for the epoxy coating was a couple of days maybe rather than 6-weeks for traditional filler.

Now that makes sense. What do you mean exactly by "talc"? We have silica flour for traditional filler which should be about the same. Do you remember offhand what the ratio was of talc to filler? Interesting idea and we have been seeking a quicker drying filler for a while now.

Christy
 
Talc is a mineral with a hardness on the Moh's Scale of 1. Silica is likely 7, though colloidal silica will be less. I haven't bought it lately, but I bet you can find in at places that sell epoxy. It would be powdered talc. It is a fairly common filler. You might have to experiment with a piece of canvas. Thicken it enough such that it fills the weave but does not penetrate the canvas. The ratio will change some with the weight of the canvas too. I am guessing this technique is more expensive than traditional filler, based on the price of epoxy.
 
Last edited:
Hey Fitz, is there a write up on that method at WCHA? We are interested in modifying the traditional filler method for sure.

Interior varnish finished, just flip it over tomorrow and put another coat on the hull and we can move it outside and bring in the 3rd canoe for this Winter's repair schedule.

Although all the thwarts are in, the hardware will get replaced when we canvas in the Spring. I have silicon bronze 10/24 carriage bolts on order from Top Notch Fasteners in Minnesota. They carry 4 and 6 inch although the website only lists the 4". I put in a larger order than usual this time, 20 pcs of 6" and 100 4" with corresponding flat and lock washers plus nuts. Without the exchange and shipping it is about $220. Should last awhile. The 4" will get used for thwarts and such and just cut them down to fit.
 
Last edited:
No Title

Canvas today and mildewcide, which is just clear end cut preservative and is one of the most noxious liquids I have had to work with. Wash the clothes and body afterwards.

Normally we don't work on boats during the nice weather, but we need to do something to A; avoid the heat, B; when it is raining.
 

Attachments

  • photo7160.jpg
    photo7160.jpg
    79.3 KB · Views: 0
  • photo7161.jpg
    photo7161.jpg
    169.2 KB · Views: 0
  • photo7162.jpg
    photo7162.jpg
    124.4 KB · Views: 0
Progress is a wonderful thing. The Y stern is in canvas and off gassing out front and the Langford is back in the shop for wood work. The little Huron is outside on some horses and I will wrap it with some ropes to try to put some shape back to it. The plan is to stress the wood a bit to get tumblehome back while it sits in the rain all week. Let it dry and see where we are.

Tomorrow I put the flywheel back on the evinrude and we see if we have spark. That is for the Y stern.

Right now I think I need a nap.

Christy
 
Back to this after a nice Summer of heat and yard work. Christy wants it done by Christmas so I had to do my part of it. Let's Make a Keel! Well, glue one on anyway.

I did some brief research on how to do this since we have never ruined perfectly good new canvas by poking screws through it before, but this boat has to have a keel. I did soak it as best I could in epoxy to help with some cracks, but old hard oak doesn't soak much up. Still, it should help.

How to make a good seal? Construction adhesive is water resistant and paintable, Very thick and will likely never let go. So, last night I ran some screws up, got the 2 pieces lined up properly then taped down both sides. Remove the keel, sand the exposed area, run up 2 screws for alignment, strap it down and run all the screws up just so they grab wood, space the keel off the boat, pump in adhesive, squish it down and tighten up, scrape off ooze out, pull tape and wait for cure.

Did not take long at all, couple hours maybe to work the plan. The plan took much longer to do.
 

Attachments

  • photo8376.jpg
    photo8376.jpg
    107.1 KB · Views: 0
  • photo8377.jpg
    photo8377.jpg
    243.7 KB · Views: 0
  • photo8378.jpg
    photo8378.jpg
    222.3 KB · Views: 0
  • photo8379.jpg
    photo8379.jpg
    205.7 KB · Views: 0
  • photo8380.jpg
    photo8380.jpg
    255 KB · Views: 0
  • photo8382.jpg
    photo8382.jpg
    187.2 KB · Views: 0
  • photo8381.jpg
    photo8381.jpg
    271.5 KB · Views: 0
  • photo8383.jpg
    photo8383.jpg
    194.1 KB · Views: 0
  • photo8384.jpg
    photo8384.jpg
    227.9 KB · Views: 0
Interesting. Why did you feel it needed a keel? For strength and abrasion? I've often wondered what would happen to my SS when cruising along at 13 k an hour if I hit a submerged rock. A keel could be a life saver in that circumstance. I was thinking of trying a bigger motor, but i think the risk of total destruction would be much worse with higher speeds.
 
Mem, it is Christine's boat, she wanted the keel, enough said. ha ha. Considering the planking is all 5/16" thick, I doubt much could penetrate it other than whatever they drove into it with.
 
" Wife said she wanted a keel, nuff said. " Smart girl.

So now it is my turn to get back onto sanding / repairing the outwales. My wrists still hurt from last weekends sanding binge. A lot of this one needs to be done by hand with a block. Oh well. It is nearing completion.

Christy
 
Back
Top