I'm trying to figure out what you did at the knuckle…on the osprey and the raven I was able to simply mate the bead and cove at the sharp part, although I might have tampered with the width of one of the strips. Think I'll start an Osprey page tomorrow, although I won't be working as fast as you.
-
Happy National Sunglasses Day! ☀️🕶️😎
You are using an out of date browser. It may not display this or other websites correctly.
You should upgrade or use an alternative browser.
You should upgrade or use an alternative browser.
J Winters "Kite" build
- Thread starter stripperguy
- Start date
I'm trying to figure out what you did at the knuckle…on the osprey and the raven I was able to simply mate the bead and cove at the sharp part, although I might have tampered with the width of one of the strips. Think I'll start an Osprey page tomorrow, although I won't be working as fast as you.
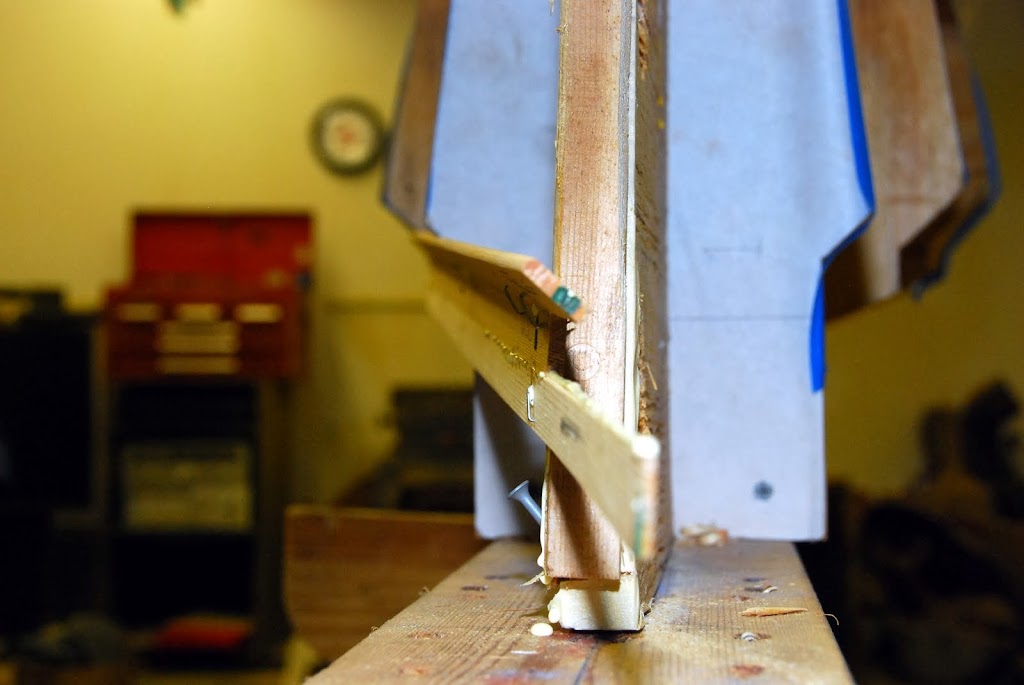
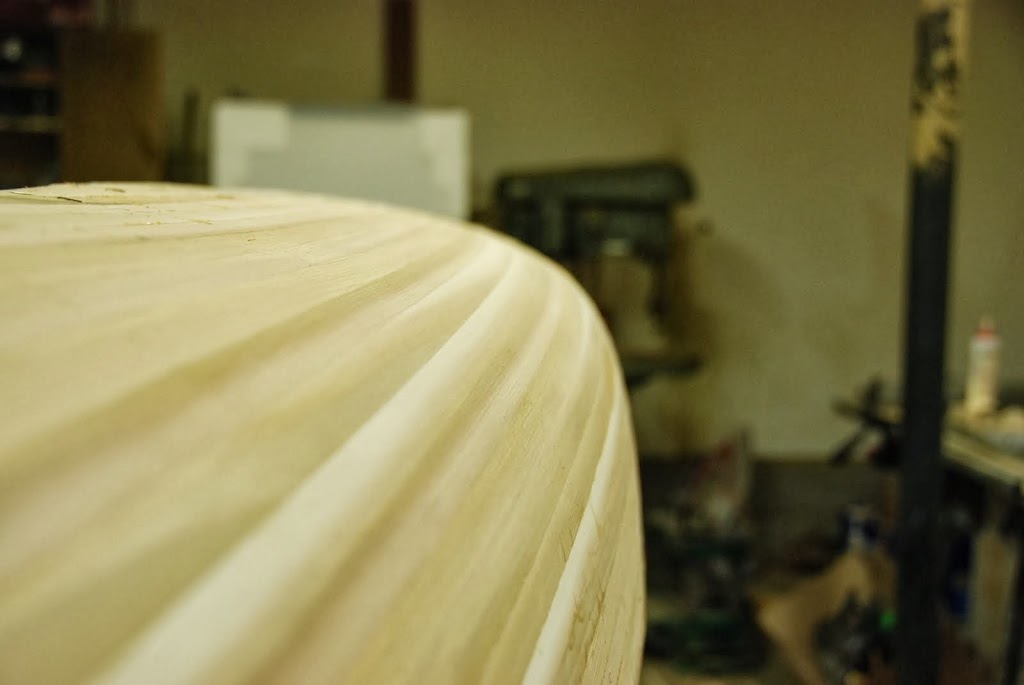
The very next strip at the stem would be at the "knuckle" to which you refer, I think. That knuckle is higher and higher as you approach the center. I simply stripped beyond that crease at every form. Those strips became shorter and shorter. Then the very next strip was bevel cut with a fingertip plane, so the strip tucks in behind the latest tumblehome strip. Later, I'll blend that joint to maintain a fairly sharp line. I didn't get the entire length of that joint to be a perfect fit, but I'm not too concerned. This hull will have an opaque finish on the outside, I planned on that from the beginning.
I'll try to get better photos tomorrow, it doesn't show well from the angles that I viewed it. I think I have some stripping photos from the plan supplier, I'll look for them too, they might show that joint in more detail.
And I'm only moving this quickly because:
1. The BC skiing is lousy
2. Little natural snow, and I won't ski man made at lift served mountains.
3. Few problems at the income properties.
4. No major reno work at the income properties (19 units, soon to be 25)
I have to squeeze in projects like this as quickly as I can, there's no telling when my free time will vanish!! (I am still working 55 hours/week at my real job)
Interesting, I'm seeing the difference now between the Kite and the Osprey. Looks like they've carried the knuckle all the way to the bow and stern stations, whereas with the Osprey, it kind of fades out by then. I'll see if I have time to post a couple of pics tomorrow to show the difference.
-25 C here today, had a great snowshoe, no shortage of winter sports or snow!
-25 C here today, had a great snowshoe, no shortage of winter sports or snow!
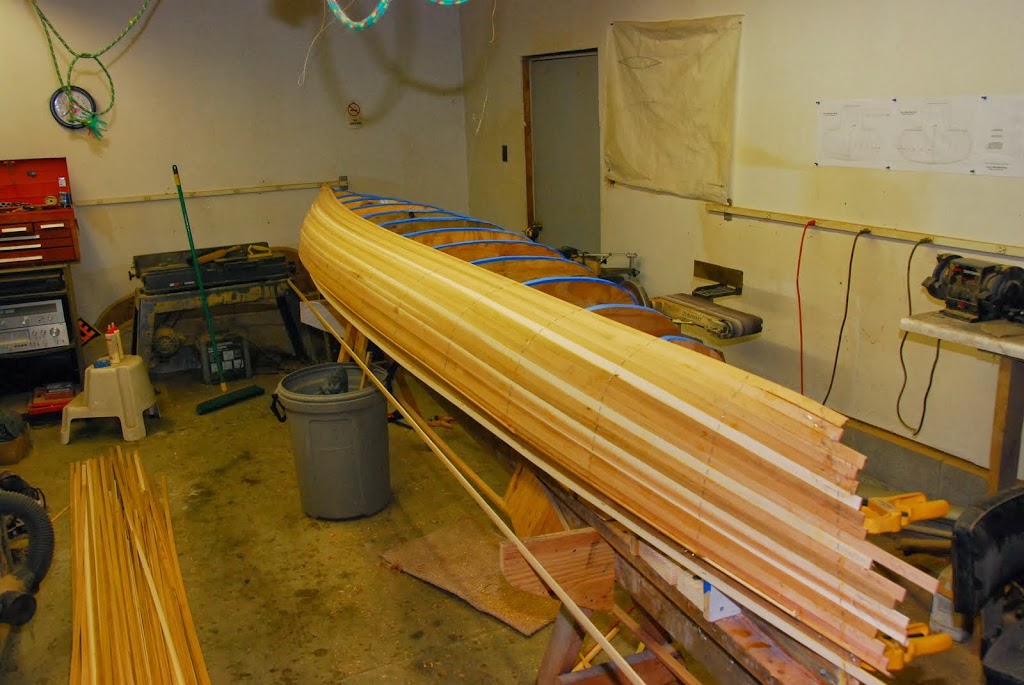
I managed to get another hour working on the Kite tonight...got as far as the stems, another 8 or 9 strips, as good a place to stop as any. Now the strips will be successively shorter as I go. More photos tomorrow, when I'll hopefully be finished stripping the first side.
As promised, below are some stripping photos supplied to me by Green Valley Boat Works, when I bought the plans. These photos show clearly that "knuckle", and the bevel edged transition strip.


As promised, below are some stripping photos supplied to me by Green Valley Boat Works, when I bought the plans. These photos show clearly that "knuckle", and the bevel edged transition strip.
I haven't logged on, in a while, and now I see all these boat builds. My heart is beeting faster and faster.... haha. Very awesome pics. Those cedar strips are so tight. Amazing work. I walk past my canoe every single morning and afternoon. I seriously can't wait to get it back on the water!!!
Patch,
Glad to see you still hang around here! I can't believe you haven't started another build yet.
So, I was almost out of glue, and would soon run out of 1/2" staples, so after dinner I made a quick run to Lowe's to pick up those supplies. Another $7.38...this thing is costing me a fortune!
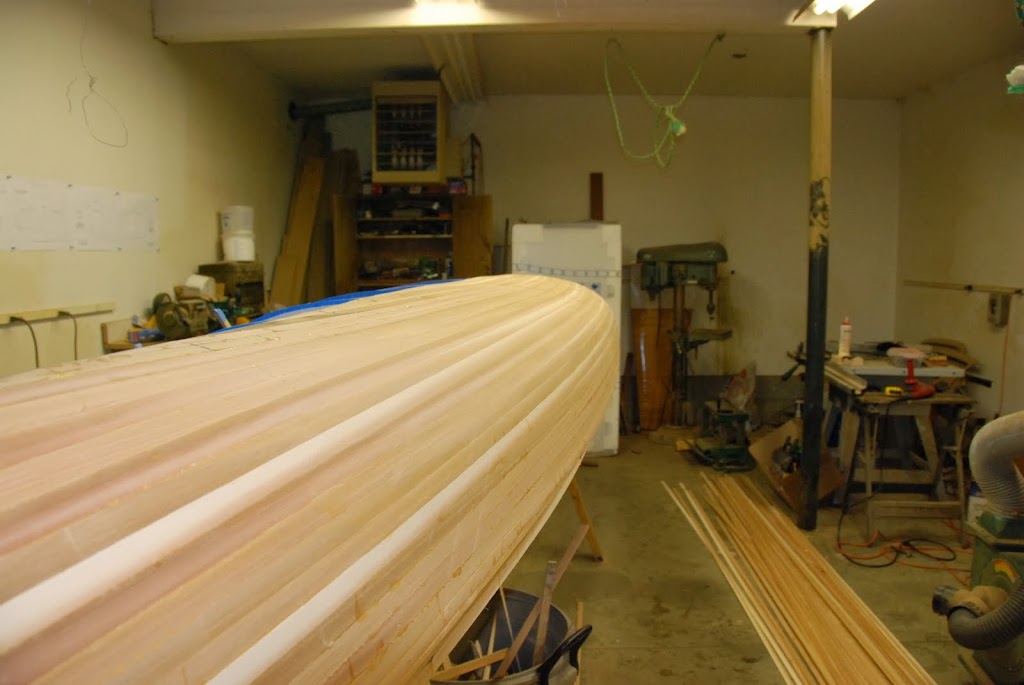
As I thought, I had plenty enough time to strip just past the keel line. Even had time to plane in most of that knuckle.
Here's where I left off last night. You can see I was just past the keel line on each stem. After that, each strip gets a little shorter.
And here it is with another 6 or 7 strips on it. The next steps will be to trim the excess at each stem, and cut the strips right to the keel line, or centerline.
Here's a better view

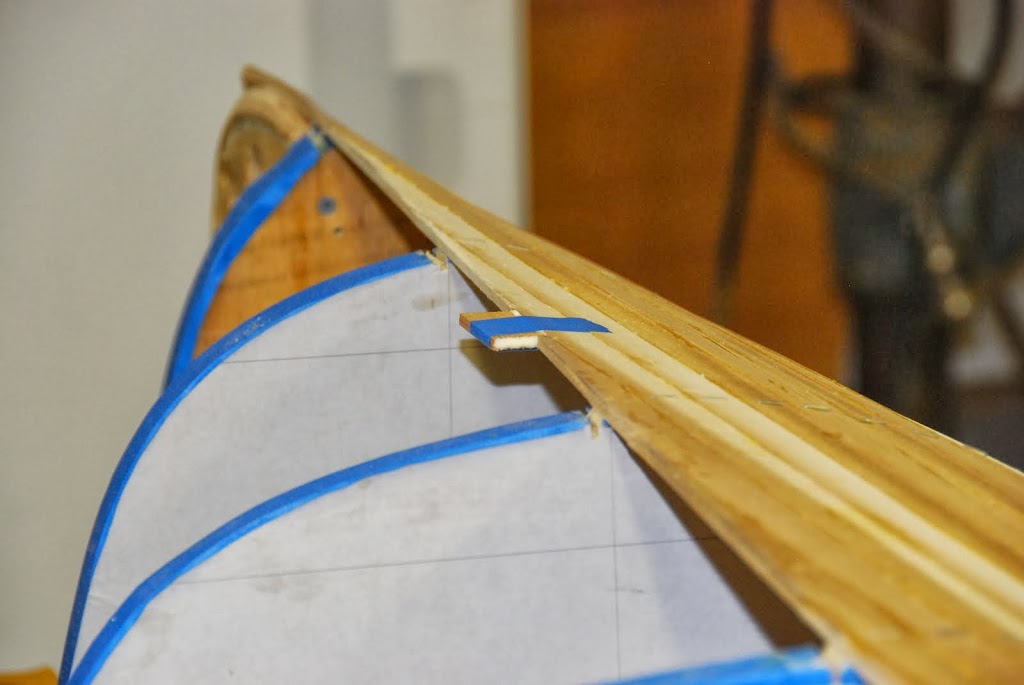
I even had some time to rough trim the knuckle using a block plane. I had to pull a handful of staples first. Don't worry if it looks a little wiggly, there's plenty of wood to work with to straighten out that edge!

Here's another look at that knuckle. You probably can't tell in this photo, but there is a section of the joint that has a little gap in it, maybe 6" long by 1/32 wide...remember, this hull will have an opaque exterior finish, so I'll just fill the gap with some Cabosil thickened resin.

Maybe I'll trim the stems tomorrow. And if I'm feeling particularly ambitious, I'll layout the keel line cut. And maybe if I'm really, really motivated, I will trim the keel line!!
After that, it's easy stripping again, until I reach the stems. On the second side, once I reach the stems, each strip must be cut to fit and match the keel line. It's tedious work, but if I get sloppy, it really shows. That boat long joint is a focal point, whether I want it to be or not.
Glad to see you still hang around here! I can't believe you haven't started another build yet.
So, I was almost out of glue, and would soon run out of 1/2" staples, so after dinner I made a quick run to Lowe's to pick up those supplies. Another $7.38...this thing is costing me a fortune!
As I thought, I had plenty enough time to strip just past the keel line. Even had time to plane in most of that knuckle.
Here's where I left off last night. You can see I was just past the keel line on each stem. After that, each strip gets a little shorter.
And here it is with another 6 or 7 strips on it. The next steps will be to trim the excess at each stem, and cut the strips right to the keel line, or centerline.
Here's a better view
I even had some time to rough trim the knuckle using a block plane. I had to pull a handful of staples first. Don't worry if it looks a little wiggly, there's plenty of wood to work with to straighten out that edge!
Here's another look at that knuckle. You probably can't tell in this photo, but there is a section of the joint that has a little gap in it, maybe 6" long by 1/32 wide...remember, this hull will have an opaque exterior finish, so I'll just fill the gap with some Cabosil thickened resin.
Maybe I'll trim the stems tomorrow. And if I'm feeling particularly ambitious, I'll layout the keel line cut. And maybe if I'm really, really motivated, I will trim the keel line!!
After that, it's easy stripping again, until I reach the stems. On the second side, once I reach the stems, each strip must be cut to fit and match the keel line. It's tedious work, but if I get sloppy, it really shows. That boat long joint is a focal point, whether I want it to be or not.
Wow, very nice! I'm anxious to get started, but when I thickness planed my local cedar, it quickly became apparent that there were more knots than not. At the rate you are going, you'll be finished by the weekend!
Yup, that's the plan...have it in the water by the weekend!! Notice I didn't say which weekend.
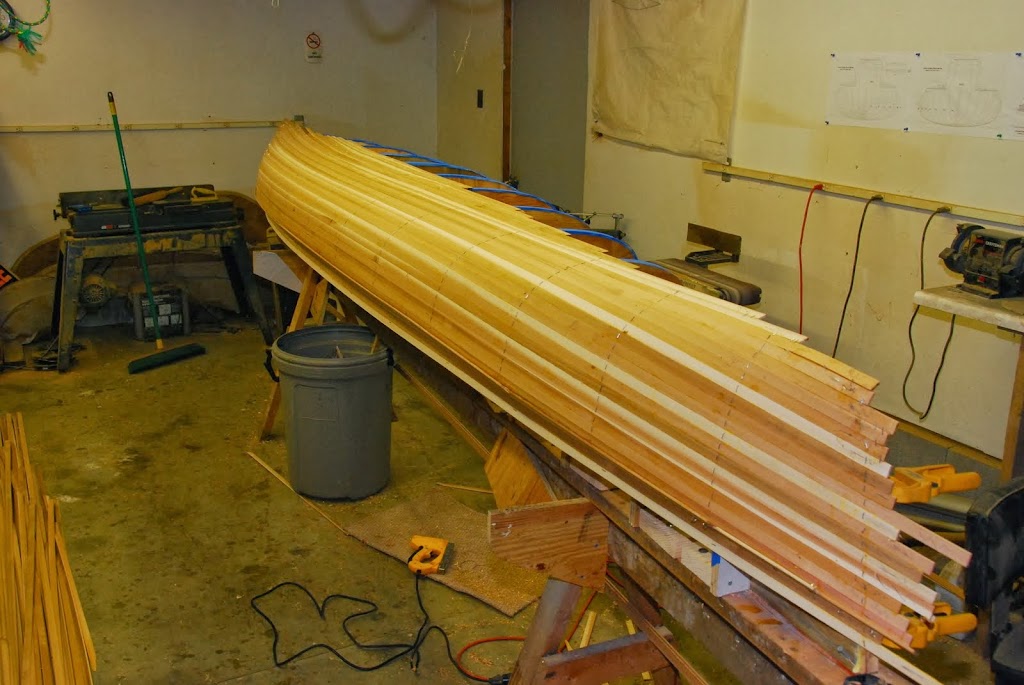
Well I did trim the stems tonight, and layout the keel line cut and cut the keel line and straighten out the keel line cut!!
So here is one of the stems, roughly trimmed using a sabre saw. Later, I'll sand everything to shape, no need to just now. Mian reason to trim the stems was to get any excess strips out of the way for the second side.

Here's the string line for the keel line cut. I'm not sure if you can see in the photo, but it seems that I didn't have quite enough excess strip in a couple of spots. Not to worry, all can be fixed.
I clamped a chunk of wood to the stem form, and the added a couple of strip pieces as spacers, to get the string line exactly centered on the stems.

Here's the keel line cut with a 6" circular saw, close to the layout line, but with a little extra left to straighten out the line.

Along the way, I thought it would be a good idea to test my pain tolerance! Most folks have the same pain threshold (what hurts me hurts you hurts everyone), but everyone has different levels of tolerance.
For this particular experiment, I decided to shove some cedar about a quarter of the way up under my fingernail. I did manage to finish all my planned efforts tonight, so I guess my tolerance level is still pretty high!

After cutting the keel line, I used a itty bitty block plane and some 36 grit paper on a long board to straighten out the cut line. I also needed to add in a couple small pieces of cedar to make up for my shortfall during stripping.
This view better shows how straight the cut line is, and the other little patch too.
Next up:
Trim those little add on pieces.
Strip the sheer and tumblehome sections.
Strip the second side as far as the stems.
Strip the section between stems, this is tedious and time consuming.
After that, the boat is done!! Except for sanding the outside, glassing the outside, sanding the inside, glassing the inside, decks, bulkheads, gunnels, thwarts, seats...yeah, nearly done!!
Well I did trim the stems tonight, and layout the keel line cut and cut the keel line and straighten out the keel line cut!!
So here is one of the stems, roughly trimmed using a sabre saw. Later, I'll sand everything to shape, no need to just now. Mian reason to trim the stems was to get any excess strips out of the way for the second side.
Here's the string line for the keel line cut. I'm not sure if you can see in the photo, but it seems that I didn't have quite enough excess strip in a couple of spots. Not to worry, all can be fixed.
I clamped a chunk of wood to the stem form, and the added a couple of strip pieces as spacers, to get the string line exactly centered on the stems.
Here's the keel line cut with a 6" circular saw, close to the layout line, but with a little extra left to straighten out the line.
Along the way, I thought it would be a good idea to test my pain tolerance! Most folks have the same pain threshold (what hurts me hurts you hurts everyone), but everyone has different levels of tolerance.
For this particular experiment, I decided to shove some cedar about a quarter of the way up under my fingernail. I did manage to finish all my planned efforts tonight, so I guess my tolerance level is still pretty high!
After cutting the keel line, I used a itty bitty block plane and some 36 grit paper on a long board to straighten out the cut line. I also needed to add in a couple small pieces of cedar to make up for my shortfall during stripping.
This view better shows how straight the cut line is, and the other little patch too.
Next up:
Trim those little add on pieces.
Strip the sheer and tumblehome sections.
Strip the second side as far as the stems.
Strip the section between stems, this is tedious and time consuming.
After that, the boat is done!! Except for sanding the outside, glassing the outside, sanding the inside, glassing the inside, decks, bulkheads, gunnels, thwarts, seats...yeah, nearly done!!
This is exciting! I have been thinking of building either an Osprey or a Kite. Won't do it until at least next winter though, because I have some sailboat projects to finish this winter.
I am curious to see how the hull comes off those stations, with all that tumblehome. I like the looks of the Kite a little more than the Osprey, but I'm curious about whether the extended tumblehome will change how the boat handles water splashing up near the gun'ls at the bow. Also curious if the build is easier than the Osprey, because of carrying the tumblehome clear to the ends - or if that makes it harder. Oh - and does that make the hull stiffer?
Sure would be cool if you two could arrange a side-by-side with both finished boats.
Good progress SG.
This is exciting! I have been thinking of building either an Osprey or a Kite. Won't do it until at least next winter though, because I have some sailboat projects to finish this winter.
I am curious to see how the hull comes off those stations, with all that tumblehome. I like the looks of the Kite a little more than the Osprey, but I'm curious about whether the extended tumblehome will change how the boat handles water splashing up near the gun'ls at the bow. Also curious if the build is easier than the Osprey, because of carrying the tumblehome clear to the ends - or if that makes it harder. Oh - and does that make the hull stiffer?
Sure would be cool if you two could arrange a side-by-side with both finished boats.
Steve,
I don't expect to have any problems to pop that hull off the forms. A few years ago, I built a DY Special, and the tumblehome on that hull is so extreme that the boat gets mistaken for a kayak sometimes! I doubt that this hull would spring out enough to lift straight off, rather, the forms would need to be twisted out from under the hull just before it is flipped.
As far as stripping with that creased or knuckled tumblehome, it's been a no brainer. Very easy, the trick is to allow that first hull strip (just next to the crease) to remain twisted as it reaches the stems. After trimming, there is just a little triangular shaped section of it left at the stems. Easier to do than describe, honestly.
The crease in the tumblehome should make that section of the hull very stiff, the hull has a nearly 45 degree bend, it really helps to strengthen the hull. If I have time, I can model a hull section with and without that crease, to see the relative effect on stiffness. It would be a comparative analysis only, I don't have a good number for the composite modulus of elasticity.
As for wave shedding ability, the hull maintains some flare below the crease as far back as form #5, that's nearly halfway back from the stem. I should think that profile would divert any rising water away from the hull, rather than let a roller flow over the bow! But, the real test is in the water, isn't it?? I guess I'll find out over the weekend.
Good progress SG.
Thanks, Rippy, now...where's that knife? I'm anxious to see the next steps!
I have way too many adventures to take with the canoe I just built!!! Maybe, if I could build as quick as you - I would consider it. You are making crazy fast progress. Nice job!!!
So cool!
You make it look easy. Thanks for all the photos and descriptions of your methods. It helps me wrap my head around the process.
You make it look easy. Thanks for all the photos and descriptions of your methods. It helps me wrap my head around the process.
Hanz,
That's my intention...to expose this boat building "mystique" for what it really is, just a series of small steps.
I'll have some more photos tomorrow, I've already improved my technique for stripping that creased tumblehome. The photos will show all...
That's my intention...to expose this boat building "mystique" for what it really is, just a series of small steps.
I'll have some more photos tomorrow, I've already improved my technique for stripping that creased tumblehome. The photos will show all...
Some techniques take longer, using staples is likely the fastest method, you can get more strips down in a session than going without. Just comes down to preference really.
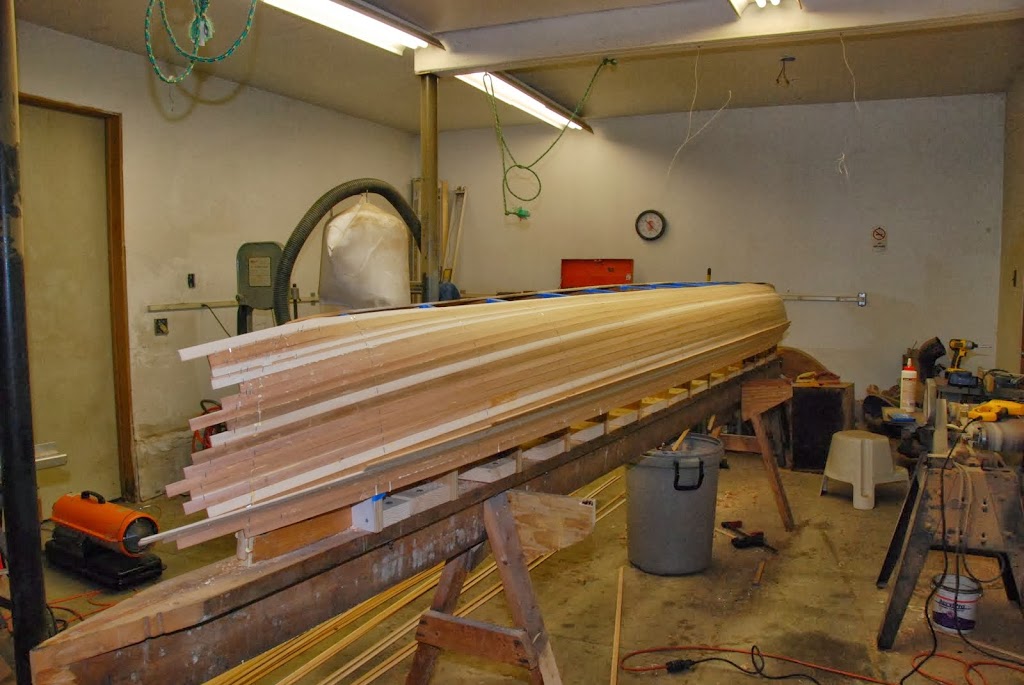
First let me show the results from last night's efforts.
I stripped the gunnel section and tumblehome section, there's only 5 or 6 strips total .
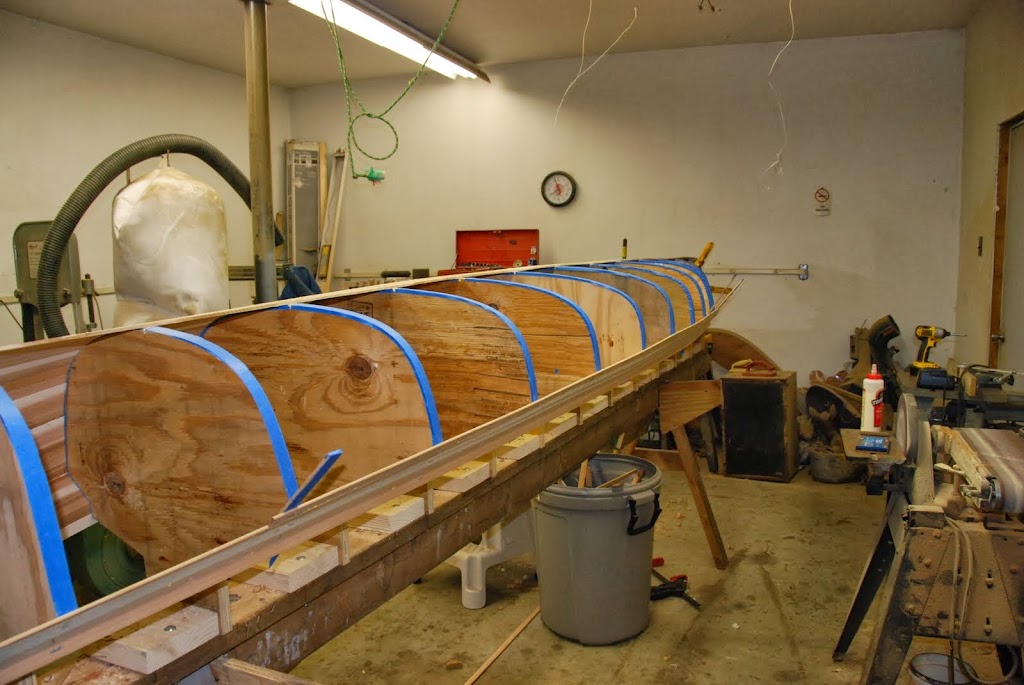
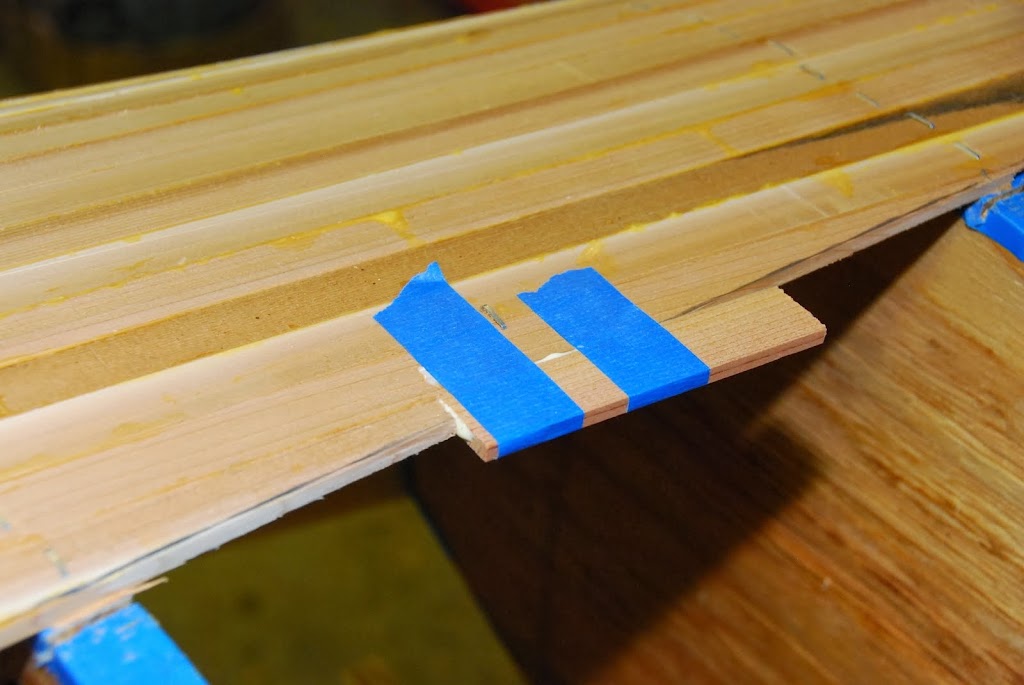
You'll notice some odd looking pieces jutting out from inside the hull. I put those temporary cleats in a few spots to help guide the strips that are beyond the forms. I have to strip with enough excess to trim that knuckle, and in spots, I actually need to strip beyond the forms, so that what's left behind (after the trimming) stays true to design. I wasn't happy with the way the first side laid in, so I improved my technique just a bit.
Even so, I misjudged again, and needed to add about 6 more inches to one of the strips.
Then, it's just glue and staple, glue and staple, glue and staple, glue and staple...
I've got just 9 more full length strips to go, and then I'll be between the stems. The stripping goes much slower after that.
And I bought a flexicat sanding board, and some 36 and 80 grit hook and loop paper to go with it. The paper is 2.75 x 16 inches...plenty enough to keep the hull as fair as I want.
I did a test sand in one little section to see how everything would work.
And that's it for tonight!
Over the weekend, I'll try to get the stripping completed, but I promised MDB I would spend some more time with her, and I'm skiing on Sunday, and I have to go in to work for a bit tomorrow...
We'll see.
I stripped the gunnel section and tumblehome section, there's only 5 or 6 strips total .
You'll notice some odd looking pieces jutting out from inside the hull. I put those temporary cleats in a few spots to help guide the strips that are beyond the forms. I have to strip with enough excess to trim that knuckle, and in spots, I actually need to strip beyond the forms, so that what's left behind (after the trimming) stays true to design. I wasn't happy with the way the first side laid in, so I improved my technique just a bit.
Even so, I misjudged again, and needed to add about 6 more inches to one of the strips.
Then, it's just glue and staple, glue and staple, glue and staple, glue and staple...
I've got just 9 more full length strips to go, and then I'll be between the stems. The stripping goes much slower after that.
And I bought a flexicat sanding board, and some 36 and 80 grit hook and loop paper to go with it. The paper is 2.75 x 16 inches...plenty enough to keep the hull as fair as I want.
I did a test sand in one little section to see how everything would work.
And that's it for tonight!
Over the weekend, I'll try to get the stripping completed, but I promised MDB I would spend some more time with her, and I'm skiing on Sunday, and I have to go in to work for a bit tomorrow...
We'll see.
Love seeing the pictures! It's inspiring. Some day when I get all my other crazy projects done I may just do it. In the mean time it's great just picking up how to tips and storing them in my mind where my dreams take place. Recently I read a quote somewhere that "Everything starts with a dream". At first I was taken aback thinking about the difference between dreamers and doers. Then I realized that doers start with a dream too.
I did get a little more early this morning...
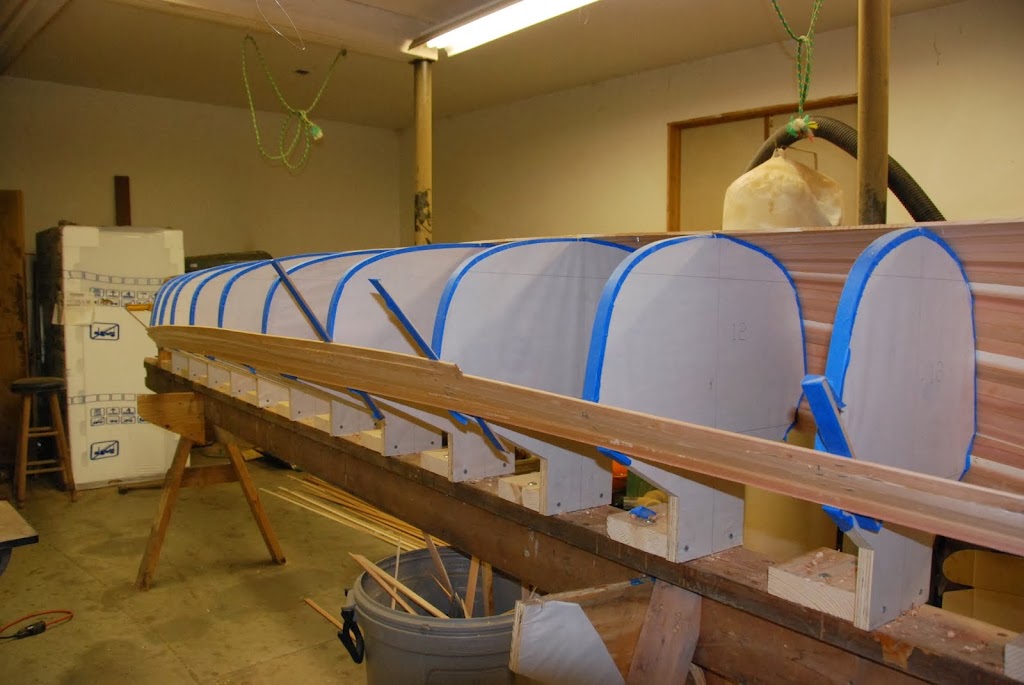
I stopped at the stems...as I've mentioned upthread, each end of the strips will now need to be trimmed to match the angle and overall length. Sometimes tricky.
Take a look. For now, I'm off for a hike with My Darling Bride, then some maintenance work at one of the income properties, then maybe back to stripping tonight.
In this photo, you can see the excess strips at that knuckle. I missed at the other end, had to add a little chunk.
You are really steaming right along, looking very nice. Can't wait till you are done sanding, I'm looking forward to seeing that profile from the bow to the stern, to compare the Osprey. Not trying to hijack your thread SG, but Rippy brings up an interesting point about the inspiration to build. About 23 years ago our school had a bunch of beat up old aluminium canoes donated to it. The powers that be decided they weren't safe enough for the kids, so they auctioned them off to the public. I was on a two week canoe trip with the kids when the "sealed" bids were opened. Turns out someone in charge of the bids rigged it so that people who didn't need those canoes got them dirt cheap. Well, I was a little miffed, cause I was broke at the time, and I really needed my own canoe. So I went to the library and looked up canoe building, found Moore's book, and built my first canoe. Man that thing was ugly, but it worked and I used it for hard, eventually giving it away. It's odd where inspiration can come from…..
You are really steaming right along, looking very nice. Can't wait till you are done sanding, I'm looking forward to seeing that profile from the bow to the stern, to compare the Osprey. Not trying to hijack your thread SG, but Rippy brings up an interesting point about the inspiration to build. About 23 years ago our school had a bunch of beat up old aluminium canoes donated to it. The powers that be decided they weren't safe enough for the kids, so they auctioned them off to the public. I was on a two week canoe trip with the kids when the "sealed" bids were opened. Turns out someone in charge of the bids rigged it so that people who didn't need those canoes got them dirt cheap. Well, I was a little miffed, cause I was broke at the time, and I really needed my own canoe. So I went to the library and looked up canoe building, found Moore's book, and built my first canoe. Man that thing was ugly, but it worked and I used it for hard, eventually giving it away. It's odd where inspiration can come from…..
Mem,
I was always ambitious and resourceful, MDB and I built a house by ourselves (yes, masonry, framing, wiring, plumbing, sheet rock, etc) just before we got married, we were 19 years old when we bought the land.
I had half of a Raddison when I lived with my parents, and wasn't allowed to use it once I moved out.
So, I needed a boat. And a fellow apprentice also needed a boat, but had no where to build...well, I had a house and a 32 x 32 garage!!
So let's see, there's a space to build, a need for 2 boats, and....one of the engineers that I worked with brought in a stripped catamaran, pedal powered no less!! As I looked over his contraption, I commented that I could probably build a canoe that way, having never even seen a strip canoe before. This engineer promptly produced the David Hazen "Strippers Guide to Canoe Building".
OK, that was it...I had a need, a place, and now the means.
Buddy and I agreed, we would build his canoe first, making all the mistakes on his, then he would help me build mine.
And that's just what we did, right down to the all the mistakes part, at least on his boat.
That was the only canoe my buddy ever built, and I have never stopped!!
Along the way, I have built 20 or 30 boats for myself and family members, and helped build another 10 or 15. And virtually helped another 6 or 7 guys, via the internet, one of the guys is here.
Similar threads
- Replies
- 42
- Views
- 3K
- Replies
- 2
- Views
- 687
- Replies
- 12
- Views
- 1K
- Replies
- 90
- Views
- 14K
- Replies
- 170
- Views
- 13K