• Happy National Zipper Day (pat. 1913)! 🤐

GP build

Alan are you going to leave a little drain hole at the tip of your deck ?

I attended a seminar about WC restoration. The presenter stated that the biggest problem with the old WC canoes, is they didn't allow the water to drain from under the big decks. Thus they rotted in those areas.

Ever since when I always left a weep hole at the tip of my decks.
e7f6663c-3cb7-4240-8811-093c1b9ab271_zpsnjyxfu9c.jpg


Just a thought !!!


Jim
 
Alan are you going to leave a little drain hole at the tip of your deck ?

I attended a seminar about WC restoration. The presenter stated that the biggest problem with the old WC canoes, is they didn't allow the water to drain from under the big decks. Thus they rotted in those areas.

Ever since when I always left a weep hole at the tip of my decks.
e7f6663c-3cb7-4240-8811-093c1b9ab271_zpsnjyxfu9c.jpg


Just a thought !!!

Jim

That's a good idea and one I've been pondering. I haven't decided yet. I think it looks nicer without the hole but it's hard to argue with draining water. Either way the bottom side of the decks will get a coat of epoxy to hopefully waterproof them for life.

Alan
 
The double epoxy should work fine !

They didn't have epoxy in the old WC canoe days !

Jim
 
I just ordered $200 of 10' white ash and need to splice a ton of ash gunnels. This will actually be my first time doing splices on my own. What is the name of the epoxy you use. I have tightbond III also.
Thanks for the answers to my previous questions.
 
I just ordered $200 of 10' white ash and need to splice a ton of ash gunnels. This will actually be my first time doing splices on my own. What is the name of the epoxy you use. I have tightbond III also.
Thanks for the answers to my previous questions.

I used RAKA epoxy for these but pretty much any epoxy should work. Tightbond III would probably work fine too but to me epoxy just seems a little more permanent. But whether or not it actually is I don't know. I'm sure tons of gunwale scarf joints have been made with wood glue. It would probably give a slightly tighter joint. I've never been able to make an invisible joint with epoxy but I can with glue. You have to worry more about excess squeeze out (don't squeeze out too much) with epoxy, or so I've been told

Do you have a jig or anything for cutting your scarf joints yet? You can make a very effective one in about 10 minutes with shop scraps. They intimidated me for a long time until I finally had to make some. Turned out not to be a big deal.

If you're looking for ideas, or anyone else who's following along, this is what mine looks like:

20150104_003 by Alan, on Flickr

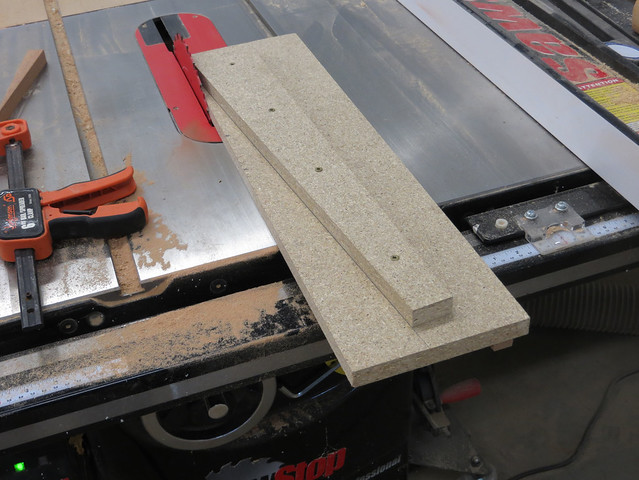
On the underside is a glued scrap of 3/4" mahogany that's a perfect fit for the slot in the top of the tablesaw:

20150104_001 by Alan, on Flickr

There's no need to get that strip glued in place perfectly square to the blade. All you do is make sure the piece of 3/4" sheet stock (particle board in my case) is oversized so that extends past the blade when it's riding through the slot. After the guide strip has been installed on the underside you just turn on the saw and run the jig through with the guide strip in the slot. The blade cuts off the extra width and you end up with everything nice and square. At this point all you have is a flat piece of 3/4" plywood that slides across the table in the slot. Now you need something to hold your board at the right angle.

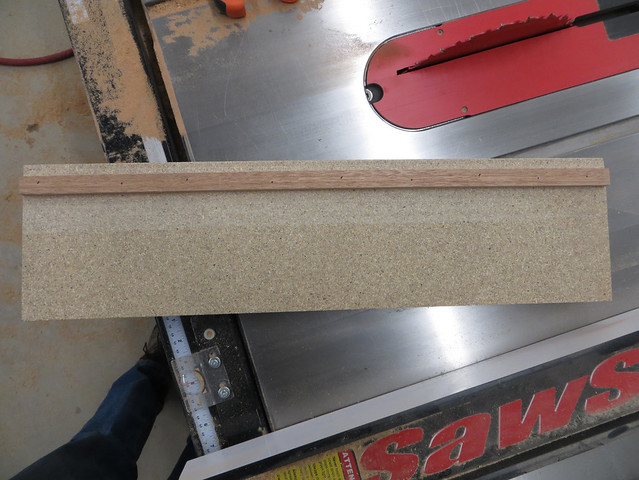
What ratio do you want your scarf joints to be? Let's pick 10:1 although you can just as easily pick whatever you want. Towards the front of your jig and on the edge that's right next to the saw blade make a mark. Now measure back 10" from that mark, along that same edge and make another mark. From this 2nd mark measure in (away from the blade) 1" and make a 3rd mark. Connect the 1st and 3rd marks with a straight edge and you have the proper angle for a 10:1 joint. For a 12:1 ratio you'd measure down 12" in the 2nd step and then still measure in 1".

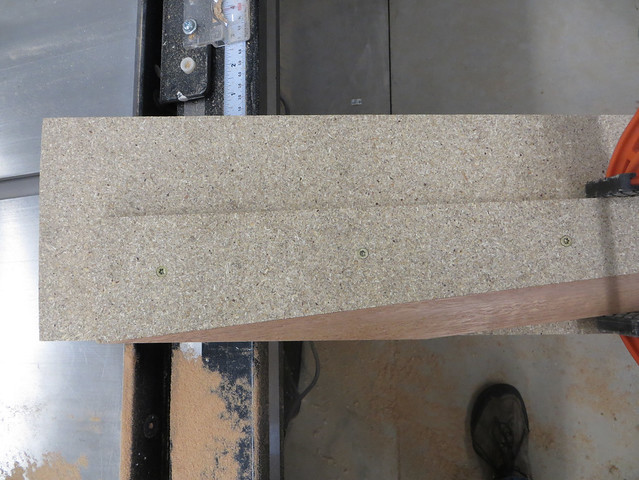
Now find a scrap piece of 3/4" board and screw it down on that line. Let the front of it hang off the edge of the jig so that you slice it off flush the first time you run in through the table saw.

I've heard of people using double sided tape to hold their boards in place on the jig but I just use a couple squeeze clamps. I'm only using one in this picture but I've since graduated to using two for a firmer hold. One towards the back and one farther forward.

20150104_004 by Alan, on Flickr

As you can see the forward part of the board that's getting cut is not secured but I haven't found this to be an issue. If the board is warped then in one direction it will pull away from the fence in front of the clamps (bad). If you flip it over so the curve is running the other way it pulls itself tight against the fence (good). If the board is perfectly straight it just sits there like it's supposed to.

Here it is after running through the saw:

20150104_005 by Alan, on Flickr

Alan
 
Alan's post is Spot on ! As usual ! I've done this with a band saw, but a tablesaw is, I think a better choice.
Great post Alan

Jim
 
We've done scarf's with a hand saw and circular saw with a jig as well. I liked how Mem did his on his Jacks and will likely do that as well this time around. My table saw doesn't have the full slots like Alan's, the T-slots don't take a sliding jig as well.
 
Thanks for that Allan. Someone sent me directions once but I had a hard time getting it figured out. As soon as you mentioned the 3 marks on the wood and I could see it, I understood the whole thing, funny how that works.
I guess I'll just use the Titebond cause I have it on hand.
Thanks
 
In the late 60's when Chestnut started scarfing rails they could have used wood glue or polyester resin. I prefer resin for those joints ~but~ we did have a resin joint fail when bending on an outwale.
 
Alan are you going to leave a little drain hole at the tip of your deck ?

Last night I cut out the decks and tonight I glued them in place. About half way through the process of gluing them I I remembered that I was going to think about whether or not I wanted to cut that drain hole. So I guess now the answer is no, I won't be leaving a little drain hole. :rolleyes:

Alan
 
Seal coat of epoxy went on the trim tonight. Got some Adtech 820 resin, which is quite thin, and it worked great. Brushed on much nicer than any epoxy I've ever used.

20160108_002 by Alan, on Flickr

20160108_003 by Alan, on Flickr

This was the last bit of epoxy work that needed to be done before the weather gets cold tonight. So now the shop can cool back down to the low 50's while I find something non-epoxy related to work on.
 
Looking very nice, and I think you've lapped me... Two? Or is it Three? Times since I started building last spring.... Turning green here!

On the subject of scarfs, someone had a rather neat router jig a few months back... showed how to do a scarf with a "hook" on it. Might be worth checking out.
 
Yes ! I still need to make that jig ! Cool !
Thanks for bringing that to light again !

Jim
 
Was a bum and didn't work in the shop all weekend. Back at it tonight though. Cut out seat hangers and trimmed the yoke and seats to fit. This is the first time I've hung seats from the gunwale. Kinda nerve racking when you finally punch through the gunwale and hope you measured everything right.

Supposed to warm up for a couple days towards the middle of the week so I hope to crank the heat back up and get a better cure on the epoxy I brushed on the gunwales and decks. It's a slow setting epoxy (1 hour pot life) and it's just not curing with the shop at 50 degrees. Been on for 3 days and it's still slightly tacky. Once it cures a little harder I'll lightly sand the inside of the hull and varnish.

Pretty exciting to see it nearing completion. Raffle tickets are being sold and tomorrow the newspaper is coming out to do a little article about the fundraiser and canoe building in general. They're not limiting themselves to how many tickets are available this year so I'm curious to see how many they sell.

Sorry, no pics. I'll take some later in the week after it hopefully has some varnish applied.

Alan
 
Cut out seat hangers and trimmed the yoke and seats to fit. This is the first time I've hung seats from the gunwale. Kinda nerve racking when you finally punch through the gunwale and hope you measured everything right.

I'll be interested in seeing the seat hangers.
 
Depending on your method, and mine might be different.

I've screwed up a few hangers, at least my share, refilled the holes, with a wood dowel and epoxy, and drilled again

My method is to drill the gunnel, the hanger and seat all at the same time. I tightly clamp everything in place.
Drill a shallow countersink, to hide my carriage bolt 1/4".

Now here's the trick I learned. Find the longest 1/4" drill bit you can find. I've got a couple that are 18- 20" long.

The advantage, is I can eyeball my angle of progress, as I very SLOWLY advance the bit . This has helped me at least improve my drilling accuracy.

Jim
 
I'll be interested in seeing the seat hangers.

I'm looking forward to the hangers myself.

Man, you guys must be leading about as boring a life as I am right now. Spring is too far away for us to be drooling over seat hangers already.

Don't get too excited. They're just the standard bridge type like Bell used.

My method is to drill the gunnel, the hanger and seat all at the same time. I tightly clamp everything in place.

That sounds like it would work well, might have to try that next time. I started by drilling the hanger and then transferred those marks to the gunnel and drilled it. Then installed the hangers and bolts. Held the seat in place against the hangers and with the other hand spun one of the bolts with the impact driver which put a witness mark on the seat. Once the first hole was drilled and the nut installed to hold the seat in place I did the same for the other three at the same time. In hindsight a couple clamps would have made it a lot less fumbly and a long drill bit, for the final hole through the seat if nothing else, would have been a breeze. But it came out fine in the end.

Alan
 
Man, you guys must be leading about as boring a life as I am right now. Spring is too far away for us to be drooling over seat hangers already.

Don't get too excited. They're just the standard bridge type like Bell used.

Well, yer kinda right. I am without a major shop project at the moment and have been reduced to alleviating boredom by tackling oddball projects using up odds and ends from the shop.

I definitely prefer bridge or truss style seat drops for the stiffness and rigidity they provide. But there are design differences in various truss drops. Bell’s drops seem awfully thin that the top of the arch, probably in an effort to skinny off another fraction of an ounce.

I’ve not had a Bell truss break, but when making my own they are more substantial; I’m a large mass, and tend to plonk heavily on the seat at difficult launches.

I started by drilling the hanger and then transferred those marks to the gunnel and drilled it. Then installed the hangers and bolts. Held the seat in place against the hangers and with the other hand spun one of the bolts with the impact driver which put a witness mark on the seat. Once the first hole was drilled and the nut installed to hold the seat in place I did the same for the other three at the same time. In hindsight a couple clamps would have made it a lot less fumbly and a long drill bit, for the final hole through the seat if nothing else, would have been a breeze. But it came out fine in the end.

I do much the same.

Truss drops can be finicky to get shaped, drilled and installed just right, especially if the bottom of the inwales are canted necessitating a complementary angle on the top of the bridge truss.

Those stupid drilled-dowel hangers Old Town uses are no doubt the easiest to install. Even easier if installed poorly. I’ve seen OT canoes with those dowel drops factory installed cockeyed off at four different angles on the same seat, and even with better installed dowel hangers the machine screws are nearly always wanked when I’ve removed them in a used canoe rebuild.

Because of my proven lack of drilling accuracy in trying to perfectly align the inwale holes, truss holes and seat frame holes I cheat a bit.

I drill the truss holes first with the drill press, and then clamp the truss atop the inwale in measured (thrice) and marked position. I just drop the machine screws through the truss and run a drill driver for a couple seconds to mark the top of the inwale with the shank end of the screw.

Drill those inwale holes and install the truss under the inwale with the machine screws dropped in place, get the seat frame aligned and clamped onto the bottom of the truss arch and run the driver on the screws again to mark the hole positions on the seat frame. I usually have enough frame to play with for minor adjustments if need be.

Even so my surest bet for a non-struggle alignment fit has been to drill the truss holes at least 1/32[SUP]nd[/SUP] or so larger than the machine screws. Even with pipe cleaner’ed varnish or urethane in those holes I have a little wiggle room to cheat with.
 
Back
Top