• Happy Incorporation of Hudson's Bay Co. (1670) 🍁🦫🪓

First Build: 17'-6" J. Winters "Yukon"

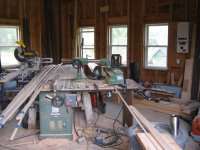
Slick way to cut your forms !

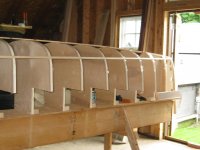
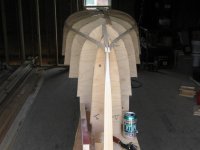
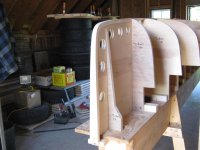
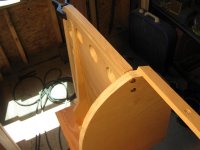
I used what I refer to as the Minnesota strongback. It's a T top, specific to the length of the canoe. None of the forms are over 16" tall. And so you can get almost all your forms for a solo, out of one sheet of plywood.
The Bear mountain form style, ( Mushroom shaped) requires two or three sheets of plywood for the forms. They are so much higher than the strongback.

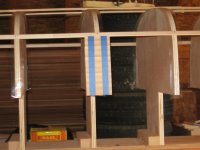
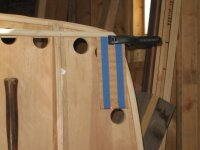
In this pic, One thing that is missing is a Strip fastened to the Top of those forms, to ensure a12" spacing between faces. Oh and of course tape on the forms. I really like Clear Packing tape. It releases so good ! I just corrected the photo.


IMG_0568_zpsmwdikbez.jpg

wAAACH5BAEKAAAALAAAAAABAAEAAAICRAEAOw==
IMG_0568_zpsmwdikbez.jpg
 
Last edited:
Between work, spring chores and weekend canoe day trips when the weather's nice, I've made slow progress on our canoe build. I'm getting closer to starting to actually build, though. Need to mill strips and set up forms on the strong back, and then off to the races! The stems glued up well, but on the first one it was a project getting laminations properly registered to each other and the form. On the second I did inner one day and outer the next, and that was easier to manage for me.

I'm thinking of 3/16 inch NWC strips with 6 ounce fiberglass plus footballs, in and out. Does this sound reasonable? Our skills are building, but we like rivers with rocks, and we hit our share.

Also, when 3/4 inch wide strips are referenced, is that overall, or "coverage"? With the rough cut material I've scarfed together there are some thinner board ends that will yield 13/16 overall, and 11/16 "coverage", with 1/4 inch diameter bead and cove. As I write this I'm thinking it probably doesn't matter on this Yukon hull, which doesn't have any sharp transitions.
 
It's always good to have a mixture of widths for strips, if you are not overly fanatical about forced symmetry. The Yukon will probably take the wide strips quite well for the sides of the hull and the bottom, save the thinner ones for rounding the corners. It's gonna be a big boat, but personally I don't think the weight saved on 3/16 inch strips is worth the sacrifice in strength, although others will disagree. The real savings in weight will come from your trim, gunwales and such. Bigger boats like the Yukon, with thinner scantlings, have the possibility of oil canning, although a football with six ounce on interior and exteriors will prevent that. I think with 1/4 inch you could skip the inner football. I have run lots of rapids with just an external football, and haven't been broken in half yet. However, there are lots of builders who use 3/16, so I'll let them chime in.
 
I'm not familiar with the J Winters Yukon. I just did a search, and couldn't find any pics.

Having said that ! I'm with the School of thought, that believes it's better to build towards the heavy duty side.

I do think also your plan of double layering, inside and out , with 6 oz glass, and using 3/16" thick strips is fine.

Buy planks that are Flat sawn, you will end up with Quarter sawn strips. The Strongest and easiest to machine !

I like my strips uniform. If I'm cutting strips from 5 planks, and one of them is thin ? I set my router table with the strips running BETWEEN the Fence and the bit.

Set the gap for the narrowest strips. The first pass, cutting the bead ? Will uniform all the strips. The router actually acts like a Planer in this respect.

Maybe you could link me to a Yukon pic ? Thanks !

Jim
 
Thank you Memaquay and Jim!

I had not considered milling different strip widths, but the flexibility it may provide sounds really useful. I'll mill my thinner boards narrower and keep them separated.

My wood is mostly flat sawn, so I should wind up with quarter sawn strips. I don't own a planer, so will utilize Jim's router table set up to "size" strips.

Karen and I had a wonderful day trip today on a new section of river with some "lively" sections. We did well, but managed to tag a few rocks. 1/4 inch strips it is!

I hope this link for Yukon pics works

https://anchorage.craigslist.org/boa/d/jber-swift-yukon-canoe/7125468669.html
 
Last edited by a moderator:
Rick, I edited the link so all you have to do is click on it. Sounds like you are enjoying this build so far! I'll be interested to see how it goes!

Doug
 
You are on the Right path Rick !
The best of luck !

Is the J Winters design, the same as the Swift design ? I'd bet not.

I do some more searching ! There should be a pic or two out there of the J Winter design.

Jim
 
The Swift design is the John Winters boat. He was their main designer for quite a few years. If you look back in the thread Jim, you will see a pic of me in the Dumoine, which is the smaller sister of the Yukon by a foot, but basically the same canoe. A large, seaworthy, friendly kinda hull.
 
Yes, I see you Mem in your Dumoine.

The link showed a Royalex hull.

I get the idea though.

Thanks !

Jim
 
I've had/taken time to work on the canoe and am finally making some more visible progress. Feels good!

Milling the 1/4 inch strips went well. I used the skilsaw method on the scarfed together, full length boards, and my table saw on a few 6-8 foot boards. The full length strips are 3/4 and the short strips are 7/8 inch wide, so I'll have some variety to play with. I ended up with 1600 lineal feet, which may be a bit short because when I did my takeoff I forgot that I'd lose 1/8 inch coverage per strip due to the bead and cove. Not my first Rookie Mistake! I used Jim's router table setup to size strip width, as I don't own a planer. It worked really well. I've never worked with Northern White Cedar before. So far I like it; it's remarkably light and pliable.

It was fun setting up the station forms and seeing the hull shape emerge. I've started fooling with the NWC inner stems (outer stems will be ash) and have a question for those of you who have built with them. At the keel line the stem is about 1/4 inch high of the station form it butts to. This is true for both the bow and stern. I've double checked layout and dimensions and think I'm true to plan. To my inexperienced eye it seems like the solution might be to lower the bow and stern forms vertically 1/4 inch?

Having fun on the steep part of the learning curve!
 

Attachments

  • photo16247.jpg
    photo16247.jpg
    343.5 KB · Views: 9
  • photo16248.jpg
    photo16248.jpg
    255.8 KB · Views: 9
  • photo16249.jpg
    photo16249.jpg
    191.8 KB · Views: 9
Well Rick, I can't answer any of your questions but do like the pics of your shop, especially that fancy tire stand for something with clamps on it! :p Must be nice having a work space that large! Good luck and keep posting pics!

dougd
 
After some thinking, research, and much appreciated mentoring, the solution to my height discrepancy is to lower the stem forms the appropriate amount.

Thanks Doug! The "tire stand" is supporting the ash outer stems, and also weighting down enough NWC for another canoe or two. I'm really enjoying this build so far, and we don't own a proper solo...

Rick
 
I'd thought about how to approach stripping a lot and had a plan. Start level at the low point of the shear, cove up, and use staples. After a lot of spin and no traction I'm not doing any of that.

I started playing with the stapler at the bench with scrap and quickly discovered there's not much room for error landing a 1/2 inch staple vertically in a 5/8 inch wide strip. You have to hold your tongue just right, every time. Horizontally would work with my 3/4 inch forms, but I didn't think I'd get enough "bite" at the ends of the boat where the strips only contact the edge of the form and are twisting the most. I tried some 17 gauge, 1 and 1/4 inch headed brads which seemed to work well, so I'm going to start off with those.

While looking at laying out a level line on the forms at the low point of the shear I realized I already had a level line at the design water line. There's not a lot of difference between the two in terms of "strip travel". I'm planning random strip layout with no accent strips or patterns. So why not start at the water line?

And then, while looking at 1600 plus lineal feet of strips with paper thin, delicate cove edges, and wondering how much fun it was going to be pushing on them to get things tight, I decided to start at the water line with the 2 full length strips I'd milled with beads on both edges.

So there it is. The best laid plan completely ignored (except for the random thing)!

I started inner stem beveling with a spokeshave and finished with a "Cruiser" sanding stick, which worked really well. I discovered that you can't check for "fair curve" at the stems until they are beveled (or close), and that one effects the other. My plans produce forms that fair for tapered stems, which I'd never heard of until I read the instructions. I think I may need to slightly pad the last station form at the stern, but am still mulling it over.

Time to make some "Jimmy Clamps'!

If the last, tricky football strip can be called the "whisky strip", the first 2 full length strips which are the foundation for everything else to follow might be called the "beer strips" For me anyway!
 

Attachments

  • photo16471.jpg
    photo16471.jpg
    235.8 KB · Views: 7
  • photo16472.jpg
    photo16472.jpg
    184.3 KB · Views: 7
Very interesting, I have never seen stripping done like that before. If I were to do it that way, I would also run full length strips at the gunwale, because due to the curvature of the boat, your strips will probably form some kind of half bullseye pattern that will have to extend past the gunwales, and then be cut. If you install gunwale strips now, you can just cut your strips to fit as they but against the gunwale strip. Not sure if that make sense to you. Essentially, I do the same thing you are doing now, but i run my first strip at the gunwale line and the second one at the sheer. Then I fill that section in.

The thing about the brad nailer....have you tried pulling them out? I tried one on my big freighter build, and it was heck trying to pull those suckers out. In the pic, you haven't shot them very deep. but I'm wondering if the strips will slide up the nail in areas under pressure.

Anyway, just my thoughts, really looking forward to seeing this canoe, I'm sure it will be the first cedar strip Yukon that has been built.
 
I concur with Mem on using brads. I can miss my staple mark as bad as any. No biggie ! If you catch someone measuring your staple hole location ? Slap them !

With your hull design, a 9/16" T-50 staple will be fine. It's been used on millions of strippers, it will work on yours ! Build up the base of your staplers with tape, to keep from driving staples too deep, and you are good to go . An Arrow Stapler has been in my arsenal lately and works fine !

I would start at the shearline, and keep going up to the Whiskey strip.

Shape your stems now, and be done with it.

Forms look Great Rick !

Jim
 
I've built with 5/8" strips. I shot my staples horizontally. Don't recall having a problem at the stems but every hull is different. There's nothing to say you can't shoot vertical where each staple leg goes into a different strip. You could also try diagonal.

Alan
 
My Old Sears Craftsman used a Wide staple. If you use narrow strips, you were better off applying Horizontal staples. They didn't work good, and soon collected dust !

Staples applied vertically Each leg has equal holding surface. If you can hit where the strip is contacting the form.

Horizontally maybe only one staple will have anything to hold.

Remember the strips contact the forms at an angle, at least on the sides. all except the center form and stems.

The common practice is the staple is applied Vertically.

Jim
 
Thanks guys! I really appreciate your input, experience, and willingness to help!

After work yesterday I decided I needed to confirm my assumption that the waterline strip is essentially parallel to a level shear strip with respect to applied strip "travel". I had crudely measured the curved form surfaces with a steel tape to reach that conclusion. I taped together sufficient strips to reach the low point of the shear (which is not the mid-point station but the next aft, a surprise to me!), and then set up a laser at that elevation. I then repeated this process at the bow and stern, and other stations. In the photos look for the red dot at the bottom of the strips. Waterline and level at shear are within 1/8 inch with respect to "strip travel" on this hull.

The brads that I used are hand driven. Old school. Possibly the only advantage of this is that they don't need to be driven perpendicular to strip surface, but can be angled, which greatly increases their holding power. In situations where the strip is resisting twisting I can press hard on the bead leading edge and tap in a brad precisely where needed. I think I'll start with brads and see how it goes. I can switch to tried and true staples if needed.

I like the idea of stripping the shear line and infilling the difference at each end. It seems like it would be stronger than just running the strips out, through the shear, and eliminates having to lay out and cut the shear after.

My personal visual preference is for level strips. To my eye when the boat's on the water the dominate landscape line is the waterline, and it's comforting to see that echoed in the visual structure of the boat. That being said, I too have been seduced by Martin's beautiful photos of strip canoes with exterior painted hulls on the Green Valley website. I may paint the outside, possibly a pretty shade of rock!

I should be able to make some progress this weekend. We're staying close to home as our dog Libby recovers from a losing encounter with a bear. No swimming or running for her for a while.

Thanks again! I really appreciate it!
 

Attachments

  • photo16489.jpg
    photo16489.jpg
    249.1 KB · Views: 5
  • photo16490.jpg
    photo16490.jpg
    222.8 KB · Views: 6
  • photo16491.jpg
    photo16491.jpg
    197.3 KB · Views: 5
Good idea with measuring strip travel up the sides ! Taping them. I'll remember that !

Brads will leave bigger holes to fill, Mac McCarthy, would fill the holes, with Tooth pics. Always thought that would be cool. A Stapler won out for speed and ease of using, for me.

Hope Libby heals up !

Great start on your build Rick ! Have a great weekend !

Jim
 
Back
Top