• Happy National Telephone Day! 🔔☎️📱📶

First Build: 17'-6" J. Winters "Yukon"

Joined
Aug 7, 2019
Messages
381
Reaction score
323
Location
Williston, VT
Karen and I need a larger canoe for lake and river tripping. I've been contemplating building for a while and finally have space to set up and do it. I've read Canoecraft and Gilpatrick's books as well as most of the past build threads on this forum so I guess I'm sufficiently "armed and dangerous"!
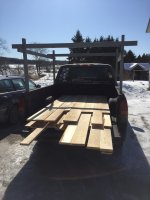
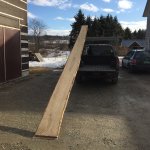
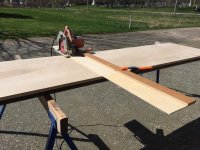
My goals are modest; hopefully a simple, well crafted canoe using traditional wood, which I'm lucky to be able to source locally. I have some Northern White Cedar for the hull, stickered and drying now. It's flat and clear but unfortunately not long. I have 15% 10' with the balance equally split between 6 and 8'. I should get good at butt joints by the time I'm done. I lucked onto a beautiful 21' clear ash board for gunwales and I'm thinking of using cherry for seats and thwarts. I bought a very nice full set of plans from Green Valley. I've just started cutting out station forms and hope to start building later this month when outside temperatures allow for glue up.
I've learned so much on this site. The knowledge and expertise so freely shared is amazing! I welcome any suggestions, advise, positive criticism and questions!
 

Attachments

  • photo14923.jpg
    photo14923.jpg
    277.6 KB · Views: 7
  • photo14924.jpg
    photo14924.jpg
    596.7 KB · Views: 7
AWESOME !

I'd do like Cruiser does, and scarf those cedar planks, before cutting strips. Butt joining is fine ! but a big hull is nice to have full length strips.

Use your strongback to support your planks, and cut the strips with a Skilsaw ! Hint ! Cut your gunnels the same time saves setting up again later !

Back when I was working full time and raising a family, I always liked starting a build in April, because when I was ready to glass the temps were near ideal ! Usually late June, early July.

More advise. If you ask questions here before you do something ? It's a lot better, than after a mistake is made :rolleyes:

I love it when another build is started ! Don't be a Stranger ! Keep us up todate !

Jim
 
Amen to that Jim, IMO a few skarf joints off the boat and none on the boat is a win for handling ...not to mention handling for subsequent B & C and anything else you do to the strips is a lot easier working with the full length strips.

On my Freedom 17 tandem build I also sourced NWC and selected several different lengths and skarfed longer planks. I could get 16' (put the joints to close to the ends for me), but used a selection of 8, 10 and 12 to get staggered joints. I used a 4:1 skarf, these aren't structural, so i saw no purpose to a stronger/longer skarf length. (I don't beleieve that build was posted here, the link if you have any interest http://buildersforum.bearmountainboats.com/viewtopic.php?f=3&t=2244 )

I did the skarfs with tinted epoxy to make the joints pop a bit as an accent feature, at the time I wasn't sure , but I really liked the effect. Also IMO using epoxy for these skarfs is a good idea, the strength and void filling property just makes it better solution (compared to wood glue).


Brian
 
I built the little sister to the Yukon, the Dumoine. It was a great canoe, I regret getting rid of it. For a 16 footer, it had a ton of room, and was extremely sea worthy. It wasn't a race horse, but it got me places safely. You could always increase the spacing between your stations marginally, and go even bigger, say 18 6, lol, just saying.

I have a different opinion about pre-scarfing the cedar. For the first 7 or eight canoes, I did that, then I got lazy one day and discovered how fast and easy it was to butt joint. I haven't used full length since then.
 
Last edited:
Whether you scarf your planks, or butt joint short strips on the forms? In the long run makes no difference. There is good and bad about both. Building a canoe is about making decisions. None of us build exactly the same. this will become YOUR canoe.

I don't scarf my planks, never needed to. On the other hand, I've never cut short planks for strips. In your case I agree with Brian, as per his post !

I cut my strips with a Skilsaw, and long planks are much easier. You will get far more uniform strips cutting them with a Skilsaw, than trying to push planks through a table saw !

Again you will be fine either way !
Good luck !

Jim
 
Jim, the main reason I don't like long planks is because of the situation you described. It is quite difficult to push full length planks through a table saw and get even strips, even with a comprehensive fencing system. Plush running them edge ways along a jointer is tough too. I like them anywhere from 6 to 10 feet. I have scarfed strips after I ripped up the boards too, but before I beaded and coved them. I made up several glueing jigs and just used 5 minute epoxy, worked like a charm. Lots of work though. I kind of think of butt joints as similar to laying a floor, just make sure to stagger them generously.
 
I like building canoes. I don't like the prep work of processing strips. So for me butt joints are an easy decision.

Alan
 
Thank you all for the advice and encouragement!
I knew I would need to scarf a few boards to produce full length strips to start planking, but really hadn't entertained the thought of doing so for the entire boat. I think now I'll make at least half full length strips and mix them with butt jointed strips. Then I'll get experience both ways. The process for me on this first build is as important as the product. It's really helpful to know that a 4:1 scarf ratio is sufficient for this application and that epoxy is the glue of choice!
It's good to hear the Yukon's little sister paddles well! Karen and I have not paddled many different canoes. We own and like a Royalex 1979 Mad River Explorer. It's tight for tripping (the way we currently pack!) and very tight when we include our Brittany, Libby. We've done 3, week plus Allagash trips in a rented Old Town Tripper which has worked well for us. The extra foot plus length
in the center is huge! So I guess you can say that we know and are comfortable in deep, high volume boats with plenty of freeboard! When I was researching what to build I was conflicted on symmetrical versus asymmetrical designs. I think I still am, and have to admit to being surprised when I got the plans and noticed that an adjustable front seat is recommended for adjusting boat trim!
Again, Thanks to each of you for your support!
Rick
 
Jim, the main reason I don't like long planks is because of the situation you described. It is quite difficult to push full length planks through a table saw and get even strips, even with a comprehensive fencing system. Plush running them edge ways along a jointer is tough too. I like them anywhere from 6 to 10 feet. I have scarfed strips after I ripped up the boards too, but before I beaded and coved them. I made up several glueing jigs and just used 5 minute epoxy, worked like a charm. Lots of work though. I kind of think of butt joints as similar to laying a floor, just make sure to stagger them generously.

I'll bet you expected this ! :rolleyes:

A Skilsaw with a fence solves your problem ! No lifting the plank ! The Strong back makes a great Saw horse, to hold your plank, as you simply push the saw on the plank. You will be amazed at the uniformity of this technique.

Rough cut lumber is not a problem ! Once you cut the strips with the Skilsaw , Bead and Cove the strips, running your strips Between the fence and router bit, and you are good to go !

28ccb1ce-0b40-4649-b3ed-89e5c40b0834_zpsasp4x7se.jpg

IMG_0205_zpsbdarnuco.jpg
 
I think I still am, and have to admit to being surprised when I got the plans and noticed that an adjustable front seat is recommended for adjusting boat trim!

You won't need a sliding seat. I have built several of J. Winter's designs (plans all from Martin at Green Valley), and haven't used a slider yet. It's a tripping canoe, so if you need to adjust trim, you can do it with your load. You will find that the bow seat could be further back than you are used too.

I'm interested to know why you ended up picking the Yukon. Is river tripping with a fair amount of white water your primary destination?

I've built Winter's Quetico a few times too, even stretched it out to 20 feet once. That is a versatile wilderness tripper as well.
 
Hey Jim,

I've built and renovated a number of barns here in southeastern PA, it's farm country. Every one has vertical board and batten siding. The siding is typically Eastern White Pine; 1x12 wide with one face planed and one face rough-sawn. The battens are typically 2.25" or 2.5" wide, and must be ripped from the regular siding boards. Most barns here use 16' long boards all around, with shorter boards cut to fit the changing length in the gables.

This is a roundabout way of saying that I have cut miles of battens with the same technique as yours, with a fence clamped to the shoe of my circular saw. Because of the width, the clamped-on fence must be attached on the other side of the blade from your setup because the typical circular saw shoe only projects 1.5" past the blade where your angle iron is clamped on. This is to aid carpenters in ripping to 1.5" for a lot of typical cutting operations like notching gable studs into end rafters in roof framing.

I can attest to this method being WAY easier than manipulating a 16' plank through a tables! You need a minimum of 32' of clear workspace to do that, and for best results need an infeed & outfeed table to support the work. Plus, that 16' plank has so much leverage that it's difficult to keep it parallel to the fence of the tablesaw until the sawyer gets closer to the tablesaw. That's probably the source of the inconsistent strip sizes with that method.

I'm right there with you in promoting the circular saw method! I would even suggest mounting your angle iron fence with drilled, and then tapped, holes in the saw shoe so you can consistently re-mount that fence with a couple of machine screws! Here's my quick & dirty fence mount in action for this particular job... my own barn (lockdown project!)

Pat
SuEj2VojSaWGIe%LOt13Pw.jpguhKS9zeYSkmCZGZbBtqaow.jpgt%v3f+SzSLa2hwdXjkLdVA.jpg
 
I'm interested to know why you ended up picking the Yukon. Is river tripping with a fair amount of white water your primary destination?

After I decided to build an asymmetrical design I contacted Martin at Green Valley asking if the Winisk might be a suitable choice for lake and river tripping. I told him our favorite trips to date had been on the Allagash which consisted of headwater lakes and river, including some Class I and II rapids. He suggested that the Dumoine might be a better choice for us, and my impression at the time, perhaps incorrectly, was that the Winisk was more of a flat water boat. I looked into the Dumoine and concluded that it was not the step increase in size from our Mad River Explorer that I was looking for. When I inquired about stretching the Dumoine he suggested the Yukon, a larger Dumoine. I discovered that the Yukon was very similar in size and dimensions to the Old Town Tripper which we were familiar with, worked well for us, and felt safe in. Basically, in my simple mind, the Yukon is an asymmetrical Tripper! We will see...

Martin has been an absolute pleasure to work with!

I'm happy to hear that an adjustable bow seat is not necessary!

Again, we've not paddled very many different canoes. If the Yukon paddles better than what we're used to I'll be happy. If it weighs less than our 81 pound MR Explorer I'll be really happy!
 
Your Dewalt looks older and sturdier than the newer one I have. There was a lot of flex between the base and saw body on mine ! You Got It !!

The 1 x stock I buy is #3 and better. It is smooth on one side and rough on the other. No problem when I bead and cove !

Yeah, I'd sure like to find some more 1 x 12 x 16' long ! Repurposing at today's prices is Great !

Jim
 
Last edited:
I have built a few Winisks as well. It's a solid tripping boat for two people, but the Yukon will haul a lot more gear and feel very solid in all conditions. The Winisk would be faster than the Dumoine, but there are always trade offs. Martin is a great guy, I have gotten plans from him for over 20 years.

The pic below is the Dumoine. The difference between the Dumoine/Yukon and other Winter's designs is that the hull if very full, there is a lot of room. I miss my Dumoine, maybe I should build a new one. The one below was made out of white pine, so it was fairly heavy. I would for sure use all cedar if i built it again. Looking for forward to seeing your build!
qbO50SY.png
 
Patrick, only comment on your setup, is that maybe think about shortening that guide a bit. If the plank has any warp the longer the guide the more it can be pulled off the desired width ... keeping it shorter allows getting consistent width strips with most boards, regardless of warps.


Brian
 
Patrick, only comment on your setup, is that maybe think about shortening that guide a bit. If the plank has any warp the longer the guide the more it can be pulled off the desired width ... keeping it shorter allows getting consistent width strips with most boards, regardless of warps.


Brian

Yes. really 12" is plenty.
 
Haha, you guys are right of course! I just picked up the closest scrap piece and clamped it on. For that job, ripping barn siding battens, accuracy within an eighth or so is acceptable. For ripping canoe strips I would certainly be more precise.

Jim, my saw is an older Dewalt. What i like most about it is the depth adjustment. The big black knob in front functions as both a handle and, by screwing/unscrewing it, tightens/loosens the depth adjustment. That particular model has a huge, durable aluminum shoe. It’s so much bigger than most that my pals on the jobsite have nicknamed it “ the Nimitz”, after the American Navy aircraft carrier of that name. I guess they think it’s as big as the carrier deck! Its way overkill for ripping 1x material, but it’s familiar and comfortable to me. OSHA won’t like it though... the guard is removed because it Always gets in the way for unusual cuts like compound miters for valley or hip rafters! Most guys rig some kind of a hook to hold the guard up. Everyone I work with knows not to pick up my saw!
 
After thinking long and hard about it, for maybe half a second, I decided to build with stems. I've always wanted to steam bend wood and never had reason to until now. I'm using northern white cedar for inners and ash for outers. I know intellectually that stems are not functionally necessary and will cost time, material and weight. But emotionally, the carpenter in me will be happy to see some "structure" at the corners!

I ripped 1/4 inch strips and soaked them in water for 3 days. A plastic zip tie through a 1/4 inch hole worked well to order strips for soaking and steaming.The family pressure cooker was drafted to generate steam. Karen was a very helpful 3rd hand, and was responsible for making sure that I clamped up with the cedar on the INSIDE and the ash on the OUTSIDE. We steamed for half an hour and the strips bent up without complaint, although I was surprised at the force needed to make them comply.
 

Attachments

  • photo15127.jpg
    photo15127.jpg
    266.9 KB · Views: 9
I'm plugging away on the prep work. The strong back's built and ready to glue up short boards into full length ones. I did a moisture check on the cedar this past weekend and boards that were 20% 10 weeks ago are now 9%, so I think they'll be ready to mill when I get to it. I'm finishing up cutting station forms and had the thought that if this were a symmetrical design I'd be done by now because I would have template routed the second half of forms.

The photo is of a homemade skilsaw track. I've made them for years in different lengths for different saws and purposes. They work really well for making quick, true cuts. 1/4 inch plywood works well for the base, and 1/2 inch for the fence. When you assemble it, do so with the base being wider than necessary and make sure the fence is perfectly straight. Then run the saw along the fence and you'll have a track tuned for that saw and blade. After that it's simple to spring clamp the track edge to the line you want to cut and you're good to go. On this project, the track was useful to establish "factory edges" within 4 by 8 foot plywood panels, increasing yield and reducing waste.
 

Attachments

  • photo15483.jpg
    photo15483.jpg
    489.3 KB · Views: 5
Back
Top