• Happy Midnight Ride of Paul Revere (1775)! ⛪🕯️🕛🏇🏼

First Build: 17'-6" J. Winters "Yukon"

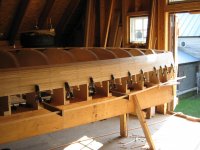
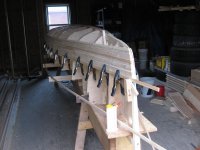
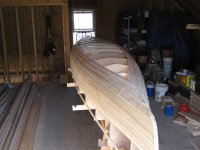
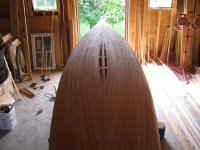
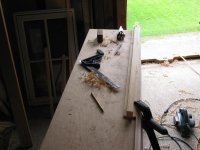
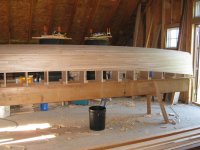
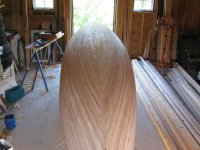
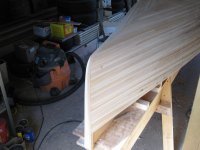
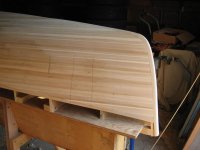
I'm just about done with the easy strips. I've enjoyed the prep work, but stripping is just flat out fun! It's been hot here so I've been using Titebond III for the extended open time. So far I've just used the 5/8 inch wide full length strips, except for one course of 3/4 inch 6 and 8 footers, which enabled me to reach the low point of the shear neatly. I was surprised how much easier the short strips are to handle and install, and how simple it is to end join strips on the boat. Because I started at the water line and am stripping backwards I clubbed together a simple rack to hold strips while I applied glue. Then I'd seat the strip with "Jimmy Clamps" between each station, and then tack it off. The Jimmy Clamps work incredibly well!

I have renewed respect for those of you who build staple less!

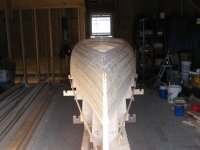
I told Karen that most of my life I've built plumb, level and square, often with crooked material. This boat building thing is the opposite. It's a really interesting new headset for me!
 

Attachments

  • photo16529.jpg
    photo16529.jpg
    279.3 KB · Views: 12
  • photo16530.jpg
    photo16530.jpg
    288.2 KB · Views: 12
  • photo16531.jpg
    photo16531.jpg
    279.6 KB · Views: 12
Looks great! I remember the Dumoine was a pretty easy boat to strip, and it can be a lot of fun. You're having a great build so far!
 
I've stripped just past the inner stems and through the bilge. Also applied the shear strip.

I've stuck with the headed brads and am happy with them. Staples may be faster. I switched from 17 gauge 1 and 1/4 inch to 18 gauge 1 inch. The 18's are slightly smaller in diameter than the width of a staple leg. Going through the bilge I was having to put the chiropractor to it at the stems. I made up some wood "washers" to use there so I could nail them home and still easily remove later without damage. The washers worked really well. Plenty of bite.

I'd thought I would herringbone the strips after clearing the stems like shown in Gilpatrick's book. That's not possible on this hull as there's still quite a bit of v at the outer stations. It's not flat enough to alternate end joints. In fact, there's a very subtle v even at the middle stations. After pondering how best to execute this detail, I'm thinking about running 2 narrow strips end to end with a bead and cove joint at the centerline, and then fitting to that on each side. I think I'm OK with it visually. It would be a visual reference to the keel line. Open to suggestions here!

I need to think about ordering epoxy and fiberglass cloth. I'm definitely going to apply a 2nd football layer on the outside, and possibly also the inside. I'm uncertain how to dimension the football layer. I'm thinking it must relate to the design waterline in some way? The design waterline on this canoe is 5 and 3/4 inches above the low point of the hull, at the middle station.

I apologize for the quality of my photos. My space is much nicer to work in than take pictures in!
 

Attachments

  • photo16725.jpg
    photo16725.jpg
    251.7 KB · Views: 12
  • photo16726.jpg
    photo16726.jpg
    267.6 KB · Views: 12
  • photo16727.jpg
    photo16727.jpg
    304.9 KB · Views: 12
The hull is looking Great !
Yes, I see the Vee. You will be fine if you stick with the CanoeCraft method of stripping the Foot ball. It would be the least amount of work, only having to fit one side of the strips. Running two parallel strips would be fine, just requiring more fitting ! What ever you are most comfortable with !!!

If your strongback is relatively parallel to the floor, front to back, side to side. I clamp a Magic marker to a stick, and walk along each side, and put a dot every foot or so, on the cloth I'm going to cut for the football.

From there it's a matter of Cutting Dot to Dot. Be Careful, as the Ink in the Magic marker can bleed through !. The height would be from the floor up to the water line you choose. Me ? I like the 3" water line on my canoes. Builders choice.

In reality, you don't have to be real precise, as you won't be able to tell where the extra layer begins or ends, after the varnish is on !

Maybe a pic will tell you more ?


IMG_0701_zps1xhztmcf.jpg - Click image for larger version  Name:	IMG_0701_zps1xhztmcf.jpg Views:	0 Size:	175.5 KB ID:	114557
 
Last edited:
Just subscribed to this thread and have caught up reading through the entire thread. The build looks great RickR. I look forward to following your future progress. All the best!
 
Rick,
I think a couple of parallel keel strips would look great! But, there would be more cutting and fitting than if you stripped one side first , then trimmed to the keel line.

Think about this...you'll only strip this hull once, but you'll possibly sit in it and paddle it for a lifetime.

Oh, and your build is coming along nicely, you should be very proud.
 
I've done the keel strips before. Like the others said it takes more time and work but it looks nice. Do whatever makes you happy. Either way will work.

I will say that I've never sat there admiring the stripping pattern of any boat while I'm paddling it.

Alan
 
Thanks stripperguy! It's certainly proving to be true that they're more decisions to make along the way than I imagined when I started.

Thank you Alan. I agree with you about strip beauty and paddling. This will be a tandem tripping canoe and will normally be loaded. We won't be able to see the bottom if we wanted to!

I'm going to shoot for twin keel strips, basically because it seems like such an easy way to achieve a straight keel line on this hull with v and rocker. I'm doubling my football fits but perhaps they'll be slightly easier in that the bevel to fit to is uniform end to end, and always normal to the surface. I will miss out on the experience of cutting in a centerline this time around.

And to my simple mind, it seems logical that I'll be able to celebrate the "whiskey strip" twice!
 
Rick Fitting strips is actually satisfying ! My first hull, I herringboned the strips. A Good experience !

Enjoy the Build ! It IS your canoe !

Jim
 
It's been a very busy August, but I'm closing in on finishing up the football. I've enjoyed fitting to the twin keel strips. I've alternated installing strips side to side, and that made it easy to keep track of matching strips when I started to care about that. I was happy to have 2 strip widths to work with as I approached the center line. Made it easy to not finish with a sliver. The 2 whiskey strips are glued up and awaiting fitting. We'll see how that goes! After that I need to fill in the 4 cheeks and then on to the next phase.
 

Attachments

  • photo16948.jpg
    photo16948.jpg
    325 KB · Views: 14
  • photo16949.jpg
    photo16949.jpg
    308.6 KB · Views: 14
  • photo16950.jpg
    photo16950.jpg
    356.8 KB · Views: 14
A very exciting moment indeed! I found that pulling the staples was very satisfying as it opened the doorway to a new work phase that really starts to bring the canoe to life. Looks great! Happy sanding!!!
 
Stripping is now complete. The "whiskey strips" went in without any problems. I'd placed and traced paper templates, and then glued up the final 2 strips on them. The first one fit nicely within 10 minutes, but the second took a couple hours to surrender. That's pretty much how this entire project has gone. I never know how long something takes until it's done. I've learned not to have a time agenda.

I ended up with about 150 feet of strips extra, using 1450.

When I decided to set shear strips I wondered how it would go fitting level strips to them. Harder than I thought. The first couple courses for and aft had pretty severe 2-3 foot tapers. Pointy, pointy. Scribing was straight forward, but adding a bead to the scribed edge did not go well and I was wishing I'd ripped the cove off the shear strips and had a square edge to fit to. I was quickly losing my professional attitude and about ready to rip the shear strips off, strip through the shear, and cut the shear line after (which CanoeCraft recommends anyway) when the lightbulb went off. I made a zero clearance, no snipe fence for the router table. With a scrap strip as a backer even the steepest taper beaded easily. After I got going, the fits were easier than those along the keel line.

The headed brads pulled easily, straight out with pliers. They're still "like new", so I saved them. If I can remember where I put them the next canoe will be cheaper!

Time to order fiberglass and epoxy. I'm now thinking 6 ounce E glass on the exterior with a 6 ounce S glass football, and 6 ounce S glass on the interior. I want a rugged hull. I appreciate any comments or suggestions.

Next up are outer stems, and then it will be time to put the beaver to the boat. I'm looking forward to fairing the hull.
 

Attachments

  • photo17039.jpg
    photo17039.jpg
    409.3 KB · Views: 7
  • photo17040.jpg
    photo17040.jpg
    295.8 KB · Views: 7
  • photo17041.jpg
    photo17041.jpg
    303.2 KB · Views: 7
  • photo17042.jpg
    photo17042.jpg
    345.9 KB · Views: 7
Outer stems are finally fit, installed, and mostly shaped.

I now have first hand understanding why building stemless is so popular! Stems are a lot of additional work and time, undoubtedly more so on a first build. They have occupied the majority of my pondering, puzzlement time. That being said, steaming, laminating, beveling inners, and fitting, installing and shaping outers has been some of the most enjoyable and satisfying work on the build so far.

Cruiser's description of outer stem shaping in his recent build made that task pretty straightforward. My stems are tapered, and the vertical portions I shaped to a full bullnose, round over. Past the turn of the bilge, on the bottom of the boat, the hull lines faired through the stem produce a pretty strong v shape which gradually diminishes but extends into the cedar stripping. I know this v needs to be softened and worked back, but I've no idea how far to take it. I'd really appreciate any thoughts and advise on this. I tend to think in terms of 1/8, 1/4, 3/8 inch radius round over terms, if that makes any sense.

I'm using a 5 inch RO sander on the flatter areas, and a longboard everywhere else to fair the hull. It's pretty amazing how all those flat strips can result in such a complex, curvy shape!
 

Attachments

  • photo17219.jpg
    photo17219.jpg
    205.5 KB · Views: 9
  • photo17220.jpg
    photo17220.jpg
    257.5 KB · Views: 10
  • photo17221.jpg
    photo17221.jpg
    216.2 KB · Views: 10
  • photo17222.jpg
    photo17222.jpg
    154.6 KB · Views: 10
Looks great! Martin always told me to fair the outer stems so that they followed the lines of the canoe, looks like you have done a pretty good job of that. Your layup specs are the same that I use for hard working canoes. Looking forward to seeing more of this!
 
I have enjoyed watching your project develop. This canoe looks amazing, stems look great. This is going to be a fun one to watch as she comes to life.
 
Looking really nice! Do you think you'll get it glassed soon? Not sure about your workspace, whether it's heated well enough (or at all) to work with the resin in the dead of winter.
I've skied up by you plenty enough to know that you can have some pretty low temps during the best season...
 
I'm hoping to at least get the exterior glassed before winter. My work space does not have temperature control, but I could rent a heater if necessary.
 
Coming along fine !
Yeah, I'd wait until warmer temps to glass ! Or look for a place warm to do it !
Patience is a virtue, so they say ! :rolleyes:

Jim
 
Back
Top