• Happy Weed Appreciation Day! 🌱🌿🌻

Camping Boxes...

Joined
Jul 25, 2012
Messages
838
Reaction score
5
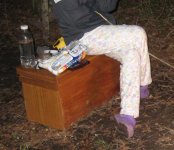
This last winter gone by one of my projects was to make some camping boxes that could replace those ugly blue barrels. It was fun but I suspect that I've gone overboard: too big and heavy.


I played with two different ways to close the boxes, I like the one on the left the best, it's simpler.


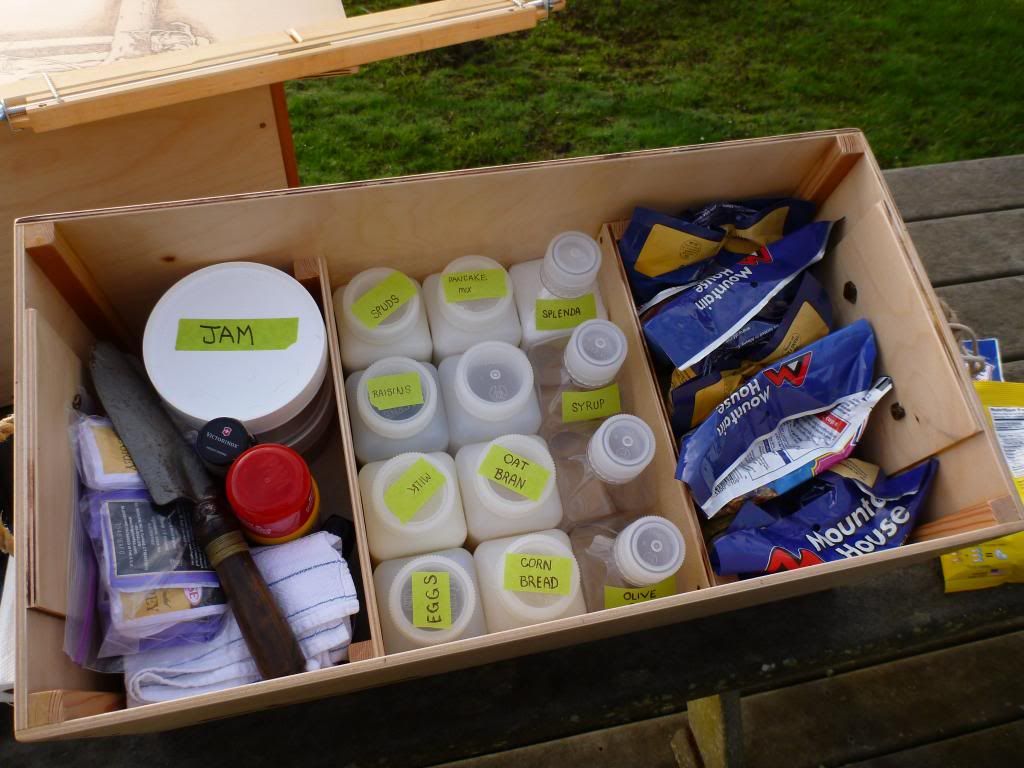
The Nalgene people make their square bottles in several sizes; these are 16 ounce, some wide mouth and some narrow for liquids. Also I have two round ones for butter and jam, you've got to be able to scoop that stuff out. I'm sure I'll have several arguments with my self about what will finally go in the various bottles.


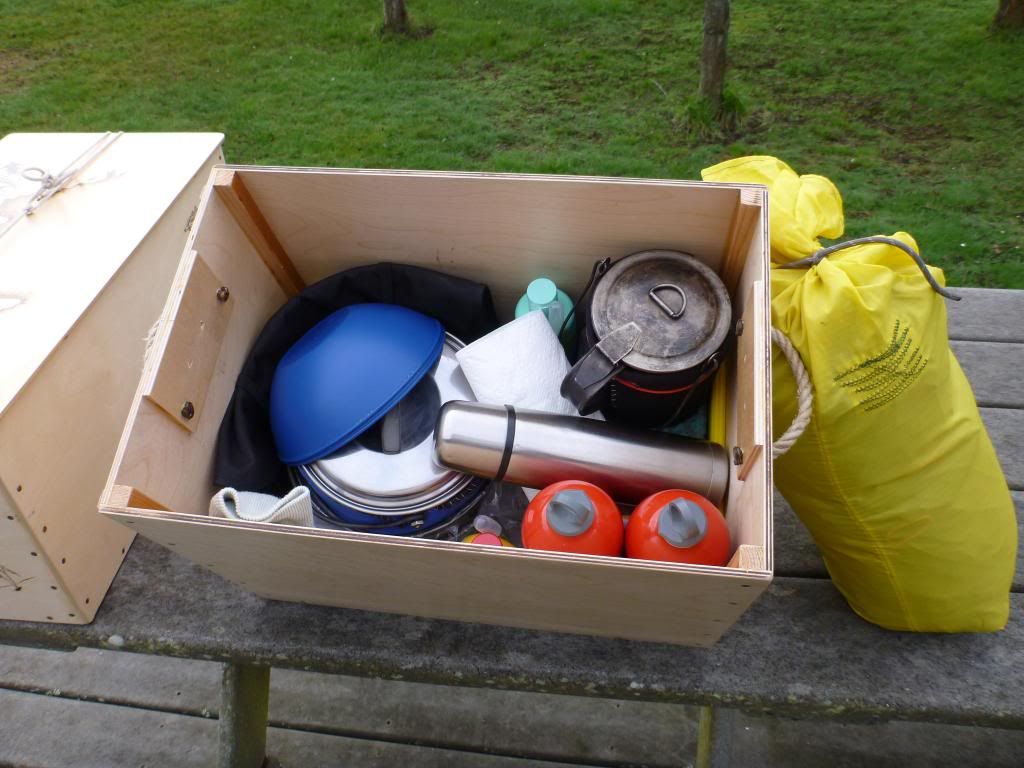
The smaller box holds the cooking stuff, subject to more reorganization as I fiddle about.
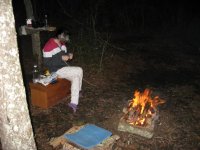
I do a good bit of my cooking over a Optimus OO stove and it suffers if there is any wind; I've tried several different windscreens, honestly didn't like any of them. I made the second box so it could also act as a really efficient wind shield. Now I know it's made of wood but it works well. I made the prototype of cardboard just to see if the idea was workable. In use, I've felt all around inside the box and only singed the hairs off the back of my hand (closest to the heat) the wood didn't suffer.


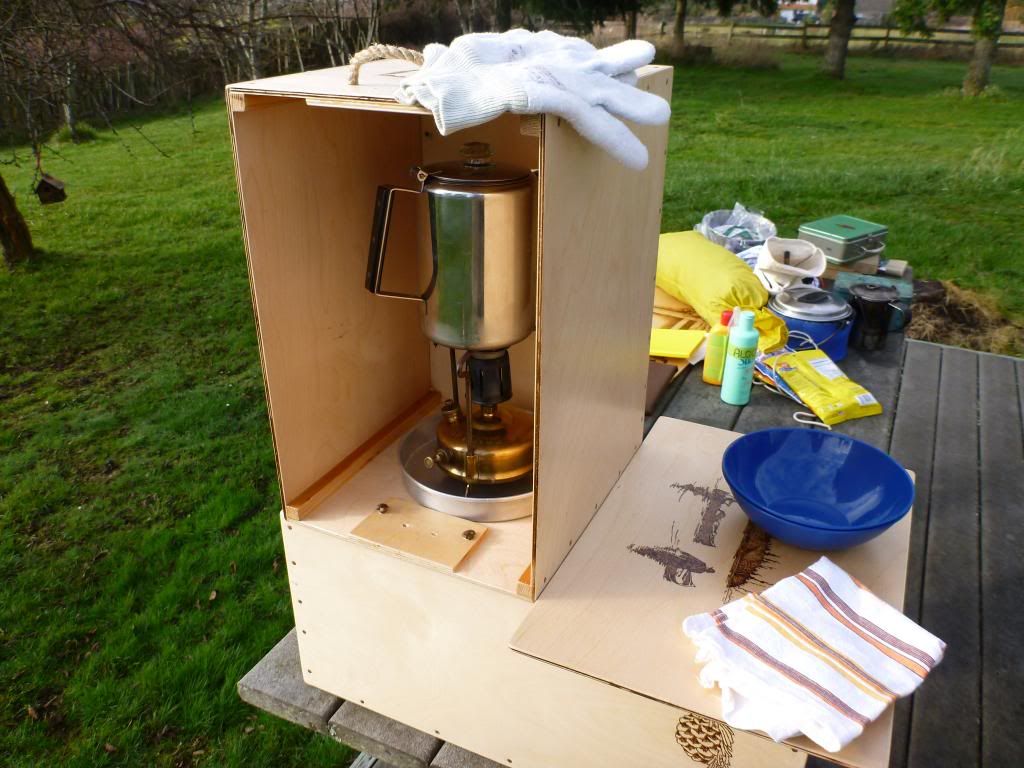
The smaller box has cleats on one end that fit into the top of the long box, it can be turned four ways depending on the wind. The lids are useful as work surfaces. The plywood is baltic birch 1/4" , if I could find it, I believe 3/16 would have worked.
Here I am trying to figure out why all my projects turn out so heavy.


My wonderful daughter came home for a visit today and taught (again) her Dad how to do photos. That's why I'm pestering everybody.

Best Wishes, Rob


It will be a nice place to store your gear in the off season at least ;)

I wonder if one, and by one I mean one with some wood skill and not myself, could build cedar strip barrels (much like a cedar strip canoe) for carrying gear?
 
nice! I've got a similar one (two actually... one here in LA, one stored in NY)... I like a slip top lid held on with string... very simple. mine are a lot heavier though... 1/2" pine on bottom and two ends, 1/4" ply on the sides, 3/8" ply lid (so you can sit on it). I finished in in spar varnish. there's a cleat on each end to carry it with... I may eventually drill through it and insert a rope handle, which makes it easier to manage.

Here's a pic of it with my daughter enjoying a campfire.
 

Attachments

  • Fire 4 - edit.jpg
    Fire 4 - edit.jpg
    92.5 KB · Views: 1
  • Fire 3 edit.jpg
    Fire 3 edit.jpg
    94.5 KB · Views: 0
Last edited:
I agree OM. Blue barrels are a bit of an eyesore. I’m not entirely sure that a round container really is the best option, but I don’t know. I’ve always loved the traditional wannigan, but never liked the weight. Is that a wood burning design on the outside? Wow! Please don’t tell me of any shortcomings of your design; I’d rather imagine a trip with your kitchen boxes than with my plastic blue receptacle. Beautiful photos.
 
Wow! Great job. I was going to say that they probably aren't waterproof like a blue barrel, but looking at what you have in them, it doesn't look like it would matter.
Dave
 
New to the site, but recognizing the images on those boxes made me register immediately so I could reply. One of my favorite books, "Cache Lake Country".
 
Hey, WOW!!, They are really nice. I can see sitting around the campsite with those. They will only look better with age, like us my Friend.

I agree with Chingatchgook, "Cache Lake Country", one of the best books ever on canoes, outdoors, lake country living, always a great book to go back to. Your attention to detail is a pleasure to the eye.

They must look really nice in the canoe, to each his own, but those blue barrels are not there for their looks, but they have their place in the canoetripping world.

Me, I'd rather hump those beautiful boxes across a portage and have them around the campsite. Then place them in a prominent place here at home off season to remind me of those campsites.

Great Stuff, Thanks for sharing, made my Sunday!
 
Then place them in a prominent place here at home off season to remind me of those campsites.

I agree, and sort of do this... once my oldest moved out, I took over her bedroom as my gear, work, gun, and storage room... my wannigan sits out where I can get to the stuff inside (mostly cooking gear and stoves.) My wife still doesn't like it, but at least now she can just shut the door if it appears to be too messy. I also covered the bed with a nice wool blanket, and moved all my "outdoor-theme" books onto her empty bookshelves (less the 'reading now' stack in the bedroom). I like going in there and puttering when it's too hot or rainy to work outside. the only thing she refuses to let me do is smoke up a shirt and hang it up to replicate a campfire... ((...sigh...))
 
Thanks everyone! It's fun to try your hand at something new and that wood burning was for me. Well actually, I did some of it when I was a cub sprout, can't remember what the project was but I do remember the kid who grabbed the wrong end of the tool and burned himself. Very sharp learning curve.
Now, nearly at the other end of my life, I've taken it up again. The tool came from Amazon at under twenty dollars and everything else locally. You sharp eyed guys are right, the drawings are from Cache Lake Country, sure like that book. I spent the bucks for a recent how to do it book, but it really wasn't necessary. If you practice on scrap wood just doing it will teach you. I did find that a really cheap quality of carbon paper to transfer the drawing to the wood is best; as long as you can see the transferred line the fainter the better, after you're done burning a light sanding will remove any remaining lines. About the wood; annular rings are very hard to work through and still have a clean even line. They are harder and the in between area is softer; the only answer I found was to regulate the pressure on the tip, easier said than done.
I often pause for thought, or just pause; you can't do that with wood burning or the tip will leave a big burn where you paused. Got to keep moving or lift the point.
They make these books with designs of different kinds; next, I'd like to try some of those Celtic designs where everything inter twines. I'll do it too, just as soon as I can figure where I could use another box.
Thanks again guys

Best Wishes, Rob
 
Stunning job on those boxes Rob! I've been thinking about building a canoe wannigan box and decorating it with burned images too. Your woodburning images are fantastic - nice clean lines and shading - well done! Thanks for the inspiration.
 
"I'll do it too, just as soon as I can figure where I could use another box."

Wannigans are like canoes---you can't have too many!!
Dave
 
You are too modest Rob, the two fellas meeting on a portage with paddles down is amazing.(imho)

Thank Your Daughter for taking the time to show you the in's and out's of posting pictures, looking forward to more of your neat stuff.
 
Thanks Robin, I'll be sure to tell her. I sure liked that book, suppose both the author and the artist are gone now. Copying the work of the illustrator, Henry B. Kane sure gives me a feel of what a fine craftsman he was. By the way did you notice that fellow on the left has a cold handle fry pan in his box? Was think of you when I did it.
I'll include two shots of the lids. That one titled "Indians heading North" I especially like; it tells a story, kind of like an old Currier and Ives book I had when I was a kid. Look how far back both guys are setting. That must be some load to balance everything. And heading North? Ah...must be the trading post is located to the south and these men are bring home provisions for the coming winter. At least the geese think so.


I wonder what ever happened to that book, probably lost in some move.


Now here is a man who has it all together and can pack up into very few packs, probably his canoe is a chestnut as well. Nothing of the dude about him. Wonder if he drove trucks?

Best Wishes, Rob
 
Holy cow, don't know how I missed this one! That is some stellar wood burning! Those pics make me want to chuck everything in the trash and head out into the beyond forever!
 
My dad was an artist, and from watching him work I'd say there's a lot of practice and skill behind these little works of art.
 
Resurrecting this thread as I'm building a wannigan this winter for a two week trip I have planned for July in the Yellowstone backcountry.

I hadn't really planned on trying anything artistic with mine but after seeing OM's work here I believe I shall indeed do some sort of personalization to my box.

Awesome artwork, sir, and an inspiration for a first time wannigan builder & user.
 
Last edited:
Hi Holmes, I was surprised to see this pop up again this morning! Maybe not quite as bad as a drowned victim floating to the surface....but still kinda.

The woodburning skill is just about on par with those "paint by numbers" things they had years ago. The real skill belonged to the guy who did the drawings for the book. Don't know if you're thinking about woodburning for your box or not but if so I have some observations that might help.

When you pick your wood, the smoother and more annular ring free the better. That "Baltic Birch" is quarter inch 5 ply and the best I've found. When you think about it; when you are trying to copy a drawing done in pen and ink into burned marks on wood some translation is required. What helped me was to do a given drawing on a bit of scrap wood the first time. It takes the pressure off and in the margins of the scrap piece I played with the various points to see just what effect the blunter ones would give me for background shading and then the pointy tips, how I'd best use them to show the fine hair on an animal and so on.

It was also kinda funny, I'd get to really working hard trying to get something right and be gripping the tool way too tight. A "death grip" doesn't help with the line and it also allows the transfer of more heat from the burning tool to my fingers. Ouch! If I was to continue doing this I believe I'd look to upgrade my little woodburning tool.

Over on Amazon, in the books, they have these "clip art" books that have millions of different illustrations and designs that are copyright free. What you can do is using a copy machine, reduce or blow up a given picture to fit the space you want to fill.

Good luck and if I can help just ask.

Best Wishes, Rob
 
I'm also happy this thread made is way up again! The art work on these boxes is wonderful, I might try my hand at it this winter.... And thank you Oldie to explain a few things!! we should get you to do a picture tutorial for us, it would be so helpful!!
Thank you again!
 
Well, thinking about some kind of tutorial and got to looking for my little wood burning tool. I put it away some where safe, I just don't know where that someplace is.
Over on Amazon: Walnut Hollow Creative Woodburning Pen is the one I used or pretty close to it anyway. Only I seem to remember paying twenty dollars for it and now they are ten.
In the books about wood burning, they have a bunch, you might check your local library or get one through inter-library loan before buying it from Amazon.

Now, it looks like wood burning is a real hobby for many of the authors. They have gone way beyond my poor efforts, really beautiful creations. but you might consider how well a given illustration will wear on the side of a camping box that you actually use and not just look at. One of the things I found very difficult was to produce shading. Look at the guy working on dinner by the campfire; the shading behind him and by the trees is composed of a gozillion little loopy circles. Again and over again till the wood was darkened enough. Phew! I get dizzy just remembering it!

What I'm saying here is be cautious of a drawing with a lot of graded tones, better to stick to a simple line drawing, at least at first.

When I first put this thread up I was really tickled how the boxes turned out, in particular how well the smaller box/wind shield worked. But nobody is interested in that, it's all about the pictures! And they were a afterthought! Oh well, what ever works for you. The one thing that isn't evident is I used some small bronze ring-shanked boat building nails to hold the boxes together along with glue. They needed a pilot hole to go in nice. I picked them up about thirty years ago and finally got some use out of them. I made a little test joint to see just how well it would hold, very impressive!

That's all I know and a little bit more,

Best Wishes, Rob
 
Back
Top