• Happy Marine Mammal Rescue Day! 🐳🐬🦭🦦

A Raven for Christmas

I only put a wet-out coat on the inside of mine. I like the extra traction of the exposed weave and, like you, I don't believe that any structural advantage would outweigh the weight & traction advantages.

I did find an easy way to get epoxy off of my skin but I can't remember what it was. I've got a couple of months to remember though.

Looks great... into the home stretch!
 
Looking really nice!
Next comes the fun part, choosing trim materials and designs.
Betcha can’t wait to get it wet.

WRT wet out only vs covering coats inside:
The tensile strength of fiberglass is in the order of 500,000 psi
Most epoxy resins have a tensile strength of about 5,000 psi
While the fiberglass tensile strength is approximately 100 times more, in reality, the composite strength is dominated by the shear strength of the bond between the glass and the substrate.
From this, it’s clear that added coats of resin WILL add strength, however, the effect is so minor that it is inconsequential.
So from strictly a strength vs weight perspective, there is practically no benefit to added coats. Add to that the decrease in traction underfoot and there is even less justification for covering coats inside the hull.
But again, that’s just my personal jaded opinion, along with some structural engineering analysis.
 
I always mean to do just one coat on the inside. But I found enough flaws in my wet out coat, to warrant filling the weave.

Advantages of filling the weave ? It's easier to clean, saves wear on the unfilled cloth, and looks finished.
Disadvantage, is the cost of the extra epoxy, the potential wear on the cloth, and of course the extra weight.

I always relieved at this point ! I enjoy the trim work, more than the glassing !

Looks great ! Congratulations !
 
Now that I have gone beyond the point of a chemical bond for a fill coat, how should I approach the sanding for the varnish. Would a light hand sanding create enough adhesion for the varnish to adhere, with out cutting into the fabric?

I know I got to much resin in the inner stem areas. I have a lot to learn. Thanks again for the compliments and advice.
Roy
 
I use my orbital sander on the inside, and just give it a light sanding with 120, enough to buff it up for the varnish to adhere to. Or you could paint the inside, which doesn't look as nice, but gives you an accurate guide as to when you need to recoat.
 
The weight of my Raven after inside glassing is 46 pounds, plus or minus a little.

I'm using poplar veneered with cherry on the inside, and poplar veneered with walnut on the outside. They are 3/4" square. One 15'6" gunnel is 2 poundsIMG_20240119_203155896.jpg
So I figured about 8 pounds for gunnels. The seat will be about 3 pounds when finished.IMG_20240120_042044267.jpg
I'll be pushing 60 pounds when I get finished.
 
3/4 is quite large for gunwales, think I used around 5/8. I didn't put decks in my latest raven either. just grab handles. I haven't weighed it, but think it is around 50 pounds. My first one built out of white pine was very heavy, probably 65 or 70.
 
3/4 is quite large for gunwales, think I used around 5/8. I didn't put decks in my latest raven either. just grab handles. I haven't weighed it, but think it is around 50 pounds. My first one built out of white pine was very heavy, probably 65 or 70.
Maybe my stems were just a little to beefy along with the heavier wood I stripped it with. I looked back over your Raven build, more then once, and noticed you didn't put decks on it.
Thanks Mem.

Warming my shop up now. Going to cut scuppers on the inside gunnels and finish the seat frame. I'll be using 1/2" nylon strap on my seat.
Roy
 
Cutting in scuppers reduced gunnel weight by a pound and a half on my build. Your canoe is looking great! Thanks for taking time to post your progress.
 
Cutting in scuppers reduced gunnel weight by a pound and a half on my build. Your canoe is looking great! Thanks for taking time to post your progress.
Whew Boy! Yep I cut one scupper 3/8" deep and 3" wide. Put my inside gunnel in and cracked it, ugh 😩. I fixed it the next day. So skip the scuppers.

With Gamma fixen to get rolling on his Raven build, I better get with it.

I just finished my seat today. I used 1/2" nylon strap.IMG_20240129_193009513.jpg I've been waiting on the gunnels until the seat was done. I have to spread the sides to get the seat in, lot of chime on this thing. The Raven is larger then I expected. The front top of my seat is 9" high. Almost the same hight of my Wabnaki tandem seats. I put a lining hole in the bow.IMG_20240129_193827574.jpg I used 1/2" PVC, I hope that's ok. IMG_20240128_120049988_HDR.jpgMy wife thought it was funny, watching epoxy dry. I'm going to do the stern, maybe this afternoon, and maybe install an inner gunwale. I don't know if I have enough clamps to do both at the same time.
I'm looking forward to taking it out. I'm curious how it does.
Roy
 
I like the lining hole idea and may incorporate some myself. I see no reason why 1/2" pvc wouldn't work and the seat looks great! Looks like you glued it in... will you skip the rear thwart?

I doubt you'll have to worry about me catching up. I've got too many irons in the fire and you're almost to the finish line. Hope mine looks that good.
 
Whew Boy! Yep I cut one scupper 3/8" deep and 3" wide. Put my inside gunnel in and cracked it, ugh 😩. I fixed it the next day. So skip the scuppers.
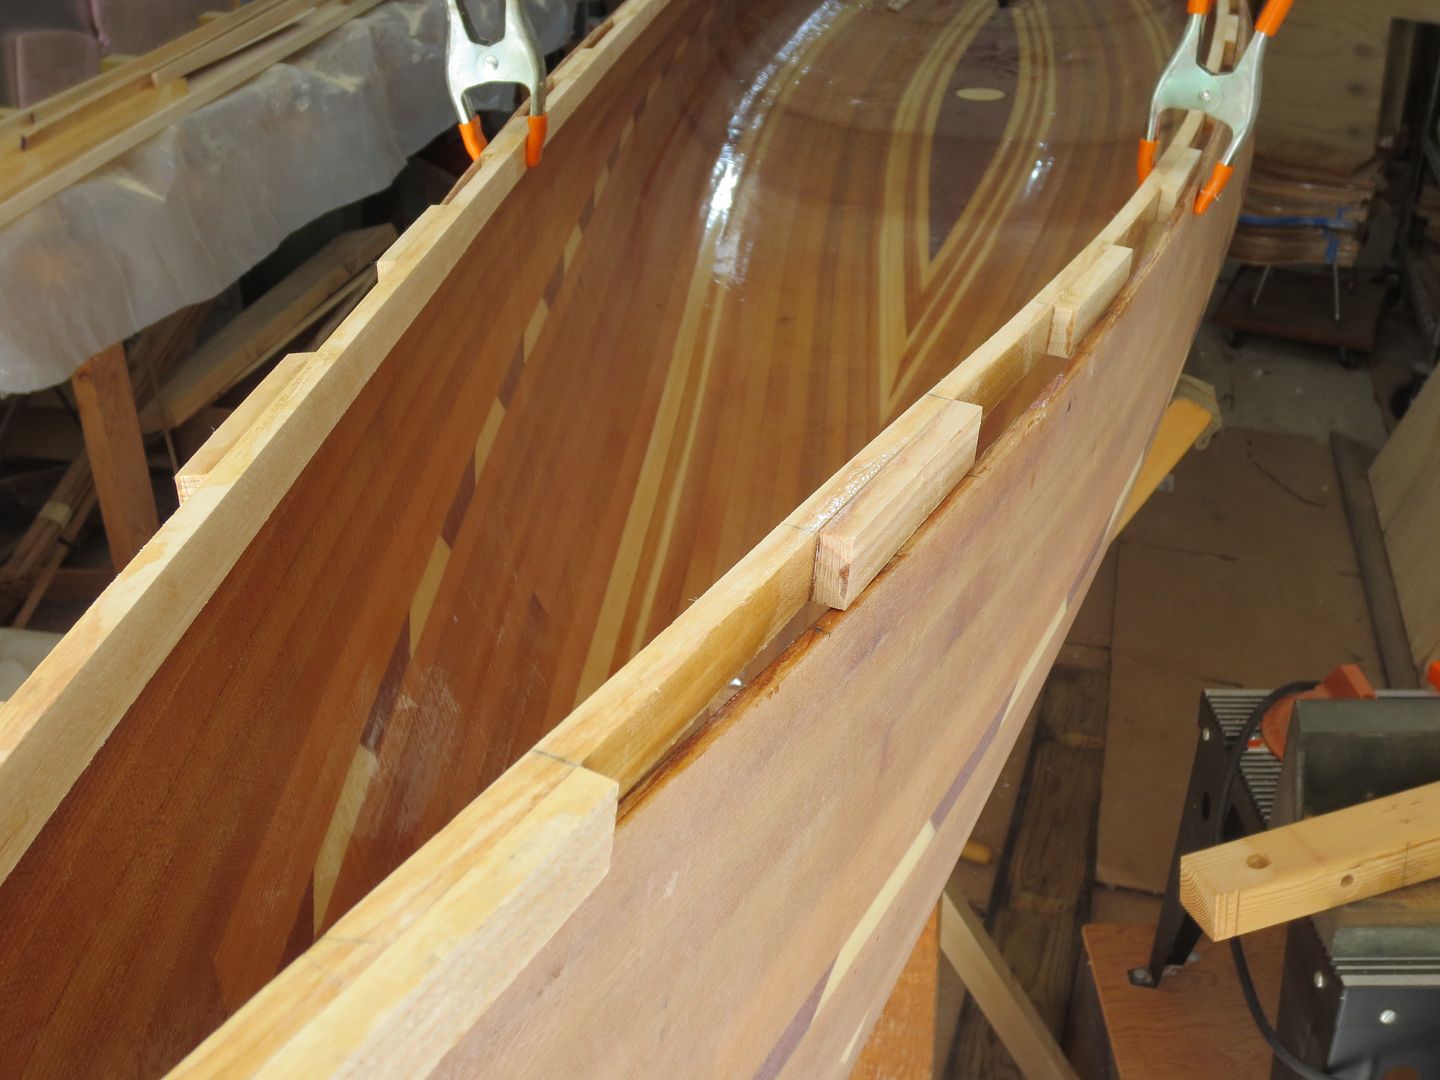
There are other ways to build scuppers, into the inwhale, other than trying to make it from one piece.
I cut a long, a 3/8" strip, ( full length ), because I have long Ash. Then epoxy 3/8"spacers. That gives me the 3/4" inwhale.

IMG_1229_zpslvb2nlft.jpg


Another method, used by Bruce Kunz, was a three piece inwhale.
The center section, about three feet long, was scuppered with spacers, making it 3/4", and the rest was a solid 3/8" strip.

The widened middle part, 3/4", accommodates hanging the seat, and thwarts. While the rest was narrow, and lighter .

To me this is a great compromise, especially if you don't have access to full length inwhale stock.

Bruce knew how to build!

Some day, I will use Bruces method.

Seat looks great !
I make mine more open. Mine are cooler in the Summer, but this time of year ? I need a pad, to keep my Tush warm and cozy.

I like the photo of you looking at the stem ! I spent a lot of time staring at my canoes during the building process . Trying to reason out my next move. I swear this is half the time it takes me, to build a canoe. I even wake up in the middle of the night, thinking of building !

A chunk of Walnut, with the center drilled out, for your liner rope, would look cool on your hull !
The PVC is fine also .

Come on Spring !


Jim
 
I like the lining hole idea and may incorporate some myself. I see no reason why 1/2" pvc wouldn't work and the seat looks great! Looks like you glued it in... will you skip the rear thwart?
I glued in the rails it sets on. I screwed the seat to the rails with the torx head decking screws, just in case I need to replace the seat or adjust if needed. The first seat made for it, didn't turn out very well. I was going to use natural cane, but messed up cutting the groove that the binder cane sets inIMG_20240103_184357766.jpgI sort of made the seat a little to wide to be hung from the gunnels. Ahh it happens, nice and wide for gluteus maximus expansion.

I will be adding the rear thwart anyhow.
 
I cut a long, a 3/8" strip, ( full length ), because I have long Ash. Then epoxy 3/8"spacers. That gives me the 3/4" inwhale
I'll do that next time. The cherry veneer was the only thing that kept it together.
A chunk of Walnut, with the center drilled out, for your liner rope, would look cool on your hull !
The PVC is fine also .
A chunk of walnut! You mean like epoxied to the hull around the lining hole? That would look spiffy 🤔.

Hey Jim, did you mention before about brushing polyurethane on the webbing? Maybe to preserve it and keep it from absorbing water.
Roy
 
Well, crap. That's alot easier than the way I did my Freedom. I'll, most likely, be stealing that idea.
If I remember correctly you epoxied the ends of the seat frame to the sides of your canoe? Did you put a rail underneath? I considered epoxying the seat ends to the rail, but I figured it be fine screwed down. I did tilt the front of the seat down a little. Dropping the front of the seat in my tandem canoe made a huge difference with respect to my knees and back.

IMG_20240130_175634659.jpgIMG_20240130_183826294.jpg
Slathered epoxy to all surfaces, thickened and buttered up and clamped on both inside gunnels. I used every clamp I had. I didn't care how insignificant a little ole clamp looked. I do need to get a few more clamps. Nothing special or heavy duty, just some 4" inexpensive ones.
Roy
 
Back
Top