• Happy Weed Appreciation Day! 🌱🌿🌻

1905-1909 B.N. Morris

Joined
Jan 31, 2013
Messages
2,338
Reaction score
182
Location
Warren, Manitoba
This is not going to be a typical build thread. I will stop in occasionally with updates since this canoe is not standard wood/canvas construction. It has some unique features which will aggravate me to no end at some point I'm sure. For the most part I know what I intend to do to restore this grand old boat. This has the potential to be a very long reconstruction and I shant bore any of you with anything you have already seen in Red's thread.

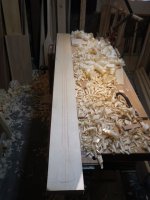
First of all, this boat is fragile in it's present condition. 5 feet of inwale is missing on one side and up to 28 ribs are broken or cracked. It needed to be fortified before any real work could begin on it and I decided to put it into traction for the duration. It has a primarily flat bottom, no rocker to speak of, so I built a strong back to sit it on and then added plywood forms on the sides to hold the structure. It is quite rigid despite not actually being screwed to the structure. If I pull up on the bow it flexes in the middle where the inwale ends, overall though, it is quite solid in it's new foundation.

One thing unique to BN Morris at the time is the pocketed inwales. The ribs sit in pockets in the inwales rather than being nailed to the inside edge. This means that as I replace and repair the ribs the inwales need to come out first. I do need to replace both inwales though so I plan to bend up the new ones before tackling the ribs. We haven't yet sourced 18 foot spruce for the rails but will try to find it somewhere. As with the Huron I did, my plan is to bend up the new rails under the old after soaking awhile, but since I have only one good one, I'm hoping to bend both under the one then just swap one around for the other side, provided the sheer line is the same at both ends it will work.

With one good inwale it had kept the shape on that side, we used the thwarts and seats to pull it back to it's original size, and it should be a torpedo once finished. 32" wide at 17 feet long. I need to shape the plywood forms based on the one good side but I needed a tool to capture the shape. I know I can buy what I wanted but could not get one locally so I made one and it worked fine. I just drew in the full curve as needed. Cut out the good side, made a copy for the poor side. I screwed 2x2 cleats to the outside of the strongback and the ply forms to the cleats.

For now, the boat is stabilized and I can get back to stripping.

The notch in the strongback is for the keel, which is about the only thing keeping the boat from breaking in half.


Are you implying I've been trouble? ;)

It should keep me from posting awhile at the least.


Well there's a saying, "idle hands are the devil's workshop". Just thinking idle hands won't be a problem for a while.

I hope you still find time to post, because you would be missed if you didn't.

Those pocketed inwales look like a pain in the arse, but I'm sure you will find a cleaver way to expedite them. I am looking forward to seeing your awesome skills at work.
 
Having seen that thing close up, I would have thought it was good kindling for the fire place. You've got your work cut out for you on this one. Remember, drink'n helps.
 
Having seen that thing close up, I would have thought it was good kindling for the fire place. You've got your work cut out for you on this one. Remember, drink'n helps.

If it weren't so rare, I would agree about a quick burn. You remember pointing out how thin the planking is at the inwales? It is all that way at the top, tapered paper thin. Only at the stems is it full thickness. This boat had closed gunwales so they tapered the planking to get the outwale tight to the inwale.

I swear, some people should have to take a test before working on old boats. Fiberglas and roofing tar on the inside to stop leaking...
 
Really looking forward to watching your progress on this restoration. Good luck. Dealing with those pocketed inwale rib slots look quite challenging.
 
If it weren't so rare, I would agree about a quick burn. You remember pointing out how thin the planking is at the inwales? It is all that way at the top, tapered paper thin. Only at the stems is it full thickness. This boat had closed gunwales so they tapered the planking to get the outwale tight to the inwale.

I swear, some people should have to take a test before working on old boats. Fiberglas and roofing tar on the inside to stop leaking...

Ick Why do people look to glass for a cure all? Roofing Tar Ick ick. That's waaay more than your usual fifty bucks and three days immersed in varnish stripper!
 
A full day of stripping and only about 3/4's done. Unfortunately someone painted the area under the decks black and it is not wanting to come off. However, Morris stained all his canoes so this might help hide what I cannot remove in the ends. Varnish and stain removal is showing prior repairs in woods not original and at this point, I believe I can get it down to only replacing 5 ribs and repairing the rest either just through resin infusion or behind the rib repairs. The more original wood that is left the better, and that is what the intention is. It isn't about repairing it with whatever I have on hand, but restoring it. My only real fear is I won't do it the justice it requires, but on the other hand, anything I do to get her back on the water is a good thing.
 
This Morris will be priceless. I'm enjoying this restoration already. I've done varnish/stain/paint stripping before, but always in the comfort of a nice home with some nice music playing. I can't imagine having to strip the inside of a canoe. Cramped and awkward. Good luck with this canoe Mihun. It'll be beautiful. I hope when it's done some rich tourist or museum makes you a big $$$ offer. Nevertheless, it will have been worth all this sweat equity. A gorgeous piece of canoe history.
 
This Morris will be priceless. I'm enjoying this restoration already. I've done varnish/stain/paint stripping before, but always in the comfort of a nice home with some nice music playing. I can't imagine having to strip the inside of a canoe. Cramped and awkward. Good luck with this canoe Mihun. It'll be beautiful. I hope when it's done some rich tourist or museum makes you a big $$$ offer. Nevertheless, it will have been worth all this sweat equity. A gorgeous piece of canoe history.

I already have a paint scheme, Burgundy and Cream with striping et al. I have it in my mind, just don't have a program to draw it with, of course, I could break out the pencil crayons and have at it.

Christine is still eyeballing that fibreglassed Morris in Connecticut and may send YC the cash to buy it, we then just need to figure out how to get it here. Our friend Douglas Ingram collects Peterborough Canoes and he asked what we are going to collect specifically. Could be the largest Morris collection in Canada, lol.
 
The search for clear spruce continues. First quote from a firm in Toronto for a 2x6x20 foot of Sitka Spruce, (with knots and kiln dried), although I specifically asked for air dried clear lumber, but I digress. The board, $245, shipping, $181. Knot!

Still awaiting further quotes and it looking like we may have to find clear lumber in kiln dried 2x12's, I did a little test. With some research I found that kiln dried wood should not be steam bent, neither should soft wood. Well, it has been done for 100 years so... The kiln drying process permanently freezes the lignin in the wood so it won't elasticize during the steaming process, thus it won't bend. Kiln Dried lumber moisture content is around 12%. Lumber for bending is best between 25-30% moisture and it should be done as the wood dries after being cut, preferably, since even air dried wood can reduce to 10% moisture content and getting it back up is apparently difficult, nigh impossible.

The test, seeing as I had the time. I cut a piece of KD 1x6 into the size of the inwale with the correct taper. I used the circular saw for this test taper and it is pretty close. I soaked it in the tub for about 4 hours in warm water. Ever try to soak wood in a tub when you don't have a plug? Duct tape worked ok.

The wood felt pretty dry still when I went to bend it, but trying a further soak in an outside barrel I had to break an inch of ice first, so that was out since it would freeze in place, so I just tried bending it. It did indeed bend. Yes, I am aware the C clamp on the left is crushing the wood, but this is a test so I didn't bother with my strapping. I cut the form for a 10% overbend and I will leave it until Sunday night and see if it holds the bend at all.

 
Karin,
Have you tried a place here in Ontario called A&M Wood Specialty? They have Sitka Spruce on their catalogue list for $22.55/bdft (Canadian)
Here's a link if you are interested
http://forloversofwood.com/pricelistlandv.aspx
Not sure what their shipping methods are, as I just go to their warehouse when I need something.
Also, you might want to try another place I know, it's called Exotic Woods. Here's the link...http://www.exotic-woods.com/index.html
I haven't been to their site to find out the cost of Spruce.
I'm very interested to see how you navigate through the murky waters that restoration brings. Good for you.
Momentum
 
A&M is in Cambridge yes? When I lived in Guelph before moving west I shopped there for bass wood. I thought them to be pricey although they had a good supply. So for what I need the board to be, if they have the length, would be $203 plus shipping.

Exotic woods lists 1" at $16 and 2" at $18 a BF. Only random lengths though. They seem to mostly take care of the guitar makers of the world.

Got another price from Westwind Hardwood on Vancouver Island for Sitka, $14 a board foot, their smallest piece of top quality Sitka is 1x12x 22 which was $308. Not sure if that included shipping or was just the wood, I need to follow up.

The main issue is, it likely wasn't Sitka in the first place, it was likely just local spruce although we have no proof other than wood colour. Sitka is darker than the wood on the boat. They could have used Sitka, distance not seeming to be a problem since they also used Mahogany for rails on some boats at the time. It might actually be less expensive to go with Mahogany than trying to ship a 18 foot board 2000km from either direction.

Trying to be historically accurate might get a bit expensive.
 
I've never had much of a problem steaming kiln dried lumber. I think the important part is the pre-soak. I usually submerge the wood for a week or so.
 
How about running a saw kerf about the length of the curved area at each end of the inwale and then steaming and bending to your form. After the the wood dries out put it back on the form, or in place on the hull and glue the laminations together. Even kiln dried wood can be bent using this method.

The glue line will be just barely visible on the inside of the canoe, with luck it will blend in with the grain of the wood.

We have considered that type of approach as well as it would definitely take the needed curve. Soaking is what we always do, so we have a couple lengths of eavestrough we lay on the floor and just let the wood soak a week or so. If we do wind up using KD, we will do this, then steam and bend the ends on 4 jigs, then we would set the center section back to soak while leaving the bends on the jigs. Only after the wood holds the curve will we put it on the boat to form the other curves.

Christine cruised Kijiji this morning and may have found local suppliers for spruce. It is most likely white spruce that was used originally and that is the official provincial tree here. At worst, 16 foot may be the longest we could get and then we would just do a middle scarf joint with the scarf up since the cap strip would hide the majority of it. We may go look at wood next Friday.

In the meantime there I still am taking off the old stem strips and opening the ends to fix the stems and there is always the unending work to do on the house, in this case insulating.
 
No Title

Nice looking project. As for clear air dried sitka spruce, it is quite plentiful up here, I actually have a friend that mill the stuff here in town. The price run at about $10 / bf. I will be in Manitoba sometime in the next year, I will be driving so I could possibly bring some wood with me. If it is of any interest!! I use it a lot for paddles.
 

Attachments

  • photo1144.jpg
    photo1144.jpg
    46.6 KB · Views: 0
Nice looking project. As for clear air dried sitka spruce, it is quite plentiful up here, I actually have a friend that mill the stuff here in town. The price run at about $10 / bf. I will be in Manitoba sometime in the next year, I will be driving so I could possibly bring some wood with me. If it is of any interest!! I use it a lot for paddles.

Where is "up here"?

We will definitely have interest in getting some wood from you when you come out this way. However, for this boat, to keep it original, it has to be white spruce and it will be once we find it.

Today I ventured into new territory by making my first tapered rib. In the past we had bought pre-made tapered ribs and just adjusted to suit. This one however I need to do on my own. Last weekend I cut enough wood for about 10 ribs and planed it to the correct thickness, which is 3/8". I have them cut about 1/8" wider than the actual ribs to clean up crappy cut edges.

So I pulled a broken rib out and used that to get the taper. I measured, checked, found where it started etc. Cut a rib blank to the right length, marked and cut my taper and crap, it isn't the same, what went wrong! When I laid the old rib on the new and rolled it I could tell it isn't a straight taper, I had just assumed it would be. It actually curves. Tapered ribs normally only have the taper on one side. The reason tapered ribs exist is when a new boat is being built, as you put ribs closer to the ends they tend to slant backwards in the process. The taper on one side visually corrects this so they don't look to be angled as much.

So, I cut another piece and drew the curved taper and planed that down and that one worked. I transferred that to some 1/4" plywood from which I will cut a pattern for the others. The only difference may be that shorter ribs the taper will either start at a different point and be steeper. That I won't know until I pull other ribs.

Cool, learned something new.

 
Back
Top