Very nice! The decks look great and add an interesting detail. Good idea.
-
Happy World UFO Day! 💫 🛸🤖👽
You are using an out of date browser. It may not display this or other websites correctly.
You should upgrade or use an alternative browser.
You should upgrade or use an alternative browser.
Tandem Build - Des Moines
- Thread starter Alan Gage
- Start date
Looking good Alan.
Nice to see that there are others who share my affinity for multiple woods together.
That ash colour is kinda bizzare. I'm not sure that I have seen ash go the same colour as cherry before. You have to bear in mind though, that all three woods that you have there will age (discolour) differently. So what looks to be very similar now may be a really nice contrast next year.
I layed cherry planking down in my house 15 years ago, and pulled out a bunch of leftover pieces to compare them the other day. Wow, was I surprised. Quite a difference.
So, don't fret my friend. I'm sure it will look real nice with the epoxy/varnish on it.
Keep posting those pics please!
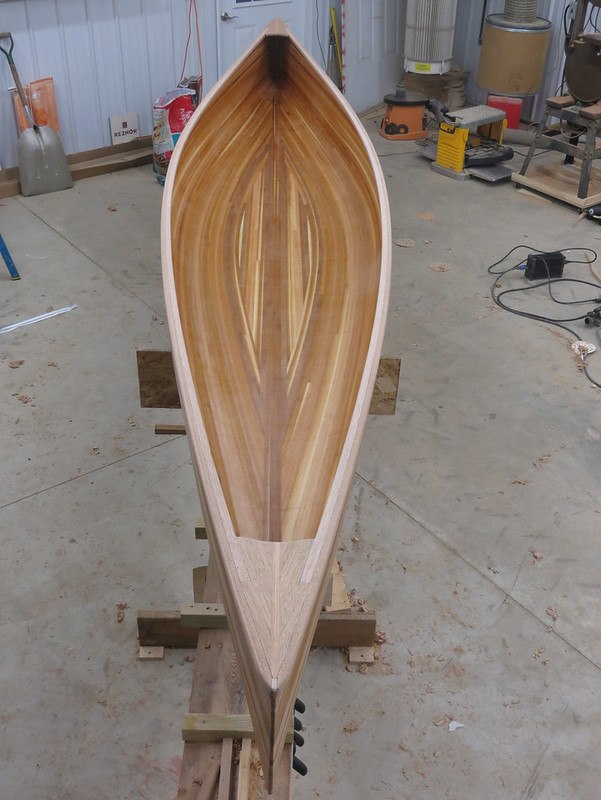
The cherry and ash strips in the decks make for quite an optical illusion. Their thickness remains the same but obviously the edges of the deck have quite a taper to fit the hull. So the thinner the deck gets the thicker the center strips appear. It wouldn't be so bad if the illusion went the other way ( thinner towards the tip) but this way just looks backwards. Something to keep in mind for next time.
I wasn't planning to glue them in place last night but did anyway. I mixed too much thickened epoxy for another task with nowhere else to use it. The bottoms of the deck got a coating of epoxy for sealant prior to install (it was still wet during the install). Suddenly the end is in sight! More pics tonight.
Alan
Decks are in place with just a little touch up left to go. Started shaping the ends of the outwales. More to go but I don't like to do things like that in one sitting. I seem to get better results when I come back with a fresh set of eyes to finish the next day. Still need to figure out what to do with that little gap in the bow and stern. Probably cut it a little larger and fill with mahogany or ash.

20150122_002 by Alan Gage, on Flickr
Anyone played around with thinning epoxy? Last night I thought I'd do a test on the bottom side of the decks and one of the thwarts figuring if it was a disaster not much would be lost. My reason for thinning was to hopefully get better penetration but also to help keep an even coat. Especially with the cooler temps in the shop epoxy doesn't always seem to be the best at self leveling and it's hard to brush on a thin coat.
So I mixed up a little epoxy and tried to add a glug of xylene but I messed up and added a glug-glug instead. Probably ended up with 60% xylene in the cup. Very thin and brushed on very well. This morning the bottoms of the decks were pretty dry but there were some sticky spots on the thwart. Turned up the heat to 70 to help it cure during the day and after work there was still some sticky and glossy spots on the thwart, though the decks felt dry. Figured at this point it wasn't going to dry in those spots and a rag dampened with xylene removed the stickiness but left a nice looking finish.
Most interesting was the remnants in the cup from last night. It's the consistency of hard Jello. I think it firmed up a little throughout the day, I'll see what it's like in the morning. Did a little googling and it seems that's normal with high concentrations of thinner like xylene, though it sounds like the thinner, brushed on layers, will set up hard.
Tonight I decided to coat the yoke and other thwart with thinned epoxy as well and this time was a little more controlled in adding the xylene, probably about 20%. Gave a nice runny consistency that brushed on thin and even. We'll see what I've got in the morning. Here they are hanging to dry:

20150122_001 by Alan Gage, on Flickr
Alan
20150122_002 by Alan Gage, on Flickr
Anyone played around with thinning epoxy? Last night I thought I'd do a test on the bottom side of the decks and one of the thwarts figuring if it was a disaster not much would be lost. My reason for thinning was to hopefully get better penetration but also to help keep an even coat. Especially with the cooler temps in the shop epoxy doesn't always seem to be the best at self leveling and it's hard to brush on a thin coat.
So I mixed up a little epoxy and tried to add a glug of xylene but I messed up and added a glug-glug instead. Probably ended up with 60% xylene in the cup. Very thin and brushed on very well. This morning the bottoms of the decks were pretty dry but there were some sticky spots on the thwart. Turned up the heat to 70 to help it cure during the day and after work there was still some sticky and glossy spots on the thwart, though the decks felt dry. Figured at this point it wasn't going to dry in those spots and a rag dampened with xylene removed the stickiness but left a nice looking finish.
Most interesting was the remnants in the cup from last night. It's the consistency of hard Jello. I think it firmed up a little throughout the day, I'll see what it's like in the morning. Did a little googling and it seems that's normal with high concentrations of thinner like xylene, though it sounds like the thinner, brushed on layers, will set up hard.
Tonight I decided to coat the yoke and other thwart with thinned epoxy as well and this time was a little more controlled in adding the xylene, probably about 20%. Gave a nice runny consistency that brushed on thin and even. We'll see what I've got in the morning. Here they are hanging to dry:
20150122_001 by Alan Gage, on Flickr
Alan
Last edited:
Haven't been spending as much time as I'd like with the canoe. Other things going on and it's at kind of a tedious point in the build. Think and think about how this is going to be shaped or where that is going to go. Then do a little work, glue something in place, and come back the next day when the epoxy has dried. Doesn't feel like much progress has been made.
But today was good. Got the thwarts cut to length and angled properly where they meet the hull. Rounded over the top edge of the gunwales and gave everything its final shaping and sanding. Finally time to do some finishing.
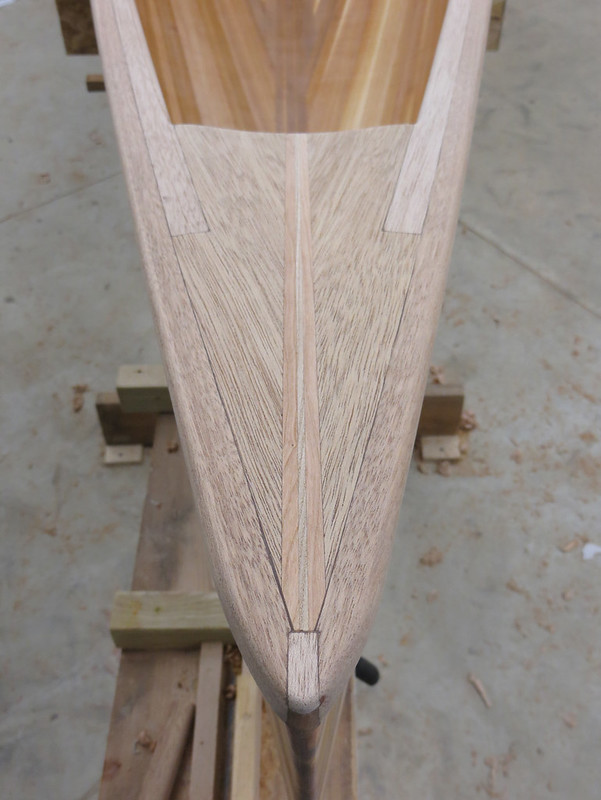
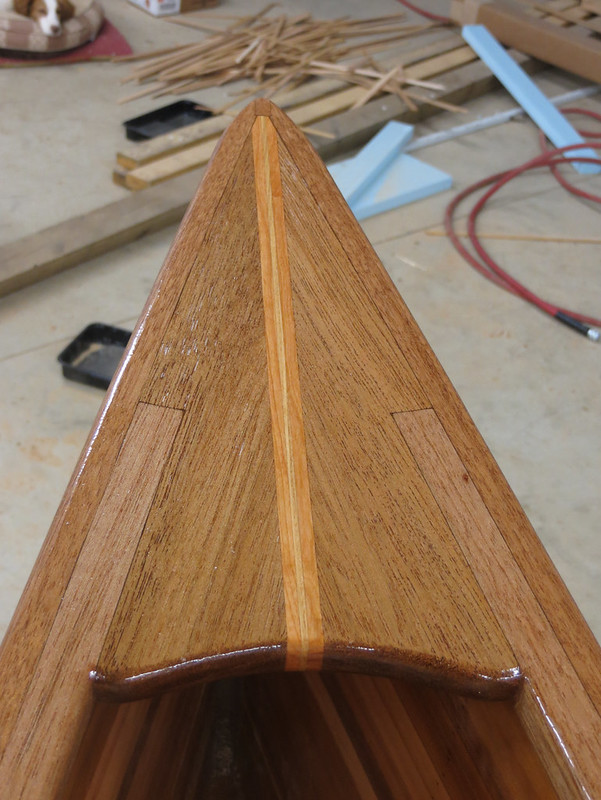
I'm happy enough with how the little gap at the bow and stern filled in. Here is what it looked like before:
20150122_002 by Alan Gage, on Flickr
I used a sharp chisel to widen it out so I was working with more than a sliver and glued in a piece of mahogany. Some tinted and thickened epoxy filled in some small gaps between the hull and ends of the outwales and allowed me to nicely shape the stems. I think the color will match well when finished.
20150131_001 by Alan Gage, on Flickr
20150131_002 by Alan Gage, on Flickr

20150131_003 by Alan Gage, on Flickr
It's not ideal but I think I can live with it. The other option was to cut a notch out of the bow and stern and glue in a chunk of solid wood that could be shaped. I figured I'd try the easy way first as I could always go with that option later if I wasn't happy.
Alan
But today was good. Got the thwarts cut to length and angled properly where they meet the hull. Rounded over the top edge of the gunwales and gave everything its final shaping and sanding. Finally time to do some finishing.
I'm happy enough with how the little gap at the bow and stern filled in. Here is what it looked like before:
20150122_002 by Alan Gage, on Flickr
I used a sharp chisel to widen it out so I was working with more than a sliver and glued in a piece of mahogany. Some tinted and thickened epoxy filled in some small gaps between the hull and ends of the outwales and allowed me to nicely shape the stems. I think the color will match well when finished.
20150131_001 by Alan Gage, on Flickr
20150131_002 by Alan Gage, on Flickr
20150131_003 by Alan Gage, on Flickr
It's not ideal but I think I can live with it. The other option was to cut a notch out of the bow and stern and glue in a chunk of solid wood that could be shaped. I figured I'd try the easy way first as I could always go with that option later if I wasn't happy.
Alan
I haven't stopped by this thread for a while, cool beans. Dave
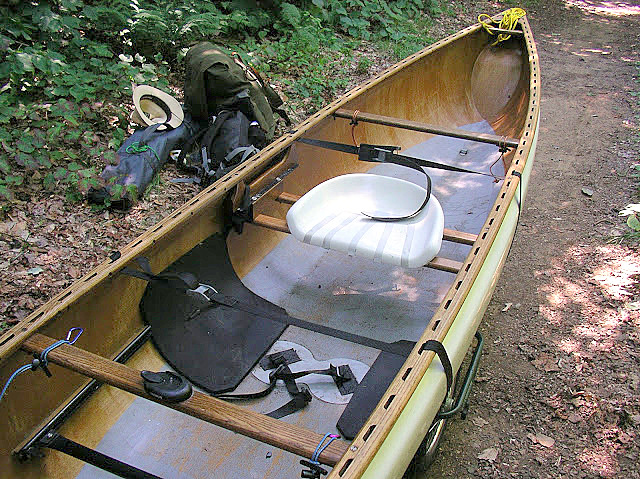
I brushed a couple light coats of thinned epoxy on the gunwales and decks, lightly sanded the inside of the hull, and epoxied the seat cleats in place. I'm happy with how it looks with some finish applied.
20150201_006 by Alan Gage, on Flickr
Thinking about it now I wonder if I should have marked and drilled those cleats before installation. Don't know if I can get a drill bit in there on account of the light tumblehome and gunwales. If not there's more than one way to skin a cat.

20150203_001 by Alan Gage, on Flickr
I don't having an pictures to show the "before" but there was a small gap between the very ends of the gunwales and the hull at both stems. I thought I might have to cut or sand it back 1/2" but before doing that I mixed some thickened epoxy (mostly cedar dust with a little cabosil for the right color), spread it on the stems, and sanded it down after it setup. I was surprised how well it turned out. Filled the small gaps and after sanding it back it's thin enough that it's pretty much unnoticeable and you can see the cedar showing through behind it:
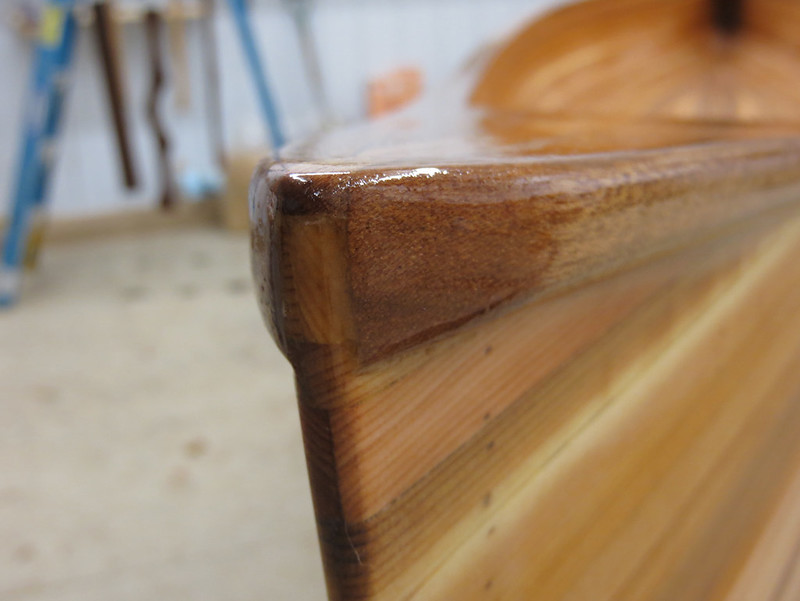
20150201_005 by Alan Gage, on Flickr
Alan
20150201_006 by Alan Gage, on Flickr
Thinking about it now I wonder if I should have marked and drilled those cleats before installation. Don't know if I can get a drill bit in there on account of the light tumblehome and gunwales. If not there's more than one way to skin a cat.
20150203_001 by Alan Gage, on Flickr
I don't having an pictures to show the "before" but there was a small gap between the very ends of the gunwales and the hull at both stems. I thought I might have to cut or sand it back 1/2" but before doing that I mixed some thickened epoxy (mostly cedar dust with a little cabosil for the right color), spread it on the stems, and sanded it down after it setup. I was surprised how well it turned out. Filled the small gaps and after sanding it back it's thin enough that it's pretty much unnoticeable and you can see the cedar showing through behind it:
20150201_005 by Alan Gage, on Flickr
Alan
- Joined
- Mar 20, 2013
- Messages
- 3,356
- Reaction score
- 980
What kind of epoxy do you use, and can you thin any epoxy, like west system?
Looks awesome, nice work. The clear goat really makes the grain pop. At first I thought you were adding screws from the outside to augment the epoxy!! Scared me, I didn't think that would have looked very good. Now I realize your drilling holes to install the seats, I feel much better.
I have a general question that maybe you can answer, on boats with no scuppers on the gunnels how do you fasten down gear? Is just the thwart and yoke enough? I keep thinking (probably my problem) that it might be good to add some sort of cleats in the chine area, so you could actually lash gear down. Instead of actual cleats I was thinking imbedding fabric strapping into epoxy leaving loops unepoxied to fasten to.
I think my mind sometimes wanders when I'm planing strips and I might invent problems where they don't really exist.
What kind of epoxy do you use, and can you thin any epoxy, like west system?
That's a good question. I'll start by saying I don't know for sure. I did a little research on thinning epoxies and it sounds like most manufacturers don't recommend it and some have a special thinning agent you can purchase that's made to work with the epoxy. What I'm unsure of is if the reason they recommend against thinning is because the thinner affects the epoxy strength or if it's the same reason varnish instructions say "do not thin," the simple reason being they have to meet standards for volatile chemicals and other nasties and as soon as you thin it with solvent you're adding those bad things. So their fig leaf is telling you not to thin.
That being said it sounds like plenty of people are thinning epoxy and getting good results. Xylene seems to be the preferred thinner. Acetone works as well but evaporates much quicker. Even with xylene I can tell the end of the batch is thicker than the beginning because some of it has evaporated.
Thinning definitely extends the setup time. The more thinner the longer it takes. When I added 50% thinner the stuff left in the cup was still slightly soft after a few nearly a week. What was brushed on the wood seemed to set up fine after a day or two, though I have no way to measure the hardness other than I can't dent it with a finger nail and it doesn't load up the sand paper.
I was originally using up some epoxy from US Composites and it was a bit thick to start with so I was adding extra thinner. My normal epoxy is Raka and that seems to be thinner to start with and I'm only adding 5-10% thinner to get it where I want. Even then setup time is extended quite a bit. The stuff in the cup will still be dentable the next day, though temps in the shop are pretty low for epoxy as well. The epoxy that's brushed on seems to set up hard before the leftovers in the cup, opposite of how epoxy normally cures. I assume the reason is the thinner trapped deep inside what's left in the cup is difficult to evaporate as it starts to setup. Whereas it can easily and quickly evaporate from the thin coat that was brushed on.
My reasons for thinning are:
A: The epoxy is cold from sitting in the shop, making it thicker. I'd have to turn the heat up to 70 long before I wanted to work with the epoxy to get it up to temp
B: I want a very thin coat that will soak as much as possible into the wood to help seal it.
C: I don't want to build up a thick coat and epoxy doesn't always seem to self level very well. I want a thin coat that stays as smooth as possible.
I'm happy with the results I've gotten so far.
Alan
I have a general question that maybe you can answer, on boats with no scuppers on the gunnels how do you fasten down gear? Is just the thwart and yoke enough? I keep thinking (probably my problem) that it might be good to add some sort of cleats in the chine area, so you could actually lash gear down. Instead of actual cleats I was thinking imbedding fabric strapping into epoxy leaving loops unepoxied to fasten to.
I think my mind sometimes wanders when I'm planing strips and I might invent problems where they don't really exist.
My mind wanders a lot too when processing and laying strips. Mostly I worry about what's not right but once in a while I'll get an actual good idea too.
I've never tied gear down. Not that it's not a good idea for some situations but here in the upper mid-west it's pretty much all flatwater. Most rivers don't have anything that even approaches class I. I don't know who will win this boat in the raffle but I'd say there's a 99% chance it will never see anything other than local day trips a couples times/year at most. So tying down gear shouldn't be an issue.
My next boat, however, will be for river tripping up north and I will need to come up with a way to tie gear in place. I'm still undecided on what I'll do, haven't spent a lot of time thinking about it yet. The fabric loops embedded in epoxy would be handy. I'd think you'd want something like strap webbing but I wonder how well that would bond with epoxy?
Alan
- Joined
- Dec 12, 2014
- Messages
- 364
- Reaction score
- 4
I have a general question that maybe you can answer, on boats with no scuppers on the gunnels how do you fasten down gear? Is just the thwart and yoke enough? I keep thinking (probably my problem) that it might be good to add some sort of cleats in the chine area, so you could actually lash gear down. Instead of actual cleats I was thinking imbedding fabric strapping into epoxy leaving loops unepoxied to fasten to.
Whitewater boats have loops and/or daisy chains glued to the bottom. Attachment points in the chines/bilges, as you suggest, would keep them out of the way of packs, feet, and dogs.
In scupper-less boats I've attached small hooks through the hull just below the gunwales, and in some cases I've put screw eyes into the undersides of the gunwales, using holes drilled only partway through so they don't show.
Originally posted by wysedav
I have a general question that maybe you can answer, on boats with no scuppers on the gunnels how do you fasten down gear? Is just the thwart and yoke enough? I keep thinking (probably my problem) that it might be good to add some sort of cleats in the chine area, so you could actually lash gear down. Instead of actual cleats I was thinking imbedding fabric strapping into epoxy leaving loops unepoxied to fasten to.
Reply by Philtrum
Whitewater boats have loops and/or daisy chains glued to the bottom. Attachment points in the chines/bilges, as you suggest, would keep them out of the way of packs, feet, and dogs.
In scupper-less boats I've attached small hooks through the hull just below the gunwales, and in some cases I've put screw eyes into the undersides of the gunwales, using holes drilled only partway through so they don't show.
****************************************
Packs may float in an upset, but I believe it's foolish not to tie in sinkable gear, especially valuable and survival sinkable gear such as metal cutting tools (axes, saws), camera tripods, cameras, guns, metal chairs and portage wheels.
A common way to secure such gear, even in canoes having slotted inwales, is to glue D-ring patches onto the bottom. These same D-ring patches are used to tie down floatation air bags. Most current D-rings have circular vinyl-rubber patches. Older and better ones had small rectangular hard ABS plastic patches.
I have four of the latter type of D-ring patches, which are very small and unobtrusive but strong, on the bottom of my Hemlock SRT. They are positioned about 30" and 60" from each end of the canoe because those are the common lengths of small end bags and large solo bags. Those positions also work well for gear.
You can see one D-ring in this shot of the stern. The one positioned 60" from the stem is blocked by the seat. The double dog bone vinyl-rubber patches are for thigh straps.
In this shot, my heavy, sinkable bag chair is lashed to that stern D-ring patch. My collapsed portage wheels are tied to the bow D-ring patch. My Duluth pack has one strap around the thwart. I want it to stay in the boat in case of an upset because it will float -- and, since I have no air bags installed on this trip, I want the Duluth pack to help float the upset boat rather than floating freely away.

In this picture, the uncollapsed portage wheels are tied to the bow D-ring. My roll-top day pack fits in between the wheels.

I would suspect that people who make and paddle wood strip canoes don't want to glue ugly gray D-ring patches onto their aesthetic woodwork, and if all they do is day trip with such hulls it doesn't really matter. If I were overnight tripping in a wooden canoe, I'd want it made with slotted inwales.
I have a general question that maybe you can answer, on boats with no scuppers on the gunnels how do you fasten down gear? Is just the thwart and yoke enough? I keep thinking (probably my problem) that it might be good to add some sort of cleats in the chine area, so you could actually lash gear down. Instead of actual cleats I was thinking imbedding fabric strapping into epoxy leaving loops unepoxied to fasten to.
Reply by Philtrum
Whitewater boats have loops and/or daisy chains glued to the bottom. Attachment points in the chines/bilges, as you suggest, would keep them out of the way of packs, feet, and dogs.
In scupper-less boats I've attached small hooks through the hull just below the gunwales, and in some cases I've put screw eyes into the undersides of the gunwales, using holes drilled only partway through so they don't show.
****************************************
Packs may float in an upset, but I believe it's foolish not to tie in sinkable gear, especially valuable and survival sinkable gear such as metal cutting tools (axes, saws), camera tripods, cameras, guns, metal chairs and portage wheels.
A common way to secure such gear, even in canoes having slotted inwales, is to glue D-ring patches onto the bottom. These same D-ring patches are used to tie down floatation air bags. Most current D-rings have circular vinyl-rubber patches. Older and better ones had small rectangular hard ABS plastic patches.
I have four of the latter type of D-ring patches, which are very small and unobtrusive but strong, on the bottom of my Hemlock SRT. They are positioned about 30" and 60" from each end of the canoe because those are the common lengths of small end bags and large solo bags. Those positions also work well for gear.
You can see one D-ring in this shot of the stern. The one positioned 60" from the stem is blocked by the seat. The double dog bone vinyl-rubber patches are for thigh straps.
In this shot, my heavy, sinkable bag chair is lashed to that stern D-ring patch. My collapsed portage wheels are tied to the bow D-ring patch. My Duluth pack has one strap around the thwart. I want it to stay in the boat in case of an upset because it will float -- and, since I have no air bags installed on this trip, I want the Duluth pack to help float the upset boat rather than floating freely away.
In this picture, the uncollapsed portage wheels are tied to the bow D-ring. My roll-top day pack fits in between the wheels.
I would suspect that people who make and paddle wood strip canoes don't want to glue ugly gray D-ring patches onto their aesthetic woodwork, and if all they do is day trip with such hulls it doesn't really matter. If I were overnight tripping in a wooden canoe, I'd want it made with slotted inwales.
I would suspect that people who make and paddle wood strip canoes don't want to glue ugly gray D-ring patches onto their aesthetic woodwork,
I don't really have a problem with them in a stripper and unless I come up with something easy I can make on my own that's what will likely go in my next boat. I build strippers because it's the only practical material I can use to build my own boats. It's relatively easy, relatively cheap, relatively lightweight, and I'm not limited by hull shape (as with stitch and glue panels). The fact that they're pretty is just a nice bonus.
What sort of adhesive is used with those patches on a composite hull? I know there's some special adhesive for them in royalex hulls, does the same work on composites or different?
A question for everyone since we're talking about strapping in gear. Those that tie down their gear, how tightly is it tied down? Is it firmly strapped in place so that it won't move even if you dump in moving water? Is it on short tethers that keep the gear inside the gunwales but let it move around a little? Or is it on longer tethers that will allow it to float/fall out of the canoe but keep it from floating/sinking away? Does how you tie your gear in change depending on what kind of water you're paddling?
Alan
I'm sure you've talked about this before but I can't remember. Do you normally sit or kneel? How do you like kneeling with that big bucket? Is it angled forward at all?
I've never sat in anything more comfortable than the big old Sawyer buckets and I'm thinking of making a mold and installing them in my next solo and maybe retrofitting into some of my other solos as well. Kneeling is the one thing I wasn't sure about.
Alan
- Joined
- Mar 20, 2013
- Messages
- 3,356
- Reaction score
- 980
Thank you Alan, that is really helpful!!
Wow, Glenn I really like the look of that canoe!!
Wow, Glenn I really like the look of that canoe!!
- Joined
- Dec 12, 2014
- Messages
- 364
- Reaction score
- 4
No Title
It's called Vynabond. I don't know if/how it works on composites.
If you want a swamped boat to float upright when you're in it, you have to use flotation bags. They do the job, but you don't float very high.
Now I've never tried to paddle a swamped boat using full packs for flotation, but something tells me their buoyancy wouldn't quite do the job. It would be nice to hear from someone with experience in this area.
What sort of adhesive is used with those patches on a composite hull? I know there's some special adhesive for them in royalex hulls, does the same work on composites or different?
It's called Vynabond. I don't know if/how it works on composites.
A question for everyone since we're talking about strapping in gear. Those that tie down their gear, how tightly is it tied down? Is it firmly strapped in place so that it won't move even if you dump in moving water? Is it on short tethers that keep the gear inside the gunwales but let it move around a little? Or is it on longer tethers that will allow it to float/fall out of the canoe but keep it from floating/sinking away? Does how you tie your gear in change depending on what kind of water you're paddling?
Alan
If you want a swamped boat to float upright when you're in it, you have to use flotation bags. They do the job, but you don't float very high.
Now I've never tried to paddle a swamped boat using full packs for flotation, but something tells me their buoyancy wouldn't quite do the job. It would be nice to hear from someone with experience in this area.
Attachments
Last edited:
Those that tie down their gear, how tightly is it tied down? Is it firmly strapped in place so that it won't move even if you dump in moving water? Is it on short tethers . . . . . Does how you tie your gear in change depending on what kind of water you're paddling?
Here's my philosophy, based on more than 60 years of canoeing in all kinds waters and having made every mistake possible.
1. In whitewater or swiftly moving rivers -- the kind where your canoe or gear can be swept away -- everything is always tightly tied in. If you dump in this kind of water and your gear falls out, it is likely gone forever even if you can hold onto and swim your canoe to shore. On these kinds of rivers I would also be running with flotation air bags.
2. In flatwater it depends on what kind of gear I have, floating or non-floating gear. On these waters I wouldn't be using air bags.
(a) If all my gear could float, such as storage bags, barrels and paddles, then I think tying in is optional. You can probably rescue your canoe and all your gear in most events, unless you are in strong winds and waves. Some might prefer tight tying-in just as in moving water, like me because of my long whitewater background. Others might like long tethers, especially if you are in wind and waves. Still others might choose to tie nothing in. Remember, I'm assuming in this scenario that everything can float.
(b) If some of my gear is heavy and sinkable and other gear can float, I tie the sinkable gear in tightly. I don't want my chair, portage wheels or sarissa spear hanging on a tether underwater if my boat is upside down. You can flip an upside-down boat upright more easily if heavy things are tied to the bottom, because the upside-down boat will then be "top" heavy. In this case, where I have a non-wooden canoe with no air bags, just a little bit of flotation from built-in air chambers, and heavy gear tightly tied in, I'm concerned that a flipped over boat will sink too low for easy rescue. Therefore, I tie my floatable gear in tightly to help the upside down canoe ride higher.
In short, I tie floatable gear in fairly tightly in all circumstances just as a habit. I do have quick release mechanisms on my big gear just in case I want it to get it out of the hull.
Last edited:
I'm sure you've talked about this before but I can't remember. Do you normally sit or kneel? How do you like kneeling with that big bucket? Is it angled forward at all?
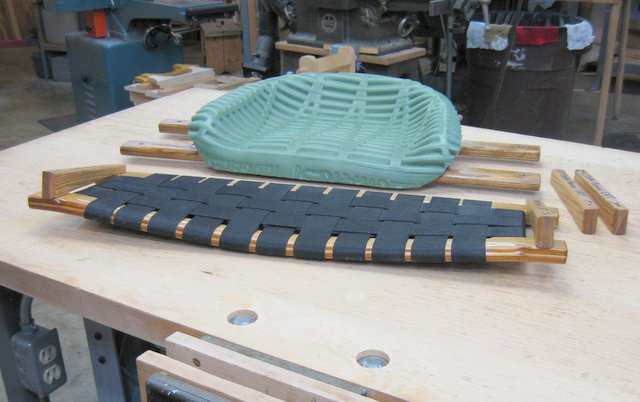
That's a small kneeling bucket seat designed by Harold Deal. The front edge is curled smoothly over the cross member to make kneeling comfortable on the under-thighs, and the entire seat is canted down in front. The angle of the cant, and the height of the seat, can be changed by using different thickness drop block wedges installed under the adjustable drop bracket, which can also adjust the seat forward or aft. Harold Deal designed the adjustable drop block mechanism for the SRT, which is his hull design, and the whole thing is made by Conk, who used to post here, for Dave Curtis at Hemlock Canoes.
I kneel 93% of the time when I'm on that bucket, as I do in all my canoes. The SRT can be paddled seated, and I have foot braces in it, but it's rather tender. I also have a Conk Custom Contoured Comfort Curve seat that I can swap into the SRT. It's specifically designed for kneeling, is a little lighter, and allows skinny paddlers some side-to-side slideability, but it can't be butt heeled like the bucket and its not as comfortable for sit paddling.
This picture shows Conk's personal Deal bucket seat and the CCCCC seat he sold me. You can also see some differently angled drop blocks to change seat height and cant. The 5C seat is made from a laminate of cedar and ash, so it's both stronger and lighter than commercial webbed or cane seats.
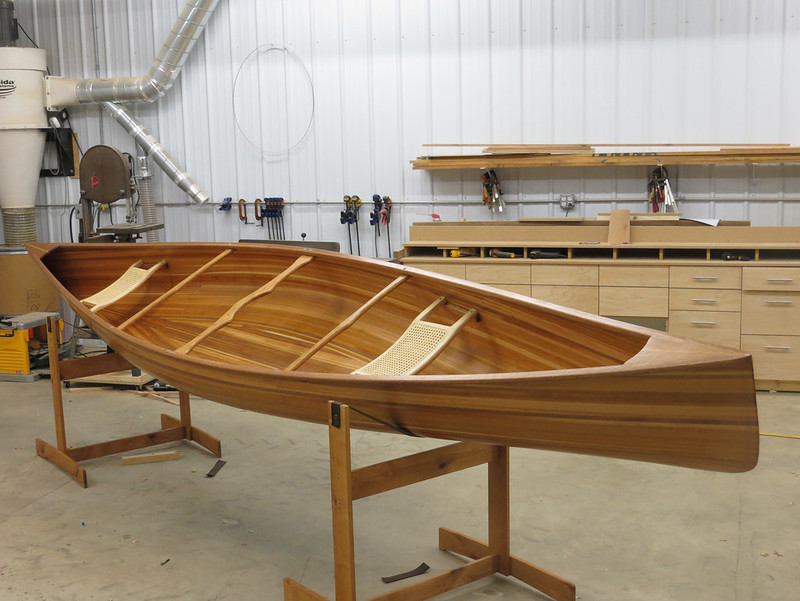
Tonight was the night. Installed seats and thwarts, found the balance point, and then cut and installed the yoke. And now she's done!
20150213_005 by Alan Gage, on Flickr
Well, technically it will be done tomorrow. I pulled the yoke back out so I could varnish the ends and the holes. I'll put it back together in the morning and hopefully deliver it early next week.
Final weight was 51.25 pounds. 10lbs. was added with just the trim (decks, seats, thwarts, yoke, and varnish). I'll add up my hours tomorrow but it's somewhere north of 100
Alan
Similar threads
- Replies
- 13
- Views
- 2K
- Replies
- 170
- Views
- 14K
- Replies
- 3
- Views
- 950