• Happy Peace Officers Memorial Day! 👮🏽‍♂️👮‍♀️

Tandem Build - Des Moines

I would stop before cutting into the cloth. You look to have it pretty good, try wetting an area with water to see if there is sanding marks. A quick sand with finer paper might be all that is needed.

That's pretty much all I plan on doing from here, just a quick pass with finer grits to get rid of swirl marks. I'll see how bad they show up with water.

You don't necessarily need to have tanks (bulkheads). You will have decks and thwarts for strength. The tanks on Christine's stripper are sealed and they were more an after thought. I doubt I would put tanks in another build, more-so a personal choice really. Rather than just plugs why not purchase hatch covers and make the space use-able?

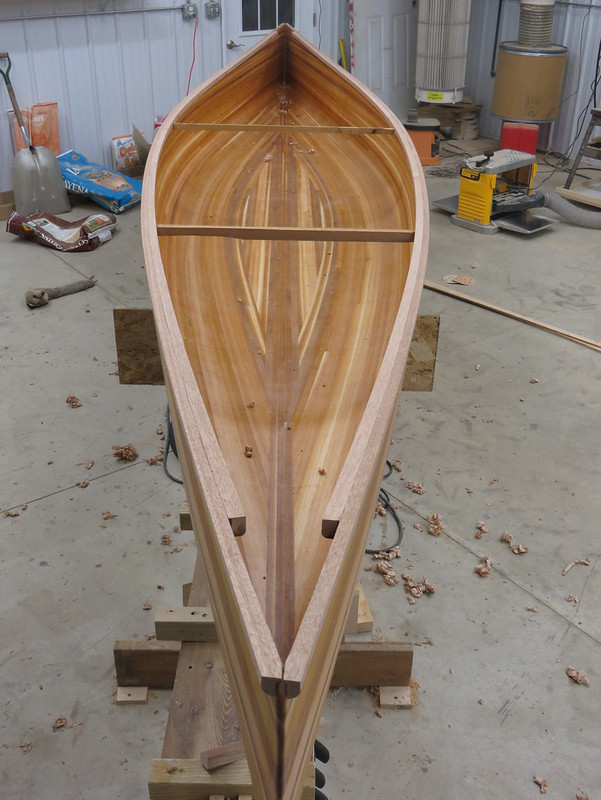
I've thought about hatches but don't know if I want to go to the trouble, though it would be nice. That still doesn't solve the problem (is it really a problem?) of pressure differential caused by temperature/altitude extremes. I'm assuming the rubber plugs installed by the manufacturer somehow allow pressure/vacuum relief if the pressure is too great but still seals against water intrusion. Biggest reason I have for installing them is to hide the bow/stern ugliness. I don't knock myself out sanding the final few inches that are tough to reach or getting the cloth perfect in that area.

Alan
 
I like having some floatation in the stems, and I prefer keeping the ends of the canoe lightly weighted. But on long gear intensive trips that space does get used.

The next time I set up to make DIY dry bags from Seattle Fabrics heat sealable material I may try to make some custom sized/shaped vee dry bags for the stems and some simple cage to hold them securely in place.

http://www.seattlefabrics.com/dry_bag.html
 
Alan,
The plugs are for drainage...differential pressure should never be an issue.
If you sealed the chambers on an average day, you would have 14.7 psia in there. For reference, the lowest pressure ever recorded in some storm or other (on Earth) was 25.62 inHg or 12.58 psia, a differential of about 2 psi. If you have square bulkheads of about 12 x 15 inches, that would be around 400 lbs force, distributed across the entire bulkhead. But, you don't have square bulkheads, so your loads would be lower...As long as you have the bulkheads epoxied in place with cabosil thickened epoxy, and the seams glassed at least on the outside, you should have no problems. I'm a suspenders and belt and rope kind of guy, and I glass in place the inside of my bulkheads too, but that's probably overkill.
Now, if you were to fly that canoe and its sealed bulkheads at 40,000 ft (about 2 psia) you might need a vent. But again, I don't think you'll ever see that hull at 40,000 ft.
Better than a little rubber plug would be a 3 or 4 inch bulkhead port, so a paddler could have a somewhat secure storage for a cell phone, wallet, of whatever.
 
I sand with 80 and then 120, until all the shiny bits are gone. I have never put a floatation tank in my strippers. They do float on their own if you tip them, and I haven't had a problem with self rescue, even on a canoe the size of the one you are currently building. If you put even an 8 inch deck on, much of the ugliness in the forward stem areas disappears. You really have to be looking for it to see it.
 
Went another quick round on the outside of the hull tonight, I think I'll call it good.

Was going to start in with the gunwales but was disappointed to see, upon closer inspection, that the cherry I'd ordered in wasn't as nice as I originally thought. I don't think I'm comfortable using it as gunwale material. There's a minimum order from that company and I don't really have a need for anything else right now so my options are a bit limited. I was talking to the local lumberyard the other day and I was surprised to hear they keep a little cherry on hand so tomorrow I can take a look at that. They also have some mahogany on hand. I might have better luck finding gunwale quality material in the mahogany as the board I got there earlier seemed pretty nice. They keep some maple too so I could rip a narrow strip to go between the inwale/outwale for some contrast.

Alan
 
I use a small block plane on the hull before I sand. Takes me about a half hour to plane, and decreases total sanding time in a huge way.

I truly enjoy using an apron plane on a boat and then following up working with a homemade fairing board. The song of the plane and its efficacy are very satisfying. And the fairing board makes short work of the high spots that are sometimes difficult to see or even feel.

I really need to get better though with cabinet scrapers for my interior work.
 
I hope you all haven't given up on me. I'm still here but progress the last week or so has been slow. Lack of motivation, searching for gunwale lumber, deciding how to attach and shape it, and very cold temps keeping me from turning up the heat in the shop to epoxy cure temps. But today I got a deadline from the nature center so it's time to get back in gear. Well, not really a deadline. They just asked if it would be done by the end of the month and, if it was, they'd like to display it at the gun show and start selling raffle tickets. That's good, it gives me something to shoot for.

So tonight I cranked up the shop to a balmy 60 degrees and used some faster setting epoxy to attach one of the outwales. I first brushed the edge that will contact the hull with a thin coating of unthickened epoxy and then applied thickened epoxy to the hull. I don't know if this many clamps is really required but I had that many and figured the more the merrier.


20150108_003 by Alan Gage, on Flickr

Looks to be a good fit so far. From what I can tell it's making good contact with the hull all along the bottom edge and there was just a little squeeze out that was wiped off with my finger that should do a fine job of sealing that joint.

I wound up going with mahogany and cut a rabbet in the outwale so it will overlap the top of the hull. The rabbet is 3/16" thick. The outwale was 7/8"x11/16" before doing any cutting. After the rabbet that left me with 7/16" thick on the outside of the hull. The bottom edge got a 1/2" round over. The top edge will get 1/4" or 3/8" round over later. The edge that overlaps the hull is a little wider than the thickest spot in the hull so it will be planed/sanded flush before installing the inwales. The inwales will be the full 7/8"x11/16", rounded over top and bottom.

Alan
 
I'm not a woodworker, but I love all these stripper and wc projects. I especially enjoy the details, such as the thought and details that go into the gunwale treatments. That raffle winner is gonna get themselves one beautiful canoe.
 
Got the gunwales epoxied in place. Brought the weight up to 41.75 pounds. I got the tops of them planed flat but still need to shape the ends (tips) of the outwales and put the 1/4" round over on the top of the inwale and outwale. That will have to wait until the decks are finished, which I'm still mulling over.

I've got some rough cut ash here that's pretty bad grain wise but I think I can get enough good sections for thwarts and yoke. I ordered seats from Ed's and they should be here in a few days.

I'm kind of 2nd guessing my choice of ash for the seats and thwarts. I was afraid with the mainly dark cedar hull and mahogany gunwales that it would be too dark overall if I used mahogany or cherry for the inside trim and seats. Thought the ash would provide some contrast and lighten things up a little. I just hope it doesn't look out of place. Any thoughts?


20150113_001 by Alan Gage, on Flickr


20150113_003 by Alan Gage, on Flickr

Alan
 
The ash might go with the light coloured strips in the feature section in the bottom so that should help some. It will be quite light and bright in comparison with the mahogany once varnished. Cherry might have been nice with the mahogany, I have an affection for cherry on canoes.
 
Maybe if you use ash for all the seats, thwarts, decks it will look ok. My stripper has a nice T shaped accent on the decks that might break it up a bit? Looking very nice so far and the weight is exceptional for a llarge boat like that.

Christy
 
I used a mahogany stain on white ash for my honeymoon canoe to try to get the ash to match the mahogany gunwales. Well, the ash came out very very dark. Perhaps there are different grades of mahogany stain, I'm not sure, I just grabbed a can without really looking.
 
Thanks for the input. While I didn't feel the cherry I had was good enough for gunwales I can surely get good enough pieces out of it for thwarts, yoke, and deck, and have thought about that. Though I think the combination of mahogany, cherry, and ash (seats) might be a little busy. Mahogany is cheap and they still have a couple pieces left in town so I could do all the trim with that too. I guess the real wrinkle is that I've already ordered ash seats but I guess there's no law saying I have to use them. No doubt they'd find a home in another boat of mine along the way if I saved them.

So I think at this point I'll just wait and see. I need yoke, thwart, and deck patterns anyway so I'll make some out of ash and then when the seats show up I can tack everything in place and see how it looks. If it looks good then great. If not I'll figure out where to go at that point.

Alan
 
Looking great Alan. Should be a really nice paddler.
Have you considered laminating different types of materials into your decks, so that you are tying them all in? You could go with Mahogany on the outside, then cherry, then a narrow width of ash. Multiple materials can be quite sexy.

Like Mihun, I love to build with Cherry. It is one of my favourites. If i ever build another canoe, It will have Cherry gunwales for sure.

More pics please :)
 
I decided to go with cherry yoke and thwarts and using the ash seats I'd already ordered. Figured if I didn't like it when I got done the seats would be easy enough to switch out and no harm done.

Been tinkering with decks the last couple days. Cut patterns out of scrap MDF and was happy enough with how they looked to go for the real thing. Took Momentum's advice and laminated Mahogany, cherry, and ash. Glued them up last night. There's a strip of peel ply under the joint to keep it from being glued to the board below. Plastic would have been a better choice but I didn't have any laying around, peel ply I did have.


20150120_001 by Alan Gage, on Flickr

Then tonight I started by planing and sanding the deck smooth, tracing the pattern, and then cutting the real decks to shape (slightly large):


20150120_002 by Alan Gage, on Flickr

First thing I did was bevel all the edges so it was narrower on the bottom side of the deck. This helped it fit the gunwales and also made final fitting easier since there was only a thin edge to plane/sand rather than the full 3/4". The fit wasn't perfect by the time I got done but I'm happy enough with it and it will look better once it's installed and the hull is pulled in tight as the glue dries.


20150120_003 by Alan Gage, on Flickr

The upsweep in the bow keeps the deck from fitting flush in the center so after installation I'll straighten that out.


20150120_005 by Alan Gage, on Flickr

And a quick wipe with alcohol to get an idea for how it will look when finished:


20150120_007 by Alan Gage, on Flickr

Well cripes! How did my ash center strip turn out to be just as dark as the mahogany? Looks like there's a winter growth ring running right down the edge of it. Gonna have to do some thinkin' about how much I care.

Alan
 
It will be interesting to see once you have a quality varnish on it, so much grain in all the woods...

You gonna use Epifanes right? Or something other than synthetic varnish?
 
You gonna use Epifanes right? Or something other than synthetic varnish?

I'd planned to give the trim a couple coats of thinned epoxy and spar over that. Figured epoxy would provide the most protection and require the least upkeep.

Alan
 
Back
Top