-
Happy National Sunglasses Day! ☀️🕶️😎
You are using an out of date browser. It may not display this or other websites correctly.
You should upgrade or use an alternative browser.
You should upgrade or use an alternative browser.
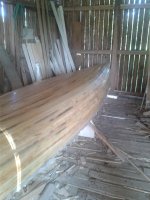
Northwest Cruiser 17 feet build
- Thread starter hautamak
- Start date
The staple holes appear well filled !
I'm a fan of the little Cigar type rollers, as opposed to squeegees. Partly because of wrist movement.
Curious, what you used to apply resin on this hull ? You may have already answered my question, but I missed it.
Jim
I'm a fan of the little Cigar type rollers, as opposed to squeegees. Partly because of wrist movement.
Curious, what you used to apply resin on this hull ? You may have already answered my question, but I missed it.
Jim
I used rubber trowel (https://www.hongkong.fi/fi/tyokalut-...sta/p/1182580/ )Like this one. The staple holes were filled with pine colored wooden filler.
I watched videos about fiberglassing canoe and everybody else manage to sweep the trowel around dry fiberglass without problem. Trowel swiped good if cloth was wet, but if I ran out of resin while making big sweep, the trowel stopped and wrinkled cloth. Any ideas what I'm doing wrong ?
I watched videos about fiberglassing canoe and everybody else manage to sweep the trowel around dry fiberglass without problem. Trowel swiped good if cloth was wet, but if I ran out of resin while making big sweep, the trowel stopped and wrinkled cloth. Any ideas what I'm doing wrong ?
Last edited:
What kind of material is that squeegee made out of? Most people use the yellow hard plastic squeegees used for auto body work. You can get them about anywhere. The hard (yet flexible) plastic slides over cloth easily whether wet or dry.
I use a squeegee for the horizontal portions of the hull because it's so fast and a roller for the more vertical sections. I roll it on heavy (I don't use fill coats) and come back with a squeegee over the whole hull to take off the excess and clean up any runs/drips/heavy spots.
On the inside I use the squeegee almost exclusively.
As for filling staple holes or other gaps I think it's much faster to mix up some thickened and tinted epoxy and apply it with a squeegee. A few ounces should do the whole boat, maybe closer to 8oz if doing all the staple holes too. Apply it with the squeegee and then go over it again, pressing hard, to force it into the holes and wipe off the excess. Quick and clean. I do this step before my final sanding.
I hope your polyester resin works out ok. I used vinylester and carbon over red cedar gunwales and was able to pull the cloth back off the next day. I wasn't impressed. The reason for pulling it off was that it didn't adhere to the epoxy hull but the cedar was clean and should have been fine. I was actually relieved I could pull it off the cedar because that meant I could reuse them without a lot of sanding.
Alan
(I don't use fill coats)
Alan
OK Alan, you wet out the cloth, and fill the weave with one coat ! Maybe you add a filler, like Cab o sil, to your resin ?
Puzzled ?
Jim
PS I'm easily Puzzled !
What kind of material is that squeegee made out of?
Alan
It's made of soft rubber like in the rubber eraser


Great progress!
I would say you have 3 options.
1: leave them be...probably not the most favorable.
2: sand down to the wood and patch them with a small scrap of glass and resin. (Probably the best option)
3: try injecting resin with a syringe. ( this one might be a crap shoot)
I would say you have 3 options.
1: leave them be...probably not the most favorable.
2: sand down to the wood and patch them with a small scrap of glass and resin. (Probably the best option)
3: try injecting resin with a syringe. ( this one might be a crap shoot)
Get a syringe, use the smallest drill bit you have (1/16" works) and drill a hole at each side of the area .... mix epoxy, load the syringe, put in over one hole and fill the void with epoxy till it comes out the other side, put a piece of painters tape over each hole and allow to setup.
Make sure the area you are filling is level, so that the void can fill.
I have used this a couple of times for smallish bubbles and it works fairly well.
Brian
Make sure the area you are filling is level, so that the void can fill.
I have used this a couple of times for smallish bubbles and it works fairly well.
Brian
OK Alan, you wet out the cloth, and fill the weave with one coat ! Maybe you add a filler, like Cab o sil, to your resin ?
Puzzled ?
Jim
PS I'm easily Puzzled !
I wrote that incorrectly. What I meant to write was that I don't use a seal coat. So I when I do wet out the cloth I pour/roll it on heavy to let is soak into the wood as much as possible before squeegeeing off the excess.
Alan
Thanks Alan !
Omitting the seal coat leads to using more resin wetting out the cloth.But I still seam to use too much resin !
I have now Fallen into the "No Precoat School". As long as I've done a good job, filling staple holes, and obvious voids !
I feel much less Puzzled now")
Jim
Omitting the seal coat leads to using more resin wetting out the cloth.But I still seam to use too much resin !
I have now Fallen into the "No Precoat School". As long as I've done a good job, filling staple holes, and obvious voids !
I feel much less Puzzled now
Jim
Going on! Inside glassed and two layers of resin applied. There is points where cloth is not in full contact to wood, can I do something for them?
Those small bubbles could be left alone, in my opinion.
Patching some rather large voids in a Carbon/Kevlar build, One hole was all I needed per patch. I used the biggest Syringe and needle I could find. The needle was actually TOO big ! Next time, I will add some Cab-O-sil to thicken it, or use a smaller needle .
As Brian states, try and do it on the level. Or at least place the needle hole at the very highest point .
I have a few more to fill, if I ever get back to that canoe !

Good luck !
Jim
Last edited:
Ok. Thanks for advices. I will fill biggest ones and leave small ones untouch.
Whats good dimensions for inwales, outwales and inwale blocks? I don't have any good plans and I would love to get some opinions. I planned to use 1/4 inch inwale blocks and 3/4 x 3/4 inwale and outwale. Also, is 130cm from front end to seat edge good? the other one is 100cm. from bottom end.
Well, this project goes on but slooow
Ok. Thanks for advices. I will fill biggest ones and leave small ones untouch.
Whats good dimensions for inwales, outwales and inwale blocks? I don't have any good plans and I would love to get some opinions. I planned to use 1/4 inch inwale blocks and 3/4 x 3/4 inwale and outwale. Also, is 130cm from front end to seat edge good? the other one is 100cm. from bottom end.
Well, this project goes on but slooow
Thats a pretty hefty gunnel !
I use 3/8" x 3/4" plus 3/8" x 3/4" blocks for the inwhale. I cap my hulls with the outwhale. I'd start with 3/4" x 3/4" , and cut out the thickness of the hull, 1/4" x 1/2". This resembles an upside down L.

I think you are pretty safe at 3/8" inside and out, that what I used for my Freedom 17 and it is plenty strong ... I forgo the inwale spacers in favour of a 45 degree bevel on the bottom of the inwale to allow water to flow out easily ... it also reduces weight, which is always a concern for me as I have to portage these boats.
Using 3/4" gunnels will ad in the neighbourhood of 13 pounds to your build ... obviously reducing that to 3/8" saves you 6.5 pounds .... the trim can add an enormous amount of weight to a build if you aren't careful.
Brian
Using 3/4" gunnels will ad in the neighbourhood of 13 pounds to your build ... obviously reducing that to 3/8" saves you 6.5 pounds .... the trim can add an enormous amount of weight to a build if you aren't careful.
Brian
Well, this project goes on but slooow
LoL! I feel your pain! That's why I called my first (and only to date) build A Slow Boat To Nowhere.

It was worth the wait!
I think you are pretty safe at 3/8" inside and out, that what I used for my Freedom 17 and it is plenty strong ... I forgo the inwale spacers in favour of a 45 degree bevel on the bottom of the inwale to allow water to flow out easily ... it also reduces weight, which is always a concern for me as I have to portage these boats.
Using 3/4" gunnels will ad in the neighbourhood of 13 pounds to your build ... obviously reducing that to 3/8" saves you 6.5 pounds .... the trim can add an enormous amount of weight to a build if you aren't careful.
Brian
With a 3/4" slotted inwhale, I have plenty of wood to hang my seats, and fasten thwarts. The slots, not only provide drainage, but great places to fasten things with bungees or what ever. A pretty tried and true system !
Yes, weight is an issue, and the spacers are a pain to locate, and make.
Jim
Last edited:
Jim, I wasn't suggesting better or worse, just alternative ... I also have stopped mounting thwarts under the gunnel in favour of over, to give better internal clearance for packs .... is it for everyone, nope ... but it is an alternative. I look at my use and am customizing to suit (and sometimes just to try something new), because as the builders we get to make all those decisions.
I think the point and counter point is a valuable part of the forums and the builder needs to read them all to see what "appeals" to them and move forward accordingly ... going from A to B isn't always the same path.
Brian
I think the point and counter point is a valuable part of the forums and the builder needs to read them all to see what "appeals" to them and move forward accordingly ... going from A to B isn't always the same path.
Brian
Brian. Yes. every builder has to make decisions, based on what they feel is the best way ! I'm not suggesting mine is the only way ! Sorry if it came off that way ! I enjoy seeing other builders methods, as I'm always looking for a better one !
Jim .
Just wanted to add, by placing everything below, or level with the inwhales, I can side my hulls on a rack, without catching, or bumping. I've said before, I'm hard on my trim, and my Ash gunnels take a beating, with very little damage.
Jim .
Just wanted to add, by placing everything below, or level with the inwhales, I can side my hulls on a rack, without catching, or bumping. I've said before, I'm hard on my trim, and my Ash gunnels take a beating, with very little damage.
Last edited:
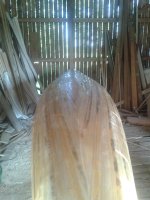
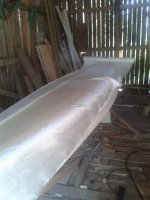
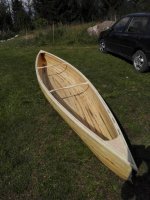
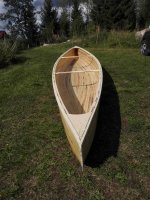
Thwarts, gunnels and decks are now complete. I tested canoe on water and 3" waterline surprised me. How it could fly top of water, like if there is just hint of water it didn't get stuck.
here's some photos
Sent from my GT-I8190 using Tapatalk
here's some photos
Sent from my GT-I8190 using Tapatalk
Attachments

Similar threads
- Replies
- 42
- Views
- 3K
- Replies
- 10
- Views
- 1K
- Replies
- 13
- Views
- 2K
- Replies
- 90
- Views
- 14K