• Happy National Bugs Bunny Day (1938)!❓⬆️👨🏼‍⚕️

New Axe Project

Kydex is extremely durable. Available in 4 thicknesses ranging from .060" to .125" thick. Its a thermoplastic formed to fit using an oven or a heat gun. Fairly easy to work with and allows do-overs in many cases.

I sold my Kydex related commercial equipment several years ago to begin chemo and I now make my sheaths and such using the basics; heat gun, manual eyelet set tool, etc. Its a fine way to go for a fellow making his own items and not interested in mass production.

Impact resistance is very good - I've accidentally tested this numerous times over the years ;) I generally use .080" & .093" for knife sheaths and other small tools. For full sized axes I use the .125". On all my Kydex covers I stay with .25" eyelets to allow easy accessory attachment, e.g., fire steels and such. When attaching accessories be sure to purchase high quality Chicago screws - the more inexpensive aluminum versions are much less desirable. All the supplies can be found at most knife kit distributors such as http://www.knifekits.com/vcom/index.php

There are also many tutorials on Youtube illustrating the simple techniques of Kydex working.

I'll be doing a cover for a GB Wildlife hatchet this weekend and will post a pic next week.
 
Hi Holmes, Thanks for the good info, I really look forward to seeing how you decide to make the hatchet sheath. Assuming I did this project inside a warm house, how long do you think I'd have once I take the plastic out of the oven to get everything all clamped up in a home made press?

I was pretty much figuring on putting the hatchet over the heater and getting it warm so as not to "rob" the heat from the kydex and cause it to firm up too soon. What do you think; do I run a risk of melting the kydex to the hatchet? By "warm" I mean still cool enough to hold on to it with my hands.


Hey Memaquay, Much as I'd like to support you in any hair-brained scheme you might have (and this one pushes the envelope!) I think it's best to decline on this one.
This last summer gone by, one day it got warmish and while doing yard work I took my shirt off. The lady next door offered me five dollars to put it back on. Seems I frightened her kids and made them cry and sent her little dog into hysterics.
Looks to be sex appeal described in negative numbers.

Best Wishes, Rob
(fully clothed by request)
 
Ok, well I guess the calendar idea is a bust, but it was fun for a bit. Time is a harsh mistress, even a few years can turn solids to jello. I'm eagerly awaiting my new axe, which will be so awesome and efficient that the state of the person wielding it will be of no consequence. A 100 year old granny could probably chop down a redwood with it. I'm hoping the hype is correct, cause i've only got about 3 swings in me know before I have to sit down for a rest.
 
OK, I'm only taking a temporary diversion from this thread for a minute. All this "lumbersexual" stuff has got me thinking that there must be some women out there who dig these lumbersexual guys, otherwise, they'd just be back to dressing in their skinny jeans with eye liner and makeup. I'm sure there are enough guys on this site to make a "lumbersexual" calender that we could sell in in those fancy axe stores to fundraise for canoetripping.net.

Anyone else care to contribute.....could call the calendar "The Lumbermen of Canoetripping".:) (just kidd'n)

I love a good thread diversion. Great photos so far.

The calendar idea might be doable. My sons make family trip photo calendars every Christmas for the following year, but they aren’t cheap, like $10 a pop. Find an economical source to have them made and pre-subscribed for 2X the cost, with the balance going to keep Canoe Tripping solvent.

Maybe pick a theme for the year. I do like the Lumbermen of Canoe Tripping. Although someone would have to slip into the Best Made store and surreptitiously hang one of those on the wall.

Let’s continue this diversion, but…

…I have been slowly working on making the Link handle fit the old Boys axe. Which, since the bottom of the eye is smaller than the top, presents a delicate filing and sanding challenge.

I’m not there yet, but, thoughts on installing both the hardwood wedge AND a diagonal metal wedge?
 
Last edited:
Hi Holmes, Thanks for the good info, I really look forward to seeing how you decide to make the hatchet sheath. Assuming I did this project inside a warm house, how long do you think I'd have once I take the plastic out of the oven to get everything all clamped up in a home made press?

The Kydex cools rather quickly. You want to have your press - foam pads, appropriate size boards and clamps - ready to go. Once you place your tool and Kydex together you want to have it in your press inside about 30 seconds. If you fumble its easy enough to re-heat and give it another go.

I was pretty much figuring on putting the hatchet over the heater and getting it warm so as not to "rob" the heat from the kydex and cause it to firm up too soon. What do you think; do I run a risk of melting the kydex to the hatchet? By "warm" I mean still cool enough to hold on to it with my hands.

That's a good idea for any ax or large knife given their mass. No worries on melting the Kydex to the point of sticking - that would take a lot of heat. I usually warm my tools and my foam pads just to increase my work time. I think this also gives me a tighter and more defined press. Have your clamps pre-set so you don't have to run them all the way through their adjustment span.

I usually let my Kydex sit in the press for 15 minutes or so to cool and take its set.

I generally do a paper mock-up to kind of see kind how I want the sheath to look and how I might lay out the eyelets.
 
Hi Mike, About the eye; the bottom being smaller than the top is nothing but good news, just fit it to the bottom hole as tight as you can. In that thread under DIY "Axe handle replacement" page 7 you might want to look at how I prepare the slot and drive the wedge in using the anvil. I know it looks to be dumb but it really works and the wedge remains intact until it won't go in any further.
Now if all the prep work up to that point was in order, the fit of handle to axe head is tighter than a New England spinster. Save your metal wedge for or if the handle shrinks down due to further drying. If that time does come then what ever you do don't let the metal wedge touch or press against the inside of the eye, keep it in the wood.
Sometimes the only metal wedge I can find is really too wide for the size of the eye; I take my hacksaw and cut off the two upper sides to give me the needed clearance. I clean up the sawed edge on the grinder.
Just so it's said: you do want a wedge that goes all the way from one end to the other filling the space inside the eye. It's true it'll get compressed not only sideways but longwise too. But given the flare inside the eye, you want all that filled up with compressed wedge.

That's what I think anyway....
Rob
 
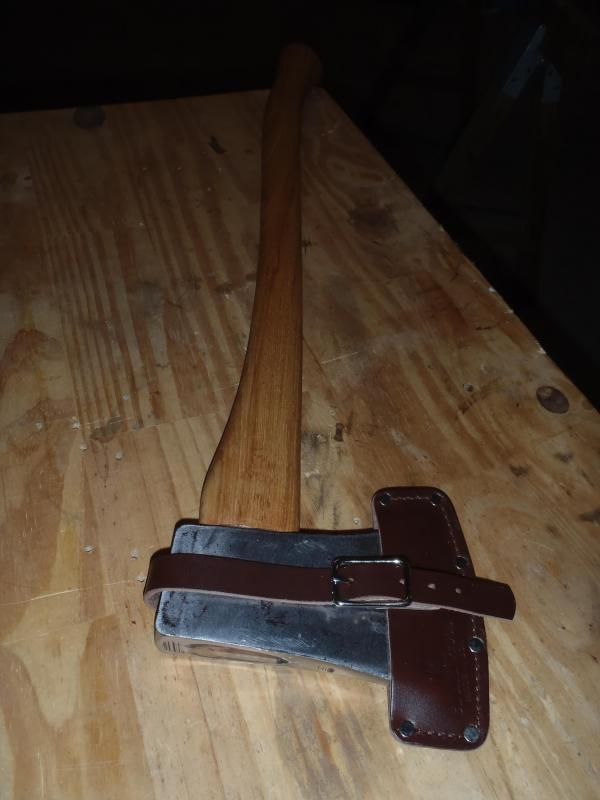
Installing the handle was just crazy challenging. The Link Boys axe handle I selected from my hardware purveyor “seemed” to almost fit the eye, at least closer than anything else in the well-stocked farm-country hardware store. They actually had several Boys axe handles to choose from. Gawd love a real country hardware store.


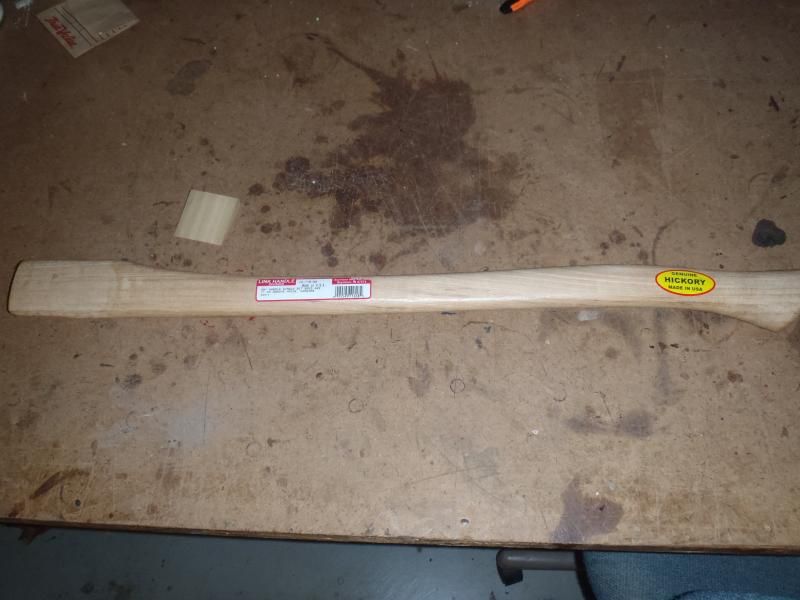
Well, close, but no oddly tapered cigar. This was kind of a square peg in a round hole challenge. Since the eye is smaller on the bottom I am at a loss as to how to file down the handle so that it will pass through the bottom of the eye and still, somehow, magically fill the eye at the top, even with a wedge.

Once again, a lot of repetitive filing, test seating, removal, more filing, more test seating and repeat and repeat, until I had an even all-around that fit snuggly at the bottom and still filled as much of the eye as possible at the top. The delicacy of that custom fitting process does give me a clue as to how the previous owner installed the head on the handle upside down. That sure would have been easier.


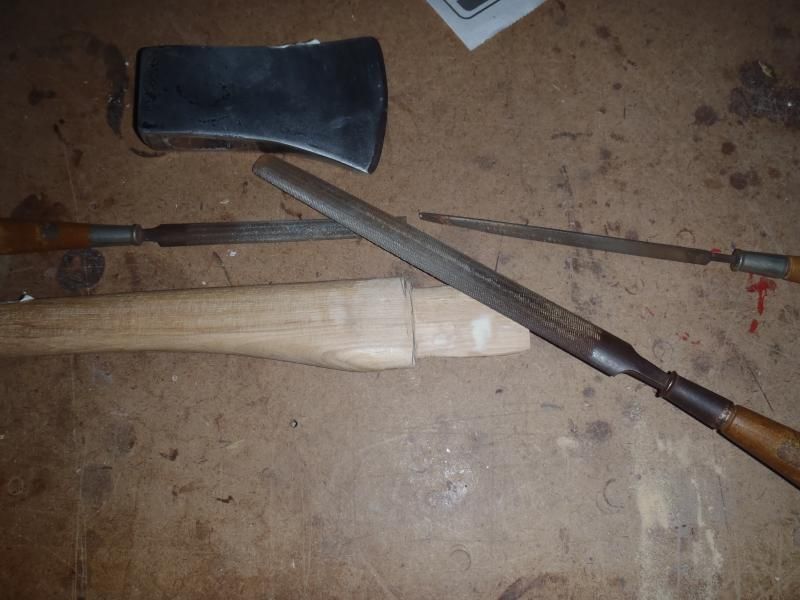
I was unsure about reducing the dimensions of the handle at the base of the eye, and the more I filed the end to fit snugly through the base of that tapered eye, the thinner the throat of the handle was going to need to be.

I left it at an abrupt L transition, at least for now. If that is a bad thing I can always go back and taper the throat of the handle with a rasp.


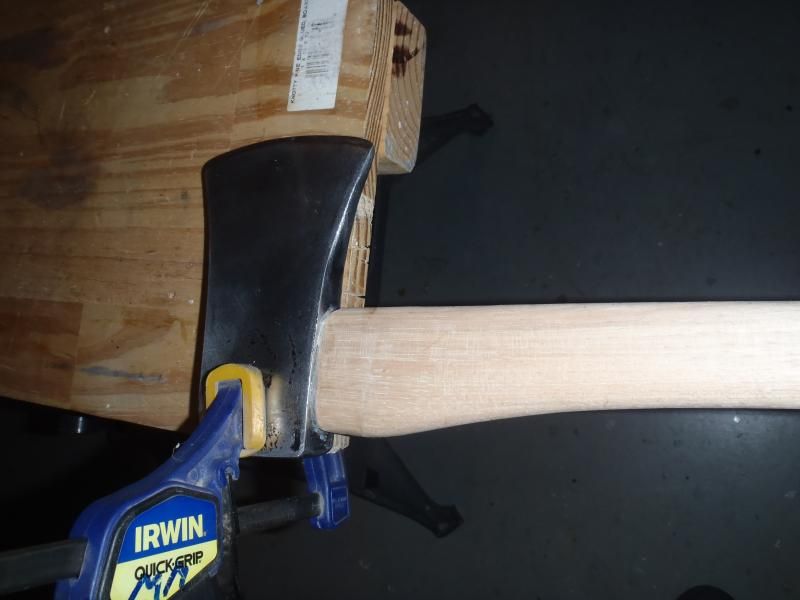
Eventually, with the handle seated and reseated several dozen times in the eye, I had a tight snug fit at the bottom and the top of the handle just above the eye. I trimmed out the slot and tapered the wood wedge slightly \_/ to fit within the eye. With the wedge seated it spreads the handle to fill the eye side to side, and the wedge length fills the eye opening fore and aft on top

It is a curious little axe head; I hadn’t measured the actual length of the eye, just the width; It is slightly longer at the top, just like it is slightly wider. The wood wedge fills that, but I am left with small L gaps on each “corner”.

Functionally those little corner voids probably make no difference, but those voids are not aesthetically pleasing. I had a project that needed G/flex attention, so I dribbled a dab of excess into those gaps. That will probably make it a PITA to ever replace the handle, so I hope I never break this one.

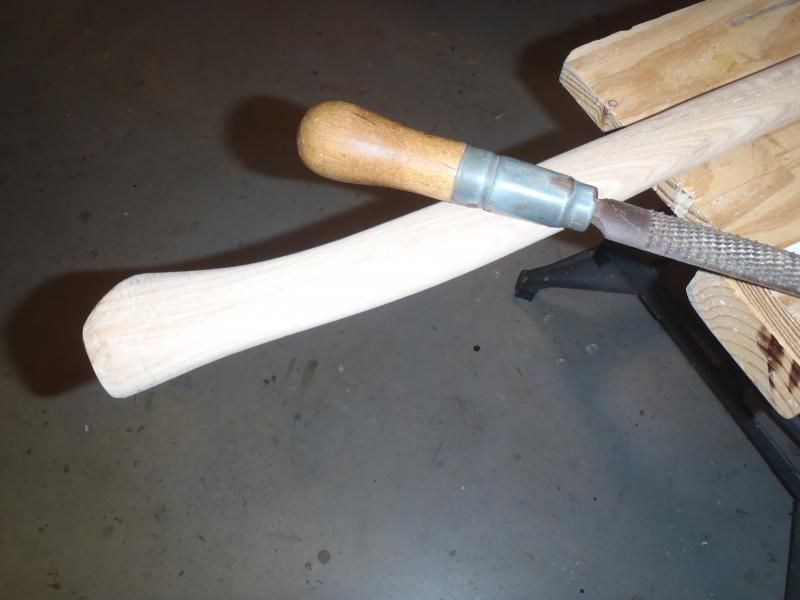
A buffing with 0000 steel wool took off the wax and a light sanding with 220 smoothed out any dings or dents from handle work.

Adopting Bernie’s personal preference from the Axe to Grind Forest Service video after sanding it all with 220 I lightly roughed up the bottom 6 inches of the handle with a rasp for better purchase. That seems like a reasonable safety step, and it would be embarrassing to lose my grip at the next lumbersexual party.


Tack clothed and ready for the first oil treatment. I used the same DIY mix I use on gunwales and paddle grips, 1/3 boiled linseed oil, 1/3 turpentine and 1/3 old varnish. I wanted that mix a little turpentine heavy, so I decanted some of the oil mix into a cup and add a dollop of turp.

The little DIY cup-on-a-stick is one of those shop helpers; I can dip out an appropriate quantity of oil (or whatever) into a cup and not have to slobber stuff into the lid seal and down the outside of the can while trying to pour just a wee dribble (which never works well with a full can).


That first turpentine coat sucked into the wood quickly, which I will take as a sign that the handle was sufficiently dry. I did have it resting a couple of feet from the wood stove for a few nights. It sucked in fast enough that I was able to apply a second coat a few hours later, likewise thinned with a bit of extra turpentine.


BTW, I have now watched the Forest Service video several times, and will watch the sharpening part again before putting a proper edge on this axe.

https://www.youtube.com/watch?v=Xz3rs-eaN3E

I love the way Bernie casually flips the linseed oil rag over his shoulder onto the shop floor. Since he is responsible for upkeep on the historic buildings that oily rag treatment should guarantee him life-time employment. (My used oil rags are all safely outside the shop)

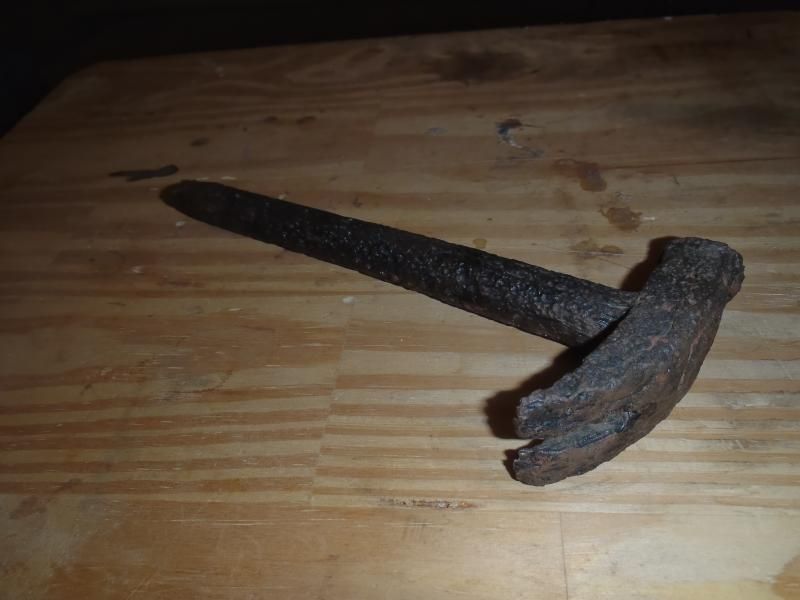
Having spent some quality time with this Boys axe I have become even more intrigued. There is (or was) definitely something stamped on one side of the pole, and maybe both. There appears to be a faint letter T in the middle, and maybe an O after that.

I don’t want to sand that area away any further, so I may have to find one of those grit impregnated rubber bars (Wonder Bar) to relieve the gunk on the sides of the pole and in hopes of revealing any discernable lettering. I’d really like to be able to decipher what was once stamped there.

I have a few days of handle oiling in my future, at least until the wood stops sucking in oil. When enough is enough is somehow apparent when wiping on (and off) an oil mixture. The wood just sort of tells you, yup, that’s all I’m going to take.

Once oiled to my satisfaction I need to put a good edge on it. Even with some protection wrapped around the edge while working on the axe I want to save sharpening for last.

I’m fast running out of antique tool projects. I need to find a derelict canoe to work on before I start in on my hammer.

 
It is a curious little axe head; I hadn’t measured the actual length of the eye, just the width; It is slightly longer at the top, just like it is slightly wider. The wood wedge fills that, but I am left with small L gaps on each “corner”.

Functionally those little corner voids probably make no difference, but those voids are not aesthetically pleasing. I had a project that needed G/flex attention, so I dribbled a dab of excess into those gaps. That will probably make it a PITA to ever replace the handle, so I hope I never break this one.

Bernie would be proud. The Forest Service specs require handles to be epoxied into the heads. See paragraph 3.2.3 et seq.

Here's the correct handle hang for the optimum head impact point:

fig032.jpg


If you're going to use your axe mostly for slicing sushi, sausages and Swiss cheese, like me, you probably want the pulpwood angle. If you're going after after Mexican strip bar zombie skulls, you may prefer the felling axe angle.
 
Here's the correct handle hang for the optimum head impact point:

fig032.jpg

I checked it for the angle of the dangle with the handle and head upright on a flat surface as shown above and it looks to hung at the one third two third version. That does seem a simplistic test, which would be greatly influenced by the size and shape of the axe head and the length and shape of the handle.

At any rate the head is seated perpendicular to the handle. More importantly, sighting down the length of the handle the head is perfectly aligned.

I am more curious than ever about what was stamped on the sides of the poll. I’ve looked at it with a magnifying glass and even tried doing a pencil rub over that faint lettering. Best guess on the side of the poll that still shows some (very indistinct) stampage remains is:

Capital letter something, followed by lower case letter something, definitely a lower case letter t, maybe a letter o and a couple more letter spaces that are all but completely vanished.
 
No Title

I am devastated. Apparently I am sooo far removed from the hipster fashion scene that I was unaware of the Urban Lumberjack look until reading about it on this forum. Maybe this will be the next "look"
 

Attachments

  • photo1592.jpg
    photo1592.jpg
    167.4 KB · Views: 0
I am more curious than ever about what was stamped on the sides of the poll. I’ve looked at it with a magnifying glass and even tried doing a pencil rub over that faint lettering. Best guess on the side of the poll that still shows some (very indistinct) stampage remains is:

Capital letter something, followed by lower case letter something, definitely a lower case letter t, maybe a letter o and a couple more letter spaces that are all but completely vanished.

This thread has a pretty complete list of current and former axe companies:

http://www.bladeforums.com/forums/showthread.php/726853-Axe-info
 
I’m fast running out of antique tool projects. I need to find a derelict canoe to work on before I start in on my hammer.


While I may be susceptible to criticism or ridicule on many fronts, now having seen the sclerotically scabrous, lepidote and furfuraceous remains of two axe heads, two Cara Cara knives, a machete and a hammer in Maryland, I don't want to hear a peep from the Old Line State about my maintenance practices for my modest collection of tools. Not a peep, thank you.
 
While I may be susceptible to criticism or ridicule on many fronts, now having seen the sclerotically scabrous, lepidote and furfuraceous remains of two axe heads, two Cara Cara knives, a machete and a hammer in Maryland, I don't want to hear a peep from the Old Line State about my maintenance practices for my modest collection of tools. Not a peep, thank you.

Yes, my Mora Hammare does need attention, but that is good Swedish steel. It'll buff right out.

Peep.
 
I'm sorry to tell you but your hammer isn't Swedish. If you look closely you can clearly see:

"Bumbershoot Tool & Die Works, Schenectady N.Y. Pat'd Oct. 23 1889"

Rather nice engraving for a tool of that time.

Best Wishes, Rob
 
I'm sorry to tell you but your hammer isn't Swedish. If you look closely you can clearly see:

"Bumbershoot Tool & Die Works, Schenectady N.Y. Pat'd Oct. 23 1889"

Rob, the age estimate may be close. My father turned up a chunk of rust encrusted metal while plowing a field on the family farm in the late 50’s and sand blasted it to reveal that very crude hammer.

If only tool could talk, what tales they would have to tell. Who would make such a thing, and why?

It is small, 9 inches long with a 3 ½ inch head, all metal, with a tapered chisel point on the end of the handle. Blacksmith forged Farrier’s hammer maybe?

 
Well, I can't help being bemused and ribbing Mike because the tools and gear in Mike's shop and house are all meticulously organized and maintained. Hooks, hangers, drawers, boxes, containers, cubicles, file drawers.

Yet he obviously has some sort of Mr. Hydey-hole from which he can extricate objects in worse shape than the average Neanderthal tool found in 30,000 year old Alpine midden mounds.

I think Mike could make a lot of money selling these ancient things rather than restoring them. That's because I've spent much of this depressing winter reading and viewing information about knives, axes and related tools. There are obsessive hobbyists and collectors out there who will pay big bucks for a black encrusted tool as long as you advertise it with au courant and trendy buzz words.

Mike, put that object on Ebay with the following words and you'll strike it rich:

"Antique hand-forged Swedish wilderness bushcraft and survival multi-tool. Only one remaining. Free shipping to any country once part of the British Empire."
 
There are obsessive hobbyists and collectors out there who will pay big bucks for a black encrusted tool as long as you advertise it with au courant and trendy buzz words.

There are, of course, antique hammer collectors.

http://www.collectorsweekly.com/tools-and-hardware/hammers

Christ, there are probably people who collect vintage bull testicles.

I have only two of my father’s tools, that farm field find and his old roofing hammer. I have pounded a crap load of nails with that beastly roofing hammer, including the bulk of a 50 lb bucket of 4” 20d ring shanks.

That was a couple decades ago and my hand still tingles in the morning when I sleep funny. And there is still no price that could buy either of those hammers.
 
Shoot, there's probably some farmer-sexuals out there, dressing in crap encrusted overalls with old hammers hanging from their pockets, and slaying all the city chicks.
 
Hi Mike, I'm dredging old memories here but one time I went to a country fair where they had a display of old steam powered farm equipment. One nice old guy had restored a threshing machine, and he and I got to talking about it. It had a gear box where you could select what gear ratio you wanted and buy removing securing pins (big) you could slide the gears required into alignment. (not while running) (not unless your name was "Stubs")
Various ports and hatches were secured with massive wing nuts that were moved with hammer taps. It had a tool box made as part of the thresher with an assortment of tools for it.
On the steam side of it, it had a beautiful brass governor, one of those centrifugal double brass ball setups. Elegant simplicity. The old guy would have loved to run it but the fair people wanted some kind of inspection done on the boiler, something about insurance, which I guess I can understand.

Anyway, back in the day I could imagine a machine like that thresher working with regular "snow drifts'" of chaff and everybody working hard and a hammer like yours getting dropped and lost. I wonder what kind of crops were grown in that field where it was found?
I'll bet if I had looked inside that tool box on the thresher, I'd have seen a hammer just about like yours.

Best Wishes, Rob
 
Back
Top