• Happy International Mermaid Day! 🧜🏼‍♀️

Need advice to repair cracked inwale

Did someone have to sacrifice a tooth in that deal?

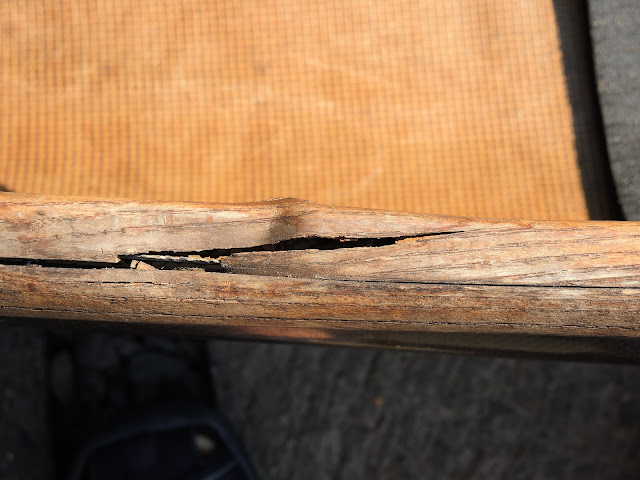
Glenn - the more I look at that gun'l, the more I am inclined to believe that it began as impact damage rather than just years of compression. If that is the case, it seems that the OP just kept using it that way while the exposed unprotected wood rotted and the warp took a permanent set. If that is the case, it's possible that there isn't as much rot as I initially thought. Also - clamping it too tightly might cause further splitting of the goofed-up grain. I would clamp it gently. Mike's suggestion of the Quick-Clamp is good. If the wowee in the grain won't straighten under mild clamp pressure, it maybe could be steamed into submission - but that would add some required drying time to the project.

Mike - I'm trying to remember if I ever had epoxy get on those Q-C clamp pads and stick. I know I peel Gorilla Glue from them all the time. I have some plastic mixing sticks that I have used over and over, because the epoxy that cures on them flakes right off when I flex the sticks (think those came from West Systems also). I don't know what kind of plastic that is, but it would certainly work as a clamp pad to avoid sticking....is it the same stuff as those plastic cutting boards, maybe?
 
Last edited:
Mike - I'm trying to remember if I ever had epoxy get on those Q-C clamp pads and stick. I know I peel Gorilla Glue from them all the time. I have some plastic mixing sticks that I have used over and over, because the epoxy that cures on them flakes right off when I flex the sticks (think those came from West Systems also). I don't know what kind of plastic that is, but it would certainly work as a clamp pad to avoid sticking....is it the same stuff as those plastic cutting boards, maybe?

I got curious and look at the pads on the ends of my quick-grip clamps – no epoxy stuck there. I thought there was an epoxy drip stuck to a pad somewhere, so maybe it did peel off.

That doesn’t really mean much; when I clamp (or sandbag weight or etc) I stick a piece of wax paper between the glued surface and the clamps/weights.

BTW, an aside – While epoxy resin doesn’t adhere to wax paper PC-7 epoxy putty does. I wonder if perhaps PC-7 throws off enough heat when it cures to melt the wax?
 
Did someone have to sacrifice a tooth in that deal?

I wanted to really get my teeth into the project, so I scraped up my left canine, which was pulled out 24 years ago. You won't see this artistic level of pictorial still life arrangement on the Brand X chat site.
 
Hi Glenn, Dang it seems I can't shut up! If you're still thinking about clamping, everything that pblanc says has been my experience too with those Harbor Freight clamps. But there is one little problem: we don't know how tough the remaining wood is under the section you are fixing. You see the spring in those clamps is full on once you let go of the handles. There isn't any way to gently apply pressure until you've moved the wood however much you wanted to go and then stop. For that you need a screw C-clamp
But there are no free lunches: if the wood is thin and you don't really screw down tight, the clamps will have a hard time holding in place. Plus the pads that exert the pressure are small and flat and don't grip worth beans. Offering advice from a distance, I'd go to the lumber company and look at the stock molding they have. Hopefully they have some molding that will cup around the gunnel and also provide a flat surface for the C-clamp. Think of a hotdog between two thick slices of bread, the gunnel being the hotdog.

There is really no way to talk you through this, you will need to just try various setups until you find a way to make it work. But as long as it's a dry run with no glue you can take your time and get it right. If they don't have a ready made molding that will work then you can always glue up a pad from scraps of wood.

Of course once you reach for the glue you'd better have some plastic between the gunnel and the block of wood. Masking tape is useful to hold things until you can get it clamped.

Rob

PS Somehow I missed that cute little bar clamp that Mike talked about above. Glenn, you are right there, if the thumb pressure needed to move the wood however much you want can be provided by that clamp it looks to be a workable idea. But I'd save the sales slip until it proves out on the dry run.
Dang.....those are sure cute clamps Mike, thanks! R
 
Last edited:
Dang it seems I can't shut up!

Rob, me neither.

Somehow I missed that cute little bar clamp that Mike talked about above. Glenn, you are right there, if the thumb pressure needed to move the wood however much you want can be provided by that clamp it looks to be a workable idea. But I'd save the sales slip until it proves out on the dry run.
Dang.....those are sure cute clamps Mike, thanks! R

I got clamps in the shop. A boat load of clamps, a couple dozen those spring clamps Pete mentioned from doing wood gunwale replacements, 3’ bar clamps/furniture clamps, C-clamps in various sizes and a dozen of those Quick-grip clamps from 7” to 24”.

The clamps that see the most use are the little 7” Quick Grips, largely because they are light and I’m usually clamping things that need a spread smaller than 7”, but mostly because they are super easy to use one handed. I’m usually working alone in the shop and it’s dang hard to hold something in place with one hand, hold a C-clamp with another hand and….hmmm….tighten the C-clamp with my teeth.

Edit: About those spring clamps – they are also easy to operate one handed but are less than ideal in other ways. The ones I have open to a max of 3” wide and offer no control over how tightly something is clamped. And the tension is all over the scale from clamp to clamp; some of mine are so forceful that I can barely squeeze them open to the full 3” spread, on others the spring tension is so weak a toddler could squeeze them open.
 
Last edited:
Welds made in steel are stronger than the original material being repaired. I feel the same about epoxy. There are lots of quality materials that can be used for this repair. I would still proceed in two distinct steps. The first one to fill the inside of the voids, and the second for the more aesthetic treatment with epoxy and wood dust. I would not want to do much clamping. That nob caused by the kink in the rail can be made fair with a grinder. It is not a new canoe, but that style of repair would largely make the bad spot disappear and provide plenty of strength.
 
Welds made in steel are stronger than the original material being repaired. I feel the same about epoxy. There are lots of quality materials that can be used for this repair. I would still proceed in two distinct steps. The first one to fill the inside of the voids, and the second for the more aesthetic treatment with epoxy and wood dust. I would not want to do much clamping. That nob caused by the kink in the rail can be made fair with a grinder. It is not a new canoe, but that style of repair would largely make the bad spot disappear and provide plenty of strength.

Ppine, I agree that the split/void can probably be repaired by filling the void with epoxy, and that the epoxy “joint” is unlikely to fail. What would concern me would be the possibility of a similar split ¼” away in the same location where the wood grain runs out.

DSCN2207.JPG

That grain run out area may already be weakened from the previous adjacent split and I would have more confidence in the repaired gunwale if it were covered with fiberglass cloth and epoxy.

That may be more involved that Glenn wants to tackle at the moment. If the wale splits again one grain over I trust Glenn to fess up.
 
Rob, me neither.


I got clamps in the shop. A boat load of clamps, a couple dozen those spring clamps Pete mentioned from doing wood gunwale replacements, 3’ bar clamps/furniture clamps, C-clamps in various sizes and a dozen of those Quick-grip clamps from 7” to 24”.

The clamps that see the most use are the little 7” Quick Grips, largely because they are light and I’m usually clamping things that need a spread smaller than 7”, but mostly because they are super easy to use one handed. I’m usually working alone in the shop and it’s dang hard to hold something in place with one hand, hold a C-clamp with another hand and….hmmm….tighten the C-clamp with my teeth.

Edit: About those spring clamps – they are also easy to operate one handed but are less than ideal in other ways. The ones I have open to a max of 3” wide and offer no control over how tightly something is clamped. And the tension is all over the scale from clamp to clamp; some of mine are so forceful that I can barely squeeze them open to the full 3” spread, on others the spring tension is so weak a toddler could squeeze them open.


Funny - I could have written that word for word. Complete agreement.


Y'all, I suspect we are all overthinking this project. Probably stressing over it more than Glenn is. It's very likely a simple matter of picking the loose stuff and lightly clamping with G-Flex. Funny, how I wrangled over the cane seat fix, and now with a little G-Flex and monofiliment it looks like it will last a lot longer than I need it to.

Glenn - you NEED at least one clamp in your life! Those Quick-Clamps are soooo useful. I found the majority of mine at estate sales......very cheap.
 
Y'all, I suspect we are all overthinking this project. Probably stressing over it more than Glenn is.

I thought that was the secret plan – to offer Glenn such a variety of advice, materials, techniques and cautions that he wouldn’t know what to think or do.

We haven’t even gotten to the ratio of colloidal silica to G/flex, epoxy pot life and cure times, keeping some acetone and a rag handy to catch any drips that creep onto the hull when Glenn F’s up taping under the cracked inwale and what to do when he epoxies his fingers together.

Oh the humanity.
 
Mike,
Your case can easily be made. When in doubt wet it out and add some cloth. I have "overdone" some repairs before, but none of them have ever failed during hard use. Repairing canoes in the field is hardly ever a rewarding experience. Much better to fix them once in the shop quit thinking about it. Now you have me convinced. Thanks.
 
Glenn, When you do make the repairs could you please give us a little trip report, maybe with photos? It's a frustrating thing getting caught up in a project and then never seeing how it came out.

I can surely understand starting to do things yourself, whether from need or just 'cause you want to. In areas where I don't know about what I'm trying to fix, I've found those Time-Life books found in most library's, really helpful. Of course the woodworking section is a rich resource too.

Best Wishes, Rob
 
Ppine, I agree that the split/void can probably be repaired by filling the void with epoxy, and that the epoxy “joint” is unlikely to fail. What would concern me would be the possibility of a similar split ¼” away in the same location where the wood grain runs out.


That grain run out area may already be weakened from the previous adjacent split and I would have more confidence in the repaired gunwale if it were covered with fiberglass cloth and epoxy.

That may be more involved that Glenn wants to tackle at the moment. If the wale splits again one grain over I trust Glenn to fess up.

G Flex epoxy, when cured, has a lower Young's modulus (of elasticity) than most epoxies meaning it is more elastic than say 105/205-206, but the epoxy joint will still be much less elastic than the adjacent wood. It is almost impossible during repairs to avoid creating a stress riser immediately adjacent to the repair.

Years ago I had a conversation (one of many) with Chris Kulczycki, the original owner of Chesapeake Light Craft when I was building one of his kayak kits. His kits used scarf joints to joint multiple panels of okoume to achieve sufficient length and the scarfs were jointed with epoxy. I expressed some concern that the epoxied joints might fail when the panels were flexed as the hull was stitched prior to fiberglassing. Chris told me that he had tested this type of scarf joint many times by joining panels of scrap okoume and then flexing them severely until something broke. He said that the joints themselves never failed, but the panels often broke immediately adjacent to the joint.

Fiberglassing over that crack and extending it a couple to a few inches beyond in each direction will not only support the repair of the fracture, but diffuse the stress riser out to more sound wood and make the whole thing much stronger. And it is easy to do.
 
Glenn will need some UV protection for the epoxy on this repair, will he not? Helmsman Spar Varnish (I have been paying attention) or some other brand varnish. I personally prefer hog bristle brushes for such a job. While Glenn is at it, he might as well use the leftover varnish to do the inside of the hull to spruce it up. Thoroughly prepare the surface with silicon carbide sandpaper in at least three progressive grits. And those rails look like they could use some Watco oil. Now, for oil, I prefer to use badger hair brushes, but you could get by with synthetic. Glenn should post some other pictures of the Wildfire from various angles, so we can come up with a number of other improvement projects for him to tackle.
 
77 ways to add weight to the WildFire.. I don't understand all the hype about UV protection when you live and store your canoe in the forest. Heck I can't even grow a flower!
 
Glenn, When you do make the repairs could you please give us a little trip report, maybe with photos? It's a frustrating thing getting caught up in a project and then never seeing how it came out.

I'll take some pictures and maybe even video as I blunder through this major-for-me project. I've been waiting on the G Flex kit to arrive, which it now has.

DSCN2228.JPG


I'll tape below the gunwales to try to prevent the epoxy from just running through the damaged wood and down the interior of the hull.

Even so, does anyone have an opinion as to whether I should try to fill the wood voids with just 1:1 G Flex, or should I thicken the epoxy with the (silica) adhesive filler? Secondly, does anyone have any experience or theories as to whether thickened G Flex can actually squeeze through the narrow nozzle of those syringes?

I haven't looked for clamps yet. The ones that can be set to varying clamp forces make the most sense to me for this repair. A simple C clamp can do that, but everyone seems to be recommending against them.
 
I would say to NOT try and fill the voids with thickened epoxy. You want something that can flow freely into any nook and cranny and allow trapped air to escape. You probably won't be able to fill it to the brim with unthickened resin but I'd get it close to filled and then, after that has began to set up (still a bit tacky), mix up a batch of thickened epoxy to fill it the rest of the way. Then sand it as good as you want it to be after that's set up.

Alan
 
If you are relying on the epoxy to percolate into a crevice, I would use unthickened epoxy. I already told you how I would go about doing this, which would be to free up the inwale enough to free it from the hull. Even if it were not completely broken in two, I suspect if you did so, you would be able to flex the inwale enough at the break in order to apply epoxy directly to the broken wood, in which case I would use epoxy moderately thickened with silica powder.

To answer your question, yes, as long as you don't thicken the epoxy too much it will go through the tip of the dental syringes. You can also reduce the viscosity by warming the mixed epoxy moderately.
 
Thanks to pblanc for excellent advice and knowledge when it comes to epoxy. The conversations with people in the business are a great source of information. Years ago I was up to speed, but the materials have advanced quickly. I know who to ask about tough epoxy questions.
 
I have no mechanical skills but I can learn spelling. The fancy glue is properly spelled "G/flex" according to the literature.

The tapered syringe nozzle can be cut back to accommodate thickened G/flex. That requires sharp scissors. Another tool problem. Hopefully the micro-scissors on my tiny Swiss Army Knife can handle this chore.
 
Glenn, Do you really want to thicken your glue??? I'm still of the opinion that it ought to be able to flow into any space that it will. And of course any air bubbles can have a chance to come up to the top and allow more glue to flow into the space.
It might be that depending on how the cracks are and where you decide to put the glue in, you may need to stopper up some cracks to keep the glue from flowing right on out again. I'd use some sticky masking tape to close off the unwanted cracks.

Rob

Practice the whole setup of how you're going to do the glue up to get the kinks out before you start working with the glue. Believe me; problems with clamps or what ever rapidly become a nightmare once everything (and you too) is sticky with setting up epoxy. (Voice of bitter experience)
 
Back
Top