• Happy Incorporation of Hudson's Bay Co. (1670) 🍁🦫🪓

Laminated Wood Seat frame failure postmortem and re-engineering

I'm less concerned about the details of the slide itself, as i know I can build some strong, light beams, but I keep bumping into things on the idea of how they are suspended.

Usually a factory bow slider will have the rear end of the tubes supported by the front thwart. The front edge of the tubes will be supported by a hanger dropping down from the gunwales or a block attached to the hull, many times a piece of aluminum angle.

I still haven't placed seats in the composite tandem I'm building. Getting it done isn't a priority and I keep waffling on what I want to do for seats and supports. Because of my gunwale profile hanging from their isn't an options. So it's either mount on blocks epoxied to the hull (which will preclude kneeling for me) or see how one of my narrow pedestals fits. I'm unsure if I want to bother with a front slider or not. I've had tandems with and without them and have gotten by fine either way.

Alan
 
stripperguy Well, I have the diamonds embedded in the hull. You might be surprised at how hard it is to get an observer to give any sort of Quantative measurement, though: "It looks fairly level, maybe One Half" to 4" high at the front. Not bad."

Muskrat simple. I feel dumb for not thinking of that... probably $2 at Wally World.

latremorej Hmmm... I get it, but something just feels off. I'd have to measure out my hull again specifically to see if any such thing could work...

Alan Gage Sort of what I thought. The issue with that is that such an arrangement precludes running backwards from the front seat. Since I'm still figuring my preferred solo seating, this may not actually matter, but was a big motivator for my original design.


Little number crunching for you: If I run solo with 50# gear, stashed as far forward as possible, (76" from center, or 24" back from stem, due to the bulkhead) I would want my personal weight at about 27" from center, or 73" from stem. Just about what I would get with the current bow slider in the full rear position. Assuming that I can sit backwards. And assuming that I kept the current seat spacing. Muskrat was right about the seats seeming too close to center, I'm having turning leverage issues from those locations.
 
No Title

My only experience with a bow slider is in my Swift Mattawa. The photo shows the factory seat before I modified it to drop it down lower and removed the sliding option. In this example, there are clamps on the bottom of the seat that use a knob and tension to affix the seat in a particular position. What I found was the brackets eventually bent allowing the seat at first to squeak, then finally not stay in place at all when in use. So I removed the brackets, picked the preferred position and screwed the seat down on rails I made. I still have all the factory pieces should I ever decide to sell the boat.

What I don't like about this set up is I cannot spin the boat around and paddle from the bow seat due to the thwart behind the seat used as a hanger for the slider rails. I have worked out how to remove the thwart and use just gunwale blocks, but I need to special order the 8" seat hanger bolts from Swift to get it mostly level if I were to do so.

Although I do have a dedicated solo, I want the option to go out fishing alone when Christine stays in camp and paddling from the stern position in a 40 pound Kevlar boat really isn't an option.
 

Attachments

  • photo4917.jpg
    photo4917.jpg
    128.5 KB · Views: 0
Sort of weird thought: absent of mathematically determining trim moments, how do you estimate trim when floating, that is, how do you tell that your bow is high, etc?


Mostly by feel. I see you have built sight markers into your strip pattern. Good idea !

If I see my bow is plowing water, I shift my weight to the rear.


As far as sliders, I prefer to make my seats a little longer, front to back, so I can comfortably shift my weight.
IMG_0726_zps9nr7wuui.jpg

The smaller seat is a replacement for a factory seat.

Jim
 
Jim Dodd That's an interesting approach. From the looks of things, that would be enough to fine tune, assuming you were close to a good spot in the first place.

Now I need to get back to the boat, and do another round of measuring, etc. I'm also picking ideas off another thread or two about seat placement, just have to see what gels.

Mihun09 Bit of a side question: do you like that type of carry yoke?
 
Yes, the deep dish contoured yoke is my all time favourite. I did file the vertebrae notch a little deeper and I use a yoke pad on it, but it fits very well and I can let go of the canoe and it won't fall off. I have no meat at all on my shoulders and what is there is damaged so the pad is necessary.

I have tried the CVCC pads and they were too hard and although it raised the canoe higher to give better vision of the ground, it focused the weight in narrower parts of the shoulder and felt to me more awkward.

The shallower contoured yokes just don't fit my shoulders well either.

So now I go to Wilderness Supply and buy a Teal yoke when I need one. I have a Teal converted to remove-able for use on my solo's as well.

Karin
 
Well, I had a crazy couple of weeks. Finally got the canoe out again today, experimenting with sitting center. Still having issues, and I'm not sure if its trim, paddle technique, or if I'm just expecting too much out of the position.

I've come to a firm enough conclusion about the seats to start building. I'm going with a fixed stern seat, and somewhat adjustable bow and center. I'm going with a wood composite again, with some differences.

100_4339.JPG 100_4340.JPG 100_4342.JPG

Here are the bits for the stern seat. I'm thickening the resin less for this. Its a Thicker resin to start with, and just needs a touch of Cabosil to be paintable, buy not drippy. The blocks on the end are important or construction strength.

The core, bulk part is Cedar.

The hardwood shell/reinforcement is Red oak. Lighter than and just as strong as the Maple from the last ones, harder and stronger than Cherry for similar weight. Easy to work, has a surface that provides plenty of tooth for the epoxy. Plus I have tons of it. Anyone need a few hundred board feet of rough-cut Air Dried Red Oak?

100_4352.JPG

Here are the parts, cleaned up and with the edge broken. I still need to drill for the lacing, and cut slight bevels on the ends of the side pieces. The joints are to be Pin and epoxy. The Pins will be set into solid oak on the ends of the side members, and will go through both the front and rear layers where they go through crosswise. This means no pin is dead-ended into cedar, which could spit under certain loads.

I've also started to fit a center carry thwart.

100_4351.JPG 100_4350.png

This is just a blank, I'll be shaping it into something more ergonomic. For now, I made sure that the critical dimensions, the beam and the bolt placement, do in fact fit.
 
Well, I had a crazy couple of weeks. Finally got the canoe out again today, experimenting with sitting center. Still having issues, and I'm not sure if its trim, paddle technique, or if I'm just expecting too much out of the position.

What are those issues? Is the hull too difficult to turn? Does it refuse to track? Too slow? Too lively? With good technique, or just more familiarity, many characteristics can be compensated for...some hull features will be forever limiting. I have a paddling buddy that long ago built a 3-27 pro boat, fully rounded with increasing beam all the way to the gunnels, and almost no rocker. Fast as could be, and great final stability, but always felt like you were balancing on a log. It never damped out, and we would constantly dither...I never got used to it!!
 
I am probably repeating what everyone already knows, but for those type of lamination's I always use an initial coat of thin epoxy (no thickener) and recoat till the wood is saturated (5-10 minutes), then I add a thin coat of thickened (peanut butter) epoxy. Then the wood is clamped, but not over clamped, the thickened epoxy fills any voids (and stays put) and any excess just squeezes out.
Thickened epoxy by itself just doesn't soak into the wood fully, using the thin epoxy precoat allows the thickened epoxy to fully bond with the wood that has epoxy fully "soaked in" ... maximizing joint strength.

Brian
 
Cruiser How many batches of epoxy does that work out to? I've noticed that the mix I'm currently using is wicking into the wood, especially the cedar. I've been painting a thin coat, and then coming back and adding more just before closing the joints. I'm also having the "Luxury" of a fully warmed up shop over the summer, which means I'm having reallyfastepoxykickover!

stripperguy I'm having what seem to be tracking issues, but don't seem to make intuitive sense....

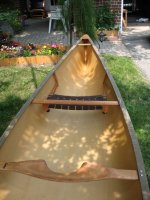
First, a word about my stance: In the center position, I'm working seated, with a sort of modified Canadian setup. Hull heeled to the side, with me tucked up under the gunwale. I've done some short stints kneeling, but have not found it comfortable, So I'm seated, 5-6 inches off the bottom. With no load, I've got my Stomach just a couple of inches aft of center. Either both legs stretched out front, or one curled up, half Indian style.

The hull seems fast enough for day to day use. I can tell that at the top end, two paddlers going all out, Its somewhat slower than my last build, but I don't anticipate doing much at that edge of performance anyway. Steady, Gentle distance paddling seems about the same.

If, by "Lively," you mean "Tippy," not so much. Sitting high near the ends is not a good idea, but I can kneel just about anywhere along the length. I can also stand near the center with no load, and if I had a SUP paddle, would be able to handle the canoe with similar success to an actual SUP board. (Though, I did end in the lake the only time I tried one! Got cocky near the end)

She seems to turn easily enough, but this is where things start to get odd: I've got a fair git of rocker, and with the canoe heeled, I'd expect both stems to be free of the water. (I have not been able to get an observer to confirm that) However, when a significant turn happens, often one end (Usually the bow) sort of "plants" and the canoe pivots around it. I get a lot of flow noise from the other end in these circumstances, sounds spread out, like a cresting ripple 3-4 feet long being pushed along by the hull.

Tracking is my big bugaboo, though. A straight back stroke, of course, tends to spin the canoe around its axis. I try to add some correction at the end of the stroke, what some people call a 'goon' stroke. To get an effect, I have to apply a lot of pressure, and tend to loose a lot of my forward thrust in the bargain. I've also experimented with adding some correction to the beginning of the stroke. If you've ever seen Rolf Kraiker's demo on youtube, think of the forward portion of his version of the box stroke, just without the in-water return. (My current paddles aren't faired well enough to do that) The problem is, this seems also to make me turn away from the paddle side. If I consistently apply the end-of-stroke correction, I'll eventually start to turn toward the paddle side.

When paddling from the stern position, with a load out front for balance, I have significantly reduced issues with this, though it still happens when I'm at approx. 1/3 hull length. Have not put together a solo load that is heavy enough to experiment with my full back stern position.
 
I usually have about 20-25 minutes in hot weather, been in the high 90s here .... this doesn't actually take much more than what you use now. You just change the steps a bit.

I make up the epoxy, apply and re coat till the wood stops drying (absorbing the epoxy), then I just add wood flour (or whatever you use to thicken), to the remaining epoxy, to get something like a peanut butter consistency. Then apply a thin coat of this to one side of mating parts (2 sides if you are really fussy, lol).

At this point if the epoxy starts to kick it really doesn't matter too much as the parts will still join and the epoxy will still attain full adhesion/strength under clamping, it stays pliable for quite awhile, so the only really important point is getting that initial deep soak on the wood. The cedar (softwood) will drink a lot of epoxy before it stays wet at the surface, if it doesn't get enough the joint won't attain full strength. The oak won't absorb near as much as the cedar, but it can still get some areas where it absorbs more than other areas, so it needs the same attention.

I like to use the wood flour for thickening for 2 reasons, 1) I like to have the thin contrast line that really dark epoxy makes at the joint as a visual interest feature 2) I have a lot of wood flour from sanding ...... apparently wood working (and canoe building) is mostly about learning how to make sawdust and wood chips.


Brian
 
Last edited:
Making some progress on the new seats. Got the stern seat trimmed, fit to its location. Only one joint glued (Ran out of the epoxy batch, not in the mood to mix another last night)

100_4353.JPG 100_4360.JPG

Turns out that making oak dowels is harder than walnut - I may have to find an alternative. This seat may seem to be set way back in the stern, but the front edge is 45" from the tip of the stem.
 
How are you making the dowels? Several companies make a dowel plate which is a steel plate with different sized holes. You make your dowel stock close to size then just hammer it through the hole and Bob's your Uncle.
Jim
 
I've got something inspired by this:

Except I have been working with square or octagonal blanks. Sort of a home-built version of a Veritas dowel maker. Worked brilliantly on small walnut dowels, but the larger oak ones have been grumpy - not cutting smoothly, wearing into the jig, so diameters grow over time. It actually got hot enough to almost burn the steel in the chisel - glad I stopped that in time.

Cruiser thanks for the thought. Jigs like that don't make long enough dowels. I go for at least 2" in an application like this.
 
RE: " thanks for the thought. Jigs like that don't make long enough dowels. I go for at least 2" in an application like this. "

Just an FYI on those cutters:


That's the reason I suggested them, they cut 2" plus a bit, and you can make dowels out any scrap with no real preparation.


Brian
 
Oh, boy... I've neglected this thread.

100_4387.JPG 100_4397.JPG 100_4398.JPG

Various bits for the seat frames coming together. I cut up another brakeline, and made a tremendous discovery. It drives tightly enough in a matching hole that I can just dry-fit and lace. So, I finished the various pieces before assembly. No cleaning up epoxy mess around the joints.


100_4406.JPG 100_4407.JPG

Even more glue-ups. The messy chunks in the back will show up again later, but this is the new set of mountings for the front and center seats.

Two of the seats, laced up. The thread rod for the rear seat is temporary, but I have had a chance to try the placement, and I like the results.

100_4411.JPG

Front seat in its slider. The seat can be mounted low like this, or on top of the rails. In the top position, it can be reversed, and is high enough to clear the 'demi-thwart?' In fact, I believe that I would be able to use it at several positions, not just all the way back.

100_4412.JPG

The center seat was intended to mount both high and low, but I realized in the test fitting that I would not be able to remove it from the low position without also taking out the slider rails. These rails are lower, so high-mount it stays. Still a bit lower than the front seat. I'll probably trim the ears back flush, since they will have no use.

If you're wondering about those blocks scattered around, and the lack of mounting hardware, I've gone over to the dark side.... stripperguy and Jim Dodd I'm going with cleats on the hull.

100_4405.JPG

The carry thwart progresses, but is not complete.
 
Well, I'm calling the seat project done.

100_4413.JPG 100_4453.JPG 100_4454.JPG

Cleats all have a contact surface of 3.5" x 1.125" Glued with thickened epoxy. No clamping, the fluid "Sticktion" (Can't remember the proper name - think of sticking a leaf to a vertical glass surface with just water) was enough until the epoxy set. Saturated with clearcoat epoxy and finished once set.

100_4421.JPG 100_4422.JPG


Doing some final fitting up before finish on the cleats. The attachment to the cleats are a combination of through bolts and threaded inserts - not all of the hull locations were vertical enough. The horizontal pins through the seat points are standard 5/16" bolts. I'm using nuts to hold them in place for the moment, but when I get a few spare minutes, I'll trim them and drill for clips.

100_4455.JPG

All set up... and tested. The reversed front seat works better with my small ballast load. I was using the middle seat as a makeshift foot brace. Definitely an advantage, now I need to see about setting one up for the proper stern seat.

This arrangement had me closer to the center of the canoe than I anticipated, though that would change if I had a larger load. The seat 'ears' for low mounting were more of an obstacle to paddling rolled than I anticipated. I'll have to continue experimenting, but If i don't end up using the lower position, I may end up just removing them.

I did not test the center seat as a seat, was not in the mood to pull the center thwart that day.
 
Back
Top