• Happy National Audubon Day! 🐣🐦🦅🕊️

Hiawatha 15- Long term build

Has anyone tried the cold weather version of epoxy? I have used it in Nevada in shoulder seasons in a garage. It works in all months except Dec-Feb. We are cool at night here at 5,000 feet.

Mo, What is the depth amidships on your new creation? It looks fairly shallow and light.
 
Ppine- depth is 12 1/4" according to the plans. I'm not too far off that. Are you referring to light displacement? Displacement is said to be 320 lbs. Or light weight? Haven't weighed it yet but does feel pretty good.
 
Has anyone tried the cold weather version of epoxy? I have used it in Nevada in shoulder seasons in a garage. It works in all months except Dec-Feb. We are cool at night here at 5,000 feet.

I worked in an uninsulated shop for 10 years or so and had occassion to do epoxy work in less than ideal temperatures.

I just used the epoxy I had, West System 105 resin and 205 Fast hardener. That seemed to require some careful planning and technique.

Careful, but simple – Warm the resin and hardener so it dispenses and mixes well, warm the hull (radiant oil heater), proper ratio/thorough mix, do the usual epoxy job and allow the epoxy to set up before applying any increasing heat. Not much different from what I normally do except a longer wait time.

Even if that wait time was several hours or overnight if I was working on the inside of a hull I could then flip it over and set the radiant oil heater underneath to help final cure the epoxy. Even then I waited a long time before attempting any sanding, and often had amine blush issues.

West has information and temp charts for cold weather epoxy work.

http://www.westsystem.com/ss/cold-temperature-bonding/
 
No Title

With the school rush over, here in Ontario, I was able to find a couple hours last night to work on the inside of the hull. I did do some work on it the other day and spent ALOT of time sanding the epoxy down to the wood surface. The high spots are really troublesome for planing and scraping. I was really frustrated at the time it was taking and even went out and bought a small 2" disk sanding attachment for my drill. Again, really frustrated, then it hit me. Sitting right in front of me is a mini hand plane that was given to me by a dear friend. I had intended to use it as a decorative desk item but i thought it may work to smooth out the surface and level out the strips.

Have a look at the comparison between my block plane and the mini plane. It it tiny, but surprisingly easy to use. I don't have overly large hands but it seems to fit well. It can be found at Lee Valley Tools if you are interested in finding out more.

It produces really clean cuts without tearing the cedar, and is an incredible amount faster than the sanding. I still had to knock down the high epoxy spots with 60 Grit sandpaper, but it sure beats having to sand everything. I will finish it off with a french curve scraper, and then 120 Grit sandpaper. I'll post pics once it's ready.

My goal is to try to have all prepped for next weekend (Sept 13-14) to fiberglass. It is nearly killing me to have such slow progress now that I am carving out a little time here and there.

Thanks for reading. Once again, stay tuned.
 

Attachments

  • photo810.JPG
    photo810.JPG
    89.1 KB · Views: 0
  • photo811.JPG
    photo811.JPG
    117.8 KB · Views: 0
  • photo812.JPG
    photo812.JPG
    110.1 KB · Views: 0
That's a cute little plane. I used a similar when quite a bit on my build but the inside of mine seemed to be too curvy for it. I used a long, skinny, and sharp chisel to knock off worst spots and the drips. Of course mine were mostly glue and not epoxy so that might make a difference.

Alan
 
Hey everyone, I finally had some time to do some sanding, and scraping, and sanding, and scraping...you get the picture. Whew, that's a bit of work. Other than a bit of touch up here and there, I think she's pretty much ready for glassing. I hope you can see the difference from when I started to now. I borrowed my in laws scale to see how much it weighs at this point. I'm so excited to say, it's only 25.4 lbs. I think that's fantastic. I know, it's no osprey, kite, or even barracuda, (wink) but I think it should settle out, when all is said and done, at around the 40 lbs mark. I really hope I'm not way off. Feels really good right now. Thanks for reading.
 

Attachments

  • image.jpg
    image.jpg
    234.6 KB · Views: 0
  • image.jpg
    image.jpg
    249 KB · Views: 0
  • image.jpg
    image.jpg
    230.3 KB · Views: 0
That looks great, nice work! Nice looking lines along the shear too.

I sure found it a relief to get the inside sanded. Only fun things to look forward to after that.

That's a good weight so far. 40 pounds should be doable depending on trim. You'll probably add a few pounds with the inside glass. I think the final trim, gunwales, seats, and thwarts, is where the weight really starts to add up.

Good luck with the inner glass.

Alan
 
Momentum,
Yeah, it's looking pretty sweet!! Nice lines, it'll look great on the water or over your head.
Sub 40 lb is very possible, take a look at mahogany for trim...light, strong, rot resistant. If you avoid the dense hardwoods and keep your sections appropriately sized to the expected loads, the weight won't increase by much.

I bet your pretty happy to see the project moving along, even happier that you didn't give up on it years ago!!
Good things take time, and anything worth having is worth suffering for...but, it seems like you're not suffering much.
Yeah, speaking from personal experience, it feels great to have a project develop right before your eyes!! I'm enjoying your build quite a bit from behind the monitor, you must be loving it!

Congrats!! Now, get glassing!
 
Last edited:
Thanks Stripperguy, appreciate the encouragement. Yep, I'm pretty pleased that I didn't dump it a long time ago. Actually, one of my neighbors drive by the other day, and jokingly said..." How long have you been working on that?" ( I answered him) then he asked..."how much does it cost to rent a canoe for the day?" He then drove off. Poor bugger just doesn't get it. I already have a Swift canoe that I can use any time but still choose to build this. It's not about money. In a previous post, I talked about my scarf joints on some straight grain ash I already had. I'm gonna stick with that at this point and see where we come out with the weight issue. I did keep them on the skinny side at 3/4 x 3/4" I've also decided that I'm gonna have the outwales rabbetted to sit on the top edge of the hull. This will remove 1/4" x 1/2" of the material. I'll keep you posted on weights as we go. Once again, thanks for following along :)
 
A buddy of mine is popping his Osprey off the forms tonight, I helped him glass the outside last week. He was asking how heavy my boat was when it came off the forms...My Kite (nearly the same as the Osprey) was 22.5 lb just before the inside seal coat, and 27.5 after glassing the inside. Even with my carbon fiber and foam gunnels and thwarts, I'm still heavier than I wanted at 32 lb finished weight. At least I know what boat I'm building next year (a lighter Kite).

BTW, I think a rabbeted outwale is a good way to go. Any exposed bare hull material will invariably take a beating, best to keep it covered as you plan.
 
No Title

I know its been a while since I posted anything useful about my build...I have to confess, I have made the biggest rookie mistake ever. Read on, maybe you'll laugh, although didn't

I started out with one gallon of resin, and one half gallon of hardener. Can you see where I'm going here? Yep, you guessed it, I messed up the epoxy ratio. What a bonehead move.

I laid out the glass on the inside of the hull,, mixed up my first batch, and began applying the epoxy to the surface. I got about half way through this first batch and noticed how little hardener I had left and how much resin I had left. Whoa. I only applied 4 light coats on the exterior so I should have lots left, I though to myself. Then it dawned on me. The pumps I was using were not calibrated, or metered for the ratio needed for this epoxy. The resin pump has a larger diameter compaired to the hardener, so I thought that I was just supposed to pump once for each. It's a 2:1 ratio, so in actuality, I have 1/2 the amount of resin needed, or twice the hardener needed for my batch, depending on how you look at it.

This is where you are supposed to laugh. It's ok, I'm over it now.

SO, what does this mean you ask? Well, it means that even though the exterior epoxy is cured, it's too soft. If I push hard enough, I can leave a finger nail imprint in it. I did notice this when I lightly sanded the exterior for the last coat of epoxy, but assumed that it just hadn't been given enough time to cure. WRONG.

I'm not one to jump straight to the blame game, but I did go back to the manufacturers web page and have a look at their info. Maybe I missed something.

The gallon and a half product kit that I purchased (complete with pumps) does say that these are metered pumps. I got on the phone and was told that I should have received very clear instructions that I was supposed to do the calculations (2:1 ratio), and that these pumps were calibrated to dispense one once at a time. I told them that I did not remember reading this, and that their web page was very misleading (metered pumps). I guess I'm buying more epoxy.

Next I called up my contact at Carlisle Canoe, and spilled the beans about what I had done. (Insert laugh here). He suggested that I place the canoe outside in the hot sun and let the hull warm up. He says that if the epoxy doesn't pull away from the wood once all is good and warm and expanded sufficiently, then I'm probably ok to just sand and recoat with the correct formula of epoxy. I nervously did this and to my astonishment, everything remained stuck and intact. Whew, dodged that bullet.

Check out the canoe in my postage stamp size backyard

I am now in the midst of sanding yet again, and have ordered more epoxy. I won't get it till next Thursday, so I'm trying to block a bit of time next weekend for the final, final coats with the correct formula this time.

In the mean time, I have drawn out my decks, and have machined the outwales. I think I need to go do something with them. I like wood, not epoxy.

Moral of the story...check and double check
 

Attachments

  • photo953.JPG
    photo953.JPG
    150.1 KB · Views: 0
  • photo954.JPG
    photo954.JPG
    179.8 KB · Views: 0
Well the Hiawatha stays true to form and continues to challenge. Although this is an annoying hurdle to get over it will soon be behind you. All the elements of the build will make using the canoe so much sweeter. Such a fine vessel to create memories in and around.

The canoe looks great out on the lawn. You've achieved so much and now you're in the home stretch. I'm sure you can feel it.
 
Momentum,
Phew!! You did dodge a bullet...but you're back on track now. That hull sure looks sweet in the fresh air!
I had a somewhat similar disaster when was building my sailboat. In my haste to get varnish on the outside of the hull, I didn't allow the resin to cure well enough, nor did I wash away the amine blush. A few days after I varnished, I noticed some wrinkles in the finish. A few more days and the poor thing looked like something from a horror movie! I couldn't sand the varnish off, it was too gooey. I tried some stripping concoctions, but I was too worried about the resin beneath.
I ended up spending 2 weeks scraping all the gooey varnish off by hand...it sucked.

Anyway, glad to see that your little goof up was just that. Looking forward to see how it goes for you on the inside.
 
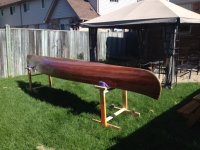
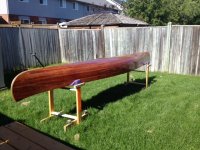
Despite my setbacks here and there, I am actually making some progress, and feeling pretty good about it. I got the epoxy in today, so I’m trying to figure out when to apply the additional coats to cover up my, uh, little epoxy mishap.

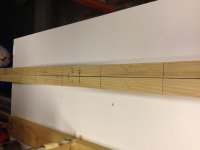
I mentioned that I was going to machine scuppers into the inwales. In my original spacing for the scuppers, I set myself up for a 6” long opening, followed by a 2” solid section. After much thought, I revamped it for a 4” opening with a 3” solid section. More traditional, I suppose.

Anyway, here’s my set-up… I set up my drill press with a 3/8” brad point drill bit. I then clamped a straight piece of stock to the table to use as a fence and used my original test scupper as a guide. You can see that there are two lines on my fence. One for each side of the drill bit. This allowed me to quickly and accurately align the inwale with the bit. Just slide along and drill. You can see the left and right holes on each side of the lines. The holes cut really easily and were done quite quickly. Next was to use my jig saw to connect the dots between the lines, so to speak. With a brand new blade, my cuts were clean and pretty straight. Here’s the result…
IMG_1289.JPG IMG_1291.JPG IMG_1296.JPG IMG_1294.JPG
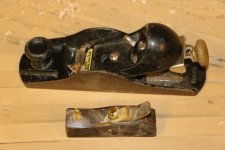
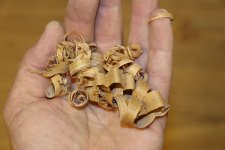
I finished them up with a ½” round cylindrical sanding sleeve. Worked great.
IMG_1308.JPG IMG_1307.JPG
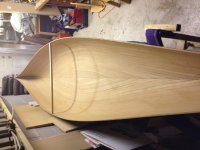
With those behind me, I turned to the decks. My design inspiration for the design I finally settled on came from the arrowhead or spearhead decks of the early 1900’s. The St. Louis Meramec Canoe Company, and the Penobscot Canoe Company both utilized this methodology. Their thought was that this design was far superior (stronger) to the decks of the day because it was not interrupted by the inwales extending all the way to the point of the deck. I’m not sure that still holds true for today. I just chose it as a little bit of a nod to our predecessors, as well as the fact that I like the looks. I drew this design out in CAD and would like to offer it up to anyone who wants it. I can get it to you in an AutoCAD format or PDF. Just PM me and I’ll send it to you J
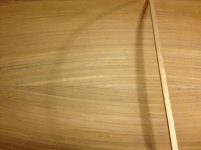
I started with a nice piece of ¾” ash stock about 4 ½” wide. I cut it a little longer than what was needed. I sliced the material from corner to corner and flipped one of them over. This gives you a triangular shaped wedge. I decided to add a “racing stripe” to the deck, so I sandwiched 3 pieces of veneer between the ash, and glue it up.
IMG_1301.JPG IMG_1302.JPG
Here’s the paper deck template.
IMG_1303.JPG
This is my quick clamping set up for gluing the deck pieces together. Note to self…put something under the glue line so that the whole assembly is not glued together.
IMG_1306.JPG
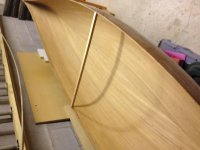
These are the assembled deck blanks, and of course the “racing stripe”. Not that I go very fast.
IMG_1310.JPG
Next step is to cut final shape of the decks and begin the fitting process.

Thanks for reading. I hope you didn’t fall asleep and wake up 2 hours later with a keyboard imprint on your cheek. Sorry about that.
 

Attachments

  • IMG_1289.JPG
    IMG_1289.JPG
    178.2 KB · Views: 0
The Bastien Bros Hurons used the arrowhead style of deck as well, so there is a little Canadian content in that albeit likely taken from the other two companies. The cut out is very Old Town'ish or is that your own pattern?
 
The Bastien Bros Hurons used the arrowhead style of deck as well, so there is a little Canadian content in that albeit likely taken from the other two companies. The cut out is very Old Town'ish or is that your own pattern?

It's my pattern. You are right about the Old Town vibe though. I have a drawing for anyone who wants it. Just PM me, and I'll send it to you

Momentum
 
Looks great, nice work. I love the clamping setup for the plate. So simple yet effective. And I wouldn't have thought to use veneer for the racing stripe. Lots of good ideas to be gleaned from this thread.

Alan
 
Momentum,
Your wood working skills are inspirational. Your boat is a thing of beauty and you should be proud of your work no matter what your clueless neighbor says. Passion is definitely missing in many people's lives. There is a lot of it here, which makes me really happy.

Wood working and using epoxy are skills that are seemingly unrelated. Most people are usually much better at one than the other. Epoxy is a complex chemical process that is oversimplified and glossed over so to speak. The ratio is very important as you have so eloquently demonstrated. It is temperature sensitive, etc. It is also very strong for its weight and the perfect compliment for wood boat construction. Learning the vagaries of its use is usually a winding road. I am stating the obvious in an effort to tell you to "never be daunted." You are doing something beautiful, important and worthwhile.
 
Hey, thanks guys (girls?)
I feel guilty sometimes that I glean so much more than I can contribute in my small build write up. I am trying to be completely open and transparent with what I communicate to give everyone the total story. Good, bad, and ugly. I could have omitted my errors and mistakes, but then fist timers like myself would have to learn the hard way what not to do. How many will go back and double check their epoxy ratios now, I don't know, but I bet there will be some that do.
As far as my neighbour is concerned, I'm gonna give him a mulligan this time...? He's going through some family stuff right now, so he's in a different place than I am. No worries.
I'll keep posting if you guys( girls) what to keep reading. I'm having fun doing it
 
Yea, keep it up, we need to see it floating. Now the race is on for completion before ice up.

My Tremblay thread will likely be my last on my w/c projects, it is basically just the same thing over and over for future projects. I would just keep Robin informed off site with the Penobscot and Morris projects once under way.

Karin
 
Back
Top