G
Guest
Guest
TL/DR. TB,TTD
(Too Long/Didn’t Read. Too Bad, Took Two Days to think of every picayune step and find illustrative photos)
I’m putting this up as a separate post so it doesn’t get lost, scattered amidst five pages of my bather and enjoyable off-topic discussions on other threads.
I don’t see any easy way to incorporate a spray skirt tunnel using heat sealable fabric, so this is mostly relevant for partial spray covers.
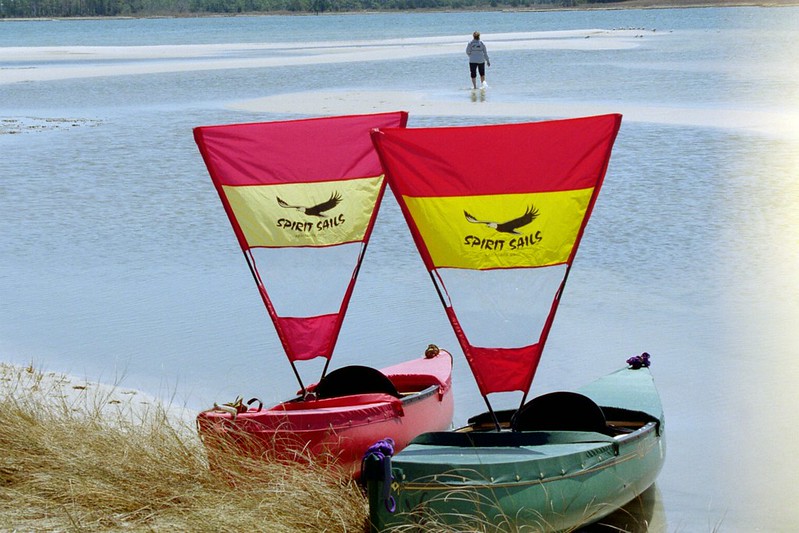
For my purposes partial spray covers for solo canoes have advantages for non-WW types of tripping and day paddling. Easier entry/egress, less potential entrapment hazard, fewer snaps, and easier to access gear, including day gear in an open area behind the seat. I feel better about using a portage cart strapped around the open center with the partial covers left in place.
 PC110013 by Mike McCrea, on Flickr
Perhaps not just solo canoe partial covers. A belly cover across the middle of a tandem canoe, from behind the bow paddler down to the stern paddler’s feet (or shorter as desired) would be even easier to make. Possibilities as well to make a partial shade and rain cover for a dog companion.
 P6100010 by Mike McCrea, on Flickr
Or a custom ice chest cover, with end bilge length end drapes to keep the sun off and the cool in. Lot of possibilities, including custom covers designed for fishing or hunting.
If you have serious sewing abilities just skip using the heat healable fabric altogether, use some coated nylon or poly material, although some of the how-to steps in making templates and seating snap buttons, sockets and studs may still be helpful.
I don’t see the weight savings of lighter denier heat sealable fabric as being worthwhile. Not for DIY dry bags, certainly not for spray covers. I would use the Packcloth material.
The heat sealable material, even the lighter weight Oxford cloth, does not stuff. But the covers will roll up tightly, and fit in an old camp chair bag for transport and storage.
 P1200024 by Mike McCrea, on Flickr
If you have no old camp chair bags making a custom-sized bag from the heat sealable material would be easy enough, just a long skinny cylindrical bag, perhaps with a simple top flap and Velcro closure; doesn’t need to be dry-bag waterproof, sized long/wide enough to contain the covers, which when rolled are considerably smaller than any old camp chair bag I had saved.
The use of 3M Dual Lock is appropriate only for hulls where snaps would be obtrusively in the way of a paddle stroke or getting in/out. Do not use Dual Lock to attach paddle pockets or lash straps to the covers; pressed together the two pieces of Dual Lock become stiff as a board and un-rollable for storage.
I highly recommend making a simple cylindrical dry bag for a sleeping pad or chair from the heat sealable fabric before attempting a spray cover. What you learn making that waterproof bag will be invaluable, and help prevent costly mistakes on the cover. Everybody needs at least one custom dry bag. And once you have successfully made one custom dry bag. . . . .
https://www.canoetripping.net/forums/forum/general-paddling-discussions/diy/83031-making-diy-dry-bags
Make (and save) a template for that simple cylindrical dry bag, it may not be your last. You don’t need to use see-through plastic and mark thwart locations for that template, even a paper pattern will suffice.
Sequentially, I hope not forgetting anything, a step-by-step for making DIY heat sealable fabric no-sewing spray covers:
You will need to set up a large table surface for marking and cutting the templates and fabric. A 4’ x 8’ sheet of plywood, sag-stiffened with some 2x4’s placed underneath (barely) will suffice. And 6’ x 8’ surface is better still; think 58” wide fabric, unrolled to spray cover length; not something convenient to do on the narrow shop bench.
 PB180004 by Mike McCrea, on Flickr
For anything heat sealable, make a template first. A roll of clear plastic sheeting makes excellent see-through material for spray cover templates.
If the sheerline is symmetrical, make the longer partial cover first. You should be able to reuse the same angled \_/ template, and just shorten the length at the wide end as desired. Making the templates is the most time consuming of any step, so save them, ya never know.
If you purchased the clear plastic sheeting and heat-sealable fabric folded it can (should) be rolled onto lengths of pipe, long dowel or etc to remove the creases. A few days tightly rolled and stored warm will lessen the creases and make the measuring, marking and cutting easier and more accurate. It helps to cut the clear plastic to the same 58” width as the fabric before rolling.
To make spray cover templates begin by taping the clear plastic over the hull. Cut the plastic to the length needed for the cover, plus the iron over hem amount at the ends, but leave it extra wide to drape well over the sides of the gunwales.
It helps to first mark a center line on the plastic and position that along the keel line before taping it in place. Painter’s tape or, better, cheap, barely sticky duct tape works well for that. Make a fold over tab on the tape, and put the fold over end on the plastic template, not the hull, so it won’t pull or tear at the edge of the plastic when you remove it.
Run a Sharpie along the taped plastic under the outwale edge, and mark the locations of any carry handles or thwarts on the clear plastic, to avoid seating snaps directly behind the end of a thwart.
 PB190010 by Mike McCrea, on Flickr
Mark the approximate snap locations on the template. For simple rain, splash and paddle drip covers 10 to 12 inch snap spacing has worked well. For covers with more whitewater-ish intentions maybe every 8 inches or so. Plus or minus in snap spacing, so the spacing is fairly even and misses any thwart, yoke or carry handle ends.
Take the plastic template off the boat, lay it on the giant table and Sharpie lines below the existing outwale line for the finished cover amount of below-sheerline drape, as well as the width of heat sealed fold-over hem you desire.
For example, if you want the cover material to end 2” below the outwale add 2” on each side, plus the amount of fold over ironed hem below the outwale trace. One inch hem two inches below the outwale? Add three inches on each side.
 PB190013 by Mike McCrea, on Flickr
Glad you left that plastic template side drape extra long?
It is best to not make any iron-over hem wider than your iron. Your iron, not the spouse’s iron from the closet. You will inevitably get some heat sealable smutch on the face of the iron, which will leave a suspicious smear after ironing the seat of your boxer shorts. The cheapest $8 big box iron will do. If you find a cheap iron with a long flat side buy two and I’ll reimburse you.
Once the plastic template has been rough cut to a trapezoidal shape tape it across the gunwales again and check the fit. Better to find any miscue on the template rather than after cutting the fabric. Take the template back off, lay it on the table and put your thinking cap on.
The fold over heat sealed hems will become peculiarly shaped at the ends to accommodate sheerline angled material, and will require some oddball cuts.
 PB190025 by Mike McCrea, on Flickr
There is a first time “trick” for making those oddly angled to-be-ironed fold over hems:
Fold the longest sides and make (what appears to be) the necessary fold over cuts on those edges, so they fold flat and even at the ends, heat sealable to heat sealable. Then, if for example using a 1” hem all the way around, cut a 1” wide strip of template plastic and tape it to the bow and open ends. Fold that additional template piece over and making the remaining cuts as will then become apparent. Ideally the corners meet at an I/_ angle, leaving no open un-ironed sleeve.
“Ideally”; I have messed that up a couple (three, four) times. It is much easier to visualize and make the template cuts if you use the same width hem on all sides.
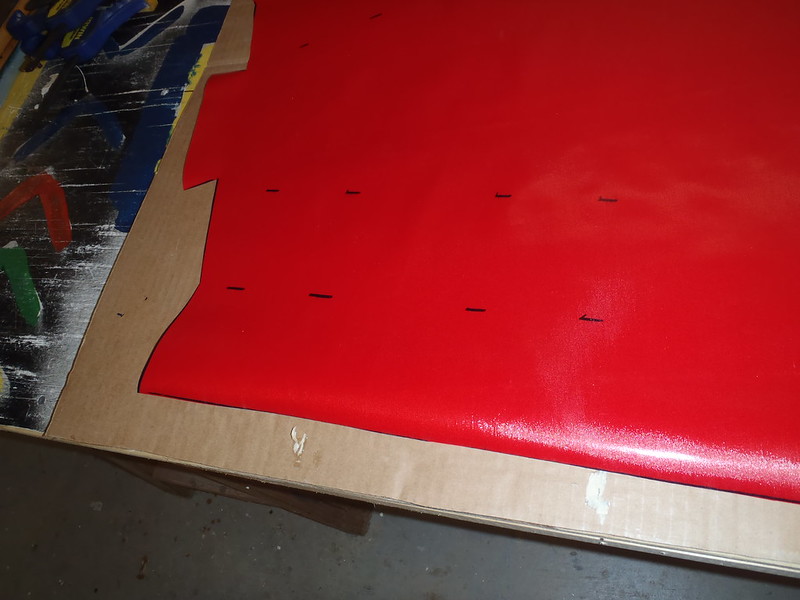
If satisfied with the template unroll the heat sealable material on the giant table and tape the template on the fabric in a few places. Straight edge Sharpie the template outlines, and cut that shape. You will have an angled cut left on the rolled fabric; leave it, it may the same angle as the next piece you cut.
 PB200028 by Mike McCrea, on Flickr
Take the cut fabric and tape it across the hull in place to verify the fit. If you somehow effed up, and a partial bow or stern cover is oops-too-narrow to snap below the outwale, you can shift it forward a few inches for more drape over the outwales and re-cut the narrow end. Or, you know, just don’t eff up dummy.
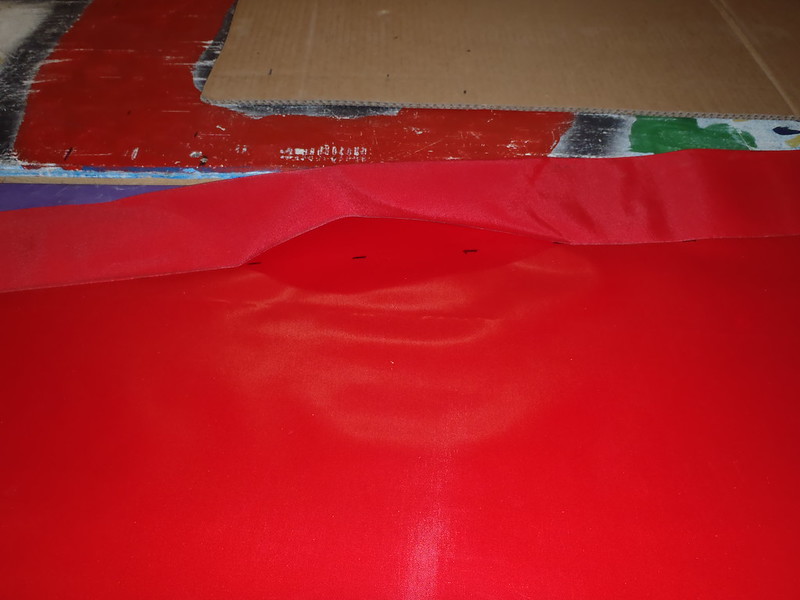
Use a large piece of thick, smoothly corrugated cardboard, with a straight flat edge on at least one side as an ironing bed. Align the straight edge of the cardboard with the long edge of the table. The longer that piece of cardboard the less often you will have to adjust the fabric on the cardboard as you iron it. See above “use a big table”.
Smooth surfaced cardboard; no creases or dents, and the stuff with visible corrugation ridges on the surface will leave a washboard road on the ironed hems. Who knew I would someday become picky about scrap cardboard?
 PB200045 by Mike McCrea, on Flickr
These next few parts take longer to explain than to do, and sounds more complicated than they are.
Pieces of Scotch tape (leave a tab) work to hold the folded over edge of the material evenly in place before/while ironing. For long hems I put one piece of tape in the middle and a piece an inch away from each end.
Those ends tape pieces are temporary; once an even hem has been folded over and taped, those pieces are replaced by clamps at the very ends of the fabric, so all that is left is the piece of tape holding the center straight and even.
Eh, don’t extend the clamps past the end of the fabric where the ironing fence will be clamped. I don’t have enough fingers and toes to count how many times I have done just that.
A trick to assuring an absolutely straight and even hem; if the hem is narrow enough, fold the material over a thin yardstick or etc, tape the folds closed and remove the yardstick. Below, a 1 ¼” hem.
 P1160022 by Mike McCrea, on Flickr
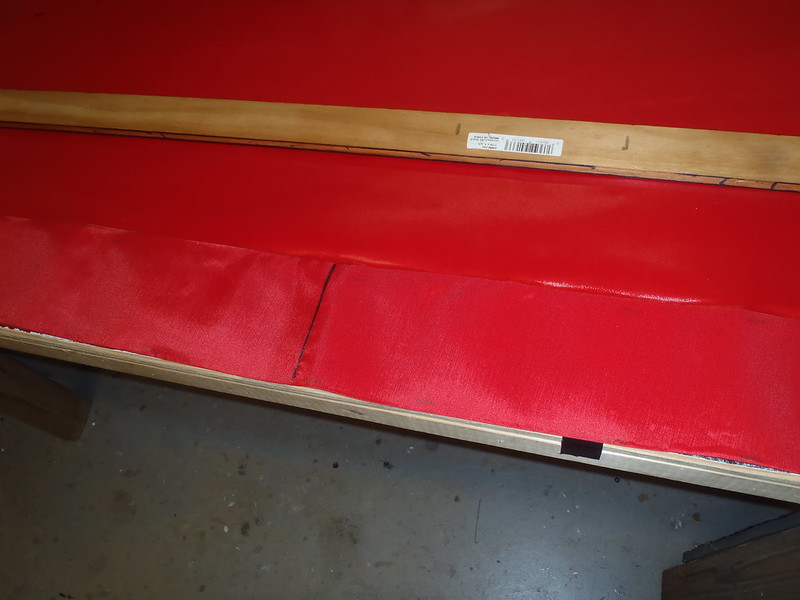
With the long-edge of the cover side ready to heat seal, clamp an ironing “fence”, a straight edged board, at the edge of the folded over hem. With a long piece of fabric or wide hems, if say your ironing table is 8’ long it helps to use an 8’ long fence and clamp it at either end of the table. Trust me, you will see why after the first time you clamp it down. Shorter pieces of fabric don’t need a full length fence.
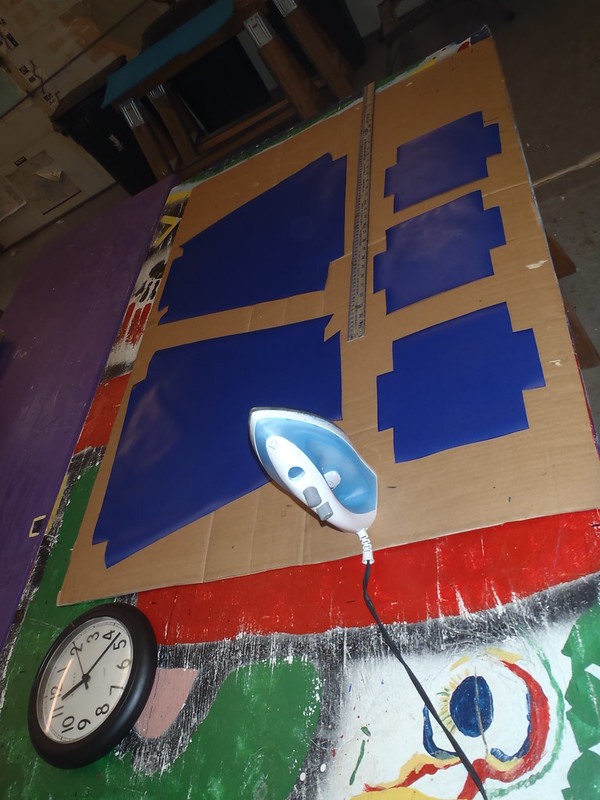
Before commencing with the ironing set a clock with a sweep second hand in view on the ironing table. 30 seconds of pressing a hot iron against every inch of a heat sealable hem takes wayyyyy longer then you think.
30 seconds on the hottest “Linen” setting has worked well on both Oxford Cloth and Packcloth, lighter heat sealable fabrics will scorch more easily. Iron over a test piece of scrap first to check your iron setting and time needed. Save it, that ironed over test piece will come in handy later to test seating the buttons and sockets.
 P1160026 by Mike McCrea, on Flickr
The heat sealable fabric only adheres shiny heat sealable side to shiny heat sealable side when ironed over, so avoid any fabric overlap on the hems.
Heat seal iron the hem up to one of the end clamps on the fabric, remove the clamp and finish that finish ironing that end, iron the other side up to and remove the clamp, then remove the last piece of tape and, after see below, iron the center.
There will be a slight curve on the to-be-ironed long side hems, from the curved under-outwale Sharpie line. Freehand ironing curves is a nope. Ironing curves with a straight fence is impossible. Iron up to within a few inches on each where the fabric won’t-lay-flat puckers up, stop and cut a narrow vee slice from the raised-puckered edge.
You will need to adjust the angle of the fence to accommodate the other side of the curve.
 PB210052 by Mike McCrea, on Flickr
Overlapped or puckered fabric won’t heat seal over securely and, again, the material only sticks heat sealable side to heat sealable side. Fold that vee slice down flat and, if you are happy with how the slit pieces meet, iron it closed. If you cut it just right the V slice will iron down edge to edge II.
 PB200049 by Mike McCrea, on Flickr
 PB200050 by Mike McCrea, on Flickr
If the hem is narrower than the width of ironing fence you can clamp the fence down over the hem as it cools. Seems to help, some still-hot compression can’t hurt.
After the hot hem has cooled run a fingernail along the edge to verify the hem is fully heat sealed along that entire fold over side. If you find lift-able areas mark them with a Sharpie dot and re-iron that area.
Even watching the clock it is really easy to undercook the edge of the hem, the ironing fence is straight, and the side of the iron curved, so only a fraction of the fence edge is actually under iron at any one time. Check your work.
Any of the heat sealable fabrics, even Packcloth, are most likely to begin a tear at some single ply, un-ironed/un-folded edge or seam. Taping the sheerline’s curve accommodating vee cuts, and any open edges/seams, with Tenacious Tape, after the hems have been ironed over and cooled seems like a good idea.
 PB210053 by Mike McCrea, on Flickr
Put the fully ironed cover on the canoe, check the fit again and verify the snap stud placement. Mark the stud snap locations on the hem on the backside of the cover, another Sharpie dot, centered on the hem.
You will need to thicken the material, even Packcloth, for the buttons & sockets to seat securely.
Little squares of 1” Gorilla tape work. There are (said to be) snap buttons with shorter “posts” that might seat securely in the Packcloth, not that I have ever found a source. The Gorilla tape squares on the backside of the cloth also help prevent tearing the buttons/sockets through the heat sealable fabric when unsnapped the covers.
To verify your material thickness/button post length, take the scrap piece of heat sealable material you previously test ironed, lay down two or three ply 1” squares of Gorilla tape and test seat a a couple buttons & sockets first. That is good practice with the flaring tool and anvil, done first on something other than the cover you just spent hours ironing.
Three-ply squares of Gorilla tape have worked on both Oxford cloth and Packcloth. YMMV depending on the height of the button posts.
 PB200043 by Mike McCrea, on Flickr
Run a shallow bead of E-6000 around the edges of Gorilla tape squares (maybe optional, can’t hurt). E6000 adhesive sealant is a wonderful shop stocked item.
 P1150009 by Mike McCrea, on Flickr
Melt button post holes through the Gorilla tape and fabric using the point of a 20-penny nail point, heated with a torch. Hint for Doug; I recommend holding the nail with vice grips, not your fingers.
Once the holes have been melted seating the buttons and sockets in the cover material requires an anvil and flaring tool, available at any hardware store, inculded with a pack of snap rivets.
 PB200042 by Mike McCrea, on Flickr
That same anvil and flaring tool has fit every snap rivet I have used, from three different vendors. Use the concave anvil side, the flat side is for the stud and eyelet, and you won’t be using that side, or the eyelets.
Eh, check to make sure the anvil is still concave side up while seating the buttons & sockets; I have smashed the bejeepers out of a couple buttons/sockets on the flat side when I unwittingly flipped the anvil over.
Even when using the concave side of the anvil don’t smash the bejeepers out of the buttons and sockets when seating them; just enough to securely seat them firm and unjingly is fine. Hitting it another time or two is better than crush smashed too far. After you have seated a few buttons and sockets you’ll get a “feel” for it.
Don’t be that guy who seated all of the buttons and sockets facing in the wrong orientation on one cover.
Once all of the buttons and sockets are seated on the cover the hardest, most finicky parts are over. Take a minute to admire your work so far. Smoke ‘em if you got ‘em.
 P1150010 by Mike McCrea, on Flickr
To install the studs on the hull, tape the cover on, evenly spaced under the outwales. Cheap duct tape again, even good quality wide painters tape wouldn’t hold sufficiently. I detest cheap, low-stick duct tape, but there are a few less tenacious applications. . . . .
Starting at the bow end stick a piece of multi-ply duct tape on the hull, under the socket on the cover and press the socket firmly against the tape. Sharpie dot the center of the resulting circular impression left in the duct tape and drill a 1/8” hole.
That duct tape is just a marker, it’s not holding anything, so I stick a piece of painter’s tape as the first against-hull layer for easier on/off. When the top piece of duct tape gets too crowded and confused, with too many circle, dot and holes, just stick a fresh piece of duct tape on top.
 PB210065 by Mike McCrea, on Flickr
Do not remove the tape before drilling the hole. Do remove the tape before seating the stud. Yes, I’m a dipshit and have done both.
You will need a pop rivet tool with a ¼” diameter nose piece that fits inside the studs. Some, not all, pop rivet tools come with such a nose piece. The extended ¼” nose piece on the right.
 PB210067 by Mike McCrea, on Flickr
Use a washer to back up the rivet pin inside the hull. Or use a mini D-ring if you want additional tie points below the inwale.
 PB210073 by Mike McCrea, on Flickr
 PB210074 by Mike McCrea, on Flickr
Use a washer with a 1/8” dia hole, even wee bit larger will simply fall off the rivet pin inside the hull once compressed. Don’t be like that guy again.
Use 1/8” diameter pop rivets, the rivet head/flange on those fits inside the snaps. 1/8” dia pop rivets come with various length rivet pins. A ¼” rivet pin will work with a backup washer inside the hull on most composite boats. A ½” rivet pin will work through most plastic hulls. You may need to go ¼” larger on either if using mini D-rings as backup washers. Really thick, old school RX canoe sheerlines with may need 1” rivet pins. Use a just-right length rivet; too long is almost as bad as too short.
To begin setting the studs on the hull, fold back one taped edge of the cover at the stem, so the inside of the hull is accessible. Seat that first stud on the hull, using a backup washer (or mini D-ring) held tightly against inside the hull, and compress with the pop rivet tool.
Walk around to the other side of the hull, duct tape, thumb press the socket, Sharpie dot, drill and seat it’s opposite mate, and snap it closed. Might as well do the next one in line while you are on that side of the canoe, then walk around, do its mate on the other side and etc, etc.
Important: Make/mark each sequential socket circle impression with any already-done snaps snapped in place. That means a bunch of snapping and unsnapping to access the inside for a washer/D-ring as you go along, but helps perfectly position and set the studs for the fit of the cover. Unlike coated nylon there is essentially zero stretch to heat sealable fabric, a tad loose is better than too tight, and there is an easy arch anti-puddle solution coming later.
Once the cover has been snapped in place add some drip edge to the wide, open ends of the covers. Automotive bulb weather strip works very well as a low profile drip baffle on partial spray covers. The self-adhesive backing on that stuff is incredibly strong.
https://shop.advanceautoparts.com/p/ameriseal-multi-purpose-bulb-weatherstrip-3-4-w-x-7-8-h-x-8-l-13480/10017524-P
To install an auto weather strip drip baffle just snap the covers in place, mark the outer edge of the outwale, and cut a piece of auto weather stripping to that length. Sleeve a piece of ½” diameter pipe, varnished dowel or etc inside the tubular bulb to stiffen that dip edge.
 PB060037 by Mike McCrea, on Flickr
That was an initial test piece to see if the adhesive held, and the SS pipe fit securely. I couldn’t peel that little squib of self-adhesive backing off the fabric without tearing something. You may need to lubricate the weather strip tube and pole to sleeve a tight fit inside. A liberal application of silicon spray did the trick.
 P1150016 by Mike McCrea, on Flickr
Once pipe/dowel sleeved inside put the cover back on the table and press the self-adhesive bottom of the tubular weather strip in place. No other adhesive addition needed. The rigid pipe or dowel stiffens the wide center-hull drip edges so they don’t sag.
A less expensive, taller but uglier baffle solution is to use ½” foam self-adhesive pipe insulation with a length of ½” rod or PVC glued inside. I like the black rubber Armaflex stuff, it lasts longer, and has better self-adhesive stickem than the cheap grey foam pipe insulation.
https://www.homedepot.com/p/Armaflex...1812/100569382
You may want to glue the self-adhesive edges of that pipe insulation with a bead of E-6000.
 P1130038 by Mike McCrea, on Flickr
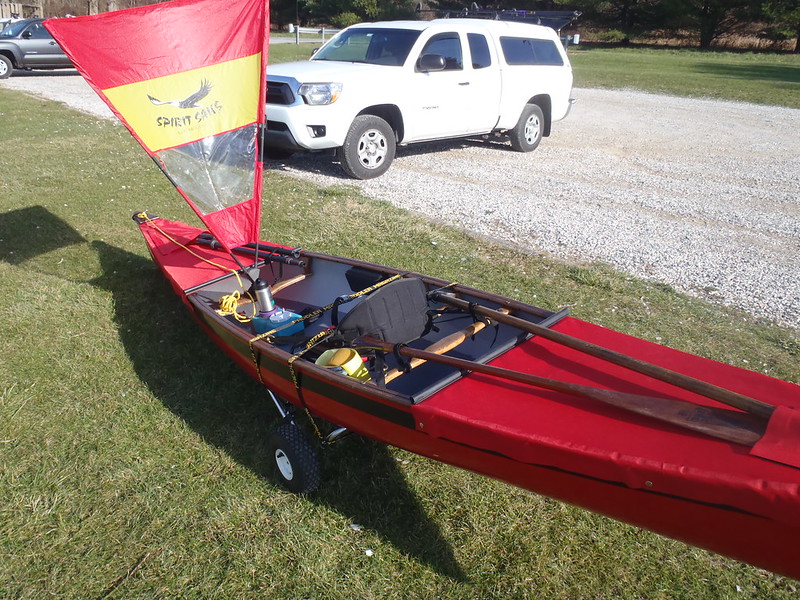
Paddle pockets and Velcro lash straps are your accessible paddle storage friend. And a near necessity, even with partial covers. It is a lot faster and easier to quickly snatch a paddle off the top of the covers than to extract one from underneath, especially with a gear load below decks.
A good length for Velcro lash straps seems to be 11”; you can always trim them shorter once you have test strapped your preferred paddles.
Having a raised, stiffened tubular drip edge will prevent water on partial covers from draining into the canoe. In combination with a carry thwart under the paddle pocket the Velcro’ed paddle shaft will rest suspended slightly above the covers, and the lash straps will arch the covers a bit for better drainage. If there is no carry thwart below the blade in the paddle pocket it is worth installing one.
 P1200030 by Mike McCrea, on Flickr
Loctite Vinyl, Fabric and Plastic adhesive works well to adhere the hemmed edges of paddle pockets and lash strap pads, but making those pockets and lash pads from heat sealable material was a PITA. I have not yet done so, but cutting up an old defunct dry bag and using that material seems like it would be a lot easier, if not color-matching coordinated.
To apply the Loctite first tape the perimeter of the heat sealable hems (or old dry bag material) inside and out, paint a thin coat of that Loctite on both surfaces, then press together and clamp the glued hems down across the length with a board. Walk away for a few hours/overnight.
 P1180010 by Mike McCrea, on Flickr
If your cover design extends all the way to the tip of the stems I would add Velcro lash straps to hold the painter lines. For easy water covers I didn’t think that tiny amount of extra cover was necessary, especially not with long vinyl deck plates and existing painter bungees. And there is still a deck plate hand hold open and available to grab.
 P1200026 by Mike McCrea, on Flickr
If you are making bow and stern partial covers for a solo tripping canoe making a center storage cover is worth the effort. Little effort, that piece can dang near be a rectangle with but a few snaps, and you can leave the canoe upright with all your paddling gear kept dry inside.
 P2180693 by Mike McCrea, on Flickr
I have probably forgotten some critical must-do step in the sequence. Don’t blame me, I’m still learning, and jonesing to use what I have learned on the next cover.
If that 30+ step, finicky, just-so sequence of steps seems like a week of work, time and effort, just to make heat sealable fabric spray covers, it probably is, and spray decks ordered from Cooke Custom Sewing will be better constructed, made from time tested design and time proven materials.
For a keeper tripper canoe, I’d go with Cooke Custom Sewing covers every time. No regrets after thousands of miles.
 P3080835 by Mike McCrea, on Flickr
http://www.cookecustomsewing.com/canoecovers.htm
(Too Long/Didn’t Read. Too Bad, Took Two Days to think of every picayune step and find illustrative photos)
I’m putting this up as a separate post so it doesn’t get lost, scattered amidst five pages of my bather and enjoyable off-topic discussions on other threads.
I don’t see any easy way to incorporate a spray skirt tunnel using heat sealable fabric, so this is mostly relevant for partial spray covers.
For my purposes partial spray covers for solo canoes have advantages for non-WW types of tripping and day paddling. Easier entry/egress, less potential entrapment hazard, fewer snaps, and easier to access gear, including day gear in an open area behind the seat. I feel better about using a portage cart strapped around the open center with the partial covers left in place.
PC110013 by Mike McCrea, on FlickrPerhaps not just solo canoe partial covers. A belly cover across the middle of a tandem canoe, from behind the bow paddler down to the stern paddler’s feet (or shorter as desired) would be even easier to make. Possibilities as well to make a partial shade and rain cover for a dog companion.
P6100010 by Mike McCrea, on FlickrOr a custom ice chest cover, with end bilge length end drapes to keep the sun off and the cool in. Lot of possibilities, including custom covers designed for fishing or hunting.
If you have serious sewing abilities just skip using the heat healable fabric altogether, use some coated nylon or poly material, although some of the how-to steps in making templates and seating snap buttons, sockets and studs may still be helpful.
I don’t see the weight savings of lighter denier heat sealable fabric as being worthwhile. Not for DIY dry bags, certainly not for spray covers. I would use the Packcloth material.
The heat sealable material, even the lighter weight Oxford cloth, does not stuff. But the covers will roll up tightly, and fit in an old camp chair bag for transport and storage.
P1200024 by Mike McCrea, on FlickrIf you have no old camp chair bags making a custom-sized bag from the heat sealable material would be easy enough, just a long skinny cylindrical bag, perhaps with a simple top flap and Velcro closure; doesn’t need to be dry-bag waterproof, sized long/wide enough to contain the covers, which when rolled are considerably smaller than any old camp chair bag I had saved.
The use of 3M Dual Lock is appropriate only for hulls where snaps would be obtrusively in the way of a paddle stroke or getting in/out. Do not use Dual Lock to attach paddle pockets or lash straps to the covers; pressed together the two pieces of Dual Lock become stiff as a board and un-rollable for storage.
I highly recommend making a simple cylindrical dry bag for a sleeping pad or chair from the heat sealable fabric before attempting a spray cover. What you learn making that waterproof bag will be invaluable, and help prevent costly mistakes on the cover. Everybody needs at least one custom dry bag. And once you have successfully made one custom dry bag. . . . .
https://www.canoetripping.net/forums/forum/general-paddling-discussions/diy/83031-making-diy-dry-bags
Make (and save) a template for that simple cylindrical dry bag, it may not be your last. You don’t need to use see-through plastic and mark thwart locations for that template, even a paper pattern will suffice.
Sequentially, I hope not forgetting anything, a step-by-step for making DIY heat sealable fabric no-sewing spray covers:
You will need to set up a large table surface for marking and cutting the templates and fabric. A 4’ x 8’ sheet of plywood, sag-stiffened with some 2x4’s placed underneath (barely) will suffice. And 6’ x 8’ surface is better still; think 58” wide fabric, unrolled to spray cover length; not something convenient to do on the narrow shop bench.
PB180004 by Mike McCrea, on FlickrFor anything heat sealable, make a template first. A roll of clear plastic sheeting makes excellent see-through material for spray cover templates.
If the sheerline is symmetrical, make the longer partial cover first. You should be able to reuse the same angled \_/ template, and just shorten the length at the wide end as desired. Making the templates is the most time consuming of any step, so save them, ya never know.
If you purchased the clear plastic sheeting and heat-sealable fabric folded it can (should) be rolled onto lengths of pipe, long dowel or etc to remove the creases. A few days tightly rolled and stored warm will lessen the creases and make the measuring, marking and cutting easier and more accurate. It helps to cut the clear plastic to the same 58” width as the fabric before rolling.
To make spray cover templates begin by taping the clear plastic over the hull. Cut the plastic to the length needed for the cover, plus the iron over hem amount at the ends, but leave it extra wide to drape well over the sides of the gunwales.
It helps to first mark a center line on the plastic and position that along the keel line before taping it in place. Painter’s tape or, better, cheap, barely sticky duct tape works well for that. Make a fold over tab on the tape, and put the fold over end on the plastic template, not the hull, so it won’t pull or tear at the edge of the plastic when you remove it.
Run a Sharpie along the taped plastic under the outwale edge, and mark the locations of any carry handles or thwarts on the clear plastic, to avoid seating snaps directly behind the end of a thwart.
PB190010 by Mike McCrea, on FlickrMark the approximate snap locations on the template. For simple rain, splash and paddle drip covers 10 to 12 inch snap spacing has worked well. For covers with more whitewater-ish intentions maybe every 8 inches or so. Plus or minus in snap spacing, so the spacing is fairly even and misses any thwart, yoke or carry handle ends.
Take the plastic template off the boat, lay it on the giant table and Sharpie lines below the existing outwale line for the finished cover amount of below-sheerline drape, as well as the width of heat sealed fold-over hem you desire.
For example, if you want the cover material to end 2” below the outwale add 2” on each side, plus the amount of fold over ironed hem below the outwale trace. One inch hem two inches below the outwale? Add three inches on each side.
PB190013 by Mike McCrea, on FlickrGlad you left that plastic template side drape extra long?
It is best to not make any iron-over hem wider than your iron. Your iron, not the spouse’s iron from the closet. You will inevitably get some heat sealable smutch on the face of the iron, which will leave a suspicious smear after ironing the seat of your boxer shorts. The cheapest $8 big box iron will do. If you find a cheap iron with a long flat side buy two and I’ll reimburse you.
Once the plastic template has been rough cut to a trapezoidal shape tape it across the gunwales again and check the fit. Better to find any miscue on the template rather than after cutting the fabric. Take the template back off, lay it on the table and put your thinking cap on.
The fold over heat sealed hems will become peculiarly shaped at the ends to accommodate sheerline angled material, and will require some oddball cuts.
PB190025 by Mike McCrea, on FlickrThere is a first time “trick” for making those oddly angled to-be-ironed fold over hems:
Fold the longest sides and make (what appears to be) the necessary fold over cuts on those edges, so they fold flat and even at the ends, heat sealable to heat sealable. Then, if for example using a 1” hem all the way around, cut a 1” wide strip of template plastic and tape it to the bow and open ends. Fold that additional template piece over and making the remaining cuts as will then become apparent. Ideally the corners meet at an I/_ angle, leaving no open un-ironed sleeve.
“Ideally”; I have messed that up a couple (three, four) times. It is much easier to visualize and make the template cuts if you use the same width hem on all sides.
If satisfied with the template unroll the heat sealable material on the giant table and tape the template on the fabric in a few places. Straight edge Sharpie the template outlines, and cut that shape. You will have an angled cut left on the rolled fabric; leave it, it may the same angle as the next piece you cut.
PB200028 by Mike McCrea, on FlickrTake the cut fabric and tape it across the hull in place to verify the fit. If you somehow effed up, and a partial bow or stern cover is oops-too-narrow to snap below the outwale, you can shift it forward a few inches for more drape over the outwales and re-cut the narrow end. Or, you know, just don’t eff up dummy.
Use a large piece of thick, smoothly corrugated cardboard, with a straight flat edge on at least one side as an ironing bed. Align the straight edge of the cardboard with the long edge of the table. The longer that piece of cardboard the less often you will have to adjust the fabric on the cardboard as you iron it. See above “use a big table”.
Smooth surfaced cardboard; no creases or dents, and the stuff with visible corrugation ridges on the surface will leave a washboard road on the ironed hems. Who knew I would someday become picky about scrap cardboard?
PB200045 by Mike McCrea, on FlickrThese next few parts take longer to explain than to do, and sounds more complicated than they are.
Pieces of Scotch tape (leave a tab) work to hold the folded over edge of the material evenly in place before/while ironing. For long hems I put one piece of tape in the middle and a piece an inch away from each end.
Those ends tape pieces are temporary; once an even hem has been folded over and taped, those pieces are replaced by clamps at the very ends of the fabric, so all that is left is the piece of tape holding the center straight and even.
Eh, don’t extend the clamps past the end of the fabric where the ironing fence will be clamped. I don’t have enough fingers and toes to count how many times I have done just that.
A trick to assuring an absolutely straight and even hem; if the hem is narrow enough, fold the material over a thin yardstick or etc, tape the folds closed and remove the yardstick. Below, a 1 ¼” hem.
P1160022 by Mike McCrea, on FlickrWith the long-edge of the cover side ready to heat seal, clamp an ironing “fence”, a straight edged board, at the edge of the folded over hem. With a long piece of fabric or wide hems, if say your ironing table is 8’ long it helps to use an 8’ long fence and clamp it at either end of the table. Trust me, you will see why after the first time you clamp it down. Shorter pieces of fabric don’t need a full length fence.
Before commencing with the ironing set a clock with a sweep second hand in view on the ironing table. 30 seconds of pressing a hot iron against every inch of a heat sealable hem takes wayyyyy longer then you think.
30 seconds on the hottest “Linen” setting has worked well on both Oxford Cloth and Packcloth, lighter heat sealable fabrics will scorch more easily. Iron over a test piece of scrap first to check your iron setting and time needed. Save it, that ironed over test piece will come in handy later to test seating the buttons and sockets.
P1160026 by Mike McCrea, on FlickrThe heat sealable fabric only adheres shiny heat sealable side to shiny heat sealable side when ironed over, so avoid any fabric overlap on the hems.
Heat seal iron the hem up to one of the end clamps on the fabric, remove the clamp and finish that finish ironing that end, iron the other side up to and remove the clamp, then remove the last piece of tape and, after see below, iron the center.
There will be a slight curve on the to-be-ironed long side hems, from the curved under-outwale Sharpie line. Freehand ironing curves is a nope. Ironing curves with a straight fence is impossible. Iron up to within a few inches on each where the fabric won’t-lay-flat puckers up, stop and cut a narrow vee slice from the raised-puckered edge.
You will need to adjust the angle of the fence to accommodate the other side of the curve.
PB210052 by Mike McCrea, on FlickrOverlapped or puckered fabric won’t heat seal over securely and, again, the material only sticks heat sealable side to heat sealable side. Fold that vee slice down flat and, if you are happy with how the slit pieces meet, iron it closed. If you cut it just right the V slice will iron down edge to edge II.
PB200049 by Mike McCrea, on FlickrPB200050 by Mike McCrea, on FlickrIf the hem is narrower than the width of ironing fence you can clamp the fence down over the hem as it cools. Seems to help, some still-hot compression can’t hurt.
After the hot hem has cooled run a fingernail along the edge to verify the hem is fully heat sealed along that entire fold over side. If you find lift-able areas mark them with a Sharpie dot and re-iron that area.
Even watching the clock it is really easy to undercook the edge of the hem, the ironing fence is straight, and the side of the iron curved, so only a fraction of the fence edge is actually under iron at any one time. Check your work.
Any of the heat sealable fabrics, even Packcloth, are most likely to begin a tear at some single ply, un-ironed/un-folded edge or seam. Taping the sheerline’s curve accommodating vee cuts, and any open edges/seams, with Tenacious Tape, after the hems have been ironed over and cooled seems like a good idea.
PB210053 by Mike McCrea, on FlickrPut the fully ironed cover on the canoe, check the fit again and verify the snap stud placement. Mark the stud snap locations on the hem on the backside of the cover, another Sharpie dot, centered on the hem.
You will need to thicken the material, even Packcloth, for the buttons & sockets to seat securely.
Little squares of 1” Gorilla tape work. There are (said to be) snap buttons with shorter “posts” that might seat securely in the Packcloth, not that I have ever found a source. The Gorilla tape squares on the backside of the cloth also help prevent tearing the buttons/sockets through the heat sealable fabric when unsnapped the covers.
To verify your material thickness/button post length, take the scrap piece of heat sealable material you previously test ironed, lay down two or three ply 1” squares of Gorilla tape and test seat a a couple buttons & sockets first. That is good practice with the flaring tool and anvil, done first on something other than the cover you just spent hours ironing.
Three-ply squares of Gorilla tape have worked on both Oxford cloth and Packcloth. YMMV depending on the height of the button posts.
PB200043 by Mike McCrea, on FlickrRun a shallow bead of E-6000 around the edges of Gorilla tape squares (maybe optional, can’t hurt). E6000 adhesive sealant is a wonderful shop stocked item.
P1150009 by Mike McCrea, on FlickrMelt button post holes through the Gorilla tape and fabric using the point of a 20-penny nail point, heated with a torch. Hint for Doug; I recommend holding the nail with vice grips, not your fingers.
Once the holes have been melted seating the buttons and sockets in the cover material requires an anvil and flaring tool, available at any hardware store, inculded with a pack of snap rivets.
PB200042 by Mike McCrea, on FlickrThat same anvil and flaring tool has fit every snap rivet I have used, from three different vendors. Use the concave anvil side, the flat side is for the stud and eyelet, and you won’t be using that side, or the eyelets.
Eh, check to make sure the anvil is still concave side up while seating the buttons & sockets; I have smashed the bejeepers out of a couple buttons/sockets on the flat side when I unwittingly flipped the anvil over.
Even when using the concave side of the anvil don’t smash the bejeepers out of the buttons and sockets when seating them; just enough to securely seat them firm and unjingly is fine. Hitting it another time or two is better than crush smashed too far. After you have seated a few buttons and sockets you’ll get a “feel” for it.
Don’t be that guy who seated all of the buttons and sockets facing in the wrong orientation on one cover.
Once all of the buttons and sockets are seated on the cover the hardest, most finicky parts are over. Take a minute to admire your work so far. Smoke ‘em if you got ‘em.
P1150010 by Mike McCrea, on FlickrTo install the studs on the hull, tape the cover on, evenly spaced under the outwales. Cheap duct tape again, even good quality wide painters tape wouldn’t hold sufficiently. I detest cheap, low-stick duct tape, but there are a few less tenacious applications. . . . .
Starting at the bow end stick a piece of multi-ply duct tape on the hull, under the socket on the cover and press the socket firmly against the tape. Sharpie dot the center of the resulting circular impression left in the duct tape and drill a 1/8” hole.
That duct tape is just a marker, it’s not holding anything, so I stick a piece of painter’s tape as the first against-hull layer for easier on/off. When the top piece of duct tape gets too crowded and confused, with too many circle, dot and holes, just stick a fresh piece of duct tape on top.
PB210065 by Mike McCrea, on FlickrDo not remove the tape before drilling the hole. Do remove the tape before seating the stud. Yes, I’m a dipshit and have done both.
You will need a pop rivet tool with a ¼” diameter nose piece that fits inside the studs. Some, not all, pop rivet tools come with such a nose piece. The extended ¼” nose piece on the right.
PB210067 by Mike McCrea, on FlickrUse a washer to back up the rivet pin inside the hull. Or use a mini D-ring if you want additional tie points below the inwale.
PB210073 by Mike McCrea, on FlickrPB210074 by Mike McCrea, on FlickrUse a washer with a 1/8” dia hole, even wee bit larger will simply fall off the rivet pin inside the hull once compressed. Don’t be like that guy again.
Use 1/8” diameter pop rivets, the rivet head/flange on those fits inside the snaps. 1/8” dia pop rivets come with various length rivet pins. A ¼” rivet pin will work with a backup washer inside the hull on most composite boats. A ½” rivet pin will work through most plastic hulls. You may need to go ¼” larger on either if using mini D-rings as backup washers. Really thick, old school RX canoe sheerlines with may need 1” rivet pins. Use a just-right length rivet; too long is almost as bad as too short.
To begin setting the studs on the hull, fold back one taped edge of the cover at the stem, so the inside of the hull is accessible. Seat that first stud on the hull, using a backup washer (or mini D-ring) held tightly against inside the hull, and compress with the pop rivet tool.
Walk around to the other side of the hull, duct tape, thumb press the socket, Sharpie dot, drill and seat it’s opposite mate, and snap it closed. Might as well do the next one in line while you are on that side of the canoe, then walk around, do its mate on the other side and etc, etc.
Important: Make/mark each sequential socket circle impression with any already-done snaps snapped in place. That means a bunch of snapping and unsnapping to access the inside for a washer/D-ring as you go along, but helps perfectly position and set the studs for the fit of the cover. Unlike coated nylon there is essentially zero stretch to heat sealable fabric, a tad loose is better than too tight, and there is an easy arch anti-puddle solution coming later.
Once the cover has been snapped in place add some drip edge to the wide, open ends of the covers. Automotive bulb weather strip works very well as a low profile drip baffle on partial spray covers. The self-adhesive backing on that stuff is incredibly strong.
https://shop.advanceautoparts.com/p/ameriseal-multi-purpose-bulb-weatherstrip-3-4-w-x-7-8-h-x-8-l-13480/10017524-P
To install an auto weather strip drip baffle just snap the covers in place, mark the outer edge of the outwale, and cut a piece of auto weather stripping to that length. Sleeve a piece of ½” diameter pipe, varnished dowel or etc inside the tubular bulb to stiffen that dip edge.
PB060037 by Mike McCrea, on FlickrThat was an initial test piece to see if the adhesive held, and the SS pipe fit securely. I couldn’t peel that little squib of self-adhesive backing off the fabric without tearing something. You may need to lubricate the weather strip tube and pole to sleeve a tight fit inside. A liberal application of silicon spray did the trick.
P1150016 by Mike McCrea, on FlickrOnce pipe/dowel sleeved inside put the cover back on the table and press the self-adhesive bottom of the tubular weather strip in place. No other adhesive addition needed. The rigid pipe or dowel stiffens the wide center-hull drip edges so they don’t sag.
A less expensive, taller but uglier baffle solution is to use ½” foam self-adhesive pipe insulation with a length of ½” rod or PVC glued inside. I like the black rubber Armaflex stuff, it lasts longer, and has better self-adhesive stickem than the cheap grey foam pipe insulation.
https://www.homedepot.com/p/Armaflex...1812/100569382
You may want to glue the self-adhesive edges of that pipe insulation with a bead of E-6000.
P1130038 by Mike McCrea, on FlickrPaddle pockets and Velcro lash straps are your accessible paddle storage friend. And a near necessity, even with partial covers. It is a lot faster and easier to quickly snatch a paddle off the top of the covers than to extract one from underneath, especially with a gear load below decks.
A good length for Velcro lash straps seems to be 11”; you can always trim them shorter once you have test strapped your preferred paddles.
Having a raised, stiffened tubular drip edge will prevent water on partial covers from draining into the canoe. In combination with a carry thwart under the paddle pocket the Velcro’ed paddle shaft will rest suspended slightly above the covers, and the lash straps will arch the covers a bit for better drainage. If there is no carry thwart below the blade in the paddle pocket it is worth installing one.
P1200030 by Mike McCrea, on FlickrLoctite Vinyl, Fabric and Plastic adhesive works well to adhere the hemmed edges of paddle pockets and lash strap pads, but making those pockets and lash pads from heat sealable material was a PITA. I have not yet done so, but cutting up an old defunct dry bag and using that material seems like it would be a lot easier, if not color-matching coordinated.
To apply the Loctite first tape the perimeter of the heat sealable hems (or old dry bag material) inside and out, paint a thin coat of that Loctite on both surfaces, then press together and clamp the glued hems down across the length with a board. Walk away for a few hours/overnight.
P1180010 by Mike McCrea, on FlickrIf your cover design extends all the way to the tip of the stems I would add Velcro lash straps to hold the painter lines. For easy water covers I didn’t think that tiny amount of extra cover was necessary, especially not with long vinyl deck plates and existing painter bungees. And there is still a deck plate hand hold open and available to grab.
P1200026 by Mike McCrea, on FlickrIf you are making bow and stern partial covers for a solo tripping canoe making a center storage cover is worth the effort. Little effort, that piece can dang near be a rectangle with but a few snaps, and you can leave the canoe upright with all your paddling gear kept dry inside.
P2180693 by Mike McCrea, on FlickrI have probably forgotten some critical must-do step in the sequence. Don’t blame me, I’m still learning, and jonesing to use what I have learned on the next cover.
If that 30+ step, finicky, just-so sequence of steps seems like a week of work, time and effort, just to make heat sealable fabric spray covers, it probably is, and spray decks ordered from Cooke Custom Sewing will be better constructed, made from time tested design and time proven materials.
For a keeper tripper canoe, I’d go with Cooke Custom Sewing covers every time. No regrets after thousands of miles.
P3080835 by Mike McCrea, on Flickrhttp://www.cookecustomsewing.com/canoecovers.htm