• Happy Incorporation of Hudson's Bay Co. (1670) 🍁🦫🪓

Copying a hull.....

Joined
Mar 20, 2013
Messages
3,356
Reaction score
475
Good day, I would like to know how to copy an existing hull to then modified( shrink it a little where I think it need to shrink...) to then make stations and sting back an build a boat?!?!
if that make any sense!!:D
 
Is it possible to buy the plans and modify them? It would be much easier. I’ve measured and documented many old boats and I’ve a few more to go. If it is an existing new boat you might just upset the designer, I know I would be.
Jim
 
But the real answer to your question goes like this.
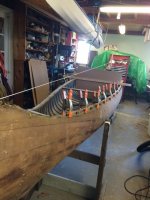
Click image for larger version  Name:	1C09DD14-4DC5-4BF7-BBBC-2E1C86730227.jpeg Views:	0 Size:	80.1 KB ID:	113260
First set the boat up level all around. This old Rushton Indian Girl had to be upright because the gunnels were falling off, and it wasn’t my boat yet. Then the length is divided into stations. I use cardboard cut to fit inside the hull and the shape is scribed onto the cardboard. I used the inside of the planking.

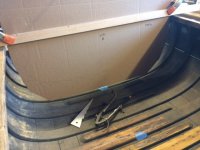
Click image for larger version  Name:	38ACF7BD-B8B4-4790-BDD2-2031F5E057F8.jpeg Views:	0 Size:	71.1 KB ID:	113262
i use one or both of these tools to ‘take’ the shape. You can see the blue tape marking a station.

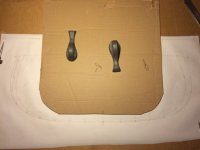
Click image for larger version  Name:	1C09DD14-4DC5-4BF7-BBBC-2E1C86730227.jpeg Views:	0 Size:	80.1 KB ID:	113260
the cardboard template is then placed on a grid to represent the baseline (string in this case) and horizontal. Then the scribe marks are worked backwards to establish points on the hull. A fixable batten is then sprung to the points and a line drawn.

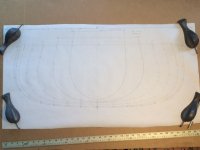
Click image for larger version  Name:	38ACF7BD-B8B4-4790-BDD2-2031F5E057F8.jpeg Views:	0 Size:	71.1 KB ID:	113262
and the result is the shape of the hull in raw data. Since it is an old hull it could easily be out of shape so these lines need adjusting and how they relate to each other need to be faired. Still a lot of work to do before I can build a replica of this boat, but hopefully you get the idea.
Jim
 
Last edited:
Very frustrating, monsieur rouge - I recall seeing a technique and somewhat recently but my searches have come up empty.

As I recall, the subject canoe was "installed" on a strongback and a C-shaped gauge big enough to "swallow" half the hull and with 1" graduations - vertically and horizontally - was used to steal lofting points at each station position.
 
Yes scratchypants, that was on one of the current canoe builds. It was a side tangent of sorts. I prefer to take outside measurements but this hull could bearly stand on its own. The way he did it was a bit more tedious as he had to not each distance for every inch of the shape. Much more time consuming than my method. I even picked up each plank edge on my way around the hull so I could reproduce the original plank layout.
Jim
 
Is it possible to buy the plans and modify them? It would be much easier. I’ve measured and documented many old boats and I’ve a few more to go. If it is an existing new boat you might just upset the designer, I know I would be.
Jim

No plans available, the design is of a friend and he said he is fine with it as long as it is not a copy of his boat( it will be heavily modified so won’t look like a copy but influenced by!!)
 
Thanks Jim. I don’t know about better but just another tool in the tool box of skills. Many different ways to do it, often one has to adapt to the given project. So it is nice to be versatile. At least with this method it can be easier to get to the plywood molds as little or no deductions need to be made for planking.
Jim

just saw your post. Copy away as you have permission.
 
Thank you for the info I will have to experiment and see if I can figure it out!!
 
Fitz, you can see my joggle stick in the second pic. I’ve made several over the years. Some rather long but found the 6 or 8” one in the photo often suffices as the cardboard is easy to cut close to shape and a longer one gets cumbersome. The Lumberjocks link describes how to use it if I remember correctly.
Jim
 

I remember seeing that post years ago when I was a member of LJs. The guy who posted it was a professional shipwright and says it was used for measuring bulkheads in boats; so it definitely would work for copying lines off canoes to make stations (or to make the bulkheads for flotation chambers in the ends of canoes).

Making the teeth on the stick irregular will probably drive the OCD among us to drink, but I can see how that would aid in alignment when going to trace the shape out on the stock.

And it's pretty much the same idea as in the Orca videos, which Jim Dodd previously posted the link to, except you don't have to mess around with making dozens of pointers or hot gluing them in place. I like it! Thanks for reminding me about it!
 
Making the teeth on the stick irregular will probably drive the OCD among us to drink, but I can see how that would aid in alignment when going to trace the shape out on the stock.

Yes, DAMHIKT! Made one once with regular teeth and quickly learned the error of my ways! Irregular teeth help in lining up the stick and transferring the points.

Cheers,

Fitz
 
I just did that on my current build. I guess how you take the shape is pretty dependent on how you intend to "modify" the shape after you get the measurements. The build is here: https://www.canoetripping.net/forum.../105054-light-weight-solo-tripper-build/page2

I wanted to have a table of offsets in Excel to work from, so I took measurements that gave me the offsets ... having the tables allowed me to adjust curves, modify shapes to see how everything would fit together.

So I think the question of "how" you intend to make your mods will determine how you take the shape, either directly by preparing forms from the donor boat or taking measurements and creating the offset tables.

If you decide on the offset route and have questions, I will try and help as I can.

Brian
 
Last edited:
Brian, I would make a table of offsets from the section lines in my last pic. Then I would use those offsets to loft the boat either half or full size to make any corrections to the initial data. If it is a boat like the Indian Girl that I would sell plans for I would then generate a new table of offsets from the full size lofting. Those would be the ones included on the plan. If I was just going to build a boat I would use the lofting to go right to the molds. Years ago I took the lines from a Kennebec Canoe Co 15’ Kino Special that I would love to build but I’m not interested in drawing up a set of plans for.
As alway we are here for all endeavors and want you to succeed so don’t be afraid to ask questions.
Jim
 
Thank you again everyone!! The boat is a Millbrook Prowler, i love the boat but I want something a bit shorter, with tucked gunnels but with a similar width maybe a bit more volume in the bow and definitely keep the « cab forward » paddling design !!
i talked to John about it since he visited me a few years back and it became a running joke, the sparkenator was the name we came up with cause John designed the spark for esquif, a smaller version of the ignitor that is a smaller version of the prowler but all have straight side walls and the smaller two are made for light weigh racy paddlers.... and light weight I am not!! I love the spark but it is a little narrow and really wet with me in!!
anyway since John as no interest in making me the boat I want I decided it was maybe time to jump in the rabbit hole of boat building.....
 
seems to me that the easiest way would to do it like the old patternmakers did- make a pair of giant calipers out of two curved sections of wood wing-nutted together, stick a small level on one side to ensue you stay vertical, mark your stations with tape marked in 1" increments, start measuring, and mark those measurements on a big piece of craft paper for each one. Connect the dots and you've got your template.
 
seems to me that the easiest way would to do it like the old patternmakers did- make a pair of giant calipers out of two curved sections of wood wing-nutted together, stick a small level on one side to ensue you stay vertical, mark your stations with tape marked in 1" increments, start measuring, and mark those measurements on a big piece of craft paper for each one. Connect the dots and you've got your template.

I really a visual guy and if I could find a video that explains the different techniques shared on here or a photo essay it would be great!!
thank you for the suggestion I still have time since I want it to be a winter project, and need to figure things i
out to make it « easy » on me hahaha
 
Back
Top