• Happy National Apple Pie Day! 🍎🥧😋

And so it begins... (Bell Merlin II Repairs)

More beef alongside of the drilled hole to minimize splitting and more area in contact with gunnels to prevent rotation???

I thought about the benefit of xtra wood along the gunwale, but at the end of the canoe is it that important? Drilling the longer hole in narrower stock wasn't an issue for me - I have a portalign drill press guide. I may have dropped down to a #8 machine screw.

The feel to my hand when carrying it swayed me to that alternative. It seems sturdy enough, it is in my WW canoe which gets a lot of hull flex when in use.
 
First, I agree with Mike that it's aesthetically nice to have matching wood on all handles and thwarts so I still recommend that you order black walnut handles from Ed's and mail the ash handles back...although ash handles and black walnut thwarts was the factory set-up for B/G boats and you said your intention was to return the boat to its original condition. My B/G Merlin did not come with handles because you can just grab it by the (black walnut) decks.

And if you do want my Merlin's original caned seat and longer Bell seat drops (or just the seat) just send me your mailing address. I like unflavored coffee and not decaf. I thought you west coasters were coffee experts. I double checked the hole spacing on my extra seat drops...8 1/16 on one and 8 even on the other. I think they must have given that task to an intern. You would not have any trouble Installing my seat or my drops.

To Mr Derness, in principle the extra contact surface on the handles should spread the clamping load stresses and help with torque retention but in practice it does not make a bit of difference...and if you carve/contour the ends of your handles a bit to match the contour of the gunnel you increase the contact area and have a better joint than even the factory set-up.
 
if you carve/contour the ends of your handles a bit to match the contour of the gunnel you increase the contact area and have a better joint than even the factory set-up.

That’s a nice touch, and one of the reasons I love having a little tabletop 1” belt sander. Two actually, with different grit belts. So easy to incrementally custom sand & fit those ends.

Even with vinyl gunwaled canoes, on which the underside of the inwales might be level across the thwart or yoke plain, they often are not at some point in the sheerline rise. Even in the center, if I have drawn in the gunwales and inch or two on a soloized/center seat tandem.

Having canted angles on the inwale underside, and a horizontal surface on the thwart or yoke provides only a narrow point of contact surface. I think that lack of surface contact is detrimental in terms of wanking the machine screws, which can lead to eventual seat failure.

I don’t expect most manufactures to go that extra mile, but if I’m dinking with a personal rebuild my hour rate is very low.
 
Thank you all for the ideas on the handles. I didn't see a black walnut option with the handles from Eds. Since the regular ones are on order and in the mail, I'll use those for now and we'll see how it looks when it is back together. If I don't end up liking it, I can pull the handles this winter and work with a bit of stain to get them closer in color?

I only managed to get one side of the hull done yesterday and not other. Progress (sigh) is slow sometimes. Take a look:
20170723_182429.jpg

It's a little difficult to tell, but it is definitely glossier and smoother to the touch (the left side of the pic = before, the right side = after). My stepson 'borrowed' my buffer and apparently still hasn't returned it. :confused: (Kids these days...) So that was by hand and putting clamps in the opposite side I was working so I didn't push it off the sawhorses....

Gumpus, some folks like really rich dark brews (coffee - not beer) like french roast and espresso while others like the medium roasts. I've a couple of ideas on what to send you... just let me know.

Also, thanks for the ideas/ ways to convert the seat to a web seat, I think that is what I'll do for now.

Hopefully I'll be able to get to the rest of the woodwork this week sometime. I'd like to get it back on the water. :cool:

Cheers!
Kathy
 
My stepson 'borrowed' my buffer and apparently still hasn't returned it. :confused: (Kids these days...) So that was by hand and putting clamps in the opposite side I was working so I didn't push it off the sawhorses....

“That’s two coats of wax, right Biff?”

Were you tempted to wash and wax your other boats while you were at it? Maybe get the buffer back first.

I know what you mean about pushing canoes off the sawhorses when working on the bottom, having vibrated one off while using an RO sander. I’m a lot more careful since, and use a couple of those little Irwin Quik-grip clamps to clasp the inwales to the sawhorses.
 
FW - if you send me your address in a private message and let me know what you want, I can mail it this week. I must also have the original ash handles from my Yellowstone solo somewhere...they are in perfect shape since I only replaced them to get "all black walnut" in the boat and I bet they would fit a Merlin II. Ed's does offer black walnut handles...but not in the section with Bell replacement parts...you'll find a drop down menu in the handles section of generic parts. Look at the pics of my Yellowstone again...real wood color is better than stain IMHO. I like both medium roast and espresso or French roast.

Hey Mike, in principle if you bolt a flat thwart to a curved surface you have only "line contact" which in theory has zero surface area and infinite stress. In practice the wood squishes a bit. I will start a separate thread on this because I could use some advice and ideas on best way to repair my Merlin II from some long term effects of the crummy bolted joint design plus 15 years of "machine screw wanking". 😐
 
By the way if you google Bell canoe prices you'll find a 2008 price list showing your boat at $2475 plus $212 for the optional almond gel coat so about $2800 with tax. So you can appreciate why folks all over the country flipped out when they saw the ad for your boat.
 
Well, the first coat of varnish is on the thwarts and seat drops... pictures after a few more coats...

I checked out the handles on Eds Canoe, while the color might match, the shape isn't what I was after. I might try to stain the new ones this winter so they are closer to matching if the color difference bothers me.

Gumpus, thank you for the info on the boat! I love it and can't wait until I get it back together.

Cheers! Kathy
 
Well, the first coat of varnish is on the thwarts and seat drops... pictures after a few more coats...

I checked out the handles on Eds Canoe, while the color might match, the shape isn't what I was after. I might try to stain the new ones this winter so they are closer to matching if the color difference bothers me.

I wouldn’t worry over much about the carpet matching the drapes at this stage or refurbishment, I’d be jonesing to get the boat out on the water again after that initial bit of refurbishment.

It really is helpful to do boat work incrementally, with some test paddles in between. That works well for figuring out the next sequential steps and stages, what you like and got right, what you still want to alter or modify.

Any chance the Merlin II will be finished enough for a test paddle by the weekend? I am vicariously jonesing for some water time here (have plans for Friday, before the weekend hordes descend).

Get that boat out again soonest you can. My old shop partner Dave is best remembered for his penchant to pronounce “We could go paddle it right now”. Often after we had just finished rolling out a coat of still-wet epoxy. He did have enthusiasm, if not good sense. I could usually talk him out of it.

Not always. We had repaired his new/old/freebie glass sailboat, a Snark Something IIRC.

We were done by noon and he couldn’t/wouldn’t wait, wet epoxy patch be danged. He called his dog Lucy, brushed her and slapped a thick wad of Lucy hair over the patch.

I couldn’t much argue about the epoxy still being wet, and we had a fun evening on the lake. The Lucy hair was still epoxy embedded years later.

BTW – Don’t be like Dave. That dog hair and poly resin patch stayed gummy for years. Cure time and light sanding between coats is worth the wait.
 
I’d be jonesing to get the boat out on the water again after that initial bit of refurbishment.

I was hoping to get it out this weekend, but....

BTW – Don’t be like Dave. That dog hair and poly resin patch stayed gummy for years. Cure time and light sanding between coats is worth the wait.

That first coat of varnish on the thwarts and seat drops didn't dry fully in 24 hours. I think I am more accustomed to wood that really absorb versus the walnut which really didn't. So - second coat tonight. If it dries by tomorrow those will go back on.

I will also try to get the floor epoxied this evening too. Would it be okay to paddle it a bit and then put the final coats of varnish over the epoxy or does it have to be done together? I would think that as long as it is cured, it'd be okay but I wanted another opinion (s).

One the floor and the woodwork is better protected, I think it's time to get back out on the water in it. :)
 
I was hoping to get it out this weekend, but....

That first coat of varnish on the thwarts and seat drops didn't dry fully in 24 hours. I think I am more accustomed to wood that really absorb versus the walnut which really didn't. So - second coat tonight. If it dries by tomorrow those will go back on.

One reason I like Helmsman Spar Urethane, beside the cost and ubiquitous availability, is that at the right temperature and (especially) humidity, it dries enough to sand in as little as six hours, and overnight is almost always sandable. With temps between 65F and 85F humidity control is the key. Stuff dries better when it is dry.

If the thwarts and seat drops are not dry enough for scuff sanding between coats it is best to wait, and wait some more.

I will also try to get the floor epoxied this evening too. Would it be okay to paddle it a bit and then put the final coats of varnish over the epoxy or does it have to be done together? I would think that as long as it is cured, it'd be okay but I wanted another opinion (s).

Absolutely. You’ll want to clean that scuff patch, lightly sand it and rinse it before applying a topcoat anyway. Epoxy is tougher than paint, varnish or urethane; you won’t damage it in a test paddle or three.
 
Couple more trivia comments...

FW - I can get over you not ordering black walnut handles because you like the shape of the ash Bell handles. Plus I see that Ed's does not even offer Bell thwarts in black walnut...only ash...so your best long term strategy is to stick to ash for replacement parts.

Attached is a shot of the "fitted" front thwart on my Merlin II. It looks nice, but unfortunately might have been a bad idea since the rear one broke right at the fastener hole...maybe due to the decreased thickness. So I replaced it with a piece of cherry that I had on hand that works great but doesn't match anything, but at least it's behind me so I don't see it.

:)
 

Attachments

  • image.jpeg
    image.jpeg
    294.2 KB · Views: 0
  • image.jpeg
    image.jpeg
    139.5 KB · Views: 0
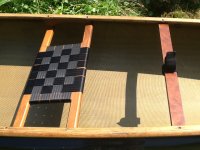
Last night was like Christmas when I got home from work: the handles arrived from Ed's, the polypro nylon webbing arrived from Amazon, and last but not least - the seat and new seat hangers arrived from gumpus! Thank you!!! :D I have a plan for those that will require a bit more time to complete. So stay tuned, I hope you'll be happy with it.

Progress:
First coat of epoxy went on the scuffed area last night, boy did it soak it up. I'll put a second coat on tonight after lightly sanding it.

I finally decided on the interior coating (System Three WR-LPU Topcoat - satin finish). Sounds like the best option to use over the epoxy and actually to cover the entire interior of the boat. After cleaning the inside with acetone, there were several areas that were initially tacky but eventually got smooth (clean?). The process I used was: cleaning with acetone/paper towels and then following that up by wiping the surfaces down with a damp (water) clean cloth. Dry, repeat until the acetone/paper towels weren't getting dirty. During this process, I noticed that I could 'feel' the tape that covers the inside fabric at the bow and the stern, and I really don't think I should be able to feel that. So, I plan on coating the interior and moving on.

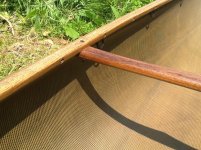
Thwarts and original seat hangers are looking good too, second coat of varnish on those last night too.

Sounds like I need to wait a few days for the epoxy to cure before putting the topcoat on, so I may be able to get it out this weekend. Not really sure I will considering the amount of work I've got into cleaning it up. Feel like I'm getting closer to the home stretch though and between work and family visiting, I'm actually pretty happy with my progress.

Will definitely get the Prospector out tomorrow morning for a bit - my brother wants to learn to canoe. :cool:

Thanks all for the feedback and suggestions - it has been most helpful!

Best - Kathy
 
Well it sounds like the student has become the teacher and we are now learning from you. I think the only one you need to please is yourself. The tidbits I sent are just the cut off ends from a set of Ed's seat drops so I'm not sure if the angle is exactly right for you...but they are black walnut and a bit thicker/stronger than Bell drops. I think you are wise to let everything dry thoroughly. Looking forward to seeing pics of your Merlin when you are done with it.
 
Progress:
First coat of epoxy went on the scuffed area last night, boy did it soak it up. I'll put a second coat on tonight after lightly sanding it.

If the scuffed area soaked up resin I’d think that indicates exposed fibers that were in need of attention

During this process, I noticed that I could 'feel' the tape that covers the inside fabric at the bow and the stern, and I really don't think I should be able to feel that. So, I plan on coating the interior and moving on.

A noticeable transition edge on the tape is common. I wouldn’t worry too much about laying on enough epoxy to smooth out that transition. If it is really tape, with a seamed selvage edge, it may be fiberglass and the raised selvage edge bump sandable (unlike kevlar which goes fuzzy).


Sounds like I need to wait a few days for the epoxy to cure before putting the topcoat on, so I may be able to get it out this weekend. Not really sure I will considering the amount of work I've got into cleaning it up.

I tend to wait, and then wait some more before topcoating, at least with any dissimilar material. Epoxy on epoxy has better chemical adhesion when a second coat is applied sooner. When topcoating epoxy on epoxy after the first coat has fully cured I always sand first to provide some mechanical adhesion. Same for topcoating with a dissimilar material.

It is readily apparent if the epoxy is still curing, the sand paper will gum up very fast.

With that inside so thoroughly cleaned (and a Prospector to share) I wouldn’t want to dirty it up and have to clean it up again either.
 
Had the Prospector out yesterday with my bother, it was really nice. He's only been in a canoe a few times in his life and we had a nice time on the river. He's also been game to help me with my little project. :cool:

Well, three coats of epoxy later, I think the floor is done. I will sand it down to smooth everything before the final coat. I also wetted out the tape at the ends of the boat because I had some extra epoxy. They are now 'invisible' again, so I feel a bit better about that.

The thwarts and the original set of seat hangers are done. Pretty happy with how those turned out.
20170730_103459.jpg

However, when I put them next to the seat and one of the new handles, I was looking at three distinct colors...

20170730_084401.jpg

And then I pulled the other handle out...

20170730_084544.jpg

Make that four colors.

After about 30 seconds of consideration, I decided that wasn't going to work. So, out came the sander. Since I have to wait a few days to put the top coat on the interior of the boat, I decided I had time to correct the wood color issue too (read that as stain and refinish).

The little canoe is coming together nicely and I decided pulling it apart again in a few months might not make sense. Especially when I have the time to do it right the first time...

Updates as they happen - thanks again for everything!

Cheers!
Kathy
 
The thwarts and seat drops look extra very nice...they are black walnut so that may be the right stain for the rest of the parts which are ash. Just FYI your boat came with handles and thwarts of different colors.

In the long run you can always ask Santa (or your brother) for black walnut handles and/or a black walnut seat. I will mention that the webbed black walnut seat that I put on my Merlin II definitely added a little weight (the wood is thicker than the stock seat) but it also stiffened up the seat a bit...so overall OK by me.

And by the way once you get some time with your new boat I think you'll need to answer your own question about how much wind is too much for paddling. Your Merlin loves windy days.
 
However, when I put them next to the seat and one of the new handles, I was looking at three distinct colors...


After about 30 seconds of consideration, I decided that wasn't going to work. So, out came the sander. Since I have to wait a few days to put the top coat on the interior of the boat, I decided I had time to correct the wood color issue too (read that as stain and refinish).

I would guess the easiest way to color match those parts would be to make the (easier to sand) thwarts, carry handles and drops match the seat, if that is in fact wood-difference possible.

I have sanded and stained re-used wood frame seats after sanding down to bare wood, but I was always DIY webbing the seat afterwards to replace old busted cane.

That is a nice OEM Bell seat, and I would not want to rip out the sound looking cane just to sand the entire seat frame down to bare wood preparatory to staining.

I’m not sure how you could sand to bare wood with the cane in place. You could stain over the cane (and the cane itself), but the varnished area under the edges of the cane isn’t going to take on any color.

Maybe someone here has a trick.
 
Finished!

(Well, at least back together in time to take to the lake this weekend :cool: )

There are some things I will work on this winter, but its ready to go for now. Thank you all for your thoughts and ideas, and especially you gumpus for the spare seat!

Finished 3.jpg

Finished 2.jpgFinished 4.jpg

Finished Top.jpg

If anyone has any further ideas or suggestions - I look forward to hearing them.

Cheers!
Kathy
 
Back
Top