• Happy Weed Appreciation Day! 🌱🌿🌻

50 Pounder Rebuild

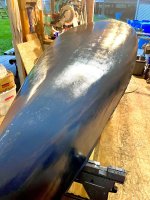
I decided against the dark red- too many of my vessels and vehicles are red. This is the first coat of Kirby Flag Blue. Too dark for me- gonna add a bit of white on the next round after sanding.
D688D679-1065-449D-8FD1-0D89C7454DEE.jpeg
FBBF8984-66E8-42C6-B235-5942FC74CD98.jpeg
I was able to get my hands on some long quarter sawn white oak for the outwales. It should be very pretty after some more sanding and varnishing. Running the piece through a router table makes the lip to cover the canvas against the ribs nicely. I will rip it down the middle and sneak up on the lip till I get the right overhang.

EBBF3DDB-4E76-469B-87EB-8FFCB50D26D2.jpeg
 
The oak is definitely going to look nice… when you mix the white in… do you keep track of the mix ratio for follow up coats? Can’t wait to see the results.
 
when you mix the white in… do you keep track of the mix ratio for follow up coats?
I don’t think it will take a measurable amount of white added. I do want a dark blue. I will mix more than I need and keep it in an empty gallon can. They are inexpensive and I find them handy for other concoctions.
 
I like your method for cutting the outwales in one piece on the router table, then dividing into two. Saves having to rabbet two slender pieces which could lead to error.
 
Gave it a good sanding with 120 and then 220.
2925F6A0-2988-4354-B7E9-01E7E0412108.jpeg
I lightened up the color a bit. I still may tweak it. It looks very different depending on the lighting. It definitely isn’t traditional, but I have never been much of a conformist.
8EEA5FE3-C516-46AD-B34C-CF3AFA193385.jpeg
19A67A6C-7C1D-4DEF-AAA6-673B2ED525AA.jpeg
It still needs a few more coats and light sanding in between.
 

Attachments

  • 05F2D3E8-B14E-4BAE-9FFB-8EC6BA130C64.jpeg
    05F2D3E8-B14E-4BAE-9FFB-8EC6BA130C64.jpeg
    188.1 KB · Views: 18
Last edited:
Finally got the seat in. I was able to reuse the original hardware. One diamond bolt’s threads had to be straightened out in a die. I liked the bootlace style so much on the last rebuild I got another. I have never been a fan of cane and this is at least woven. I got a wide seat so I can sit on one side comfortably to heel it a bit. Tomorrow I plan to get the waterslide logo on and a couple more coats of varnish. I am waiting on the outwale screws to arrive. I only had frearson silicon bronze screws and wanted flathead. I’m hoping to get it wet next weekend. It’s been a long time coming.

Bob

8DB0130B-ABA5-4714-9E2F-131B596A18FC.jpeg
 
I was able to get some brass finish washers and short slotted screws at the local hardware store. I gently flattened the washers a bit in a vice and gave the screw heads a tap to seat them to look like the old style cup washers. Not perfect, but they don’t stand too proud of the ribs. The period correct decal went on easy too.
BB0002A5-35CA-41D3-8DF0-E350E77252AE.jpeg
374BA0A1-82C5-4E55-A0B0-C142C678F8A1.jpeg
image.jpg
88F842AD-1ED9-482F-B769-B35BEC403F26.jpeg
 
Looking very nice Bob. There is a recent discussion about the keel 'cup' or finish washers over on wcha.org. A gentleman over there found a very good substitute for the original washers on the Lymanboat.com site. I think it's a good solution to eliminate the keel but maintain the look inside the canoe. I may do the same on my Chestnut restoration.


Your seat is mounted directly under the inwales. Is this a conscious decision or did the canoe seat come originally with spacers? I'm thinking that the center of gravity may be high with the seat in this position, but with no experience of the Old Town Lightweight canoe's degree of stability, it may not be an issue.

You're getting close! I look forward to seeing her wet!
 
Last edited:
Thanks Pat.

Yes- it was intentional. It came that way and I’ve seen other 50 Pounders mounted directly to the inwales. I figure it is an easy enough fix with some drop downs or trusses if I don’t like it. It is a pretty wide flat bottom. We’ll see.

Bob
 
You do nice work Bob, that's a fine-looking canoe. I restored a canoe for a friend once and talked him into leaving off the keel, but he asked me to glue some screw heads into the holes, it looked good in the end.
My Chum just has empty holes there, I'll wait till the next restoration before I do what you and Patrick did.
 
These outwales are a bit tricky, but it’s getting done. A bit of varnishing left, one last coat of paint (possibly not this year- still undecided on the color), a brass painter ring, stem bands… oh crap I got a ways to go. I may take a day off work and put some time in.


B8F74D4D-99E8-4791-87B1-AB99343A050A.jpegE1A7D084-C8C1-4FC7-A44D-E408EC9B6EA0.jpeg
 
Schuyler Thomson showed me this trick, a bead of Sikaflex along the bottom of the gunnel where it meets the canvas, then paint over it and the underside of the gunnel.
He felt this prevents water from getting to the top of the canvas where rot and shrinkage can be an issue. I did it to this old canvas on an old Chestnut, the canvas still had plenty of life to it. I do it to my Chum as it has an old canvas and It gets the roughest use.
542D4E52-DE21-4DFB-8946-C3121009405A.jpeg5FE6AE05-ED55-40C6-9122-E6ADC3AAE87F.jpeg
 
Thank you Robin! I remember him mentioning that to me, but I couldn’t remember the name of the sealant. I am going to see him at some point to pick up some rib stock and I can scratch that question off the list.
 
Sikaflex makes great sealants. I've relied upon them for close to 40 years in my work as a carpenter.
 
Other than a paint touch up in a few places, it’s done. I was hoping to get it in the water today, but there are white caps and I’d rather play around in it than be on a mission. Being my first wood and canvas canoe rebuild I learned a ton and am looking forward the next two I have in queue. Thank you all who offered guidance, suggestions, and support.
BF494951-7BC1-4902-86A0-F82B5605E6DE.jpeg
0E664D12-D757-44CE-9A88-6071E95126B4.jpeg
 
Back
Top