• Happy Weed Appreciation Day! 🌱🌿🌻

50 Pounder Rebuild

F7FA264C-5063-4338-8C97-5EA2397FEFDE.jpeg 7EA328D4-32E1-448E-B5B2-82B0CD1CF5A6.jpeg
Steaming some Norway Spruce. I made a jig using the old inwales. I enjoy this aspect of the rebuild much more than just cleaning up the hull. This stock was so straight grained and green the steam bending really isn’t essential, but I prefer it has some set.

Bob
 
Just a suggestion with bending the white cedar, wet the pieces down well with water before you steam them. NWC cedar is very light and doesn't really retain the heat very well, getting some water on it helps it heat up and hold the heat longer, so bending is easier with less breakage.

Brian
 
6BA4197A-DEDE-4659-98E9-85B6AD374CF8.jpeg Removed the inwales and top planks to expose the rib ends. One side was really rotten under the inwales. Looking forward to the rebuilding bit rather than cleaning and taking apart.

Bob

FD4BA893-45B8-4A52-9734-7C61841B300B.jpeg
 
Like others, I click on a picture and get nothing but a black screen. Kinda disappointing.
 
If I may ask, how did you cut the scarf joints on all those rib ends? That looks like quite the project to me. Nicely done!
 
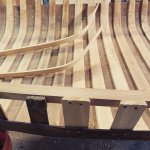
Over twenty of them... wasn’t bad after I got going. I cut the rib stock to length- about an inch or so more than I needed and cut it to the width of where the bottom of the scarf would be on the existing rib with a block plane. Then I cut the angle on the new piece with a belt sander clamped in a vise upside down. These ribs taper and are beveled (trapezoid shape) and I roughed that in with a block plane. Then I used the belt sander to cut the angle on the old rib matching it to the new piece as I went. Brushed tight bond III on both pieces and clamped. I will have to sand them smooth and touch up the tapers/bevels with a spoke shave. And stain them to match.

I have done this with a chisel before, but find I get a better fit with the sander. I have also used epoxy and PU glue. All work well, but the PVA glue cleans up easiest for me.

This is my method, but as with most things always more than one way.

Bob
 
C92EE005-0B20-49A3-9E28-AEF12B3A1BAE.jpeg Mocking up the stem ends today from some ash scraps. I only need the top few inches of each. They are thicker than they need to be. The backside of the scarf will run down the existing stem to give more surface area to glue.

ACB27A65-940C-4833-950C-2EA2D1306271.jpeg
 
E3683B21-9AD4-4FE7-BA7F-E212DC0957B2.jpeg Well I was supposed to be on a trip this week, but weather took a turn for the worse- “hail and damaging winds” according to a couple forecasts. So some local fishing and wood shop time finally. The inwales are in, rib ends trimmed, and getting the stems shaped. Next- decks, planking and replacement ribs. Not to mention cleaning the shop!

Bob
 
I was able to find some nice maple stock for decks. The white cedar ribs were a pleasure to shape. I’m used to working with hardwoods. One rib snapped when bending, but I had enough extra thankfully.

A38F57D3-EC98-4276-B15F-4E6779103F38.jpeg C74B2B1D-6C41-4EEB-A23A-61AC4AB9D027.jpeg 2B38CC52-8760-46A1-B83E-937B7E536253.jpeg
 
It has been a while since I’ve had some time to work on this. I have the week off work, the kids are in school, and it’s raining… perfect. I have replaced four ribs and have two to go. I forgot how enjoyable this work is and that 90% is done with hand tools.
 

Attachments

  • C92DCE6A-E139-4CCD-8542-002E716943AB.jpeg
    C92DCE6A-E139-4CCD-8542-002E716943AB.jpeg
    692.2 KB · Views: 14
  • 263B64BB-F6F8-480B-A3C0-5F3C1F8CDF49.jpeg
    263B64BB-F6F8-480B-A3C0-5F3C1F8CDF49.jpeg
    336.5 KB · Views: 14
Looking good! It’s satisfying work rebuilding, right?
Thanks. Yes, I often wonder when working on it about who put it together 75 years ago and the trips it’s been on. I don’t think they were intended to be used and rebuilt so long after being built, but if feels good to keep them going!

Bob
 
Back
Top