• Happy Publication of "Star Spangled Banner" (1814)! 🚀💣🇺🇸

Kite +6%

Those accent strips are gonna look great, and blend well to your stems.
When I paddled my first strip built canoe (1978!) I expected it would be a cool head trip. What I didn’t expect was all the questions and comments. I could have made cue card responses, the questions were so consistent.
What brand canoe is that?
Did you build that?
Was that a kit?
Then a myriad of detail questions, what kind of wood, what does it weigh, how long did it take, what did it cost and so on.
I still take the time to explain, especially to those folks that want to build their own.

I firmly believe that we, as canoe builders, have a responsibility to share our knowledge and encourage would be builders in order to preserve the art.
 
A few more strips today, frustrating pace. Used the heat gun to put some twist on the strips. Reached the point that I need to start more shaping on the stems. Jim's stemless method keeps looking better.

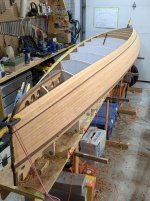
A closer look at you stems ?
I believe either your two piece forms, attached to the stem, are too low, or your inner stems are too high ?

Someone more familiar with the Kite build, can tell you more ?

It looks to me like you will be building a bump, or what they term " Hog Nose" on the stems ?
The inner stem, should be below, your first full form. ??

Again those with more experience with the Kite, can chime in on what it looks like to me !

So when I set up my forms ? I take a Strip ( it's called a Fairing strip ), and lay on the hull, to check for any irregularities .
The Fairing strip should make contact with all forms, or very close to it.

Your inner stem, needs a lot of shaping, to make it Fair, with the rest of your forms.

Other than that ? Your hull looks great .

Yup ! Stemless Rules ! :)


Jim
 
Last edited:
The inner stem is fine, it should be flush with the top of the station. The channel for the outer stem is carved from the covering cedar, so the outer stem is only about a 1/4 inch when planed down close to the stem, and then gradually gets thicker as one approaches the turn. Once you have done a few of them, shaping the inner becomes a very fast process, I usually use a small block plane and a rasp, takes about ten minutes to do the whole thing. Keep in mind, only the back of the inner stem is visible, so wood butchery is in order for shaping.
 
I went off script when it came to the stems because the walnut I have for the outer stem is only 1-1/4". I believe the plans call for 1-5/8" to taper. The inner is currently too proud like you say Jim. I will be shaving it down and covering it with hull. I will try to bring the outer stem laminations as far down as I can while attempting to maintain the stem profile to the plans.

The idea of cutting a channel sounds a bit tricky. Do you guys have a tool suggestion/method for this?
 
Cleaned the glue out of the ends took the strips down to the stems. Put a strip on each side after pre-twisting with some heat. Noticed I had small gap under the clamp after it dried unfortunately.

For the ends I'll fit the strips up to the inner stem as if it were a 1 piece stem. Then I'll laminate the walnut on top before final shaping.
52.jpg50.jpg51.jpg54.jpg55.jpg56.jpg
 
Stem looks quite nice as it is…does it really need another piece laminated on top?
And what about decks and bulkheads? Open stems? You seem to have a pretty specific aesthetic in mind already.
IIRC, you’re planning on aluminum gunwales
 
The stern stem is a little low and will require one lamination, the front I might squeak by with. I really like what you did for floatation tanks over the tear drop style but haven't committed to anything yet. It is funny how plans change though. I was drawn to Allan's kite for it's simpleness. My plan was to follow similarly but with a the single walnut accent strip along the knuckle and another along the keel. I used the yellow cedar since I had it on hand but as the rest of the boat takes shape I'm wishing I hadn't. The two browns look so good together the lighter colour is a distraction. After adding the second accent strip I decided not to do the keel strip as I think it would be too much. We'll see how bad my fitting is along the keel.
 
Since you built a stripped kayak, I’m sure you’ll do a fine job along the keel on this hull.
I don’t recall if you had a target weight in mind, or is that not a concern. Wait, you’re a bigger guy, and I suppose 5 lbs one way or the other won’t really matter. Aged welterweights like me have to watch every ounce to keep us carrying without suffering too much.
And have you thought about a seat yet? Laced frame? Maybe some sort of molded seat? You’ll likely need to have fore-aft adjustment. Allen made some nifty bottom mounted adjustable seat supports. I made bottom mounted pedestals, with 3M Dual Lock, kinda like Velcro on steroids.
Looking forward to see what choices you make
 
My choices in hardware are pretty plain. I bought the same seat, hangers and end caps that are in my Clipper. The longest trip I've done in my Caribou was 6 days and the seat with the back rest I adapted was very comfortable. I like being able to stick the end cap in the dirt for portaging or for setting it on a rest without being concerned about the finish.

For a weight target 40lbs would be the dream. With the 6% scale up and since I used walnut and yellow cedar along with the additional glass I'm planning I think 45lbs is more realistic. I'm thinking 6oz inside and out along with another layer of 6oz sideways in the cockpit all the way up. So an extra 5 feet directly underneath me from where my feet will reach out front of the foot bar to the tips of my toes behind me kneeling. I'll probably also do a keel strip of either 2" or 4" 6oz. If I don't find the hull firm enough I'll add a layer of either 4oz or 6oz to the exterior football.

My stem plan didn't work out so well. Fitting strips to the stems is proving very difficult. I'll have to come up with a different solution.

Well coffee break is over now I should get back to work.

Here's the dash I made for the Caribou and seat back I adapted.
57.jpg58.jpg
 
Your woodworking skills are much more refined than mine. I can only show you some wood butchery as to how I end up mating the two stems together. It looks like you are altering the internal stem at the point where I would be altering the external stem. My channel for the external starts right around the sharpest bend in the stem, so the channel is often fairly deep at that point. I'm not pretending that my way is correct, it's just how I have evolved my limited ability to make sense of it.
https://www.canoetripping.net/threads/jacks-special-chestnut-chum.19309/page-5
 
Back
Top Bottom