• Happy International Mermaid Day! 🧜🏼‍♀️

Thus build the Raven, evermore

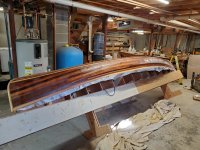
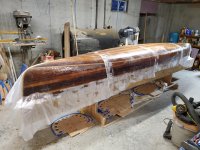
The sooner the better when applying fill coats. Apply your first fill coat, and about an hour or two later, apply the next. If your first coat is still tacky ? It will hold the next coat, and prevent runs. Straight from a System Three Tech !

I planned on using Peel Ply like Alan, and yeah it didn't work for me either. On a flat surface, it will save you at least one fill coat. Trouble is ? Peel Ply is at least $8 a yard.

Used Dynel from RAKA, on a fiberglass Snow scoop. Didn't hold up at all ! It cut too easy to have any abrasion resistance. Glad I didn't try it on a canoe !

Jim
 
Interesting, I wonder which tech you talked to Jim. From the ST website....When this first coat is cured to at least a soft set tack free stage it can be recoated. Subsequent coatings applied at anytime between this soft set stage and 72 hours do not need to be sanded and will chemically bond. I won't bother quoting the rest, but they are pretty clear to wait to recoat until the previous coat is tack free.
 
I built a dust extractor for the shop vac out of 5 gallon pails and some ABS pipe. It works really good for sanding boats and drywall and any dusty work. Keeps the shop vac filter much cleaner. It helps if you go large and then step the hoses down a bit.

https://www.youtube.com/watch?v=1WnitgYFnE0&t=11s

There is another video of how to make a mount that goes on top of the shop vac too. It's all a really slick and not expensive setup.
 
Interesting, I wonder which tech you talked to Jim. From the ST website....When this first coat is cured to at least a soft set tack free stage it can be recoated. Subsequent coatings applied at anytime between this soft set stage and 72 hours do not need to be sanded and will chemically bond. I won't bother quoting the rest, but they are pretty clear to wait to recoat until the previous coat is tack free.

It was many many Moons ago Mem ! When you could buy 15 gal. kits, of Clear Coat., for less than the cost of good Varnish, per gallon.

I had contacted System 3 about discoloration, between fill coats. The Tech I talked to, explained, I would get a BETTER result by not waiting 72 hrs. The discoloration could be due to contaminates, or humidity.

He went on to say, by Applying fill coats while the previous coat was Still Tacky, I would experience fewer runs, and a clearer epoxy finish !

I followed that advise and found it to be true. Obvious to me ? He was a Savey Tech, as that has proven true in my experience, even with other resins !

I will continue to follow that great advise !

Why they came up with the 72 hr thing ? I don't know ! Is there a magic strike of the Clock ? At 72 hrs, ? like Cinderella The Carriage turns into a Pumpkin ?

No ! The Sooner the better,

​​​​​​​ Jim
.
 
I built a dust extractor for the shop vac out of 5 gallon pails and some ABS pipe. It works really good for sanding boats and drywall and any dusty work. Keeps the shop vac filter much cleaner. It helps if you go large and then step the hoses down a bit.

https://www.youtube.com/watch?v=1WnitgYFnE0&t=11s

There is another video of how to make a mount that goes on top of the shop vac too. It's all a really slick and not expensive setup.

I've seen this before, and need to make a couple ! Thanks for the share !

It's on my "Bucket List" :rolleyes:
 
Oh man Iskweo, now I have to figure out how I'm going to time in to build that in between filling gaps in the strips in hull with thickened epoxy (before I sand). That's such a great dust collecting design! I'll probably use it to have my kids vacuum the garage floor when I'm done;)
20210311_171520.jpg - Click image for larger version  Name:	20210311_171520.jpg Views:	0 Size:	416.1 KB ID:	122692I'm only tilting the strongback on a couple of 2x4's but that's making it so much easier to get to the tumblehome. I was originally going to wait to fill the gaps with epoxy until I had the hull almost totally faired but I found there was too much play in some of the strips so I decided to deal with more difficult fairing (epoxy vs. cedar).
 
I C-clamped 2x4 legs to my forms in order to tilt the strongback. Looking at yours ? It looks like it will work .

Tilting the hull makes it handy for a lot of tasks. Fitting strips in the football, checking strip fit with a light source underneath, and sanding the football, and tumblehome.

IMG_2328_zpsmwhlrkty.jpg
 
A lot of work this weekend! I ended up doing much of my fairing with a makita 3x18 belt sander with a 40 grit belt.

While doing this I noticed a few spots where the strips separated and sprung a little. I used tape and a 6 foot piece of quarter round flexed to hold both strips flush.
20210312_161427.jpg
I also had a couple of out of place (too deep) strips so I glued a scab piece in the recess. Most of it was planed and sanded off later.
20210313_094352.jpg
 
Can you find the scabbed strip now?
20210313_125632.jpg
I was able to shape the knuckle pretty well mostly using my 5" ROS. To get it ready for the fillet.
20210314_102937.jpg

20210314_103412.jpg

I'm using raka epoxy with the slow no blush hardener. The resin seems much thicker than the system 3 I've used in the past although my basement is cool (65 F)

I'm also trying Peel-ply for the first time. i made the peel ply strips too narrow so it was harder to put on and smooth.
20210314_170218.jpg

there was some sticking when I pulled the peel ply but taking the tape off at the same time helped a lot.

20210314_170327.jpg
the good thing was that I knew I could scrape or sand that smooth.
 
Thanks for posting your progress, and all the great photos which I'm happily able to enlarge now! Your scabbed, glue on solution to the low, misaligned strip solved that problem nicely.
 
I used a space heater under the hull with the raka epoxy warming on the strongback over night since it seemed considerably thicker than the system 3 I have used in the past.

I decided (wrongly) to put the football layer on top of the full layer of 6 oz. Glass. I ended up with little strings after the wet out that I haven't had when I buried the football.

I used Jim Dodd's method of tipping the hull and wrong out one side then the other. I could manage wetting out the knuckle more easily. 20210317_153059.jpgI thought I could cut the football and the second layer of protection at the same time. In the end I cut the stem piece of both ends.

20210320_105826.jpg

After 3 hours, the wet out was firm enough to cut the excess glass from the shear line.
20210320_141131.jpg

20210320_161652.jpg
I prefer using a plastic squeegee to spread the epoxy but with the inverted knuckle, I used the cigar style foam roller. I find those easier to get off the handle than the black foam rollers.

I think I'm going to let these 2 coats cure, flip the hull and work the inside. I'll go back to the outside later, sand the hull and use peel ply to put on the bag strips bow and stern.

I'm waffling on using spruce gunwales I have left over from a canvas old town guide or laminated basswood and cherry.

Thoughts? I plan on screwing them not gluing.
 

Attachments

  • 20210320_105834.jpg
    20210320_105834.jpg
    360.7 KB · Views: 2
To avoid the unraveled glass and have a clean line on the football s-glass layer I now put down a strip of masking tape where I want the edge and apply epoxy to there. When the epoxy has firmed up I cut along the line with a razor blade and pull up the excess glass and tape which leaves a nice edge with no frazzle. It makes scraping that edge very quick and consistent. In the past I've had some air bubble issues trying to wet out the hull and 2 layers of glass at the same time, so I won't do that again.

I use spruce exclusively now for gunwales and screw them. They're light, reasonably durable and if you already have them, why not. The softwood gunwales are definitely susceptible to damage, mostly when turning the canoe upside down for the night. Watch out for rocks hiding in the brush.

Personally, I would do all the epoxy on the outside of the hull while you have the opportunity and it's still green. No reason to add another step. Raka says you have 24 hours to get the chemical bond.

Mark
 
Looking great! I was wondering if you would put the football patch on after your full layer. I tried that with mine last year and when I started pulling those edge threads out I freaked. I was panicked and didn't handle it well, almost like an amateur, oh wait I am an amateur.
Your canoe is looking great!
 
Too late for jf, but here are a couple pictures of what I tried to describe above. I saw this on one of Nick Schades videos, so it's not my idea. In the second picture you can see what I mean about it coming out very clean. Since I use s-glass on the football, the weave of the fabric is visible below the line (above the line in the photo). I have s-glass footballs on the last 5 boats I built. My experience with it is that it doesn't leave a gouge at all like e-glass.

Mark

IMG-3249.JPG

IMG-3252.JPG
 
Too late for jf, but here are a couple pictures of what I tried to describe above. I saw this on one of Nick Schades videos, so it's not my idea. In the second picture you can see what I mean about it coming out very clean. Since I use s-glass on the football, the weave of the fabric is visible below the line (above the line in the photo). I have s-glass footballs on the last 5 boats I built. My experience with it is that it doesn't leave a gouge at all like e-glass.

Mark


That does look like a good clean job. I'll try that on my next one, one of these days.
 
Mark, those images are great! I have masked off areas in the past when flashing rub strips and other things in the past. I probably got the idea from watching Nick Shade as well.

This build seems to be about how quickly I can build. Although in the end, the rushing will probably take more time, but I'll be busy and get to problem solve;)

Because I couldn't restrain myself, I pulled the hull off the forms and started sanding and scraping the inside after cleaning up the shear line. 20210321_100805.jpg - Click image for larger version  Name:	20210321_100805.jpg Views:	0 Size:	368.3 KB ID:	122965

20210321_102839.jpg - Click image for larger version  Name:	20210321_102839.jpg Views:	0 Size:	367.3 KB ID:	122966


After furniture shopping with the family, I got back in time to add more protection on the stems.
20210321_175256.jpg - Click image for larger version  Name:	20210321_175256.jpg Views:	0 Size:	349.3 KB ID:	122967

And then I went all in and decided to try peel ply and the whole hull! We'll see tomorrow morning.
20210321_190504.jpg - Click image for larger version  Name:	20210321_190504.jpg Views:	0 Size:	319.9 KB ID:	122969
 

Attachments

  • 20210321_190502.jpg
    20210321_190502.jpg
    360.6 KB · Views: 2
I pulled the peel ply before heading to school. I was a little concerned that this could run my whole day but it t turned out some better than I expected. There are some places where I'll have to sand a lot. But the edges of the football are totally buried in epoxy now.
20210322_055451.jpg
20210322_055502.jpgthe we've had disappeared for 3 layers of cloth.

It's really hard to get a 1.5" strip of glass to lay on a 4" strip on the stems (with peel ply on top)
20210322_055519.jpg
I do know how to cut and sand though. I'm not thrilled with the clarity of the epoxy after I've worked it so much. I'm not blaming the raka as much as myself, but system 3 is really easy to use (maybe that's why it costs more). I've considered painting this hull so if it ends not being clear enough for me, I won't be that disappointed.
 

Attachments

  • 20210322_055451.jpg
    20210322_055451.jpg
    335.4 KB · Views: 3
I'm about 1/2 way done sanding the inside of the hull. Working at it only about an hour at a time had made it less soul ripping;).

I set up a really really fancy jig to hold the canoe up at an angle to apply the thickened epoxy.
20210323_154031.jpg

I used making tape to reduce over applying the epoxy which works quite well. I was able to peel the tape/ excess epoxy of while it was only partly at up

20210323_161002.jpg

The best tool for applying thickened epoxy and anything out fillets has to be the white plastic spoon!

Taking some time from sanding the other side of the hull I ripped cherry and ash to make a laminated Conk style seat. I'm planning on a rectangle 16" wide by 12" deep. It's kind of an amalgamation of traditional (rectangle), Conk (dropped front) and Gilpatrick (wide and deeper)

20210324_161424.jpg

Is there anything I'm missing?
 
A spoon would make a nice smoothing tool but I think by far the best application tool for fillets is a zip-lock baggy. Nip off one corner and squeeze it like a piping bag. If you get it perfect hardly any smoothing is needed. Application is so clean there's rarely any need to mask around it.

Looking forward to seeing how your seat comes out.

Alan
 
Back
Top