• Happy National Garlic Day! 🧄🚫🧛🏼‍♂️

Thus build the Raven, evermore

Alan, do you mix your epoxy in a cup first with the thickener and then put the glop in a baggie? I tried that a couple of times in the past but made such a mess I felt like the tar baby from braer rabbit;). Also, do you have to smooth after applying the epoxy from the baggie?
 
Last edited:
A spoon would make a nice smoothing tool but I think by far the best application tool for fillets is a zip-lock baggy. Nip off one corner and squeeze it like a piping bag. If you get it perfect hardly any smoothing is needed. Application is so clean there's rarely any need to mask around it.

Looking forward to seeing how your seat comes out.

Alan

A professional shipwright I know refers to that as a "puke mouse."
 
Alan, do you mix your epoxy in a cup first with the thickener and then put the glop in a baggie? I tried that a couple of times in the past but made such a mess I felt like the year baby from braer rabbit;). Also, do you have to smooth after applying the epoxy from the baggie?

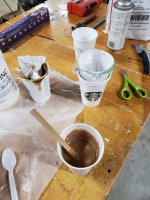
I was taught to mix epoxy in a separate cup and then add fillers. The baggie goes in a separate cup. It helps to fold the top of the baggie over the edges of the cup, and to poke a finger into one corner of the baggie to "seat" it in the cup then pour/scrape the epoxy into the baggie. Seal, twist, cut off corner and go to town with your "puke mouse."
 
I'm a believer in the epoxy "pastry bags", makes a messy job much cleaner.
I used Alan's technique when I added thickened epoxy inside the foam gunnels before attaching them to the hull. Previously I used little strips as spatulas and the job was miserable and took way too long. With the baggie, it was effortless and fast...

Oh, and your build is coming along nicely, relax, and enjoy the ride!
 
Thanks for the excellent descriptions for the pukng mouse (pastry bag method. The one thing I was missing on previous attempts was putting the bag inside a clean cup for the transfer. I'll give it a try when I do the fillets along the inner stems and on the left side of the canoe. I may end up retiring my spoon:)
 
I like the idea of putting the baggy in a cup before filling. I'll try that next time but I've always just transferred the epoxy over with a mixing stick (one of your spoons would work well too). I pinch the mixing stick from the outside of the baggy and then withdraw it (the stick) to keep my fingers clean.

Rarely I put down a perfect bead that doesn't need to be touched but usually I need to give it a swipe with my finger to even out any high/low spots and the feather the edges.

Alan
 
For filling cracks, I like to mix up the epoxy and saturate the crack with the unthickened first. Then go ahead and thicken the epoxy and apply in a small bead to the crack deliberately overfilling.

The bag sounds like a good idea, but for something like strip cracks which tend to be smaller, I like to use a disposable syringe, the bag sometimes lets the epoxy "curl" as it exits and that can be a bit tricky to apply evenly.

Last step is to pull the tape once the epoxy has kicked well, this avoids embedded/epoxied tape ... then let the areas cure overnight.

Next day just use a carbide scraper to level everything and you are set for the next sanding operation.

Brian
 
So another question for the gang: hang the seat from the gunwales or epoxy brackets on the hull? I do plan on some sort of adjustability for trim.

I was planning on mounting rails from the gunwales but now am thinking the seat might shift (wiggle) side to side
 
It seems like it would be easier to raise/drop a seat hanging from the gunnels and I've seen some clever ones that adjust fore/aft as well (rails hang from gunnels, seat position adjustable on rails). Although with a tripping canoe you can always move a pack around to adjust trim.
 
I've done both, but prefer to hang from the gunwales. The Raven needs the seat back from centre a bit, I believe I put the front of my seat 9 inches from the centre point, although six might have been better. I believe I recall J. Winter saying he was not a fan of sliding seats, and that the idea behind his asymmetrical solos was to get the stern to squat down a bit for general paddling conditions. There is so much rocker in the Raven, you can get that slight stern dominance and still retain good maneuverability. Think I hung my seat about three inches down from the top of the gunwale.
 
That's very helpful Mem. So you were able to get good trim just by adjusting your load?

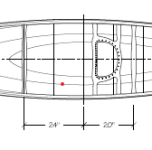
I just looked at the lines drawings. Screenshot 2021-03-26 thwart and seat distance.png - Click image for larger version  Name:	Screenshot 2021-03-26 thwart and seat distance.png Views:	0 Size:	7.7 KB ID:	123145 It looks like the front of the seat is even less than 6 inches from the center (station 8).
 
Last edited:
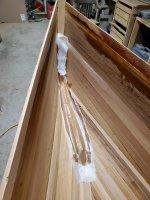
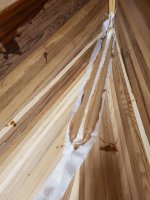
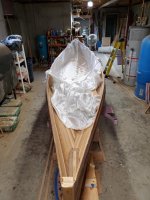
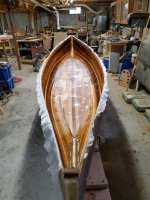
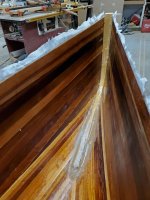
I got the knuckle epoxied on the left side and then after dinner added the thickened epoxy on the either side of the inner stem. I used the puking mouse method but still used my spoon to smooth the peel ply.

20210326_203040.jpg20210326_203050.jpg
20210326_204823.jpg
20210326_204835.jpg

The best practice, is practice. I figured out that you need to cut a really small corner of the baggie, make sure you don't bury an edge of peel ply in the end of the stem. I did see that and pulled the edge out.
 
I've never added thickened epoxy like that, I usually just push the glass down with a screw driver or some other flat edge, and epoxy generally fills in beside. On my first couple of Winter's solo's I put an extra strip of glass on the inside of the knuckle, but don't bother with any extra reinforcements now, the usual treatment seems to hold well.

Is station number 8 the actual dead centre of the canoe? I often question seat placement in an asymmetrical canoe, as the fullness of the canoe is mostly to the stern, so I feel the seat can go back a bit further. I always adjusted load with my packs, but I found the Raven to be quite forgiving with weight placement. As a tripping canoe, I was finding lines and running through them in white water, not trying to pull big moves to impress the hot grannies on the shoreline. Things like back ferries can be difficult in asymmetrical canoes, and when running white water you want to keep those stems loose, so if your seat is back you will want the heaviest things right in front of you.

If you are not bothered by a sliding seat, I suppose it could be useful, but you will want to watch the weight, the Raven is a girthy solo, and weight will start adding up quickly.
 
Looking great!! Funny how we all get so wrapped up in our builds and just can't seem to not work on them...
As far as your seat supports, let me throw in the idea of a couple of pedestals to support your seat.
If conveniently sized, you can get a foot or both feet under the seat, as well as a foot on either side of the seat. Makes for multiple, varied foot placement and helps on those long days in the canoe.
Also, there's no cross hull support to get in the way when you're moving fore-aft to climb in or out over beaver dams and log jams. Even makes loading, launching and landing easier too.

Not the best pic, but you can get the idea...

ACtC-3dOMaeF-tp5u9UUkNkG89N7XsVrR3zmj4EvHvTi1Q2hzQyJVr4T9P25EVBdWcIscAcOE4JDrAe_TfC5uNkrN5Eb6BqPoM6T-B0RGhT8DfZWZDuOLxNJnBQIQzvdIBKl_QEELMqtEB2-dCuP2qwx8JCYUg=w590-h882-no?authuser=0.jpg
 
This is a very clever technique. Having room for the legs to side straddle this seat is a brilliant idea. Many times I am limited to kneeling because my big ole size 13' Bean Boots do not like to fit under any seat. I personally have never seen this seating method before. Is this seat epoxied to the hull?

The Raven is looking great. Not too much left to do now. You will be paddling in no time.

Dave C.
 
Last edited:
This is a very clever technique. Having room for the legs to side straddle this seat is a brilliant idea. Many times I am limited to kneeling because my big ole size 13' Bean Boots do not like to fit under any seat. I personally have never seen this seating method before. Is this seat epoxied to the hull?

The Raven is looking great. Not too much left to do now. You will be paddling in no time.

Dave C.

The pedestals are permanently mounted, but the seat frame is kept in place with Dual Lock, the sort of Velcro on steroids
BTW, I can adjust the seat fore-aft about 12” to trim the boat with various loads.
 
Back
Top