• Happy International Mermaid Day! 🧜🏼‍♀️

Thus build the Raven, evermore

Joined
Dec 22, 2020
Messages
215
Reaction score
130
Location
Manchester, Maine
I want to thank everyone for their input on my thread asking about large solo. I had pretty much decided on the Green Valley Boat Works Raven by Jon Winters and your combined input clinched the decision. I really liked the idea of of electronic files to be able to have the forms cut and I knew that our local high school has a CNC router.
20210201_150152.jpg - Click image for larger version  Name:	20210201_150152.jpg Views:	0 Size:	292.6 KB ID:	121481
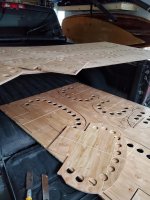
I picked up the CNC routed forms from my local high school shop. It took about 10 minutes to cut the forms (the rest of the way) out. This was by far the fastest I'd ever gotten forms out; EVER.;)
wAAACH5BAEKAAAALAAAAAABAAEAAAICRAEAOw==

wAAACH5BAEKAAAALAAAAAABAAEAAAICRAEAOw==
20210201_160626.jpg
I had prepped the inner and outer stems from clear white cedar that I had purchased for an Old Town guide re-build but I decided it was too far gone (it needed 26 ribs replaced). The up shot is that I'm finding a really good use for the traditional canoe building wood.

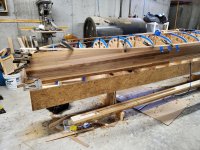
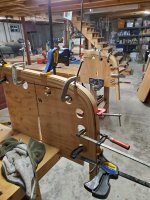
After seeing a number of people on this forum using a wallpaper steamer (instead of my camp stove, my wife's ruined lobster pot and a piece of stove pipe). I got a new steamers set up. The grey PVC was just big enough to get the stem stock inside.
20210201_192117.jpg

Fifteen minutes of steaming and the wood bent sooo easily!
20210201_150152.jpg - Click image for larger version  Name:	20210201_150152.jpg Views:	0 Size:	292.6 KB ID:	121481
wAAACH5BAEKAAAALAAAAAABAAEAAAICRAEAOw==
filedata/fetch?filedataid=18440

I set up my dehumidifier to help with the drying process. I've the building fever so waiting a couple of days before I can glue the stems up is going to be very difficult. Has anyone used Gorilla polyurethane glue the day after steaming?

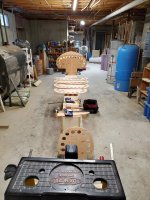
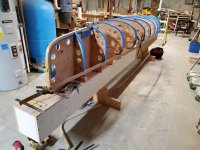
I'll be setting up the forms tomorrow. We are having a storm day so I don't have to go into school:D
wAAACH5BAEKAAAALAAAAAABAAEAAAICRAEAOw==
 

Attachments

  • 20210201_151049.jpg
    20210201_151049.jpg
    369.3 KB · Views: 1
  • 20210201_195346.jpg
    20210201_195346.jpg
    323.1 KB · Views: 0
Last edited:
Your pics state they are invalid file ?

We have a Shark HD 5 with the long bed.

The programing would take up a lot of the time, for Me ! Having the program in hand would be the ticket.

By the time our water cooled router made the cuts on 3/4" plywood, .09" depth per pass, I think I could match the speed easily. Draw back is I'd have to true up the edges.

Yes, trimming the tabs would be easy.

How thick are your forms ? Birch Ply ?
 
I'll have to go back into the post so I can add the photos in correctly.

I went a little cheap and did 1/2" instead of the 5/8" the plans called for. I will have to do some shimming on the T-slotted forms but they were easily strong enough for the bending.
 
Click image for larger version  Name:	20210202_112858.jpg Views:	0 Size:	406.6 KB ID:	121472

They say a journey begins with a single step. I think I walked about a mile 15 feet at a time. Back and forth setting up and adjusting the laser level (totally worth the $50).


20210202_115139.jpg - Click image for larger version  Name:	20210202_115139.jpg Views:	0 Size:	349.9 KB ID:	121471
 

Attachments

  • 20210202_112858.jpg
    20210202_112858.jpg
    406.6 KB · Views: 1
Looking like progress. I’m jealous of the basement workspace. My wood stove needs constant tending to keep it warm enough.

I really like that hull design. I’m looking forward to seeing it come together.

Bob
 
I'm finally getting around to posting progress and errors.

20210204_202908.jpgso I got too excited and only placed a sacrificial strip on one of the stems. I did figure out that I could use that when marking the taperson each side much easier than flexing a metal yard stick.

20210207_095902.jpg
the power plane made quick work of hogging most of the excess off each side.
20210207_121355.jpg

20210207_124615.jpgI used a 14" section of strip with 60 grit sandpaper glued on to quickly fair the stem for the sheer strips.

20210207_135020.jpg

This is where I started to run into trouble. I'm using scrap cedar that's 1.25" wide and between 4-6 feet long. To maximize each stop I thought (foreshadowing) the I could make scarf joints on the fly. The result is that I didn't match them up on forms and they shifted while gluing.
20210207_135029.jpg
20210209_155915.jpg
this view clearly shows my error. The strips shifted!! At first I thought about filling in the space, but when I looked more carefully I realized that I would be stripping around that error for the whole canoe.

The answer, pull it off and start over.
20210210_202027.jpg
you can see how bent the strip was.

20210210_201917.jpg
so I glued up 2 full length shear strips so that the shear would be a smooth curve.
 

Attachments

  • 20210207_145355.jpg
    20210207_145355.jpg
    322.7 KB · Views: 1
Oh wow a build to follow! I think, for what little knowledge I have is worth, you did the right thing. It took me a good week of setting the forms in place, scarfing the shear strip and then measuring and eyeballing it, before I was comfortable to proceed. And then I constantly measured from center down to strips that I have added. I used a sewing tape measure so I could go with the curve of my forms.

Thank you for posting your build. I look forward to seeing it develop.
Roy.
 
Thanks Roy, using the laser level greatly reduced my set up time. I didn't re- measure the height of the shade strips but they seem level. I'm well below the 4" waterline and my strips are all pretty even.
 
The real test, when you get to the Keel line.

If you do the strip past center, then cut the centerline ( CanoeCraft method) ? You will know how uniform everything turned out.

So many things come into play !
How uniform the width of your strips. How consistent your glue joints are. How accurately you mark, and make your forms. Then there is cutting the centerline.

It doesn't make any difference ! But as a builder ? It's something I judge my work by.

There are stripping methods for the football, that can hide this.

Just know, nothing is perfect, and when you are done, and put your craft in the water for the first time. The satisfaction of paddling a craft that you built ? Makes it all worth it !

Good Luck !

Jim
 
Very true Jim, I've already started going back to glue in tiny strips where there are gaps from imperfections. Once the hull is in the water I'm going to worry. That's partly why I'm stapling my strips instead of going stapleless. Also I'm rather impatient.
 
I thought I had posted some images of stripping. Doing the tumblehome knuckle was very difficult because it's so different from anything I'd built before.
20210213_153903.jpg

20210215_190410.jpg
20210215_190410.jpg
I wanted to make an accent strip at about the 4" waterline. I cut some narrow strips in the lightest cedar I had. I realized I'd have to scarf 3 strips per side to have a sweeping curve.

I came up with a simple tape scarf jig. You can see one of the strips gluing in the upper corner.

20210216_205241.jpg

20210216_203938.jpg
 
Here's more progress. Filing in the bow and stern above the waterline worked very well especially with my short strips.
20210217_183211.jpg

I've I started s stripping below the waterline I had to rip my 1.25" wide strips in half. This allows me to follow the twists in 3 directions.

20210224_203251.jpg

20210224_203258.jpg

I decided to strip the football straight. I placed a straight strip along the keel-line and then laid strips on either side going to the curve.

20210301_193408.jpg
The real question is whether I should recut the strip the last strip. Check out the gap on the right. I know I can fill the gap with thickened epoxy after backing the gap with tape underneath. What do you all think?
20210301_194510.jpg
 

Attachments

  • 20210217_134215.jpg
    20210217_134215.jpg
    444.2 KB · Views: 4
Unable to enlarge pics.

Maybe try and post just one pic per post ?
 
The real question is whether I should recut the strip the last strip. Check out the gap on the right. I know I can fill the gap with thickened epoxy after backing the gap with tape underneath. What do you all think?

Epoxy all the way. Save some of your sanding dust and it should blend right in.

Sometimes I'll cut a sliver on the bandsaw to slip in and fill the largest portion of the gap.

I don't like going in reverse but will when I need to. For me this is isn't one of those times.

Alan
 
Back
Top