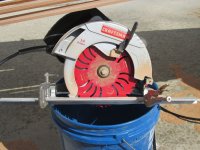
Jim Dodd suggested I write up something on making strips with the "Skilsaw Method" .... this will be that something, hopefully useful to some.
I first saw this method in a post by Jim Dodd (he doesn't claim credit for it, just passes it along), on the BearMountain builders forum, I had just finished my first canoe and had done my strips for that build on my RAS and it took much sweat, setup and 2 people to get that part of the build done. Keeping the board flat to the cutting guide was in a word a PITA.
The idea with bigger saws (bigger saws = RAS/Table/Band), is to use a longer cut guide to give accurate, straight cuts and for its intended purpose it works very well indeed. However, when cutting canoe strips, the boards can get fairly long, typically 16' - 20' ... something that long will rarely have a perfectly straight edge. So having this long cut guide is now going to cause issues with trying to cut even strips with a board that has a slight curve to it (and most will), the longer the guide the worse the issue.
The second issue with using a larger saw is the need for infeed and outfeed tables, most of us are not going to have ~40' of available shop space, so that usually moves things outside (which has it's own issues), not to mention making up the tables.
Enter, the "SkilSaw" method of cutting strips, attaching a shorter guide to your circular saw and making use of your strongback as a work surface ... sounds too good to be true, is something that simple is going to actually work? It actually works very well and is easy to setup ... so lets take a look at how to make that happen.
These are the important points of how the skilsaw method can be done, in this case with examples from my projects and equipment, the idea here is to present a workable method, you can take that and adapt as required to your individual situation, the method is very flexible.
Equipment Required
- strongback form with attachment blocks in place
- circular saw
- 12" - 16" piece aluminum angle (1/2" - 3/4") ... use what material you can get, my neighbour had this piece kicking around
- 1" x 3" strapping material ~8'
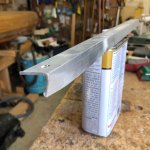
A look at the aluminum piece, note the slight bend in the edge part (will mention again later). This piece will be riding to the side of the wood, think about the thickness of the wood you usually use ... if the aluminum is thicker than the wood, it will hit the sacrificial strips, I like 1/2" pieces for that reason, it is however, entirely at the users discretion. This guide piece is fairly important, being shorter allows it to follow the edge of the wood, so even if the wood has a curve, the blade will track just fine and produce an even strip start to finish. Obviously there is a limit to the amount of curve that can be handled, but it is surprising how much curve this setup can easily handle on a long piece.
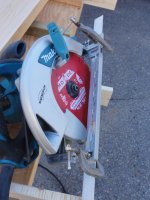
Attachment to the saw with 2 "C" clamps, you can use C clamps, visegrips, actually drill and bolt ... I have seen all these variations, you will need to figure what will work best for you.
Just a few words about blades ... you are ripping wood, this pretty much mandates fewer teeth on the blade. The fibers are being cut length wise and need more room to help them get ejected from the cut. DO NOT think you need a finer blade (more teeth) for a better finish, this lowers the space between the teeth and clogs the blade, impeding the cut. You will be doing a thorough sanding of the hull after installation, so the finish on the strips is pretty far down the list of objectives.
I suggest you get a thin kerf, 24 tooth (or less) blade (mine is a 7 1/4") ... a Diablo Demo Blade 7 1/4" 24 tooth thin kerf from Home Depot works well and is fairly inexpensive. That is not a recommendation for that blade, just an example of what to look for.
The "Thin Kerf" reduces the width of the cut (the one above is less than 1/16" wide) which reduces the wood being removed which reduces waste and loading on your saw (less wood removed = less power required).
Set your strip width so it is even across your angle guide. Also note here how that little bend is oriented, this keeps that sharp tip from digging into the wood and allows it to slide smoothly.

Cut some sacrificial 1" x 3" strips, 18" - 24" long and attach to the form blocks on the strongback
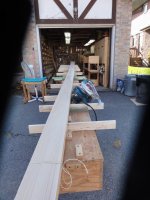
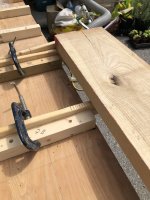
The wood piece has to be held while being cut, so we need to add a few more pieces to hold things in place. I just use a few pieces of scrap angled up to catch half the thickness of the wood being held ... these keep the wood from sliding back
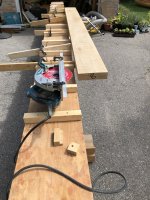
We also need to keep it from moving forward and that is done with another scrap piece at the end
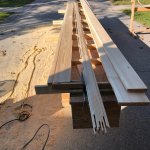
You also need to provide the skilsaw with a base of some sort to run on. Initially the wood piece is fine, but as you cut strips, this becomes narrower and at some point does not give enough of a base to be stable. Fortunately, multiple boards are almost always being cut, so add in one of the "other" boards and cut against that one, allowing you to cut to end of the piece
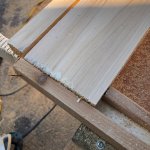
the strip on the left is 1/4", the waste is quite small on this board
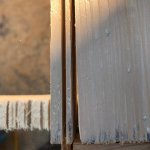
Operation is pretty straight forward, hold your saw guide flat to the wood and start your cut, holding the saw against the side of the wood and keeping a downward pressure ... walk the saw the length of the wood piece and continue past to complete the cut. If you use a corded saw (like me) then you may have to do some cable management as you go ... when you get a bit of experience you can finesse your setup a bit to minimize this.
The method is quite versatile and in wood working there are a lot of applications for cutting strips.
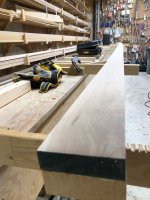
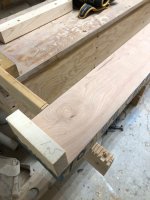
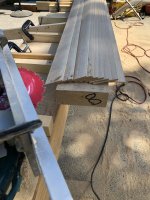
Here I replace the end angled stop piece with a glued "hook" for cutting 3/8" x 3/4" x 18' cherry gunnel blanks
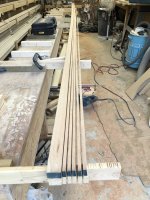
Or 1/8" x 2" x 8' ash strips for paddle making
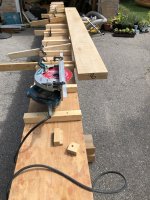
Strips for steam bending, bent laminations are a breeze with this method, producing even strips that require little prep for use, usually a light sanding and go.
I recently broke down a popular 2" x 10" x 10' into 1" x 2" framing material, much easier to lay the piece out on the strongback, add the standoff and cut strips with a circular saw.
If you haven't at least tried this method for cutting strips, you may be pleasantly surprised if you do ... certainly it is something I am glad that i added to my "bag-O-tricks" for wood working ... if you have adaptations or comments on how you use the method, please post it here ... maybe we can make a nice collection of experience for all to benefit from ....
Brian
I first saw this method in a post by Jim Dodd (he doesn't claim credit for it, just passes it along), on the BearMountain builders forum, I had just finished my first canoe and had done my strips for that build on my RAS and it took much sweat, setup and 2 people to get that part of the build done. Keeping the board flat to the cutting guide was in a word a PITA.
The idea with bigger saws (bigger saws = RAS/Table/Band), is to use a longer cut guide to give accurate, straight cuts and for its intended purpose it works very well indeed. However, when cutting canoe strips, the boards can get fairly long, typically 16' - 20' ... something that long will rarely have a perfectly straight edge. So having this long cut guide is now going to cause issues with trying to cut even strips with a board that has a slight curve to it (and most will), the longer the guide the worse the issue.
The second issue with using a larger saw is the need for infeed and outfeed tables, most of us are not going to have ~40' of available shop space, so that usually moves things outside (which has it's own issues), not to mention making up the tables.
Enter, the "SkilSaw" method of cutting strips, attaching a shorter guide to your circular saw and making use of your strongback as a work surface ... sounds too good to be true, is something that simple is going to actually work? It actually works very well and is easy to setup ... so lets take a look at how to make that happen.
These are the important points of how the skilsaw method can be done, in this case with examples from my projects and equipment, the idea here is to present a workable method, you can take that and adapt as required to your individual situation, the method is very flexible.
Equipment Required
- strongback form with attachment blocks in place
- circular saw
- 12" - 16" piece aluminum angle (1/2" - 3/4") ... use what material you can get, my neighbour had this piece kicking around
- 1" x 3" strapping material ~8'
A look at the aluminum piece, note the slight bend in the edge part (will mention again later). This piece will be riding to the side of the wood, think about the thickness of the wood you usually use ... if the aluminum is thicker than the wood, it will hit the sacrificial strips, I like 1/2" pieces for that reason, it is however, entirely at the users discretion. This guide piece is fairly important, being shorter allows it to follow the edge of the wood, so even if the wood has a curve, the blade will track just fine and produce an even strip start to finish. Obviously there is a limit to the amount of curve that can be handled, but it is surprising how much curve this setup can easily handle on a long piece.

Attachment to the saw with 2 "C" clamps, you can use C clamps, visegrips, actually drill and bolt ... I have seen all these variations, you will need to figure what will work best for you.

Just a few words about blades ... you are ripping wood, this pretty much mandates fewer teeth on the blade. The fibers are being cut length wise and need more room to help them get ejected from the cut. DO NOT think you need a finer blade (more teeth) for a better finish, this lowers the space between the teeth and clogs the blade, impeding the cut. You will be doing a thorough sanding of the hull after installation, so the finish on the strips is pretty far down the list of objectives.
I suggest you get a thin kerf, 24 tooth (or less) blade (mine is a 7 1/4") ... a Diablo Demo Blade 7 1/4" 24 tooth thin kerf from Home Depot works well and is fairly inexpensive. That is not a recommendation for that blade, just an example of what to look for.
The "Thin Kerf" reduces the width of the cut (the one above is less than 1/16" wide) which reduces the wood being removed which reduces waste and loading on your saw (less wood removed = less power required).
Set your strip width so it is even across your angle guide. Also note here how that little bend is oriented, this keeps that sharp tip from digging into the wood and allows it to slide smoothly.

Cut some sacrificial 1" x 3" strips, 18" - 24" long and attach to the form blocks on the strongback

The wood piece has to be held while being cut, so we need to add a few more pieces to hold things in place. I just use a few pieces of scrap angled up to catch half the thickness of the wood being held ... these keep the wood from sliding back

We also need to keep it from moving forward and that is done with another scrap piece at the end

You also need to provide the skilsaw with a base of some sort to run on. Initially the wood piece is fine, but as you cut strips, this becomes narrower and at some point does not give enough of a base to be stable. Fortunately, multiple boards are almost always being cut, so add in one of the "other" boards and cut against that one, allowing you to cut to end of the piece

the strip on the left is 1/4", the waste is quite small on this board

Operation is pretty straight forward, hold your saw guide flat to the wood and start your cut, holding the saw against the side of the wood and keeping a downward pressure ... walk the saw the length of the wood piece and continue past to complete the cut. If you use a corded saw (like me) then you may have to do some cable management as you go ... when you get a bit of experience you can finesse your setup a bit to minimize this.
The method is quite versatile and in wood working there are a lot of applications for cutting strips.
Here I replace the end angled stop piece with a glued "hook" for cutting 3/8" x 3/4" x 18' cherry gunnel blanks


Or 1/8" x 2" x 8' ash strips for paddle making


Strips for steam bending, bent laminations are a breeze with this method, producing even strips that require little prep for use, usually a light sanding and go.
I recently broke down a popular 2" x 10" x 10' into 1" x 2" framing material, much easier to lay the piece out on the strongback, add the standoff and cut strips with a circular saw.
If you haven't at least tried this method for cutting strips, you may be pleasantly surprised if you do ... certainly it is something I am glad that i added to my "bag-O-tricks" for wood working ... if you have adaptations or comments on how you use the method, please post it here ... maybe we can make a nice collection of experience for all to benefit from ....
Brian

