Spent a few months refurbishing a circa 1960 Chestnut Playmate. When I obtained the boat a few years back, the original canvas was heavily cracked. Managed to squeeze in 3 seasons of light usage by following some of the restoration advice of the pros on the forum. The canoe began leaking too much during a trip last fall so a new skin of canvas was needed going forward. Mike Elliot's restoration book, This Old Canoe, was a great resource.
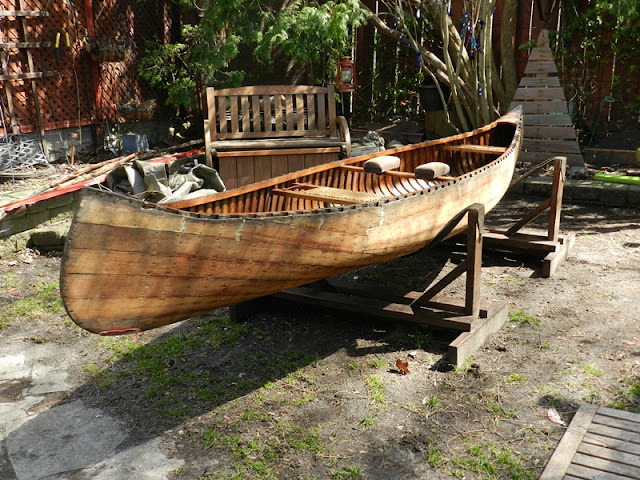
Fortunately the woodwork was sound without any trace of rot in the stem or cracked ribs that needed replacing. Biggest pain was dealing with all the paint and varnish covering the screw heads of the stem bands and outwale fasteners. Each needed to be delicately cleaned with an tiny awl before attempting to remove. Like most Chestnuts of the era, gunnels were fastened with steel screws that were heavily corroded by now. Eventually managed to get all the bits off to reveal the woodwork. This one is all red cedar planking that wasn't faired well. Giant rasp marks were all over the place but hidden under the original #10 canvas. 60 years of sand and gunk were trapped between the canvas and the bottom of the hull. Still, the oiled cedar still looked great in spots.
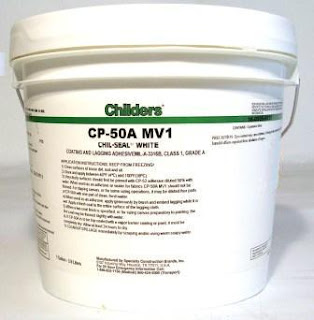
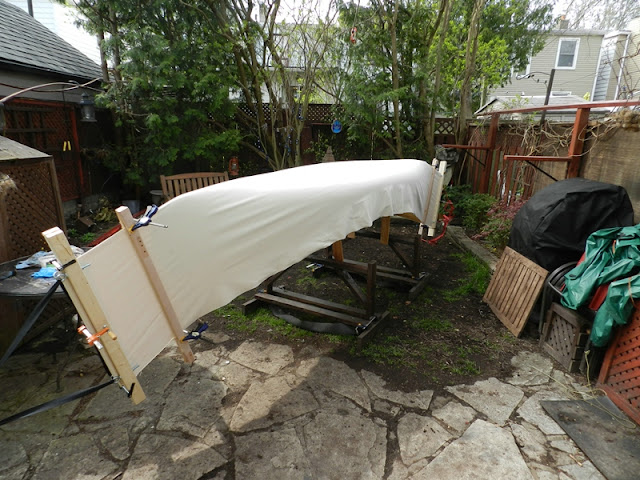
Much time was spent cleaning the hull and fairing it as good as it was going to get. A few tacks re-clinched and some minor repairs of filling in the tack holes in the stem and along the sheerline. To lighten the boat a bit, the new skin would be #12 and would be filled with water-based formula used by some builders today. It apparently cures in about 30 hours instead of the 30 days of traditional oil based filler. Since I wanted to get this boat back on the water for the upcoming season, thought I'd give this stuff a whirl. Last summer, Pam Wedd of Bearwood canoes did a recanvassing demo at the WCHA assembly in Peterborough. She showed the upside down method of stretching the canvas as well as the application of this new filler. Thanks to her demo and tips, I improvised my own system in the backyard. Ended up using some hardwood pieces from my son's disassembled crib to make the necessary clamps and elevated risers on the sawhorses to raise the canoe extra high...
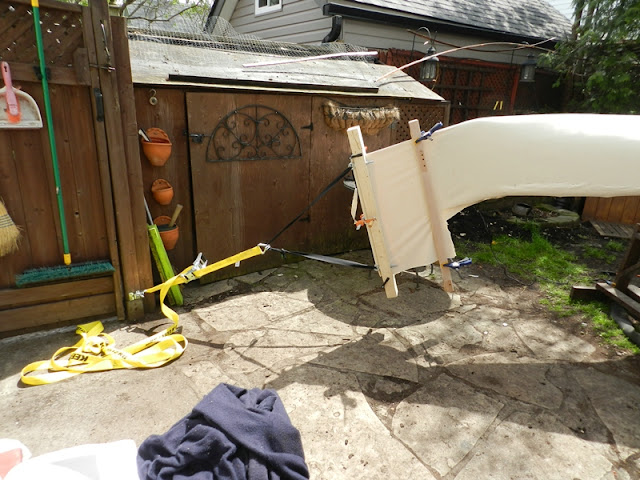
Also used a Y-strap typically used to secure the canoe to a car roof rack as an anchor on one end...

...with a heavy duty 2" wide ratchet strap to provide tension on the other...
Following Pam's guidance I used a staple gun to secure the canvas at each rib location also on the stems. Whole thing took about 6 hours working solo much of which is setup time and working the canvas with stretching pliers. A chemical preservative was brushed onto the raw canvas directly on the hull. The cotton fibers soaked up about 1/2 gallon of liquid and stank up the neighbourhood for a few days but this treatment shrank the weave after drying, tightening it up even more.
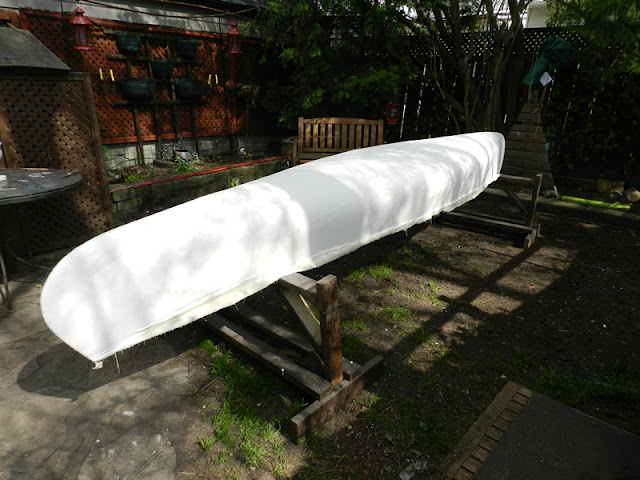
Multiple coats of the water based filler were applied on another sunny day. It is pretty forgiving stuff to apply, hardens to a nice layer and is very easy to clean up. The quick drying time was a bonus too. Only downside is that it is white so when working on natural canvas it can be a bit hard to see what areas need more filler if your lighting conditions aren't great. Here's a shot after the final coat of filler...
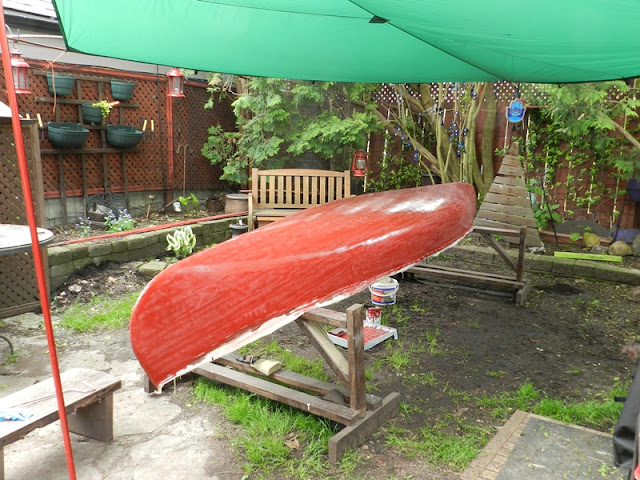
Thought I'd keep as close as possible to original so it was painted red. Next up the tedious work of priming + multiple color coats with plenty of sanding in between.
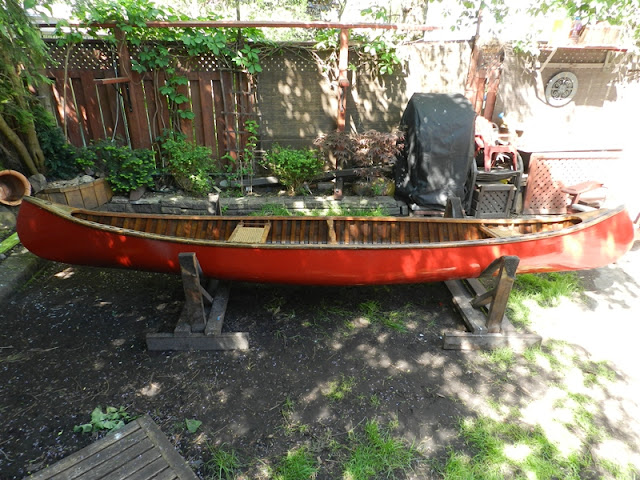
Ended up re-using the original stem bands after polishing them up. The original spliced oak outwales were in usable shape and were re-fastened with brass screws just to keep as many original parts as possible. All that stomping around a soggy spring yard did a number on the grass so the yard was a casualty of the whole process, but now the canoe is ready to rock for many more seasons.
The keel was not re-installed saving about 4 pounds. Switching to #12 canvas and water-based filler instead of #10 and oil-based filler saved another 5 pounds. It has been scaled at 59.5lbs. More weight could probably be shaved off in the future if I get rid of the stern seat since this boat will be used as a solo. Replacing the heavy oak outwales might help too. A friend in Ohio with the same canoe got it down to 49 pounds by replacing the oak decks and outwales, replacing the ash seats with cedar thwarts, completely eliminating the keel and using lighter #12 canvas.
Was worried that I don't have a dedicated indoor shop but this whole process worked pretty well. All you really need is some creative anchoring methods for the canvassing and multiple days of good weather outside. You can re-purpose things for the the oversized clamps and don't need expensive speciality tools.
Fortunately the woodwork was sound without any trace of rot in the stem or cracked ribs that needed replacing. Biggest pain was dealing with all the paint and varnish covering the screw heads of the stem bands and outwale fasteners. Each needed to be delicately cleaned with an tiny awl before attempting to remove. Like most Chestnuts of the era, gunnels were fastened with steel screws that were heavily corroded by now. Eventually managed to get all the bits off to reveal the woodwork. This one is all red cedar planking that wasn't faired well. Giant rasp marks were all over the place but hidden under the original #10 canvas. 60 years of sand and gunk were trapped between the canvas and the bottom of the hull. Still, the oiled cedar still looked great in spots.
Much time was spent cleaning the hull and fairing it as good as it was going to get. A few tacks re-clinched and some minor repairs of filling in the tack holes in the stem and along the sheerline. To lighten the boat a bit, the new skin would be #12 and would be filled with water-based formula used by some builders today. It apparently cures in about 30 hours instead of the 30 days of traditional oil based filler. Since I wanted to get this boat back on the water for the upcoming season, thought I'd give this stuff a whirl. Last summer, Pam Wedd of Bearwood canoes did a recanvassing demo at the WCHA assembly in Peterborough. She showed the upside down method of stretching the canvas as well as the application of this new filler. Thanks to her demo and tips, I improvised my own system in the backyard. Ended up using some hardwood pieces from my son's disassembled crib to make the necessary clamps and elevated risers on the sawhorses to raise the canoe extra high...
Also used a Y-strap typically used to secure the canoe to a car roof rack as an anchor on one end...
...with a heavy duty 2" wide ratchet strap to provide tension on the other...
Following Pam's guidance I used a staple gun to secure the canvas at each rib location also on the stems. Whole thing took about 6 hours working solo much of which is setup time and working the canvas with stretching pliers. A chemical preservative was brushed onto the raw canvas directly on the hull. The cotton fibers soaked up about 1/2 gallon of liquid and stank up the neighbourhood for a few days but this treatment shrank the weave after drying, tightening it up even more.
Multiple coats of the water based filler were applied on another sunny day. It is pretty forgiving stuff to apply, hardens to a nice layer and is very easy to clean up. The quick drying time was a bonus too. Only downside is that it is white so when working on natural canvas it can be a bit hard to see what areas need more filler if your lighting conditions aren't great. Here's a shot after the final coat of filler...
Thought I'd keep as close as possible to original so it was painted red. Next up the tedious work of priming + multiple color coats with plenty of sanding in between.
Ended up re-using the original stem bands after polishing them up. The original spliced oak outwales were in usable shape and were re-fastened with brass screws just to keep as many original parts as possible. All that stomping around a soggy spring yard did a number on the grass so the yard was a casualty of the whole process, but now the canoe is ready to rock for many more seasons.
The keel was not re-installed saving about 4 pounds. Switching to #12 canvas and water-based filler instead of #10 and oil-based filler saved another 5 pounds. It has been scaled at 59.5lbs. More weight could probably be shaved off in the future if I get rid of the stern seat since this boat will be used as a solo. Replacing the heavy oak outwales might help too. A friend in Ohio with the same canoe got it down to 49 pounds by replacing the oak decks and outwales, replacing the ash seats with cedar thwarts, completely eliminating the keel and using lighter #12 canvas.
Was worried that I don't have a dedicated indoor shop but this whole process worked pretty well. All you really need is some creative anchoring methods for the canvassing and multiple days of good weather outside. You can re-purpose things for the the oversized clamps and don't need expensive speciality tools.