• Happy Weed Appreciation Day! 🌱🌿🌻

​Patching (and inspecting) dry bags

G

Guest

Guest
This got me thinking.

So I have patched my Sealine Propack too many times and am ready to pitch it.

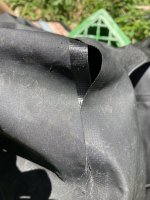
I’m pretty careful with our dry bags, but even so I found a goodly number of small puncture wounds, usually on bags with unreinforced bottoms.

Actually I have found most of those punctures were closely spaced on the same bags. I expect I have inadvertently set them down on a greenbriar thorn, cactus spine or other needle like spike, lofted them extracting gear and set them down anew on the same thorn. In those kinds of suspect areas I now try to set the dry bag on my chair while emptying the contents.

Fortunately I didn’t discover those punctures when I pulled damp gear from the bag; I had the brilliant idea one day to stick my head up inside each bag in the gear room and look at the ceiling light. Ohhh, look, new pinhole constellations winking through the bottom.

Unfortunately I was not smart enough that day to shake the sand and dirt out first, at least with the first bag I stuck my head inside. YMMV.

I marked the pinholes and had a dry bag patching day. The best (and easiest) patch I have found is a waterbed patch kit (bedding isle of any bigbox store)

http://www.walmart.com/ip/RPS-Products-Inc.WPKWaterbed-Patch-Kit-VINYL-REPAIR-KIT/38471323

I patched the punctures inside and out and those repairs are still holding strong years later. I’m not surprised; if they will withstand a couple hundred gallons of water (and whatever vigorous activity) sloshing around inside a waterbed they oughta seal a dry bag.

If you have never closely inspected your dry bags for punctures it is worth a dry land looksee. Better dry now than damp later.
 
It on my list of to do's for this week, I know of one hole.

Sweeper, I’ll be interested in what you discover.

On inspection most of our dry bags were fine, but a couple, all of them sans reinforced bottoms, had a scattering of closely spaced pin holes.

The only leak I have suffered in a self-inflating sleeping pad (not counting crapty Slumberjack pads, but that’s another story), was three tiny slow-leak pin holes in a Therma-Rest, all within a few inches of each other. I’m all but certain that was due a greenbriar thorn hidden in the pine duff under the tent.

Those kinds of punctures may depend in part on where you trip. Greenbriar thorns may be my nemesis, but cactus spines, sand spurs and even sharp shells probably take their toll.

One thing I would look for when purchasing a new dry bag is a reinforced bottom.
 
I have one S-I pad that has resisted my first 2 attempts at patching. The length of the scrape is almost an inch, I've found a good way to clamp the patch but now that I use a hammock haven't got back to it.

Got any ideas for tent rain flies?

I loaned out a tent to a non-camping friends who went to Australia with it. When they returned they proudly said they didn't need the fly and used it as a door mat to keep the sand out of the tent. I knew then that fly was shot, but it is a nice Sierra Design so I still haven't given up on it. It took a long time to repair the hole in my lip, the free electrical work I got in exchange for the use of the gear costed me in the end.
 
Pin holes and even quite large holes are easily repaired with seam grip. Mostly just smear some over the hole but with larger tears put a piece of tape on the opposite side to support the fabric. I have dry bags and mats still in use after a repair 10 years ago.
I used it once to repair a Thermarest that had been chewed on by a mouse. Luckily it had only taken an interest in the last couple of inches of the mat. I cut off about four inches, scrape out enough foam to give me a bit of bare fabric then glued and clamped it together. The resulting short mat was then given to my sister in law. As she is only 5ft tall it works just fine for her.
 
Got any ideas for tent rain flies?

I loaned out a tent to a non-camping friends who went to Australia with it. When they returned they proudly said they didn't need the fly and used it as a door mat to keep the sand out of the tent. I knew then that fly was shot, but it is a nice Sierra Design so I still haven't given up on it. It took a long time to repair the hole in my lip, the free electrical work I got in exchange for the use of the gear costed me in the end.

Sweeper, if the fly appears beyond reliable repair the first thing that comes to mind is to tell that door mat story to Sierra Designs and ask if you can buy a replacement fly. You might be pleasantly surprised.

I loaned a tent to a similar non-camping friend. I even showed her how to set it up and take it down. When she returned it the tent bag seemed awfully small. I had the stakes, ground cloth and fly, but no tent. How do you manage to pack up everything except the tent?

I asked her and she had no idea what happened to the tent. I sent that tale to Eureka with some humorous embellishments and they sent me a replacement tent body gratis.

I’ve had similar results with other misused gear. I screwed up the polarity on a Silva compass by storing it next to a ceramic magnet. I mailed the compass back to Silva, mostly as a joke. No Return Authorization number or anything, just a package with a note that read “Toto, I don’t think we’re in Kansas anymore”.

A new compass showed up a few weeks later.
 
Years ago. bought a USED Thermarest at a sale, cheap. Of course it leaked. I checked into sending it to Thermarest, for repairs. If it is soiled in anyway, they will return at owners expense.
 
I checked into sending it to Thermarest, for repairs. If it is soiled in anyway, they will return at owners expense.

I have had issues with only two self inflating pads. Or may four.

One was the pin holed ThermaRest. The holes were so close together that I opted to send it back for factory repair. There was a nominal repair fee and that pad, the one I use most often, is still going strong years later.

The other one (three) was a Slumberjack pad that leaked at the valve from the first night’s use. Slumberjack acknowledged that there was a problem with some valves and offered a choice; they would send me a new valve and repair kit, or I could cut off a corner of the pad with the valve and send that in for a replacement pad.

I opted for the latter and shortly received a new sleeping pad. Which delaminated a huge party balloon like bulge the first time it was used. I contacted Slumberjack, somewhat disgruntled, and they offered to send me any pad I selected if I again cut off the valve corner and mailed it back.

I selected Slumberjack’s top of the line pad. Which delaminated a huge party balloon like bulge the first time it was used.

I didn’t bother getting an RA number to return that one, I just gave up on Slumberjack.
 
The seam has delaminated in this dry bag: Cressi. Their equipment is mostly for divers. I like the bag because it has places to attach your spear guns (read paddles and fishing rods) to the outside of the bag.

I'm attaching a photo. Is there anyway to fix this? Or perhaps I cannot trust this bag/manufacturer at all. When I pulled at the seam where the hole was, the seam came apart even further, which seems like a bad sign.
 

Attachments

  • IMG-5349.jpg
    IMG-5349.jpg
    197.4 KB · Views: 10
“The seam has delaminated in this dry bag: Cressi. Their equipment is mostly for divers. I like the bag because it has places to attach your spear guns (read paddles and fishing rods) to the outside of the bag.

I'm attaching a photo. Is there anyway to fix this? Or perhaps I cannot trust this bag/manufacturer at all. When I pulled at the seam where the hole was, the seam came apart even further, which seems like a bad sign.”


Cutting to the chase I wouldn’t trust it to perform as a dry bag on future trips. It looks as if the seam is beginning to separate below the current failure near the hairy bits, and in a rough and tumble swim I’d be concerned about apparently intact areas of seam splitting open and disgorging my gear into the depths.

I don’t know that the bag material is, but if you want to try to fix it, perhaps as a bag for non-critical gear, you could try Loctite Vinyl Fabric Adhesive.

https://www.amazon.com/Loctite-Plas...ocphy=9007844&hvtargid=pla-352793682230&psc=1

Chip turned me on to that stuff, and it works very well for gluing vinyl to vinyl. The application and performance buried somewhere in this thread, used for gluing paddle pockets to a DIY spray cover.

https://www.canoetripping.net/threads/diy-no-sewing-spray-covers.119398/

If you are looking for a modern dry bag with places to attach things to the outside of the bag there are models with exterior lash tabs and D-rings. Our old Sealline Pro-Pack has several exterior D-rings, and at least one of our other dry bags has a couple lash tabs.

I don’t know what size dry bag you prefer. This 30L Sealline Bigfork has an exterior lash system with multiple D-rings and a lash tab.

https://www.seallinegear.com/packs-duffels/bigfork-dry-daypack/bigfork-dry-daypack.html

Or you could find a suitably sized dry bag and use the Loctite vinyl adhesive to customize it with a paddle pocket and lash tabs for rods and paddles. If you decide that the Cressi is a goner maybe cut it up and use the parts and pieces.
 
Thanks, Mike. I felt the same way about not trusting it, but awaited your recommendation.

I'll look into some of the ones you suggested.

Thank you,
Erica
 
I'll look into some of the ones you suggested

Erica, about your desire to carry paddles and fishing rods secured to the outside of the pack I’m thinking that adding a pouch or open topped envelope near the bottom of the dry bag to hold the paddle blades or rod handles would be beneficial.

Either glued on using that Loctite vinyl adhesive, or perhaps better something with grommets at the corners that could be clipped to D-rings on the pack.

If you decide the Cressi bag is a gonner it would be easy to cut off a section of the bottom, add some grommets and clip it to something like the Sealline Bigfork, which already has bungee lacing and D-rings.

I’ve never carried paddles or rods in that guise. Any concerns about how far above the pack the paddle grips or rod tips extend? I wouldn’t want them getting caught in overhanging branches.
 
When winter backpacking, we would strap snowshoes or XC skis to the side of the pack. I don't remember any particular problems. Obviously on an overgrown portage trail that could be a problem. I'm not worried about the paddles. For a fishing rod, I'd have to have some sort of protection, which might make it moot. I'd like to have my hands free during a portage.

Instead of being bag shaped, the cressi has sides, like a box would. Makes it a logical place to strap on something to the outside. But I agree with you; I can't trust that bag.

I need to haul out all my dry bags and see what each has and what the possibilities are.

Thank you.
Erica
 
“Instead of being bag shaped, the cressi has sides, like a box would. Makes it a logical place to strap on something to the outside. But I agree with you; I can't trust that bag”

“I need to haul out all my dry bags and see what each has and what the possibilities are”


I agree that I wouldn’t trust the seam delaminating Cressi, and wouldn’t cut up a good, viable dry bag for parts and pieces but, as in the OP of this thread, it’s a good idea to stick your head inside the bag(s) and look for pinhole punctures or suspiciously worn thin translucent spots in the vinyl coating. Better to find those issues at home rather than try to deal with them after a leak soggy swim.

If you lack a shop tinkerer’s assortment of adhesives and repair materials a big-box waterbed patch kit has everything you need for pinhole punctures.

https://www.waterbedoutlet.com/Wate...BZ4al9EGZXHIPu4hQgxUQ57Cgoytc5R8aAoWpEALw_wcB

Sometimes found in the bedding aisle of big-box stores.

One thing I have come to value in a dry bag is a reinforced bottom. I suspect the pin holes I’ve found (always) in the bottoms of dry bags have been from bad in-camp habits.

Dropping the bag heavily on the ground from shoulder height as I groan in relief once finished the haul. Re-packing the bag by cramming stuff inside, and then thumping it on the ground to settle the contents. Hmm, That’s why these thorny pin holes are so closely spaced. Dummy.

No? No one else does that, just me? I try not to, but, eh, bad habits die hard. I have yet to find a pinhole puncture on a dry bag with a reinforced bottom.

If the Cressi is a goner I’d be really tempted to cut it up and save all of the pieces; straps, buckles and bag materials. Never know when you might want old straps or buckles for some DIY project.

One possible Pole, Paddle and Portage (Bill Riviere reference) height adjustment with that BigFork pack – available at REI, Campmor, Backcountry and OutdoorPlay dot.com etcs; I’ve never seen one, not saying it’s a great dry bag design - might be the 6 vertically spaced D-rings along the back.

With a clip-on corner-grommet pouch you could adjust the pouch attachment height, tall enough that it wasn’t thumping you in the arse with each step, low enough that you weren’t catching branches or interdicting low flying aircraft.

What liter volume dry bag would you want? I carry a few smaller miscellanea bags, or at times and decked boats space-saving tapered stem bags.

https://www.canoetripping.net/threads/more-tapered-dry-bags.98705/

But most often, for most gear, clothes, tent, tarp and sleeping bag/pad type essentials, favor having fewer, bigger dry bag packs. I like our 120L Sealline Pro-pack a lot, and it has a couple D-rings low on the backside, and a several more up top at the strap ends, which could easily be used to strap on cased fishing poles and paddles.

https://aventuron.com/products/seal...foPM-85FAuwvvrIvIYXixhpA6CfWM18MaAgvPEALw_wcB

Sealline has a feature-identical multi D-ring 70L Pro Pack

https://www.seallinegear.com/packs-duffels/pro-dry-pack/pro-dry-pack.html

I want a 70L Pro-pack, not just for the reinforced bottom, which most of our other smaller dry bags lack; the 120L is a very well built and thoughtfully designed dry bag, with comfortably padded and adjustable shoulder straps and waist belt.

Again, not saying that Pro-pack is the be all and end all of dry bags. If you want absolute dry surety go with Watershed bags. If you want something designed specifically for the canoe tripper go Cooke Custom Sewing.

https://www.shop.cookecustomsewing.com/

Cooke Custom Sewing. Dan might incorporate a paddle/pole pocket and lash points on one of his canoe packs.

Like various spray cover designs it could become the popular “Erica” variant.
 
The seam has delaminated in this dry bag: Cressi. Their equipment is mostly for divers. I like the bag because it has places to attach your spear guns (read paddles and fishing rods) to the outside of the bag.

I'm attaching a photo. Is there anyway to fix this? Or perhaps I cannot trust this bag/manufacturer at all. When I pulled at the seam where the hole was, the seam came apart even further, which seems like a bad sign.
I have not had great luck repairing dry bags that have seams bonded with some type of adhesive as that one has. It is difficult to get a flat alignment of the detached pieces and hold them in position while whatever adhesive you use cures. I am assuming that bag has a cylindrical shape and the seam that is giving way is where the circular bottom meets the rest of the bag. If that is the case and you wish to try to repair it you might try the following.

If the remainder of the seam is giving way with an easy pull I would go ahead and detach the bottom completely. Find a can of some type that just fits inside the bag and use it as a form to keep the bag in shape while you rebond the seam. Use some large elastics around the bag and inner can to keep the bag in position. After thoroughly cleaning the seam on both pieces use a product like Gear Aid Seam Grip to rebond the seam. After positioning the detached bottom weight the seam with something like a sand bag to apply pressure until the adhesive cures.
 
“I have not had great luck repairing dry bags that have seams bonded with some type of adhesive as that one has. It is difficult to get a flat alignment of the detached pieces and hold them in position while whatever adhesive you use cures”

Holding the glued pieces together until the adhesive cures is critical. I clamp or weight anything glued together; wood, minicel, plastics, etc.

The best and cleanest way I have found to glue up a vinyl seam is to first tape off the to-be married edges to prevent brushing adhesive beyond the perimeter. This is for a paddle pocket on a vinyl impregnated DIY spray cover.

P1180009 by Mike McCrea, on Flickr

Coat both sides inside the tape box with adhesive, ‘til tacky or etc glue use instructions, pull the tape and align the pieces, smooth them out, lay a strip of wax paper over the top and clamp down a board.

P1180007 by Mike McCrea, on Flickr

The wax paper is there to prevent accidentally gluing the board to the fabric.

The end result comes out clean and very well attached.

P1200025 by Mike McCrea, on Flickr

The bottom of the bag sound trickier, even if you can find a perfectly fitted bucket or barrel. If the bottom seams are similarly suspect I call the Cressi bag a gonner and cut it up for parts and pieces.

If you really wanted to save it, maybe for sentimental reasons, you could cut off the bottom and just seal a flat seam. That will reduce the interior volume of the bag, but it works when making DIY dry bags from heat sealable material.

To help reinforce a flat seamed bottom I “dog ear” a triangle together the bottom corners, which makes a handy place to install a grommet as a tie point.

P8101144 by Mike McCrea, on Flickr

To help soften the metal edge against the fabric I run a bead of E-6000 around the perimeter of the grommets on both sides.

P8101146 by Mike McCrea, on Flickr

The flat bottom seam does reduce the volume, but not to un-usability. DIY tapered stem bag In a canoe.

P9081206 by Mike McCrea, on Flickr

Custom camp chair bags

P8021110 by Mike McCrea, on Flickr

There might still be a custom modified use for that old Cressi bag. Tapered stem bag maybe?
 
After bicycling in the rain with my dry stuff in a 20L Sea to Summit, my dry stuff wasn’t dry at all. I thought time to stick my head in the bag and look for pin holes. I shook the sand out and inserted my head, but didn’t see any holes. I moved on to the sink and filled the bag with water. Little rivilets appeared all around the bag. I didn't count, but I'd guess there was water coming out at least a hundred places. Conclusion: time for a new dry bag.
7C7B45E0-AC9D-450E-AD58-F8246E7AA521.jpeg
The pictured dry bag is a Sea to Summit Big River 20L. Cabella's says it is 420-denier nylon with thermoplastic polyurethane lamination. At 6.8 oz, it's heavier than some but lighter than many dry bags. I'd guess it's around 5 years old and has at least 100 trips on it. And, it's shot.

So, I find myself shopping for replacement dry bags. My inclination is to look for heavier material, though I really don't know if more weight makes it a better bag. I'm thinking I want vinyl rather than nylon coated with TPU. Any thoughts?


Please recommend your favorite dry bag.
 
After bicycling in the rain with my dry stuff in a 20L Sea to Summit, my dry stuff wasn’t dry at all. I thought time to stick my head in the bag and look for pin holes. I shook the sand out and inserted my head, but didn’t see any holes. I moved on to the sink and filled the bag with water. Little rivilets appeared all around the bag. I didn't count, but I'd guess there was water coming out at least a hundred places. Conclusion: time for a new dry bag.
View attachment 130927
The pictured dry bag is a Sea to Summit Big River 20L. Cabella's says it is 420-denier nylon with thermoplastic polyurethane lamination. At 6.8 oz, it's heavier than some but lighter than many dry bags. I'd guess it's around 5 years old and has at least 100 trips on it. And, it's shot.

So, I find myself shopping for replacement dry bags. My inclination is to look for heavier material, though I really don't know if more weight makes it a better bag. I'm thinking I want vinyl rather than nylon coated with TPU. Any thoughts?


Please recommend your favorite dry bag.
The best waterproof bags and duffels I have used are made by Watershed. A variety of sizes and models are available. They are made of tough fabric and when the closure is properly sealed they are completely water proof.
 
The best waterproof bags and duffels I have used are made by Watershed. A variety of sizes and models are available. They are made of tough fabric and when the closure is properly sealed they are completely water proof
Agreed. I don’t use them for tripping but have one pack for fly fishing gear and a smaller that gets used mostly to hold my adventure skottle and isobutane for day trips. They are pricey but substantial. The recreational grade should be more than adequate for any paddling done on this planet. I doubt anyone would need to spring for the military grade versions.

For tripping I use various sizes of granite gear dry bags. Nylon and taped seams. I get about 12 years out of them and they get used a lot but don’t see much abrasion since they are kept inside a portage pack.

I have an older MH Synchro jacket in perfect condition except for one hand pocket where the zipper was welded to the fabric and the weld gave out slightly. I may look into some of Mike’s pointers and see if I can fix it.

Barry
 
Best dry bag vs favorite dry bag are two different things. Our Sealline 120L Pro-pack still comes on every trip and is my “favorite”.

I agree with Pete and Waterdog about the “best”; hands down Watershed bags. Claimed to remain watertight at 300’ they have welded seams, multiple layers of polyurethane coating and (again claimed) five times the durability of PVC coated bags.

They also have a belt & suspenders approach to a watertight seal, using both a Zip-lock style closure and a roll top. The one downside is that the zip-closure is not the full bag opening width.

Like a lot of things you usually get what you pay for with dry bags; my least favorite dry bag is a Texsport roll top duffel. It is just a bad design and cheaply made , relegated to use as the shoe bag on family trips.

I am not enough of a gram-weenie to need some rip-stop taffeta fabric UL bag with thin coating.

Another maker of heavier-weight durable dry bags is Jacks Plastic welding, the same folks who make the Paco Pad. Intended more for abusive canyon raft trips I don’t own one, but the ones I’ve seen appear to be seriously durable.

https://www.jpwinc.com/?v=7516fd43adaa
 
Back
Top