• Happy International Museum Day!🏛️ 🖼️🏺

NWC Cruiser build

Joined
Feb 11, 2017
Messages
235
Reaction score
30
Location
Mound, MN
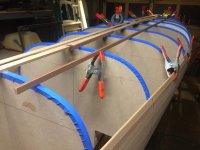
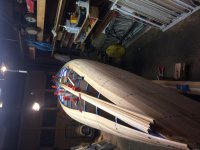
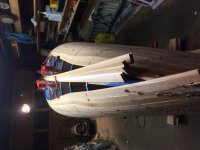
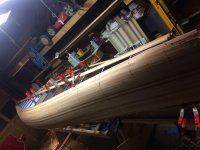
I have been lurking around this forum for a while now, and have learned a lot from all of you experienced builders. I enjoy reading all the threads of canoe builds. Figure it's time for me to contribute to everyone's need for build threads. My ultimate goal is to have a lightweight composite tripping canoe for the bwca, but I will start by building a cedar stripper then it will be used as a mold for kevlar/carbon build this summer. Hopefully I will have it done before my annual trip to the bwca in september. Started the build last week and currently have stations cut strongback assembled and finished milling strips with bead and cove today with a little help from my father. Now for the all important part of the thread...................the pictures.
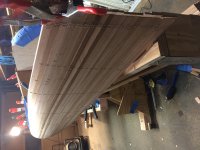
Strips were cut using the Jim Dodd method
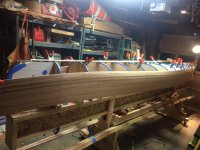
The cruiser is a symmetrical hull so I cut half the stations and cheated for the other half by using a pattern bit in the router table to duplicate. this saved a bunch of time with the sander.
 
The Flikr link is not working. If we have to join Flikr to view the pic's that's an issue for some folks. Photobucket makes it easy to post right here on the site, which allows for a caption right above the picture to explain what's going on in the picture.
 
Sven, posting pics from Flickr takes several steps and maybe more time than another website... I've been with Yahoo since sometime in the nineties and using Flickr after they bought the website.

Pretty straightforward... several clicks and copy and paste.

Choose Photostream

Choose your photo

Click on "share photo"

Choose "BB code"

Copy the line starting with "https" and ending with "jpg" but leave out the s at the beginning and end of that line

Paste that into the window for posting photos at CT


This might be more work than using other sites but it works... let me know if you have problems.
 
Last edited:
I apologize, having troubles figuring out how to get pictures posted properly
 
Great start Sven.

Saw looks like it won't have any trouble cutting strips.
Are you going to bead and cove ?

Jim
 
Good start. Looking forward to both builds. Are you going stemless with the stripper? Nice strongback, mine is exactly the same as yours.

Mark
 
Last edited:
No Title

I got a few strips on tonight!
Thanks Jim for the encouraging words. That worm drive saw is a beast. I started out using a 13 amp bosch direct drive and found out the base was tweaked. Apparently someone used it on a jobsite and "forgot to tell me" that they dropped it.....Oh well. The worm cut those strips like butter. I am doing bead and cove.
Thanks dogbrain as well. I am building stemless on this one. The I joist kinda just makes sense for a strongback. Very true lumber!
 

Attachments

  • photo6131.jpg
    photo6131.jpg
    295.4 KB · Views: 0
  • photo6132.jpg
    photo6132.jpg
    289.8 KB · Views: 0
Just the way I'd build it.
Stemless, strongback on wheels, follow the shear with the first strip. And minimal glue usage.
Hopefully the weather will be good enough outside to sand, when you are ready.

Keep the pics coming !

Jim
 
I seem to be on track with your build methods. I did all of the above. I'm not sure if any of my pictures show it but I did put wheels on my strongback which fold up into the legs when not needed. I will take a picture later and post what I came up with. I know it's probably a very ambitious goal but I want to try and have it fully stripped by next Monday. Could be a tall order since I stay home with the kids (twin 20 month old boys, and a 9 and 11 year old also noys), work part time, and most of my spare time is after 8pm during the week.

this is my first strip built so I have no frame of reference as to how long it takes to strip a canoe this size

I'm in the Minneapolis are and this weekend looks to be mid 50s for temps. Maybe I will make some really good progress during nap time today.
Who knows, I might hit it hard this week and be ready to sand by the weekend.

Wish me luck
 
Put in a few more hours last night. Feeling pretty good about progress so far. Hard lesson learned, when milling strips do not cut cove side out of rough sawn face of lumber....fair amount of tear out on those edges. Oh well,going to use them anyway
does anyone else use one of these "glue bot" bottles? If you haven't you should try one out. Best 6$ I have ever spent.
Put in a double racing stripe of reclaimed redwood. Should really stand out once it is glassed. 32744488632_6352f79502_o.jpg 32857294356_3645a1d0fa_o.jpg 32774096801_5b17c1ce5b_o.jpg
 
If that glue bottle puts out a pencil thin bead, I'll give it a try !

Where did you get it ?

Are you building bead up, or cove up ?

Staple lines look great ! Don't sink them in too far ! It's a pain to sand out the bruises they can leave.

Making great progress !

Jim
 
The glue bot is great, comes with a couple different tips. because of the way it's designed it dispenses glue right side up or upside down and anywhere in between. I got mine at menards but i know they also have them on amazon.
I am building bead up.
Trying my best not to sink staples too far....might have a couple that will be problematic.
I find my best learning experiences are from making the mistakes along the way.
I'm pretty sure I will spend a lot of time sanding this beast once it is all stripped. Figuring it will take at least a 12 pack for both inside and out.
 
I was just at Menard's today ! I'll look closer next time ! Thanks for the tip !
Learning from our mistakes ! There's not many out there, that I haven't made at least once, most twice or more. The secret is keep learning.
I still have my first boat. Oh It taught me Soo much !
The second one Will be better !

It looks like you are using an electric stapler. With my regular Stanley's. I add several layers of tape to build up the base. You still have to watch it. But it works pretty good.

Jim
 
I was thinking that tape might be to keep the glue off but now it all makes sense. I was thinking about doing something along those lines with my manual stapler but the electric is adjustable and seems like I have it dialed in pretty well. Might put some tape on anyhow for glues sake.
 
image_6158.jpg Managed to get a few more hours in last night. I couldn't convince the Mrs. that we should spend our quiet time on valentines day working on the canoe, but she did help me put the last 3 strips on last night. She says that it was kind of relaxing and enjoyable. Who knows maybe I can get her a little more involved in the parts of the build where it is helpful to have an extra hand or two. Now the part for which we all tune in..........PICTURES!!!!!!!!!!!!!!32929048635_fc1b7d3d8e_o.jpg
this is my technique for holding strips while I apply glue
32775405332_0beb33f112_o.jpg 32929055175_dba00868e8_o.jpg 32548426890_50462247aa_o.jpg 32085798334_30b14447d1_o.jpg
 

Attachments

  • 32929047065_813bfb03dc_o.jpg
    32929047065_813bfb03dc_o.jpg
    246 KB · Views: 0
  • 32929047065_813bfb03dc_o.jpg
    32929047065_813bfb03dc_o.jpg
    246 KB · Views: 0
  • 32548426890_50462247aa_o.jpg
    32548426890_50462247aa_o.jpg
    296.1 KB · Views: 0
  • 32085798334_30b14447d1_o.jpg
    32085798334_30b14447d1_o.jpg
    286.5 KB · Views: 0
  • 32114149473_33216824d9_o.jpg
    32114149473_33216824d9_o.jpg
    295.2 KB · Views: 0
  • 32114149473_33216824d9_o.jpg
    32114149473_33216824d9_o.jpg
    295.2 KB · Views: 0
  • 32775405332_0beb33f112_o.jpg
    32775405332_0beb33f112_o.jpg
    288.3 KB · Views: 0
  • 32775405332_0beb33f112_o.jpg
    32775405332_0beb33f112_o.jpg
    288.3 KB · Views: 0
  • 32775405332_0beb33f112_o.jpg
    32775405332_0beb33f112_o.jpg
    288.3 KB · Views: 0
  • 32775405332_0beb33f112_o.jpg
    32775405332_0beb33f112_o.jpg
    288.3 KB · Views: 0
  • 32929048255_8699ae8fa9_o.jpg
    32929048255_8699ae8fa9_o.jpg
    275.1 KB · Views: 0
  • 32929055175_dba00868e8_o.jpg
    32929055175_dba00868e8_o.jpg
    260.7 KB · Views: 0
  • 32929048635_fc1b7d3d8e_o.jpg
    32929048635_fc1b7d3d8e_o.jpg
    251.8 KB · Views: 0
Last edited:
No Title

Slow progress last night with lots of interruptions. Those last few strips on the stems were quite a workout to get into place. Even resorted to using some small screws in the ends. A couple more pictures to keep everyone entertained.
 

Attachments

  • photo6163.jpg
    photo6163.jpg
    263 KB · Views: 0
  • photo6164.jpg
    photo6164.jpg
    199.4 KB · Views: 0
  • photo6165.jpg
    photo6165.jpg
    250.3 KB · Views: 0
I've used bungee cord, and packing tape to hold things in place in those areas. Let the glue dry.

Your coming along fine ! Don't sweat the small stuff.

Jim
 
Back
Top