The title gives fair warning. This is not a canoe build but rather a (gasp) kayak, and a skin on frame one to boot!
As usual it was a long winter, too cold to put the finishing touches on my cedar stripper now hanging in the garage. But I have a toasty, unfinished basement where I could work away in comfort as long as I could get whatever I come up with out of a relatively tiny window once done. Throw in minimal cutting and sanding requirements, no noxious chemicals to stink up the house, and little in the way of strongback and related "infrastructure", and a SOF build made a lot of sense. So in late February I acquired a set of plans, a couple of sheets of Baltic birch, some clear 16 foot Douglas fir (as I found out, not a wood I like that much but serves the purpose) and was in my happy place while staying warm and social distancing.
Being aware that this site is named "canoetripping", not "kayaktripping", and in light of the pretty awesome canoe build threads now underway here, I won't bore you with all the details. But I have to say I enjoyed the process and hopefully will actually like the boat once I get it in the water - even "upsized" it a bit to make it light tripping capable. And hey, it gives everyone here something to look at and maybe trash talk for a few minutes.
So the following is an overview, short and sweet (although to be frank this construction is so simple that there isn't a lot more to show, which is a big part of its charm if a relatively clean, quicky build is what you are looking for - I may even do it again next winter). Will post a few follow-up photos once completed.
Started with plans for fuselage frame kayak, 15 feet long by 24 inches maximum beam. Given that a lot of interior space is eaten up by the plymwood frames in this style, I upsized the printing by about 10 percent to increase interior volume, and extended the length up to 16 feet so it wouldn't look too chubby.

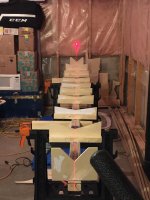
Cut out form stands and aligned on strongback (box beam made from steel framing studs, mounted on cheapo plastic sawhorses). Frames are hot glued to the steel box beam, and keel stringer zip- tied into place
ce

Plywood forms placed and first couple of stringers attached - I like the cedar floorboards in the second photo below, but they add almost 4 pounds so they probably won't stay.


Some considerable lashings later, all stringers are done and coaming base tied in. Douglas fir for the keel, chine and gunnel stringers, cedar for the ones on the deck.

A profile and top down shot - lines look ok to me, although with 26 inch beam it is a little chubby for a kayak, but good room for comfort and light tripping freight


All clamps on deck for glueing up the coaming riser to assume the correct bend for the base

Coaming completed - 1/4 inch plywood layers with cedar veneer on top, under 3 coats of epoxy. And up-sized for easy entry/exit and room to move my creaky legs and hips around once in. Will screw onto the coaming base from below, sandwiching the fabric in between.


Thats where I am right now. Weight is 21 pounds - hope to stay under 30 when all is done. Next steps are to varnish the frame, then attach the polyester skin and seal it, which means I will probably have to move the frame from my basement to garage through the aforementioned tiny window. If you don't hear anything more from me on this you will know that I have grossly mis-measured one or the other.
As usual it was a long winter, too cold to put the finishing touches on my cedar stripper now hanging in the garage. But I have a toasty, unfinished basement where I could work away in comfort as long as I could get whatever I come up with out of a relatively tiny window once done. Throw in minimal cutting and sanding requirements, no noxious chemicals to stink up the house, and little in the way of strongback and related "infrastructure", and a SOF build made a lot of sense. So in late February I acquired a set of plans, a couple of sheets of Baltic birch, some clear 16 foot Douglas fir (as I found out, not a wood I like that much but serves the purpose) and was in my happy place while staying warm and social distancing.
Being aware that this site is named "canoetripping", not "kayaktripping", and in light of the pretty awesome canoe build threads now underway here, I won't bore you with all the details. But I have to say I enjoyed the process and hopefully will actually like the boat once I get it in the water - even "upsized" it a bit to make it light tripping capable. And hey, it gives everyone here something to look at and maybe trash talk for a few minutes.
So the following is an overview, short and sweet (although to be frank this construction is so simple that there isn't a lot more to show, which is a big part of its charm if a relatively clean, quicky build is what you are looking for - I may even do it again next winter). Will post a few follow-up photos once completed.
Started with plans for fuselage frame kayak, 15 feet long by 24 inches maximum beam. Given that a lot of interior space is eaten up by the plymwood frames in this style, I upsized the printing by about 10 percent to increase interior volume, and extended the length up to 16 feet so it wouldn't look too chubby.
Cut out form stands and aligned on strongback (box beam made from steel framing studs, mounted on cheapo plastic sawhorses). Frames are hot glued to the steel box beam, and keel stringer zip- tied into place
ce
Plywood forms placed and first couple of stringers attached - I like the cedar floorboards in the second photo below, but they add almost 4 pounds so they probably won't stay.
Some considerable lashings later, all stringers are done and coaming base tied in. Douglas fir for the keel, chine and gunnel stringers, cedar for the ones on the deck.
A profile and top down shot - lines look ok to me, although with 26 inch beam it is a little chubby for a kayak, but good room for comfort and light tripping freight
All clamps on deck for glueing up the coaming riser to assume the correct bend for the base
Coaming completed - 1/4 inch plywood layers with cedar veneer on top, under 3 coats of epoxy. And up-sized for easy entry/exit and room to move my creaky legs and hips around once in. Will screw onto the coaming base from below, sandwiching the fabric in between.
Thats where I am right now. Weight is 21 pounds - hope to stay under 30 when all is done. Next steps are to varnish the frame, then attach the polyester skin and seal it, which means I will probably have to move the frame from my basement to garage through the aforementioned tiny window. If you don't hear anything more from me on this you will know that I have grossly mis-measured one or the other.
Attachments
Last edited:
