• Happy Launch of Lewis & Clark Expedition (1804)! 🧭🏞🏞️

Northwest Passage Solo

I've made a little progress, stripping is going OK. For some reason the forms seem to be a little off fair. When I built the Petryl and the Freedon 17 once I placed the forms everything worked perfectly. This build had a nested drawing set for the forms which I just printed out full size, glued to a piece of hardboard and then cut on the line. Seemed pretty simple so I don't think I screwed it up, I'm guessing the patterns were lofted and not computer generated. Either way not a big deal, I just lifted the flat section off the form a little and shimmed it where I liked it.

Here are some pictures...

IMG_1735.JPG

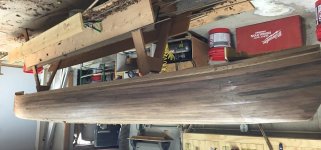
First hull I've done with tumble home, looks cool and really seems to stiffen up the hull. I hope it fiberglasses OK.

IMG_1734.JPG

A added some cheater strips to get the stripping close to parallel to the waterline

IMG_1733.JPG

I'm not sure how everybody does there cheaters but normally I infill the triangle one piece at a time. It gets pretty difficult when the taper gets really long, the lowest strip in this infill has about a 3 foot taper. On this build I did it a little differently and it worked really well. Basically I glued up the infill normally except or the lowest strip, leaving all of the strips long so they can be trimmed later. Then lay the full length strip on top of the infill and mark a cutline with a utility knife. Now take the staples out of the infill so you can remove it and work on the bench (that's why the lowest strip isn't glued) Next, trim to the cutline with a bandsaw and clean up with a block plane. That's it now just glue the infill in place and keep on stripping.

Not sure how clear that is, any questions feel free to ask.
 
Looking very nice. That hull design strikes me as a sweet paddle. I'll enjoy following this.

That sounds like a good way to do those cheaters - especially the long boogers. Cheaters really helped (forced) me develop my low angle apron plane skills on my first build :)
 
Looking great Dave.

I'll want a report on how it handles in the water, when you finish it !!!

I don't deal much with cheaters, I just strip up from the shear, and deal with the strip twist when I get there.

I have a cheapo 10" Craftsman band saw, that I can set about anywhere that's handy, to trim strips I love that little saw !

Jim
 
Yeah I didn't really need the cheaters, the bends really weren't that bad. I was worried about what the football would look like, it seemed safer to get rid of the sweep. I have an old 12" craftsman band saw also, I can't believe I struggled for so long without it. I have a partial 50's 14" Delta that I'm going to rebuild one of these days when I find another donor.
 
I thought I'd post an update, haven't made a ton of progress lately because I've been traveling for work. I'm pretty much past the bilge and now working the football area. Of course looking at my pile of strips I think I'm going to run short. I don't have easy access to more redwood so I'm planning a feature line to make the transition to cedar. I'm adding a compass rose to the football to break up the stops so I can use all of the drops I have. I made the rose on the bench it's about 16 x 24". I still need to add some pinstripes.
 
Challenging ! I've seen similar patterns, and I'm amazed at how cool they look.
As always, patiently waiting for more !

Jim
 
Here are a few pictures. Hopefully I can sand most of the hull tomorrow so I can start filling all the staple holes (not a big fan) and get a seal coat on at some point this week. I called Thayercraft, Steve's still in business, he just shutdown his website temporarily until he can catch up. I'm going to try to get an order into him next week. I thought stripping this hull was surpriingly difficult, one I got past the bilge, the strips really didn't want to bend nicely. I think it was a combination of the Redwood and the 7/8" wide strips.


51c5b8ef-9fc2-4ec5-ae8c-09bf8cf22c4d.jpeg aa5c5a9a-7315-4691-8730-af36dbdcdcf1.jpeg b5e21893-e032-458d-a3d0-26375e0b3441.jpeg fa151c59-3611-49d4-a2fc-bb7b7944454c.jpeg
 

Attachments

  • aa5c5a9a-7315-4691-8730-af36dbdcdcf1.jpeg
    aa5c5a9a-7315-4691-8730-af36dbdcdcf1.jpeg
    98.3 KB · Views: 3
Strip width can pose some problems, especially around the bilge. My son's Traveler was built with 5/8" planks, and then beaded and coved. It was a breeze to strip, but used a lot more strips ! ​ Redwood is a little stiffer, and brittle compared to WRC.

A trick I really like for filling staple holes, is push wood glue into the holes with my finger ! I used Elmer's Max . It penetrated the hole, and blended very well with my WRC.

Is that bottom pic of the hull, seal coated ?

Jim
 
That is going to be reaaalllly pretty. Way to stick with it.
 
No seal coat, just water. Haven't started sanding yet. I can't believe I posted that picture, the gap between those upper strips is ugly!!
 
Starting to get excited, just went downstairs to do some sanding. I did about half the hull with 60grit. I just got a quote from Thayercraft for 15yds of 1522 3.7oz cloth. Not sure if that's what I should go with,~160# tensile vs ~210# for 6oz. I should have enough for 1.5 layers inside and out so I think it'll be OK, any opinions?

Next I'll sand the rest to 60 grit, wet to raise grain, fill/steam holes and dents. Hit it again with 60grit and then progressively sand up to 150grit.

Here are some better pictures...

b7e38671-0177-4a46-81c5-07b9c9bfdd2d.jpeg
60 grit RO sanded on the side nearest me.

52b9aeb0-4bb6-4821-a928-344a6ab0d55d.jpeg
Inlay 60 grit RO dry
b099131d-139a-464b-bf32-5ee4228a99ae.jpeg

Inlay 60 grit RO wet
 
You know, with the dark wood if you used thickened epoxy and wood flour for filling the staple holes they may not show as much as they did on my lighter strips with dark holes. Just a thought.
 
That's going to be a BEAUT !


One layer inside and out, plus an extra layer on the bottom outside, of 4 oz. should be sufficient.
I've always used 6 oz, inside and out plus the extra bottom layer. They are heavy, but durable.

​ Just curious about the difference in price of the 4 and 6 oz?

Jim
 
You know, with the dark wood if you used thickened epoxy and wood flour for filling the staple holes they may not show as much as they did on my lighter strips with dark holes. Just a thought.

Agree !
 
67 for 15 yds of four ounce glass, shipping included. Not a huge difference. When I bought the 3.25 oz from him I think it was like 2-3 $/yd. that was a good deal. I regret not buying more. I think the holes won't be too bad with the dark wood, I just regret putting them there in the first place. I've been using hot melt glue to hold the strips on the forms which works well and doesn't take that much longer.
 
Back
Top