• Happy Incorporation of Hudson's Bay Co. (1670) 🍁🦫🪓

Milling planking for a W/C canoe

Joined
Apr 21, 2015
Messages
815
Reaction score
402
Location
Livingston, Montana
While I've been working on removing the fiberglass and paint from the Old Town restoration project I described here earlier in the year, my mind has turned to fabricating replacement planking for the canoe. I'm curious if any of you are interested in describing, or even posting a few photos of the process of making planking for a cedar canvas canoe.

Of course I built a cedar strip canoe last winter and learned all the steps to make strips and do the bead and cove, scarfing and milling gunwales, but making planking 3-3/4" wide and 5/32" thick is a big step for me. I have done every search I can think of online and come up with nothing. This would be a good contribution to the DIY restoration community too. I believe I have the right tools for the job, a decent bandsaw and a good thickness planer. That being said, I'm starting with 7/8" cedar boards and think I should be able to get 3 planks out of each one. Does that sounds right? How do you set up your woodworking tools to make planking?

Thanks, Mark
 
I too would like to see the process of milling those planks !

I'm guessing a bandsaw is the tool. Getting three planks from a 7/8" board, might be pushing it. With two kerf cuts, and some planing ?
Guessing again ! but a wide blade, with a low tooth count seems to me the most logical.
Maybe Google resawing ?

​ How long are your planks you plan to use ?

Jim
 
Mark I will be doing that very job this winter and will document the build. You basically are correct. A tall fence (just taller than the plank) for the bandsaw. Planing down that thin is often problematic as the wood can shatter easier. Often the cutters don't go that close to the bed so you will need a carrier board of something, pine would work. Run the 3/4" carrier board though the planer a couple of times to be sure it is uniform, then use double sided tape or a couple dabs of hot melt glue to stick your plank to the carrier board. Use new sharp blades for this job.
The reality is every new job is an excuse to buy a new tool! A drum sander is the better tool for thin wood and that is what I'll be using. And Jim is right a wide bandsaw blade with about 3 teeth/inch is what I use. Go slow when feeding the wood as a wide cut needs time to clear the sawdust out of the gullets. I always cut a test sample first of the actual wood to be cut. The saw fence needs to be aligned for any blade drift.
All that said, some times it is easier to just rip a plank or two on the table saw, flipping the plank to make the full cut. The plank can be cut closer to the actual thickness, a little sanding to blend the two saw cuts and any further fairing can be done on the boat.
Jim
 
I use the table saw method. I haven't experimented enough with resawing on the bandsaw though. I have a Rigid thickness planer and have no problem getting western red cedar and northern white cedar to 5/32's.
 
Getting three planks from a 7/8" board, might be pushing it. With two kerf cuts, and some planing ?
Guessing again ! but a wide blade, with a low tooth count seems to me the most logical.
Maybe Google resawing ?

​ How long are your planks you plan to use ?

Jim

Yeah Jim, that might be pushing it since the middle board will be rough on both sides and might end up wavy even after running through a planer. I've got 8, 10 and 12' planks. I found some 8 and 10" wide boards that go close the center of the tree, so the first 3-3/4 inches are quarter sawn with a slight angle to the grain which is what I understand to be good for this purpose. I'll probably have to get some help running those long boards through the bandsaw.

Mark I will be doing that very job this winter and will document the build.

All that said, some times it is easier to just rip a plank or two on the table saw, flipping the plank to make the full cut.

This is great Jim. Looks like you'll have some eager eyes awaiting your posts and I'm sure the thread will be active with many questions. I can see how this dry WRC could shatter getting it that thin. I know my planer goes down to 1/8" and I also know that I need new blades, which I'll use for this job.

Yes, Jim and Fitz the tablesaw method actually sounds a little more straight forward. A tall fence, featherboards, Hmmm, I'll be thinking on that one. As far as a drum sander, after taking up the entire garage last winter with the canoe build, a moratorium has been placed on me putting anything else in there. I have been notified that a car will be parked in there this winter. The canoes and kayaks will stay on "my side".

Thanks for the replies, Mark


If you go the table saw route don't use a 10" blade, get an 8" or something in a really fine kerf. The smaller blade has less flutter. I do that all the time.
Jim
 
I use a bandsaw with a resaw fence, then a MDF carrier thru my planer.

What size lumber are you starting with? As far as a carrier, what exactly is its purpose, and is it the same size as the planking? Does it move with the planking? or is it just a spacer that stays put as the plank is run through? You can see I'm trying to visualize all of this.
 
I can start with any size lumber I can get my hands on. I'll run it over the joiner a couple of times to surface 1 face and 1 edge, rip to desired width on the table saw, then use my band saw with a 1/2" skip tooth blade and a shop made single point resaw fence to cut to a desired thickness line. I will say my bandsaw is very well tuned and has carter guides (I'm a carpenter for a living). I will then hot glue them to a mdf sled and run one side thru the planner (I have a shelix head on my planner), I then pop them off, flip them over and plane to thickness. If the stock I start with thin enough to only get two pieces out of Ill join one face, plane the other, bandsaw in half, then put the good side face down and run thru the planner.

I also have a thickness sander, but with the shelix head on the planner, it's faster, less airborne dust, and just as clean to do it on my planner.
 
Cookannapurna, what is the sled/carrier board for exactly? I can see the potential for the thin stock to buckle when run through, plus possible protection of the planer itself.
 
The sled does two things, my planner doesn't like to go that thin with stock directly on the table, so the 3/4" mdf sled gets really thin stock up a little. Also if there is any inconsistency in the stock (and the stock is too thin to safely get over the jointer) a couple of long beads of hot glue under it long ways when I attach it to the mdf sled keep the planner head from just following the inconsistencies. I use the same technique to plane stubborn wood for acoustic guitar tops.
 
We have done the table saw only so far as we lack a decent band saw. The table saw creates more waste but so far our thickness planer has handled the 5/32 without an issue. A tad thick is easily sanded when fairing the boat anyway.

We just picked up a Y-stern that was a one off home built and the planking is 5/16". We may pull the side planking off and thin it to lessen some weight, would then just pound the tacks deeper to fair the thick to thin.
 
[FONT=Arial, sans-serif]I just thought I'd put a cap on this thread after making the planking for my old town canoe, and to show anybody who's interested what method worked for me, and the tools I used. First of all, I started with off the shelf western red cedar boards that I found at various lumber yards. All of the wood was kiln dried and about 7/8" thick, but I did find a good 2x4 also that was about 1.5" thick. In all cases, the boards were 8 or 10" wide and were cut from near the center of the tree. This allowed me to rip the first 3-3/4" (the width of my planking) and ending up with something close to quartersawn boards. I had a 6' board, some 10' and one 12'.

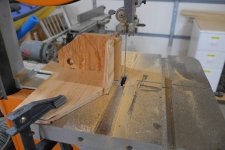
For resaw, I used my bandsaw with a 1/2", 3tpi blade. I made a simple resaw fence out of plywood and a piece of an old broom handle for pivoting the wood and keeping the a straight line. Here's a photo of the setup.
[/FONT]

plank1.JPG
I didn't bother drawing any lines to follow, I just eyeballed the whole thing.

My goal was to get 3 planks out of the 7/8" thick boards and 5 planks out of the one 2x4. On each board, I set the fence a little closer on the first cut because I didn't have to plane the good side. The remaining cut was made right down the middle of what remained of the board. Usually on this store bought cedar, one side is rough. That's why I couldn't just turn the board around and make a second thinner board since both sides had to be planed anyway on that last piece. This worked well and as long as I was paying attention, I didn't have a problem. The only issue I had was not paying attention to the lower half of the board, and a couple times the blade drifted away from the fence and I ruined a short section. I blame this on bad lighting. If I do it again I'll set up a light behind the fence so I can see if there's a gap. Getting 5 planks out of a 2x4 was a little difficult and the last one was slightly thin. I was getting lazy by the time I got to that board and forgot to narrow up the fence for the first cut.

For a planer, I have a dewault dw735 that goes down to a minimum of 1/8", so 5/32" was no problem. The planer behaved perfectly as long as I didn't try to take too much off with each pass, usually 1/32" or less. I have tried to plane down to 1/8" before and the blades will shatter the ends of the boards and make all kinds of nasty noises.

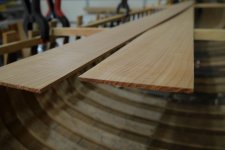
So, this was a complete success and after a couple hours I ended up with 165 feet of 3-3/4" planking. I won't need anywhere near that amount for this canoe, but who knows, maybe there's another restoration in my future. I was trying to figure out how much planking is needed for an entire canoe and I think I made it most of the way there.

Mark


plank2.JPG
 
Dogbrain, you did it almost exactly the way I do it. The shop made fence is fantastic, I would have never thought of a broom handle! Im glad it went well.
 
I had bought some 1x4 cedar and I had a guy rip them down for plank, it was a while ago and I'm not sure what he used but they ended up a little too thick. I don't have any of the tools mentioned above, so I will use my poor man's planner (belt sander upside down on the bench) to bring them down to the right thickness on my Chestnuts.
nVrKUXosBNRh6coF4DiSr59Z7ruGQzJWenFQsvHnPuI6hncBfWZO18pC2f54RkVHSMd-fGlELGnNGcgDT0oidYr4hI-gdBwB08Mo57dXU_hD_RfrAxpCCXlwMASXJT1c2uarhNOVedla95lAEG4VAYC0VAiGepMUspGGkgS-KtqHe8c5A-H_ZeYAn7rLDULp8Nn_lNQmJkuKa19u0gaJdzQOlm8cnRgn_OvqxcVdzOg9Hf3C9g6N6m5stSA9S4D0p_ITUv3QuMPwil8tnLRkS4F5C8RiTMteHe8IGbtyVX3KN2Cv7RR6E-yEzLnjOQDwO5DSNr7_uM57HTDr2sgJom4haSwMu-zMppJyAmm6zzz0fL6io9batv_D-bqVSU3bGobjnDZzrU7c9VwBAQr6O_b-oMoUwsHQ0_7xYgziBIQAKhGmzcrJ9BAIZ4ifY4XkA9G1Yz0WD-jKoUx6yaDS1Wqw2uStnN0CTwJ-4_UhFYYgU1oXFDETZ4GBiqgPEy3AaJ5XLRRKzijiDLRPPVPMrQt75b4dprhevi5WOz7p2igMr2JdeXAbw3ijOoI68Mi6bZBIeJMw4gAzQ_JPExRnZCa-Z5Hbsr-DaOGTpFIegMnBO4ojPpJk=w659-h878-no
 
Looks like you have enough plank to build a boat there Robin. As far as making the planking, whatever works. I was lucky to have "borrowed" my brothers fancy planer a couple years ago and he hasn't asked for it back. Mark
 
Back
Top