Ha ha, that was the best thing ever, I read it to my wife and she cracked right up! "It shaves a Dave"! Think I'll stay away from the buffer, sounds kind of dangerous. Can't wait to see the finished Stabby!
-
Gone canoeing. You should, too! 👋🏻🛶
You are using an out of date browser. It may not display this or other websites correctly.
You should upgrade or use an alternative browser.
You should upgrade or use an alternative browser.
Knife project
- Thread starter Rippy
- Start date
Ha ha, that was the best thing ever, I read it to my wife and she cracked right up! "It shaves a Dave"! Think I'll stay away from the buffer, sounds kind of dangerous. Can't wait to see the finished Stabby!
Glad you liked it Mem, I had fun with it. In fact I amused myself with it. Now back to our regularly scheduled program complete with pics. Today I polished Stabby Joe up to a mirror finish. You'll have to take my word for it cause none of the pictures seem to reveal this. D2 is always slightly grainy when polished. I knew it would be when I selected D2 for the project. Like I mentioned toward the beginning of this thread, there are always priorities and compromises in knife making. I wanted the performance aspects of D2 over a slightly better surface finish I might have got with another steel.
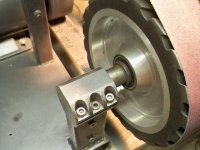
I started out on the sewn wheel with a green chrome type buffing compound. The sewn wheel is much firmer than the loose buff on the other end. I use the loose buff (not pictured) with a fine white compound to put the finishing touch on the blade. In this picture I am buffing with the blade edge up to keep from washing out the grind lines. I have to be careful not to catch the top edge with the wheel or it will throw the knife blade. Yes it has happened before and I was lucky both times.(still have all my fingers)

In this next picture I am polishing the flat area on the wheel. You can see the blade is starting reflect my fingers toward the bottom where I'm holding it. The flat I'm polishing in this picture had some stubborn tiny scratches that wouldn't come out so I had to go back to the sander and sand some more to remove them. In the end Stabby Joe polished up just fine.

My favorite coffee mug for size, and maybe to make Robin envious. You can't see the grind lines in this picture but they are there. If you look close near the guard pin hole area above my name stamp you will see a small round mark. That is a indentation made by the hardness tester in post #49 of this Thread. It will be covered by the finger guard.

See, I told you the grind lines were still there. The ceiling is reflected along with a light fixture near the back of the grind line.

That's all for now folks. Dave
Had a little burst of energy after supper so I went back down stairs to the workshop. I taped the blade off with red duct tape to protect it. Next I slid the guard on and pinned it in place with a piece of 3/32" nickle silver rod. I mushroomed the ends of the pin with my trusty ball peen hammer for a tight invisible fit. (It will be invisible later on.)

Getting closer to the drawing but still pretty blocky. Next I will silver solder the small gap between the finger guard and the tang to seal it up so no moisture can get in between and start to corrode inside. The silver solder I use has a low melting temperature of 435* F so it won't affect the temper of the blade.

Here is my silver soldering setup. It consists of a very large soldering iron with a home made aluminum fork shaped tip to transfer heat to the finger guard and blade. The tape also protects the blade from the flux fumes which will etch the bare blade. I will have to rebuff the small area between the tape and the guard. The first time I used this setup I didn't mask off the blade and had to rebuff the whole thing.

The solder joint came out real nice as there won't be much to clean up. Some times it gets sorta bird crapty looking and is a mess to clean up. I will wrap a piece of 320 wet or dry around a three cornered needle file and lightly sand the joint. I will polish the face of the guard at this time also.

That's all for now. Dave
Getting closer to the drawing but still pretty blocky. Next I will silver solder the small gap between the finger guard and the tang to seal it up so no moisture can get in between and start to corrode inside. The silver solder I use has a low melting temperature of 435* F so it won't affect the temper of the blade.
Here is my silver soldering setup. It consists of a very large soldering iron with a home made aluminum fork shaped tip to transfer heat to the finger guard and blade. The tape also protects the blade from the flux fumes which will etch the bare blade. I will have to rebuff the small area between the tape and the guard. The first time I used this setup I didn't mask off the blade and had to rebuff the whole thing.
The solder joint came out real nice as there won't be much to clean up. Some times it gets sorta bird crapty looking and is a mess to clean up. I will wrap a piece of 320 wet or dry around a three cornered needle file and lightly sand the joint. I will polish the face of the guard at this time also.
That's all for now. Dave
Thank you. It's trickier then it looks isn't it.A very impressive silver solder job there, sir. Silver soldering is truly an art form. A tip o' the hat to ya.
That was considerate of you to tape up the blade, so I wouldn't hafta do any more driving and buffing, then driving and rebuffing...
That's gonna be the sexiest shaving razor ever.
It's looking good Dave. You've earned a day off. Right after this knife is done.
That's gonna be the sexiest shaving razor ever.
It's looking good Dave. You've earned a day off. Right after this knife is done.
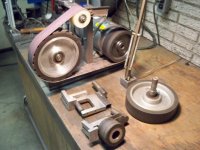
Back to work on Stabby tonight. The last thing I did was solder the finger guard. Tonight after cleaning up around the solder joint I got busy rough shaping the finger guard. To do this first I changed to my 3/4" diameter sanding wheel and roughed a bunch of material out of the way.


After mounting my 8" wheel back on the sander I worked the sides to a oval shape that tapers from front to back so it will conform to the swell in the handle.

Some rounding where the wood will meet the guard. The guard pin that I mushroomed with a hammer in post #84 is now invisible after sanding.

I move the belt tracking off the wheel a little for a softer belt edge so I could work the concave area with out the belt digging in as much.

pretty much roughed to shape. I will finish sand the wood and the guard together later on.

Next time I should be gluing up the handle assembly. That's all I got for now. Dave
After mounting my 8" wheel back on the sander I worked the sides to a oval shape that tapers from front to back so it will conform to the swell in the handle.
Some rounding where the wood will meet the guard. The guard pin that I mushroomed with a hammer in post #84 is now invisible after sanding.
I move the belt tracking off the wheel a little for a softer belt edge so I could work the concave area with out the belt digging in as much.
pretty much roughed to shape. I will finish sand the wood and the guard together later on.
Next time I should be gluing up the handle assembly. That's all I got for now. Dave
Very nice work. It must take a lot of experience to shape the guard in anticipation of the handle shape so that they flow together and have the correct shape.
May I ask why so much sharpening is done to the blade before the handle is installed? I'd think, just from a safety stand point, that you'd want it left dull until the handle was installed.
Alan
May I ask why so much sharpening is done to the blade before the handle is installed? I'd think, just from a safety stand point, that you'd want it left dull until the handle was installed.
Alan
Alan Stabby is not sharpened yet. The knife I sharpened in post #80 is a different knife. I just threw that up for Mem who asked about using a buffing wheel to sharpen with.
As far as shaping it, I have a picture in my mind's eye of what Stabby looks like, and I just keep taking off material till what I have in my hand looks like what's in my mind. This is where the drawing came from not the other way around. I had to keep moving lines on the page till it matched Stabby.
As far as shaping it, I have a picture in my mind's eye of what Stabby looks like, and I just keep taking off material till what I have in my hand looks like what's in my mind. This is where the drawing came from not the other way around. I had to keep moving lines on the page till it matched Stabby.
This knife is now moving into WOW territory.
What kind of amazing sandpaper stuff do you have to use to cut through metal like that? Gosh, I've been sanding the canoe for a couple of days, and it sometimes feels like I could chew the stuff off quicker!
Mem the finger guard material is Nickle Silver. They used to call it German Silver. There is no silver in it at all. It is a white brass containing 18% nickle. While it is noticeably tougher to sand then 360 yellow brass (the other material that I sometimes use for finger guards) it is way easier to remove material then with steel. I was using a sharp 120 grit belt to sand the guard.
No Title
Can't tell real well in the picture but the belt was off the side of the wheel at least 3/8". You just have to experiment as you sand.
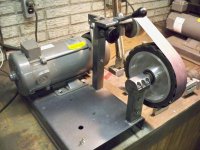
When I designed and built my sander, ease of belt changing and tracking adjustment were well thought out because I change belts back and forth often. Because I'm impatient, the DC motor is set up with dynamic braking so it comes to a complete stop in about 3 seconds. I can depress the spring loaded belt tensioner with my left hand and change belts with my right hand in 3-4 seconds with out needing any tools. Fire it back up and adjust the belt tracking with the black knob in another 2 seconds and I'm back to sanding. I have different wheels for different sanding needs. I can change wheels in about ten seconds.
Nice technique on the belt sander. Setting the belt off like that is something I've never thought of. A new trick you've taught me and I thank ya.
Can't tell real well in the picture but the belt was off the side of the wheel at least 3/8". You just have to experiment as you sand.
When I designed and built my sander, ease of belt changing and tracking adjustment were well thought out because I change belts back and forth often. Because I'm impatient, the DC motor is set up with dynamic braking so it comes to a complete stop in about 3 seconds. I can depress the spring loaded belt tensioner with my left hand and change belts with my right hand in 3-4 seconds with out needing any tools. Fire it back up and adjust the belt tracking with the black knob in another 2 seconds and I'm back to sanding. I have different wheels for different sanding needs. I can change wheels in about ten seconds.
Attachments
Hey Glen do you have a write up about your grinder anywhere? I've been thinking about building one and I like a lot of the features you incorporated.
Jim
Jim
Thank you but I'm Dave. I wasn't insulted by the mix up but Glenn may be. I don't have a write up on the sander. The motor is a 180 VDC Baldor 1HP 3000 RPM unit. The DC drive is a Baldor unit as well. I made the drive and Idler pulleys, the tensioner and tracking devise, bought the contact wheels and mounted them to 7/8" shafts so they would all interchange on the machine.
Last edited:
Sorry Dave, sorry Glenn. As soon as I hit post doubt crept in, all well. Thanks for the info. I have the info to build a real simple horizontal one, but of course no interchangeable wheels, etc. Thanks for posting this project it's interesting seeing how a project like this comes together.
Jim
Jim
Stabby Joe is glued up. Not much to tell. Mixed up Devcon 2 ton epoxy and smeared glue on all of the parts and then clamped them up for a good snug glue joint. I wouldn't have to glue it up. I could just pin the end bolster on and it would hold just fine. The glue fills any gaps between pieces so there are no openings for moisture to get to the steel tang inside. Also no visible gaps to take away from the appearance. The same glue clamp was used to hold everything together when drilling the bolster pin holes.
Dave

Dave
It already looks way better than one of those swedish thingy's!
Those Swedish thingy's are on a whole different limb on the knife tree aren't they. That's OK, different strokes for different folks. Mem, just for you, I'm going to try to get my Cat In The Hat thing going for my next update.
Similar threads
- Replies
- 14
- Views
- 2K
- Replies
- 7
- Views
- 3K