Of course we are watching and waiting to see it in the water.
-
Happy National Sunglasses Day! ☀️🕶️😎
You are using an out of date browser. It may not display this or other websites correctly.
You should upgrade or use an alternative browser.
You should upgrade or use an alternative browser.
J Winters "Kite" build
- Thread starter stripperguy
- Start date
What are those brown spots beside the white ones outside your home? Is that Grass? I've heard of that, not seen it in awhile though...
It is funny to me, you use the top of the bulkhead as a deck. I did bulkheads then had decks above them, makes a nice little pocket to put stuff.
It is funny to me, you use the top of the bulkhead as a deck. I did bulkheads then had decks above them, makes a nice little pocket to put stuff.
Looks a lot different from the osprey, almost kayakish with the extension of the knuckle. Will be a very distinctive hull.
I watch and read with every post. Keep it up.
I'm in daily. Sorry for not posting any words of encouragement. But really, how many times can I saw wow!
That looks great BTW!
I am a SG addict. I have to get my fix, when you don't post, I go through withdrawals
Jason
That looks great BTW!
I am a SG addict. I have to get my fix, when you don't post, I go through withdrawals
Jason
For what it's worth, I am also watching your build. Your thread of progress has brought me a lot of enjoyment, as I watch in awe. My hat is off to you and hope you get a lot of time and fun paddling this sweet ride of yours. Thanks for bringing me along for the build!
What are those brown spots beside the white ones outside your home? Is that Grass? I've heard of that, not seen it in awhile though...
It is funny to me, you use the top of the bulkhead as a deck. I did bulkheads then had decks above them, makes a nice little pocket to put stuff.
Some of those brown spots are the lawn sausages left behind by my daughter and SIL's great dane, he's a 180 lb crap factory!! Be very careful where you walk... We've had over our yearly average for snow so far, but even that was only about 60 inches. Makes for easy winters, nothing like what I see some you folks endure.
Mihun,
Are you saying that you have the bulkheads recessed under the decks?
A buddy of mine did that with one of his builds and it made for a convenient lifting purchase. Too bad for him, the decks to hull joint failed quickly, he later repaired it with a solid subdeck.
I like to keep my bulkheads flush with the end of the decks. I too had a recessed deck on one of my builds. That spot would trap water when the hull was flipped over for carries, made for a heavier carry and an unpredictable balance point.
I also place a thwart near the end of the deck, not for strength, the decks and bulkheads supply plenty of that. A thwart near the ends makes for easy tie down points and convenient lifting.
And speaking of thwarts, I have one of the ones from yesterday here at work. I'll give it a few days to really firm up, then I'll do another load deflection test, to find it's flexural rigidity.
And to all that are following:
I'm glad you're all enjoying this trip, so am I. But, I would post update after update with no feedback. Like a stand up comedian that doesn't know he's bombing!!
C'mon, I know you're out there, I can hear you leaving.
")
Now that I know there really is interest, I won't beg feedback, I'll just keep posting...
G
Guest
Guest
Hi SG, sorry if I've been a little quiet. I've been quietly enjoying your build. The explanations you've given, help non-builders like myself to figure out the whys and wherefore. For example, I didn't know bulkheads added strength, as well as buoyancy? And speaking of bulkheads, I'm awed with how good these stripper ones look. I must confess I was expecting them to be unattractive lumps, begging for cf cover up. Looking down the length of your right side up hull, it looks like cedar strip origami, or should I say awesome origami.
One question though, what is sheer or sheer line? You talk of trimming; is that only excess fibreglass, or do you actually trim wood as well? i.e. Is the top wooden (pre)gunwale hull edge an absolute, or is it trimmed? If so, how do you ensure symmetry?
Oh! I forgot, For some reason I really like the slightly blunt ends to the hull. I don't know why, but I just do. And the red. And the unpainted interior. And the slightly translucent nature of the exterior; I didn't notice it till you took it outdoors! Only after seeing it did I realize I prefer it to an opaque finish. I'm not going to ask any questions regarding the seats, cause I want to be surprised. Thanks SG.
Hi SG, sorry if I've been a little quiet. I've been quietly enjoying your build. The explanations you've given, help non-builders like myself to figure out the whys and wherefore. For example, I didn't know bulkheads added strength, as well as buoyancy? And speaking of bulkheads, I'm awed with how good these stripper ones look. I must confess I was expecting them to be unattractive lumps, begging for cf cover up. Looking down the length of your right side up hull, it looks like cedar strip origami, or should I say awesome origami.
One question though, what is sheer or sheer line? You talk of trimming; is that only excess fibreglass, or do you actually trim wood as well? i.e. Is the top wooden (pre)gunwale hull edge an absolute, or is it trimmed? If so, how do you ensure symmetry?
Oh! I forgot, For some reason I really like the slightly blunt ends to the hull. I don't know why, but I just do. And the red. And the unpainted interior. And the slightly translucent nature of the exterior; I didn't notice it till you took it outdoors! Only after seeing it did I realize I prefer it to an opaque finish. I'm not going to ask any questions regarding the seats, cause I want to be surprised. Thanks SG.
Brad,
I've done quite a few strip building threads, and I try to expose the "mystique" of strip building. To that end, I describe the type of background info that is sometimes glossed over in the boat building books. I happen to be a technical guy, and I like to understand the science and physics behind these composite structures. I can model (3D model, stress analysis, finite element) nearly any structure here at work, but composites are really tricky to define, better to build a test section and see how it performs.
My general goal is that everyone builds their own boat, after all, it's just a series of small steps. Same as any long term project...build a boat, build a house, build a car, get your Ph.D, all are possible with but a few requisites...a goal, a plan, some tenacity. But I digress, back to boats.
I had planned to make the bulkheads and decks from carbon fiber and foam, to save some weight and continue that traditional/modern contrast throughout the build. When I played with the photos and some magic markers (not actual magic, btw) it was quickly apparent that the decks had to be stripped.
The sheer line? That edge is defined by the design, and I'm staying as close to design as I can. I usually keep my sheer lines a little straighter and lower than most. This saves me some weight, catches less wind, and gives my boats a distinctive look. But I pay a price in lower freeboard, and the occasional wave over the bow.
When I talk of trimming the sheer line in this particular hull, I mean all of the hull was trimmed, wood and glass. If you look through the series of photos on Picasa, you'll see the point at which I trimmed the sheer. It changed the looks dramatically, I think.
As far as symmetry, that was easy...this hull was stripped starting at the sheer line, with an extra strip added that would later be trimmed off. All I needed to do was cut the sheer line with a scroll saw, and plane it to the remaining strip edge.
Most of my builds, the sheer line is a by eye layout. If it looks pleasing to the eye, that's where it goes!!
The last step, after finishing the trim (gunnels, thwarts, seat) is to coat the outside with a clear coat. That will make the currently matte finish quite glossy and smooth, and the red should "pop" even more.
At the moment, I'm still trying to decide exactly how to build the seat frame. Should it be assembled from individual CF and foam parts, or should it be a single piece? Individual parts requires joints and more CF wraps (maybe) and a single piece would require vacuum bagging. At least my indecision won't slow progress of the build, the seat frame will be the last thing to go in.
SG - I haven't been on here in a while, but I'm still trying to keep up with your project. Thanks for keeping it up!
I have a question about trimming the sheer line. ON this particular boat, couldn't you use the inner crease of the knuckle as reference for the sheer line? I mean - you could use a marker and sliding block (whatever thickness you like) to follow the crease and mark your cut?
BTW - one of my paddling pals built a stripper last winter. He made a pedestal with strips and bulkheads, with the back bulkhead circle-cut for wine bottles. The pedestal is actually a (2) wine bottle rack, epoxied to the floor. I wish I had thought to take a pic of it when we paddled together a couple weekends ago. It looks real classy, and it works.
SG - I haven't been on here in a while, but I'm still trying to keep up with your project. Thanks for keeping it up!
I have a question about trimming the sheer line. ON this particular boat, couldn't you use the inner crease of the knuckle as reference for the sheer line? I mean - you could use a marker and sliding block (whatever thickness you like) to follow the crease and mark your cut?
BTW - one of my paddling pals built a stripper last winter. He made a pedestal with strips and bulkheads, with the back bulkhead circle-cut for wine bottles. The pedestal is actually a (2) wine bottle rack, epoxied to the floor. I wish I had thought to take a pic of it when we paddled together a couple weekends ago. It looks real classy, and it works.
Steve,
The sheer line was a no brainer, just follow the joint between the extra sheer strip and the one that remains. I intentionally left a little after the cut to be planed down, knowing that my scroll saw skills are crap!!
I was thinking of a pedestal mount for my seat frame, still undecided. Not likely that I'll include a wine rack though...I generally travel light and I don't drink any alcohol...ever!!
Thanks for following along, I'm doing my best to keep up too!
Short and sweet, SG - AMAZING!
A quick photo...
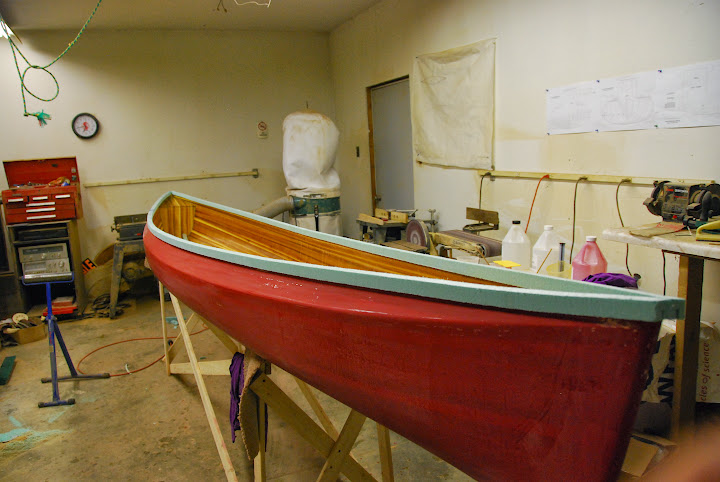
Foam substrate needs to be epoxied on, shaped, then CF tape applied. Still waiting for that CF tape!!
I 'll work on the seats and thwarts while I wait...
Foam substrate needs to be epoxied on, shaped, then CF tape applied. Still waiting for that CF tape!!
I 'll work on the seats and thwarts while I wait...
Thanks for the photo SG! Looking good. Maybe all this rain will aid in the opening of your local waters in time for completion. Nothing worse than sitting on a new toy that you can't use yet.
Thanks for the photo SG! Looking good. Maybe all this rain will aid in the opening of your local waters in time for completion. Nothing worse than sitting on a new toy that you can't use yet.
The rain should help for sure...but, my free time has begun to evaporate, as I suspected would happen. We had a vacancy in one of our income properties, and must use those short times to do the improvements that are too obtrusive to perform when a unit is occupied. Those improvements were finished yesterday, but, still I am delayed by the lack of CF tape. I can piddle along with the gunnel foam and seat frame, but soon, I'll be stalled by lack of material.
Also, we close very soon on a 6 unit income property, 5 of those 6 have tenants and long term leases. The 6th unit is still open to the studs, but at least the plumbing, drains, vents and electrical rough in is complete. I'll need only to insulate, sheetrock and finish the bathroom and kitchen, and do the floors and fixtures. So, as long as we don't have any disasters in our other income properties, I can get back to the important stuff. Oh yeah, I guess I do still have a 55 hour work week too...I think I need to realign my priorities!!
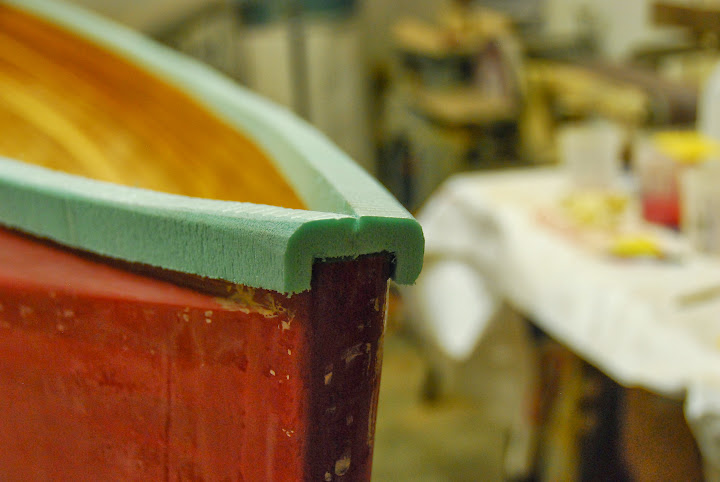
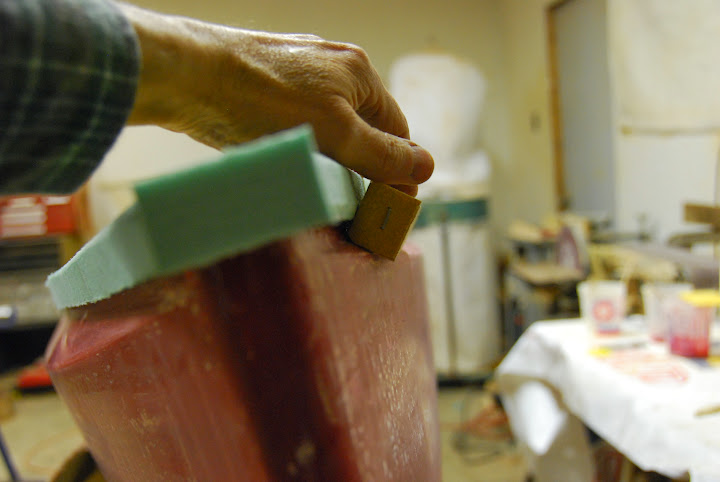
I babbled in the last post about the treatment of the overhanging ends of the gunnels, well, a picture is worth a page of babble, so here's a pictorial explanation.
Overhang at each stem, gunnels only temporarily in place.
Close up view of gunnels trimmed back to match stem
Solid end cap, to be shaped at a later date
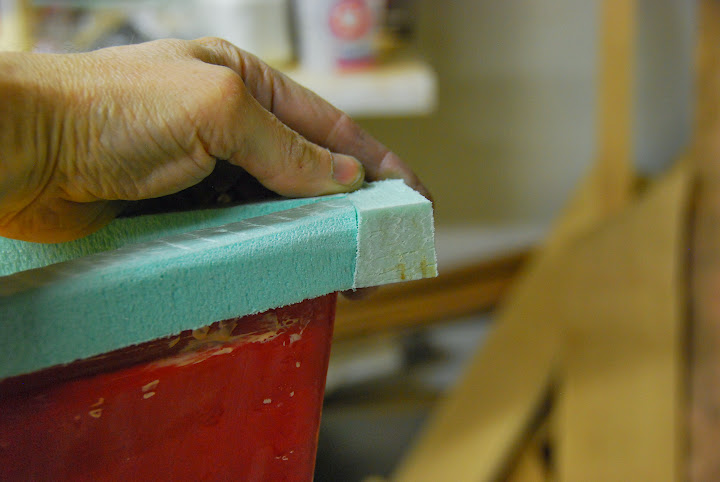
Gunnels and end cap epoxied in place
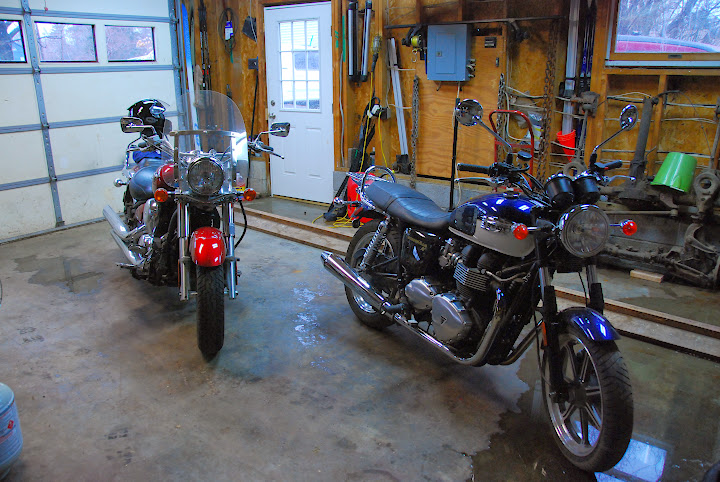
Oops, how they get in there?! The Triumph is awaiting a retitle inspection next week, was an insurance wreck that I got incredibly cheap. Took very little to repair, it's a keeper, a 2010 Bonneville SE.
On the left is last year's insurance wreck, already repaired, retitled, ridden and soon to be sold for profit.
Overhang at each stem, gunnels only temporarily in place.
Close up view of gunnels trimmed back to match stem
Solid end cap, to be shaped at a later date
Gunnels and end cap epoxied in place
Oops, how they get in there?! The Triumph is awaiting a retitle inspection next week, was an insurance wreck that I got incredibly cheap. Took very little to repair, it's a keeper, a 2010 Bonneville SE.
On the left is last year's insurance wreck, already repaired, retitled, ridden and soon to be sold for profit.
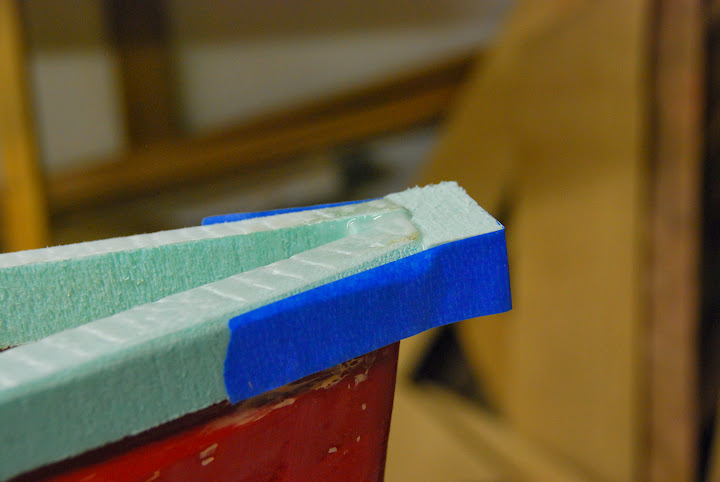
I'm a tad excited...shaped the under side of an outwale a few minutes ago, yeah, this is gonna be better than I thought.
I stapled some 32 grit to a block, stapled some velcro backed sandpaper rough side in to the adjacent edge of block (to act as a cushion). Then I just followed the crease around as I sanded the under side.
Oh yeah, I had to sand a fat chamfer on the sanding block, to clear the fillet on the crease.
Here's how it looked from below

Here's a view from the stern, I only worked the under side. The sides and top of the gunnels will be easy to shape and blend. Any irregularities will be blended away.
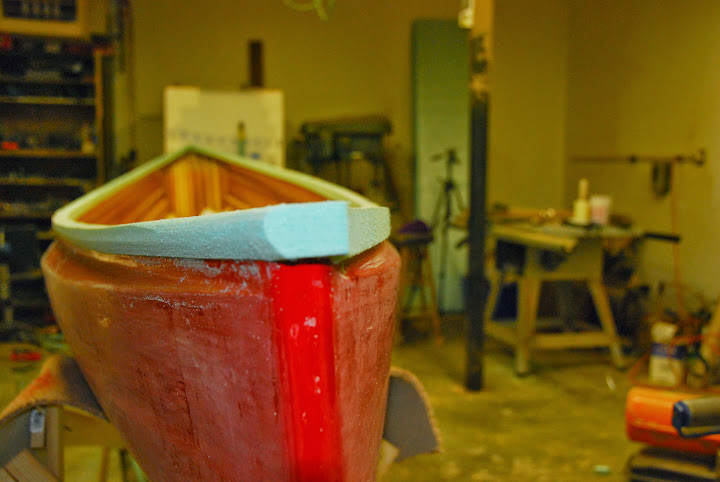
I only had enough time to mess with the one side of one gunnel, I'll be able to finish shaping everything in another day or two.
Oh, and I added a second layer of CF sleeving to the thwarts, they really stiffened up!! I'll test them at work in a day or so...
I stapled some 32 grit to a block, stapled some velcro backed sandpaper rough side in to the adjacent edge of block (to act as a cushion). Then I just followed the crease around as I sanded the under side.
Oh yeah, I had to sand a fat chamfer on the sanding block, to clear the fillet on the crease.
Here's how it looked from below
Here's a view from the stern, I only worked the under side. The sides and top of the gunnels will be easy to shape and blend. Any irregularities will be blended away.
I only had enough time to mess with the one side of one gunnel, I'll be able to finish shaping everything in another day or two.
Oh, and I added a second layer of CF sleeving to the thwarts, they really stiffened up!! I'll test them at work in a day or so...
Looking good SG.
Very nice!
Just out of curiosity, if you were to do this with, say 4 or 6oz glass, would you have any savings over wood gunnels?
Just out of curiosity, if you were to do this with, say 4 or 6oz glass, would you have any savings over wood gunnels?
Very nice!
Just out of curiosity, if you were to do this with, say 4 or 6oz glass, would you have any savings over wood gunnels?
My gut says yes...A hardwood has a density of 30 to 40 lbs/ft*3. The foam substrate that I'm using is 4 lbs/ft*3 max. That leaves quite a lot of room for the weight of the glass and resin. Even without an accurate calculation, I would still maintain there is significant weight savings to be had. You might need multiple layers of glass, but my money says you'll still be ahead with foam/glass vs hardwood.
Many of the current commercial lightweights are moving toward integral gunnels, whether CF or Kevlar of just glass. Maybe Charlie will chime in and tell us about the substrates of modern gunnel constructions.
My process is slow, and needs to be done in place, not practical if I was trying to put food on the table with this build.
Similar threads
- Replies
- 42
- Views
- 3K
- Replies
- 2
- Views
- 687
- Replies
- 12
- Views
- 1K
- Replies
- 90
- Views
- 14K
- Replies
- 170
- Views
- 13K