• Happy Marine Mammal Rescue Day! 🐳🐬🦭🦦

Freedom Solo 16'

Finally, the prep work for the build is done and I can tackle the forms, first step ... dig my original forms out of the shed, then figure out the modifcation of the stern and bow stems.

This is the original bow stem assembly, with St 1 and St 2 attached:

BYnsW4jPKmzRt2ms9SpdC52pDoILjlY8Qc5QaPyl3ULnuqBlBj49uOKjcM_sheiM3QV-qanf8EIP82u7atZo_-uM0KdNxnvRsd5MRxjf-_qfTPK2SuMqbKETdHcPBeLxGmegZeQXpyXrxbZIgWDoaWejxz1upGs6nkzoUpdJcr7OLdAcDq5FsuZiAP26jWBg4y6HXBHXgjiJRzKVv_rsMam3VQZruXfiHOVaP4duxCwpteVVMmxl_7ZRi4fusoHyDrImatWOq6L3_ZbHFfZuKyHeIP55-371PGMmkmS8lCQ5jEvoTSdKH91K6EjbZx-ljaUnKOH5ciga98nhjxQEIL0sHQTqJG7rSbdy69_YmOrnmGts2HcZsyjS_PkI8CEuW1Pm2Gekem_XwttQtWm1Gb--DsAdQbf0TFxG4gkDSRoQbf_KprVM-KQMd96Hv1ZmqaDFMKNn8buxtL_JlokPCqFfYAoiGDCHp00WGjN5Wk20TvRxFKc6Y_aorl2K7aCLw5s4jsvWzv9oTtFTni5-kvRTNsHbyo6DfyH94sUg8K1DkieV0C2bVlK95sHeR6kGvhRyhmET4g7Q_8Bg-OTY8eCZlPwBvu-c_znS9W9UZg=w1438-h1078-no


I drew up the new stems in the summer, I traced the old form on a piece of graph paper setup for lofting, this gave a point of reference when making alterations ... I tried a couple of different radius types and stayed with the one that has the sheer notch. There is also a ref line for where the tumblehome falls, that is kept to help align the initial strips to help with the accent strip placement.

cKpjfzs4a7G7pNv6knzSPzNUL0AaLkviwVDUio0t95snPginIFKKGV7Yn4klnQrcTCu1y8QDkBrURJ4j0v6CYbbWJKeO8GvHprmoaQUyKmCQvnFU9xYCG01R-S3eKnE60skycOOd5AuP6ZK_ZYvqAPowr1_GdtH1yBgZF37sfPKoJiEkyOkU7vl0BKrKb2jRu8IxUQZ9nt2Zv7Ywdr22ZK1scS953ho_KlvbzchFm6-atGevkloiw5SRbVGubQb6Tb8DoCzoI-0bqB5VupFhFobMAd_9Lz75HoghtHnHGDBBqh8UWRzUcY5acYY72w0Of8QplGl8LG5fBJzKeFL5UcacdoU_ha3jISCid3CoNMznzNSenFtallRT2v8EP9uKDJyYrF-ORg-BjaHTc_MSEaLkx3BhAUWySmwM8ZHQzFHFuxwTzb6Om77SjXFZLFlFjqSz7E_Mb627AdhMp94zOgIh0Txg2B9WG4h14EeDv-kGdoYsJ9fJoTS-wqBxZTfgrXMf5nkh4pRB92C9DsG35ufdOgc7QSHjiOf95u6NGLF8NSePhGDHpd8SKLW4rzW2A6kQI1LKxKNWDtwQkF1ilVODafO3llzsbBxO9j4J2g=w773-h580-no


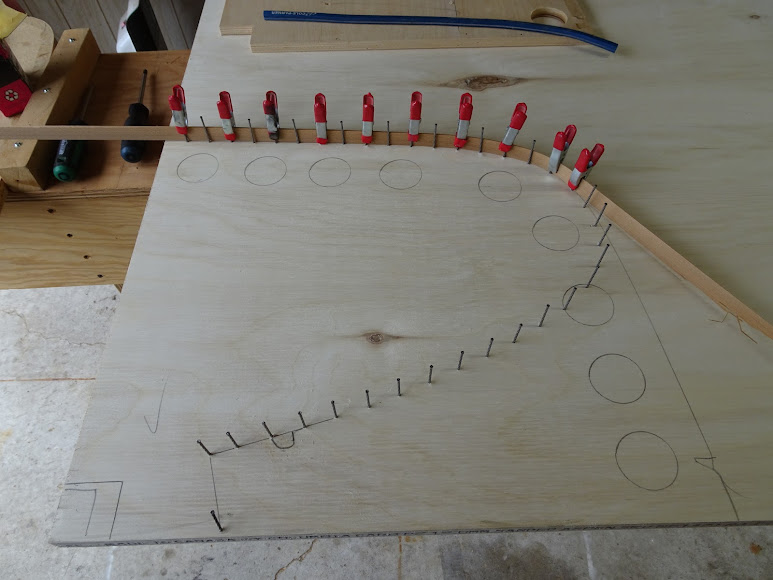
To transfer the shape, the drawing is positioned and taped in place, then finishing nails are placed every inch or so. The drawing looks a little strange, but the explanation is that I wanted to use the ply left edge as it was the manufactured edge, and I had to flip the bow drawing over, it was still visible enough to do the transfer.

9UVuJM_6WyGV8dZCOOYDIrLrI-75SW1ifPVs3mjAqXs2ZEdE45Ba2caBuu2rG4edcm7leflQo33kumnVrgkWxMY59EaFN-AQ6Jul3xDJzoXi4fakERBPdNefRa6viMzWfbgdA9Y1koCCYhlDcsFQbdOvBU3Liwu-Dnvn8AK_Va247fSvihG1eDkHtQnia7hRR9JcnJnvNjnXglyC9FFTA67YWjmvvdyvbUleSQ1sHEYIuaT8pdFBLBzqncWBRWne4Cr3-zEnKd35Un1Uk4AZG6mrkPGM09CSkeCAN66grDF3qPWQYyhwkSTTxP-ZITovTtF23klkx4RvF9NusJYTxAfQAN2MxOs3XgtXWKeNgyiDQXiWdldVDoFeho--Ri5NpLADKJg2yAi-Fkri48s4lQY9LSZwFNrVKobAF-5QEmdj5ysW_IFPfallRnUOQooVk95MYBs8j7mcivo6_scnOZGNa7GjCozdIIVp6H4WaEJ5PlkeFzsJSoWL8GtAL-s3eYjpVMnC6wYpLQwclb-gf0X1cnj9Sw1PVYy0jwZEmOedIgpYfY-qlNAS2sdg6RYkSVJSJDpmYZA0tjqA0AlOxbfnFgFnYAU8K59PeI9agA=w773-h580-no


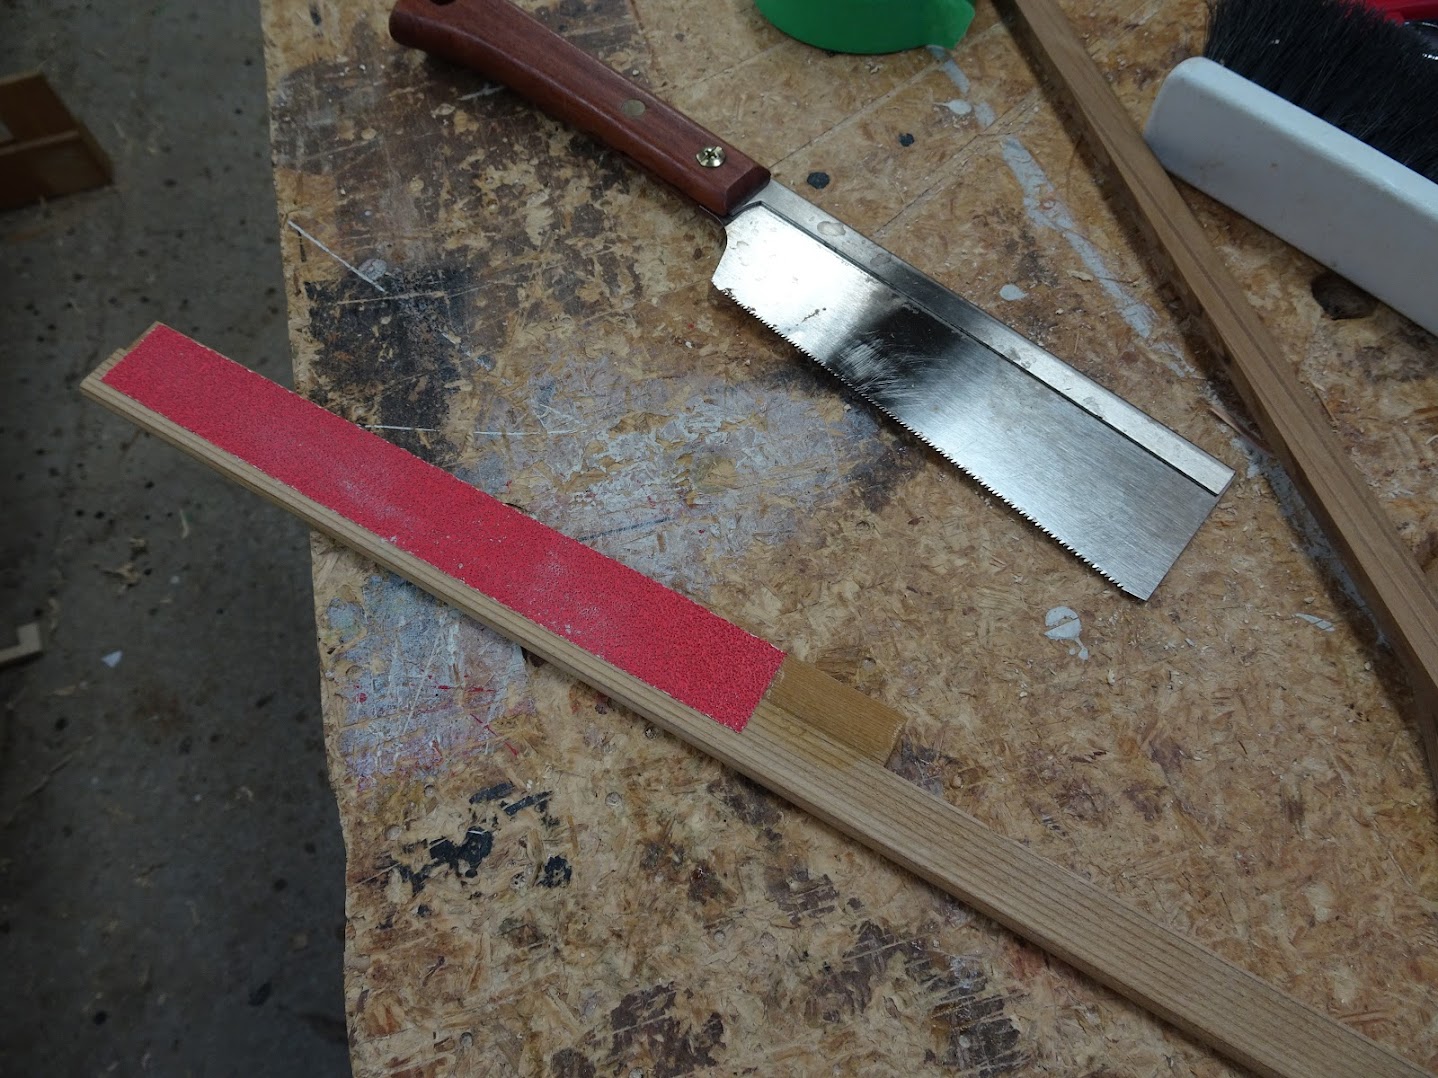
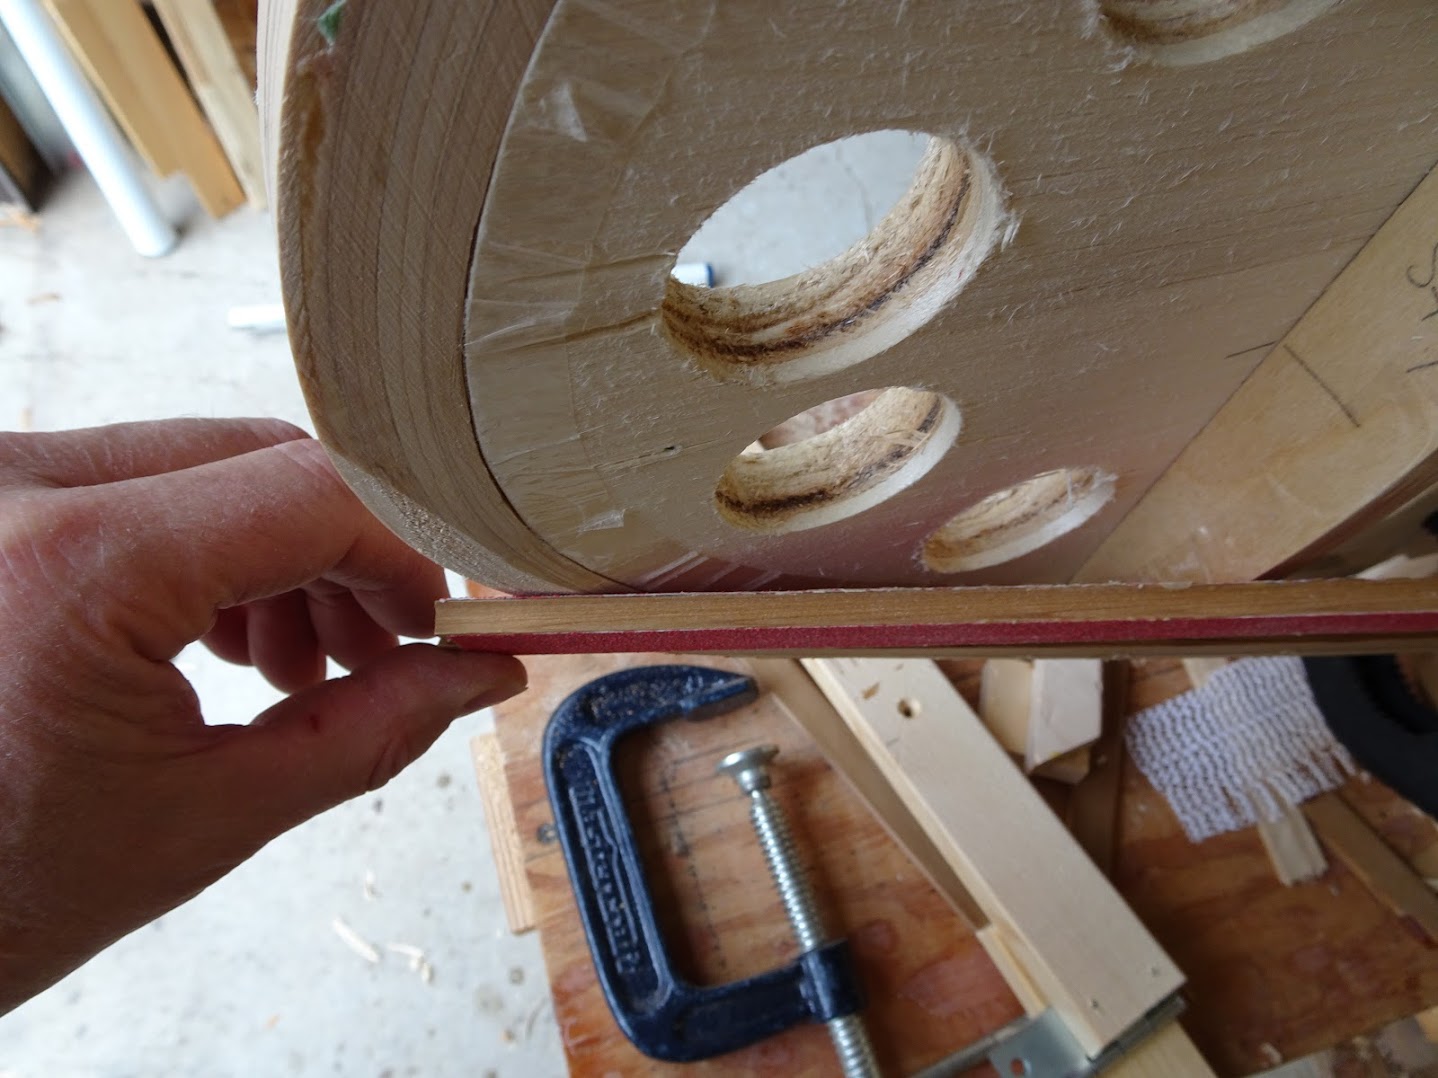
Carefully lift the paper away and you are left with just the nails, use some clamps and a fairing strip, draw between the nails with a pen or pencil. I started with a marker, not a good idea, bleeds too much. You can also see the original shape ... that was transferred for reference.

qS5C1VE-0Gmwy8EUnoq4jmeEA3_GjXGgWPR1xk0uSk8JfiXeyMfLIC7Dia_Kt3KdfFF2jdke6qgwJajzWdT6_ORf4H4A98sEC0Fd3OboBV8E0K4z7438CnNNBvN8tAs50R2tRd3BagvkxUkr2zJcqcIism628ZiAJPzDFIcwFxdRLewizT1QIkefB0Gf1CvdwGQLIMHjKL6Dwc7guw3C9nA3_M896KzQ6Sj7EBdLziC7GPFFBaVLWPhWnyxwy7VOjMaQPwNzCTNauwpBSGF_bxHCEDF_Xp-TSTs3HBVExEUDjVzxJj8eLfFgW3BBo0mnNzzmzyQhZot7mxxLyA_tM_ng4EE7mnrlWAEbRR0IR78M6Vc6j9Z6F65dbV49xLBD0j4E6bpFx_nTaLnVYROnazDkQX9c3b0xHt5wwis1c4xV7dHMgCcah-hSOHXy91RMrd0g9gkAD8d6VM18anudG6E_ovG50SahJf3QozItQTHINhG25p6JmvDwuxA9mi8bs9GpKlLEs-fgOYFHsdksd0aGxG3KnhcqTKo2E1V-D4O2UXkU-ydsttko71c4aViDdaLBDikb_hdUMyIGh8jl6e0ILjQEoVVgaSW-6frIvA=w773-h580-no


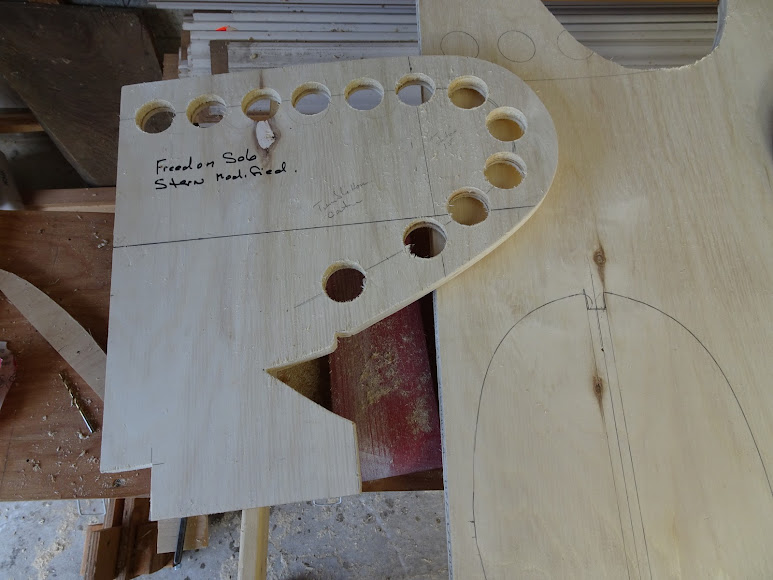
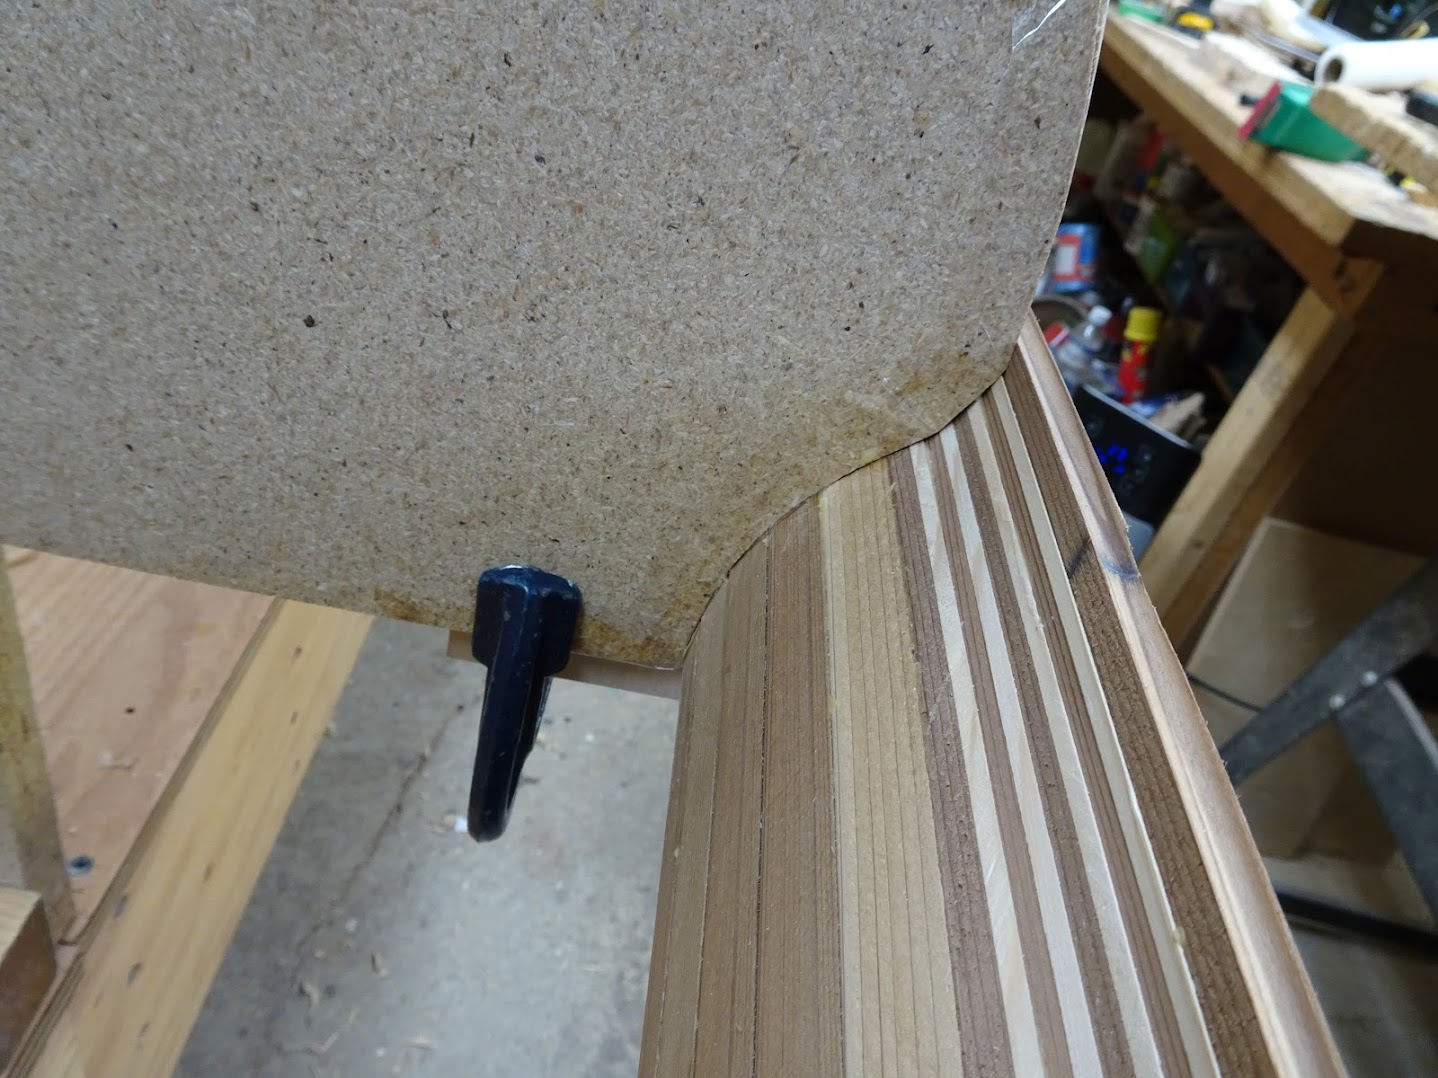
Cut out and sand to the line, reposition clamp holes as required and presto ... a new form is born.

1WllgyyQ7TTS814ilYZeaUBCdvlPNwhPNSHWzkp6K66UmjCX13Za1YgJzrw1S-kDEyIQnd9-QlzCxl35aYQWOKLADElkfpDUTzuSFF4BgSiSNktYJprreq8FzSK3QQy8UwF3WIBnUbxNxctjk3lhIUxuN9ifp1eA9vbG2tWu2SFYewEi9xqBmsM93c0kH-5u26wnmkhQ9AXjwfJYKgIsk_OXlROUm4Bj5dR78VR8AJX_TYoj6qv7rOHjlvd6N7rGR27y4STUDqrad1KFmsyJqA0dycYLWW3mh8acFV9gElBTnfMsrEQVjLEZ4cice7L_TJuzzCUI9WW0zRYCXjnGDRCC6lCmSqXw3oIZepfD8IgshpvvIGrgPt02-g5nFnjARtHQQbBfaVAL6u_AKbA6Qi97fRpOvt-hcsaMveRD7NmY_IXsAXQ5CY_hvL22qR4q5wMLEBBhMX4Sirri3yDA-1rS4XjdsbC7ss5-45z5X2CtdmZuULyjvPOBiaLrKC4U0D91jpcpEE6AnjNf8323ucvC-L2SPlUVHz8bO7s7yRXQIvcF47vFT8PRM91u8kUkYz92MKJ5c7qYGmv4oDGJDlg_q6_4AYi_ZcNFJdcNyQ=w773-h580-no


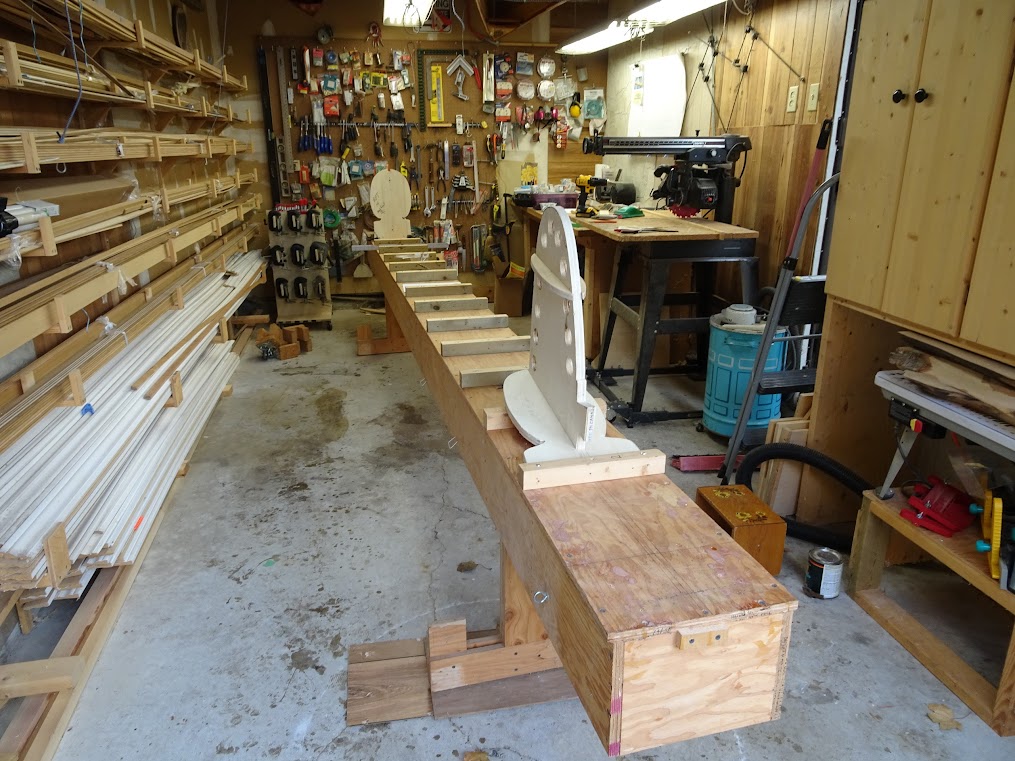
It was pretty clear that the last (or first) stations would require modifications, so I duplicated the existing St1/St2 and St14/St15, as I wanted to keep the original form set intact for possible future builds.

sGVOP6uEUTLav7qMnolPDOWAUzy40KN5PcV24u-hZGorwYHiDtii_0YJVjzt6xoPGMswNGozu2uDyqtvN1rvyxadHqp7Vrm_RruxEwJeJC9Xzzc1EljX2pT22CjjV_g_RO9NfrBB6GRyBMXxoTzDsmweTDWZh_Er-7lY1F734x4YzBWzvzUDqj4fjjgenPV6vcsD81wEQJ_iOlUoTPgY29TaIAanlLeWOk71ONQWJ_Tg_1PZPyO2cANViyOXlovFKqmJzoxJ4UzFYGhrUYZr49mgo-qh_yCBkojzMI9lFfktB0g-gsGQVxfj8V1-jJVM2VQ5VJXGEoZEDNuy2T4I2M91GIG7gA7GXWsMsFEb7il_ddpUl5c7S3n1dHnVCia7yP0y8Kr_yKq_zHy5B722u_7QER22qNnYwqOkeNHBms7oeUUAj2zCjcZhtcKDGTv9xZuav-IREZAbGfMfE6UDQo3D1B6wagZCe0ZXfCl_RGa23ljNK-dR_8CfKgR-3tpuaijeR5-aiWvhUabKc5r9GnFt2rOcPcq84T_iGEs0HupzBIv2anueemdu67ZoDbBsI2X_wRvpk5tPhl15KDdX3PLbIdRGCpRvCpbtVl6tEw=w773-h580-no


The new St15/St1 (wings on the stem form) were largely eyeballed using a fairing stick and common sense as to how the strips had to fall. The stem form (stern pictured) was assembled and the St13 modification was determined and marked on the form (you can see the new shape marked in pencil.

HwOJpS0mUQMoT4VS8bHTU6ljev8IOKk-lHK33qmcK-jl3yYHwx9go2gNS-jmVQ7zZuYFj0z7Nxj5Rjy8wZyDBmKDNll_l4Xkx6_pToHHz0U-k43GT-sMGc0EpbfLw9GROuSVtL9FgPm_CzfAjgsmkTg4NZgMB3qLtKEfmFuxm_O-mXhvxyTq5srotoIU1qbcz72ow4iPzqdaLC1C_v08NIBVgW0xj5iuwivNAM9a5c7TJtvDuo026Fw13c_K3dc6g-p03ZSUowPip6fnTO3e0vP7Dlwyuw4FMJhvRBU0vD96LzQrbxV2xEY_WIm5yNxJM43D26lCWuEqipiHOOJ9AAAQzU6vVu0P65y4040eALtEurrVU--2Ifp57HAXUeJo4-lPZilReo6Iq81EHyUSkufzkCeK0un13cP8zZIunSfdJyCWNFwCXA-S3LmD4KfxAsmNTMJL_632HR1KE57H7F1nYFrjgnlLa4X3jnGWb1XYsQwEaLxacg-WcXwF_aioiiknJ0EnNr_YKGZAsmIbIQOzyv48h2lnswj1FQ1unF0yPLu6JLOxl51AxhG9p84tjHmzkuTNz4PMCwSa5DlDpJgo03jKdq6-vQ4APFuhkQ=w773-h580-no


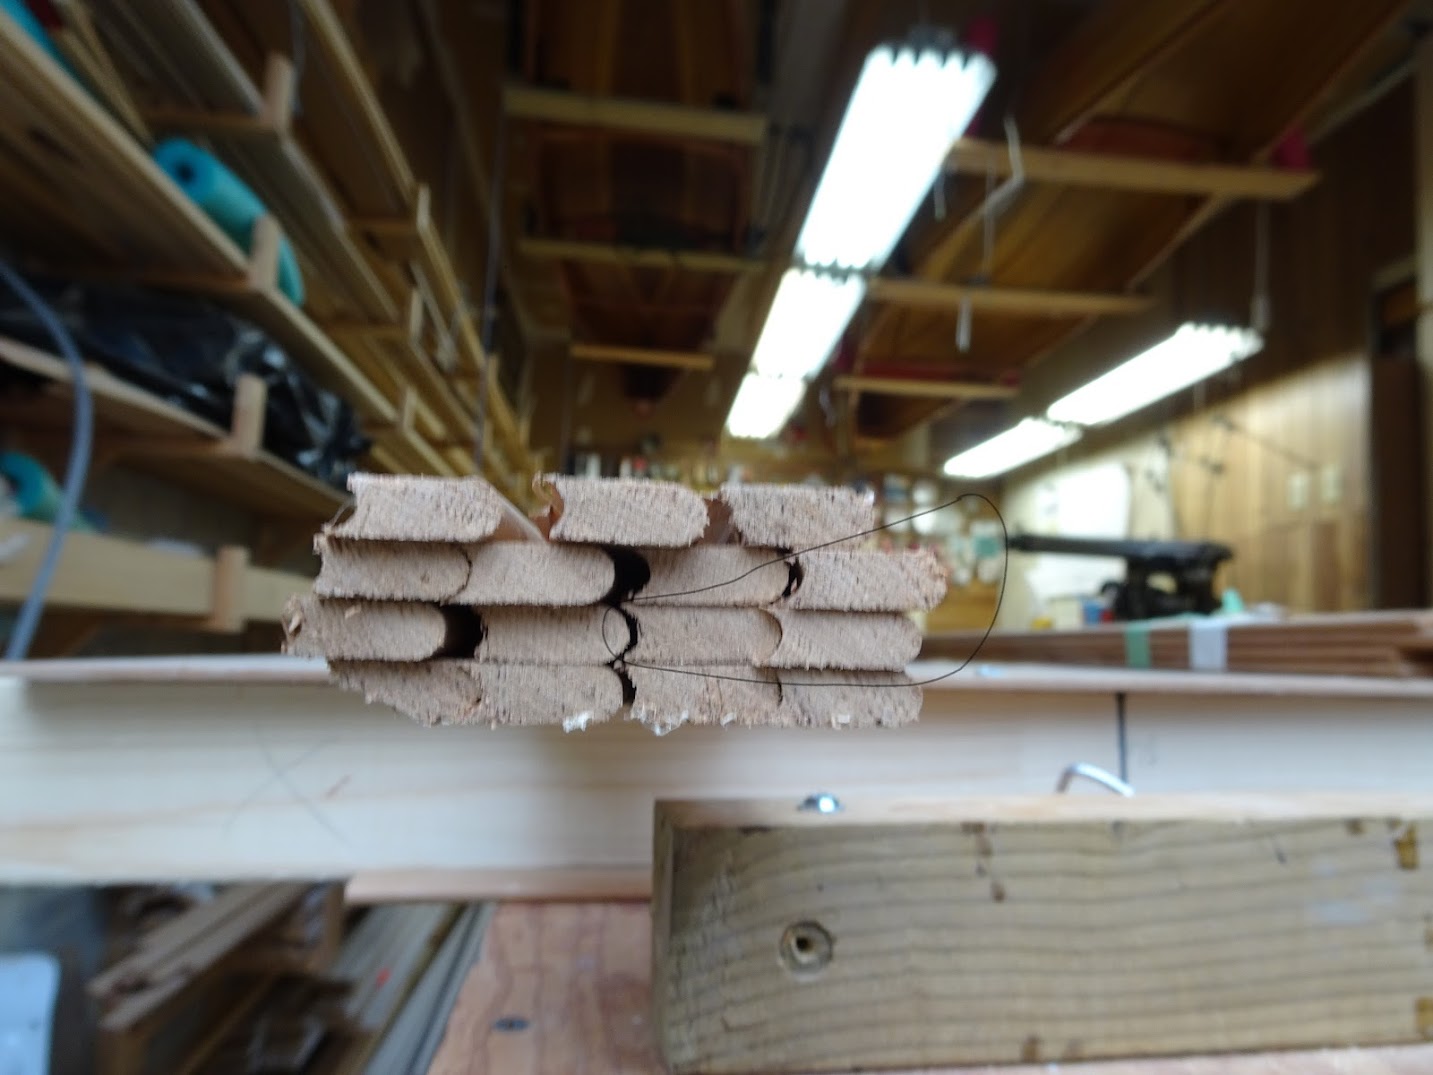
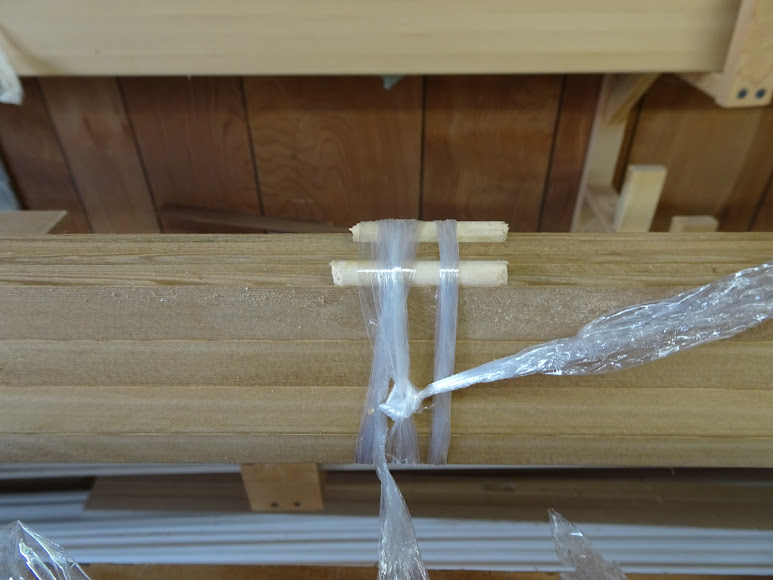
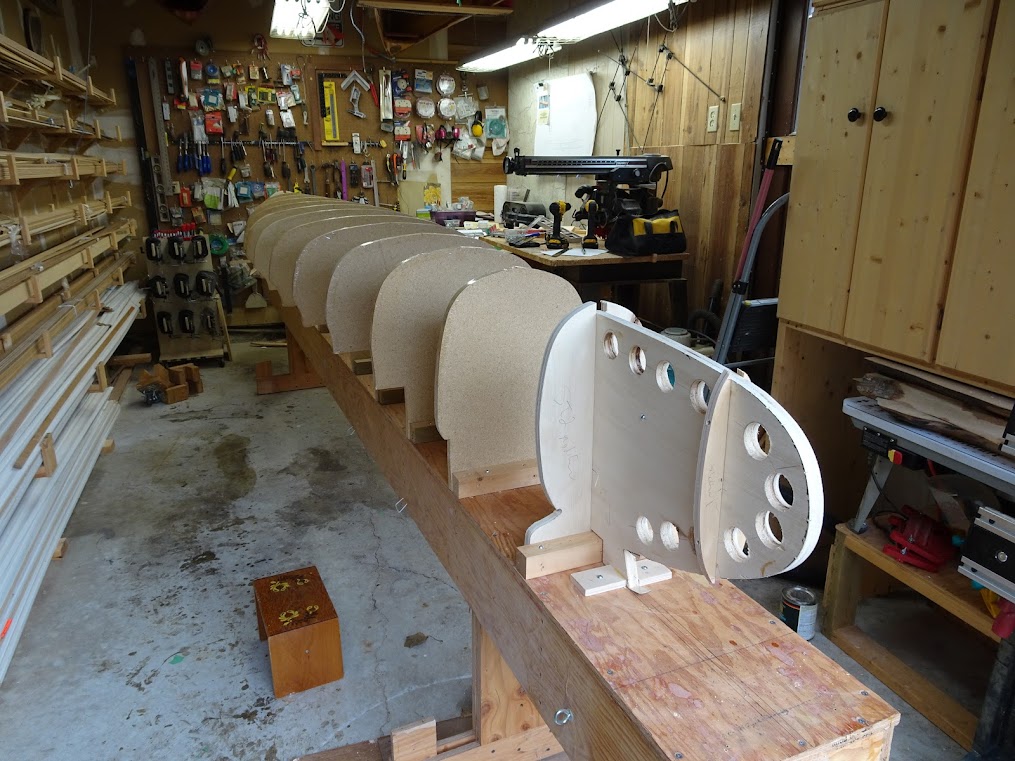
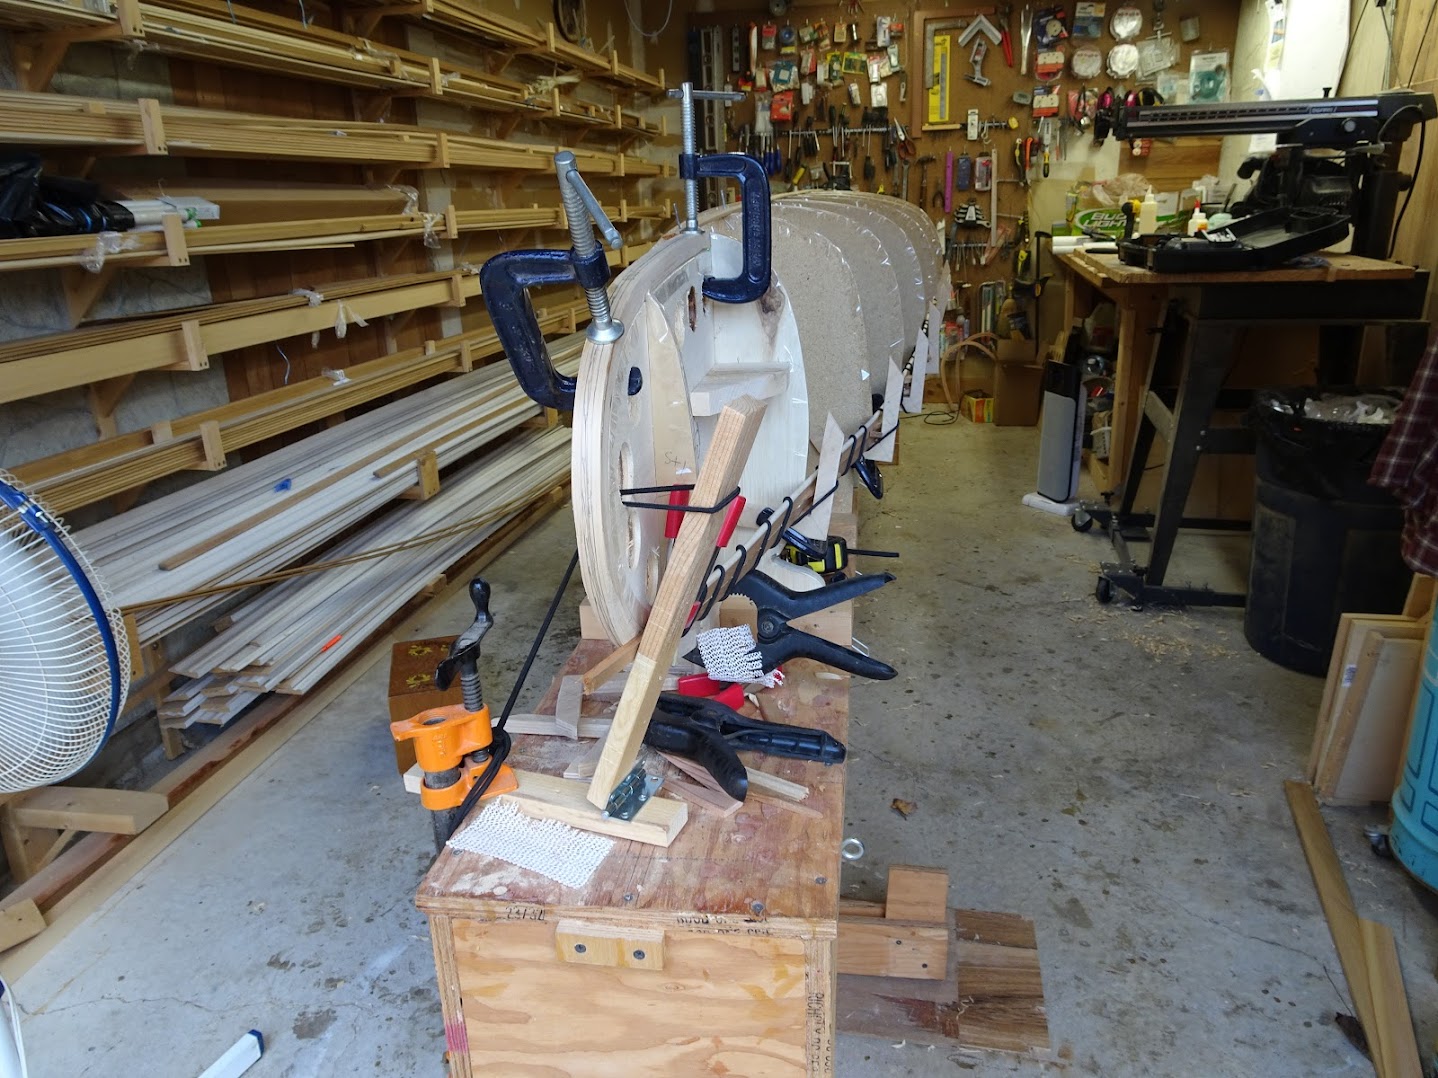
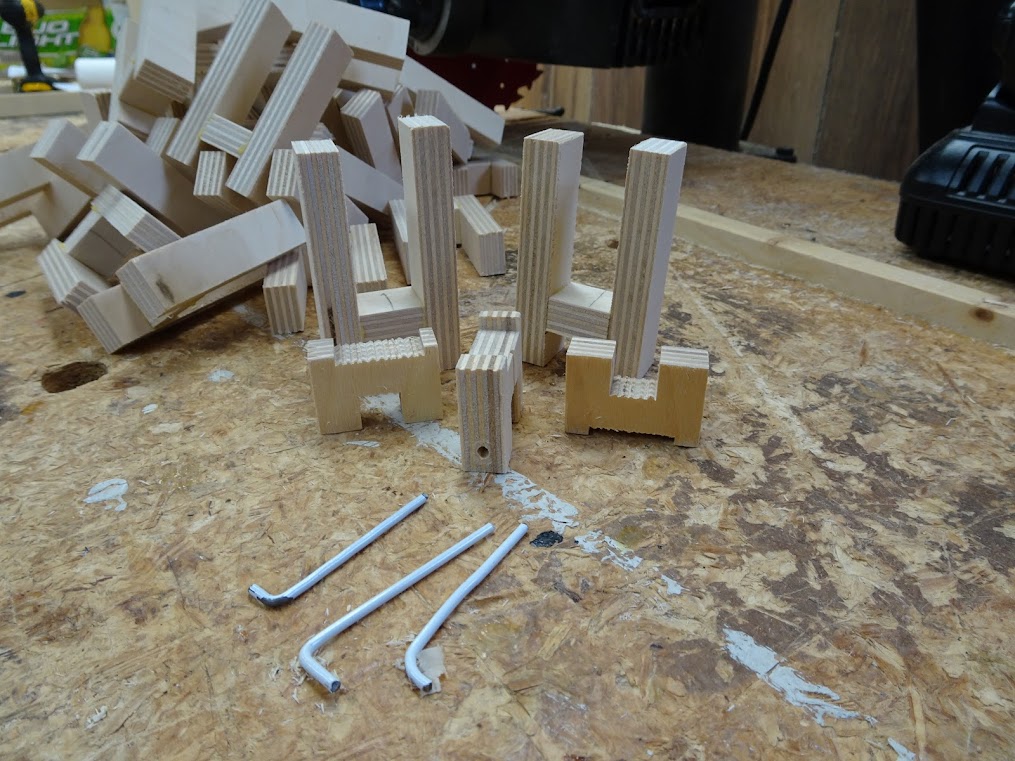
Once the bow/stern stem assemblies where completed, it became clear that I would need to also modify the next station as well to space out the twist the new shape required. It was a small change, near the sheer, just to ease the twist over a longer length. Here is the completed set ready to be installed:

9PuuST3sZFN5-YSMnoiknUcl6mGHNW25dVA2lswgazhnkjMxQz7R_L5xNEnGGkm9wDYuSZCZyJgmamS8qBTayLxvb5Kt8cYQ2mXkZXYcz11DdPSp8aP3EesZQrPNpPArFj8BfW7CRfMCk2d81YGw8B0BODX3QNJbwumpzMQJ9zAHpwj4Lqk8Po7L-Odlp3MdLpa0bSkiiMHL-keF1xUc5DxKTFUaWovq0D42J34UW1l56GsngIFUTaXtCpf_jjlxm4BTyME-KWdwtWv9vMUX9xxW1PqKMcHDcK7cWLsx9IFe-IXMS0XSQnEcg8_EW8vHJyD7gDVV5mSPcTiz4i9Wcl72N_IIU6SWbliYNMDz9BPqRo2fR2eu7KP8BDlJbly3tg7Ak9L33OXMV5dTfSYngVFf-tt_T6hq26IY7wd8eXU4771p13DebPGly9g4SxDZIEJErCAVkUK-Ly5W_jDadfdSAxWiLvHn1opjB2P0mYFCuy-dBtEkOGRZBClJU3iBew28HsA5HPS8ibdLGbFBXvss2SRIfafj9nkevEZASsxCcsInsMfhR_sNyQ_BumbH36DoTBDX4NNqLDfoGd8iB8oovdVsnBv1jFwZy6SpwA=w773-h580-no


So the new shape required changing the stem form and 3 stations at each end ... I won't know how well the changes work until I start stripping.

Brian
 
Brian,
That's a pretty radical sheer line!
Looks like you'll end up with a nearly closed stem, is that the plan?
I'm quite interested to see how it takes shape. Sanding the inside is gonna be a challenge, isn't it?
Your attention to detail and particularly the strip matching is waaay more than I ever do.
And more than anything else, I'm anxious to hear how it handles when you're all done...
 
StripperGuy,

I currently drive a Freedom Solo and absolutely love it, that was my first build. The challenge here was to make some changes and not touch how it handles .... so all of these changes are pretty much cosmetic, as they are above the waterline.

The plan is to close in the ends some and yes that makes me a masochist to a degree when it comes to sanding ... the Freedom bow/sterns are a pita to sand inside, but this time I am going to try a tip Jim Dodd posted on Bear Mountain ... to use an angle grinder wheel (just the abrasive disc) for that area. I think that will help a lot, but like any build, there are places you have to just wing it.

"Your attention to detail and particularly the strip matching is waaay more than I ever do" ....lol, you are not alone in that thinking ...

Brian
 
Brian,
That's a pretty radical sheer line!
Looks like you'll end up with a nearly closed stem, is that the plan?


I'm quite interested to see how it takes shape. Sanding the inside is gonna be a challenge, isn't it?
Your attention to detail and particularly the strip matching is waaay more than I ever do.
And more than anything else, I'm anxious to hear how it handles when you're all done...

X2 !

A Fairing strip will help, with the form placement ! I often have to shuffle a few forms to get the Fairing strip to make contact on every form.
Until you get the strips in place, that shearline shape will be hard to see.

A pic of my friends Kootenay, it is an MCA Solo Kootenay, plans are still available.
This hull handles great ! Larry has used it for two week excursions to the BWCA.

http://www.mncanoe.org/content.aspx?page_id=22&club_id=709151&module_id=9 5917

IMG_0013_zpsgqulinxh.jpg - Click image for larger version  Name:	IMG_0013_zpsgqulinxh.jpg Views:	1 Size:	236.8 KB ID:	73726
 
Last edited:
Over on the Bear Mountain site, some time ago, a local builder had gone through getting the wood and making strips, but never got further. He wanted to sell off the strips, so I picked them up at a good price.

I knew transport had damaged some strips and that when I decided to use them, they would require sorting and maybe some rework. At the time I simply got them stored in my racks for the future.

Well the future is here and it's time for those strips to be used (first build I haven't made the strips).

Here I have got them out for inspection (both floor and strong back):

aUC06bLNdjJBfHjHtE4dmkFJYzyZ4KtwVAgPED2PkjTkvA8vSrwAczkuHe1lb_ZSM3t0EPRf7_luOs9Zg8rM1BRCxIBSvRtVFnMW2cq0Z2_XgxEnD6O7Bg6KdmtYu-fa0hsWY2o2tMUHI1fkWK1A3mUSNRkTKMDE1RL9p1wrUqnZSbCeMNHrU6aAGXTOUivUupbQrm5fxuKtFGav8TtmZipJAn1VcAAXmp2sUkDDH3a2EWgILyWxYaiHeZ9HMptbj1NI7MrFhFNCZBjZMeu2ekpikRgj2oXy1uTo_rCLsxac7xrMRuZ0YqqbaW3zefIt6cVyHREma8rd5uswPThNu3YkSa8zvpcz7CVlZiCaUA4jAcUhYRCQ03visdPadi5ind6fWF6MP0gpEAMjOQKg74Rx_y7gg2ASel56alEFpILfXhGfs2LrWIeXYpTafo3oXXNlQUAmo01L76R5iMTusAdtCK3C3U3jNB_HioNm_4r1uwn9VDT2qwUX-UNCH3OXuprYD4O1W6L-okXshzIyQcqJp8P03MyZVXyrB7Y0zt-_zO9-pxNGTpQvoXm97D_C7Dqk8MxRov7veAIaQWB6gfUG_JgxzdCYRigqyVpctA=w1434-h1075-no


Since I didn't make these, a careful inspection was done. There is a lot of edge damage to the coves and they seem overly thin. Careful inspection yielded something I didn't expect .. not sure if it shows up clearly in this end pic (look at the outlined area), but the cove looks to be off center slightly, plus when fitted, it looks too deep.

eW5Uu1oWEwWOmZy21aI1Ss8IBQrWcwNlfYILlMo8xMn0LdZTnlukEtK84aMwsTj9D8buq1wjHbxKyef_0enydjM9y98UsSF3dR2rGTpXkIdcXTmtkAkfEqzHSCKc6MTG6VXkYBhVntSrefrdwB1xUhs2OURETYk3wWW4bG4WspdS9KI5LIFfmK67HN5ilH77RFUwDPslW3mgwhi_szXEyK-Lz9orMT01X8ORoJcf8OygFyU9nXviFhBb4xProKCNjkqVliKi2pMSfHhX-ZLcYBeznF50DuDh9O8b6aOFTePmp9TN2PIAa1a1GbTB7gcKxHxlO_GeoUp-JoNL0JHq3W6kv7YtWML0gM8UCmob5axGkwxD94vuw6W3xAXlmEAxiGzLQfWExeGrnTpdy-vB_TM1R3oTTjGP-lhFMl1xzv3hP0eszg4XAlry7h95OkxhpP9GklAVS6zo9Jbk4aaSQVoVVePxI6JJWu_V9Y3y8rQMFh4ah4YYF-xqA5i2G1iMTFxoxKxZXKtnjUiu_aSV8RCBeVvUOSjuQ2rg9LAjGImobATnCY_THczRtiFXb5KWauCAV5e2IGhWym-l8rSfB33CKqFGAZZH1U7DKVcKww=w1434-h1075-no


The plan is to take off about 1/16" from the cove side of the strips and then re establish the cove. this will clean up the edge damage and re center the strips ... that is the plan anyway. I made up a jig for the router to do this .. I think these 3 pics should describe the process pretty well.

Underside

sgoXwUPei81nepVT9KFizz-rJFnaNrYTXw1K0312PNhakkT7NehMpUqp4IQU5jJAj3x_WkpEaRoBU_TWTTdo5CCDa3w_cUaCnNJRCyILHnmDoDwVzqN97pq-SRygWuEqaYwiBiGmWEE7DO0bGDJWTWHULkacQYg5OzsUldNGXTn2rBCW3YBIG-xNgPDarczqrR6huedx-gM_iBmWTcIK1KlWxygLp2j5NTp1VzePbGKFijKDnyB-0qQxRUWaYIVj59JZ9TMMjYZ0GQYs2r-XJJfCVyM9Gnazjqwv5-L8xnReFI1GcgazGnACTykZGmt2gvePR5wcZDLpnSd3cO8SqTq1supFtpPCmToLUmdNQrvVuDkZVlWMvEVUZuyzLZFuakJOZ7x6R5ZLJf6NoIJ4iLRGdZznlXqD1GOyWt4sHMy9b5DrIIsa_cqQT4u_US15T-BZF5WVbCUAygz-wANgJD_65sTFQ6Uc1FKyIBybosrgIrO0jBnz7_e7WS3GrqfuqjvYq5nEhRnpr--ibaOTP2A_AguUFYRqABN7-FONfOptIqPcfo2TlgbY-n8mt1I9oV1wpjP27THZNE-460UVE8t5P2aMnD9VeDesoKf14Q=w773-h580-no


Top

Nr6GOr49zQkwcH-1WdbJaYo7bAzlaUMDFMlLZ_cShHOq5-tgcnjkCiANcUx32I36kaY7OT4NIZemaWqVH4NpcWlZ_KCC6GgTmnmpv-_y-d44st-aNder2VmvnW6jqLCEVGZH4MqskJ09ZSC_wJc7owx2VZP_3Cr_VHjo2gS3Nh9iKzLyKhAM_e1QUU-SYsZJ_Oluv7SF-b_BuU4QouYyK34D2Yn6fDU3jRXcJtU1-VVyIj8rEDdPEMT68Q-eSB8ABnc0q12z06akkIiSfRmteXzJseFlQLuX1dC2L2IIyCZ7PwC5JQMzF9MW_ljCA02mtVHac97Lzz4EmDrQRzlbq1tCG_G5RXEDuRMZSf8yxShrzUmhKbG8MvOHFc8XTfLDEjzS4uAWd_SohWdmKpnIilHUoUcddzGA4SHf_fUXu4zi4pJ3yOJRS_WfBaKhimBGPqKj_TQkIehkC5pqpitsSemt5jMdA7eInGudnzMSZIgUhJtxNzslFIVatZaC6HU7fFXcoPi3dhXS-AdHXfO0_oHrXBKoFS6UPEbuXYnF34gVClsk4c6hQyQ7mayWxWGUrGT-r1lwoATwozukAxr7by5MNhqzFiNEvEtbQqDrQQ=w773-h580-no


Installed (top view)

CGyKSiJrwzT3Vodta2Q2pBSXxUKk95Vu10-c_YPktK-wbYIYRTqgISe6tuBErP0Ne0oD0lo5GmFdFQpmfbo6qPHe42Sar1Bkr-YINxgXu2HW7Q3-BaOsbDmS4JeMKOim1DNI5WKxaMkRMyCanw1-6fHN8YNXz438MAwVIschZLEiU3CfBW8SksL9oD1CrGiYlSI1BD70etpSPa89RBeQLN8HjYIzTW5Y11qCSZwYc_p9cB7Fzf8l6RuWIuoLNGssQoyLNpz1K4INEvY1EM7olhFmn4UjXXbPS5HNlTNpQOhHUDuRTV3qproH2_2JAau1Xw1IgYTOHy5eGhA_bTvbOvdlmGByyAhfKWHL9YY3kgO1jwlrDLYDEiv-ePddzAm3xq69KdoaXVZLh_SBzopvsqzYkivIq7j0jUnADGDsJpo53zC-S_Sez19ehKH-fVyOU62kfYdncru_rGpmnAbtswqWBR2L2zvBoFpjHC19Laqjo5V3l4oDz-TPhYS9yQVmPUO71VdwDFawEm-RfQiuGAR1pq-kKaZ8XC_uYT_ExWOifcUtl0JbiexUv2BFbeq0jauQ8rKI-UhlStWRuqiR6RuonngdCsp3RPQLizr0Sg=w773-h580-no


I guess it wasn't my imagination that the strips were off center, this is a pic of the "shaved" strips ... pretty clear that cove isn't in the middle.

ELZY6KYhTtz9iM9cp1x6xaqT9n7UHP0eou30NQiU0DceCGuvdOlvPc2Br5T5OtqdZhTGk7Xx9Dyh1HS6vQiCU0J3BvGIWsCg1qiDobIPOEoEiBR9sx48Kz9ui3K_3OoZJgzvLGlMNycLe09xv2fs8aSmelDYdF3XyFpN9s48_6eqszk8t49-HRHsCy3OKCOJ787swykwZKvvzlOSngc-uvOxv2O7xdt_KGhmq_fyc0X3s1PrD4FdAvsllb5aJUS9HLDOwl_uwMKOOir5TXthDPibMTAZZR51sqowxe6BlR84bYxRHHtbigcZCLxeBLpwm-Mo2JttFyapaRpdhPudQzYJpfeJgsydHMnt8Q5bFBCCSuRSUkV-q6Lik0gjoEXbpkmRU1D_vZ4aX1Q-pyuad_-XNCPdIg3qH2RMTzscDHed2-xHZk0hF2A2uoXdRSbA5E4GDK3sxyr43fdcIUtoZfdXSArp88kmONiboY__Kjnb0CZjZio5BRuQO5wg-VkYCKDt_K5gep2Yth7zR6P6sUAuWxqWcGf9rV7Z58woaBpfS19kViPGANFW40X9B-bjpPT0IFie26eiY4xh1tYwogQgynLMo5yL94gyT5Dwlg=w773-h580-no


Once all the strips were trimmed down, I setup the router to do the coving. Nothing remarkable here, so there won't be a lot of detail ... although one of my go to tips for setting up the router (found on the Guilemot site). Take a waste piece of strip, blacken it with marker ... then do your setup cuts, it really helps define the edges, here you can see the adjustment progression.

FqbGB0DQvH5KD-cqsDTRzt96PXvq15Zy18OP9uMI9aNtrqcg_fHnEgwNsSjqU9K6_WsB7ZxHQtBPncdk-WOuyUAKqz77W15HzhgCtiSMQuYGm5if9ouMdarLnqTMrCZcsQNDxBVClyCPd-gkVQr8j-bEdGOgv0nC6W99LS4qTIr05v374PD-rzhkfVUUjkoSONPZVnX57UP2pH2pcf4tfi-nS-v-o0aNdDJgd8FJfBbOryrNoQIaQq7b3yBByW2IchdZZUeWkcLkgku_1zMAUIn1Sy-Tsfj-iI4un8xihYDPLPxXZNCiJRF1bo4SBLnXT4RnlpIS7f7Bdaj2whLWnoTFwtX059mdq1wZMLWnSkEFn4gyOeq2_7SuNx1A-T0N_hxaWQ6R6aYJ2yxsJgd2wRUGzy4hg4Uk8wFl25wT7NlSh0POYEt_H_j5xmzNMk1-Chd8UAwejD4sC0BEXxlGl3xXRtztTJnstKv338LrFz2VrO-KDQGEkixCFb-_E8whSy06in-UsAkU7p6_xrluymunJdjj57j3hnPwpLYio9rvEjgohWpCToAh_3M0ySX7c5huE4fz4iZ36mm6vR7kjkTydjjfQvrdFWbIvv0Y-A=w773-h580-no


Nothing left to do but bundle and put the reprocessed strips back in the racks. They get bundled using 1/4" dowel keepers and 4" palletizing tape to keep them tightly bound, avoiding handling damage.

dDbH1bWba8QOHItTm5KtM2yYVKs-3yIlQAkwaKUlRUGqW2oblf3KbgWS5tR5EhLIwp8BfU-9P1iBgnIrte0JDuhgCMfM_rnJEvgcg2RQeM-fMkk5B12MVdVoNBvuF4-agxQnOYxtKFznfGYlTTHe0cETck-rh29f9k2zR4jueyaijvIWEcQiNoYnQf_68oGo-xPjn_c7GnuSah9lOIiX2q20J7PPHK3OKAaOoEoI4k3QIp5sW-vU_ZnYbJC4TUnxyOO_ZVSh6E9cAd7FAKGAYtHp_HOZOHs7OiG6a7suWhyE5JOqg3OUGzTfQVeJ3N7p6EiV1SnAkqkaTaWQZBnZFN6sNQv2Gy9QSMGNtpkKU787kfUACt3-8LxLR4YbOcYHALVYJZYJwjehZigGBBZwx9A2L976KcQxyz0TVYqVp3RMTC5zNb5ETJkJwjyqVnZbMKlw2ryceeoRIVIw1l2ikAzIfwr5fDCffcH5_qppKnHOpaZo1X7FSKv26A9iWBySSQ8NQl3tuqs1QiGDkfKCTUftzWEM4aiaGJpKRIME1vmL91tjRVuZjeCWQ5bPv96mGuA4XeWH4PWY5s78y_sG1dGQAUUYSacFAsqECTZUQQ=w773-h580-no


Brian

Great setup Brian !
Quality strips are worth it ! Makes everything easier when they are uniform !
Jim
 
The modified stem molds, have considerably more bend than I usually do .... to make the bending easier, I just cut down the thickness and used 4 pieces per stem ... that means reducing the normal .25" to .1875" .... I love having a planer.

Here are the strips on top of my steamer, I decided to use cherry and northern white cedar.

zUA2cqJVqw5qS_smUqP9oax-Ht8d5o_dsfVOQ6TIIT8Isjyvxms9OOd3i90OiPaJAxrbTszW993jXhAHqwb3S0dlMkwprGfLieWUVS3uM-AftWX4teJ5SO4RDbQZFcLo2OTYDB4p83qp4uy0spS7s7KV-yvW2DdOX9Y0uzY0ypNhSRuSjV09g_fNQHT8AH5fnXEBktPgi8DqR5dVJI0fYMrfIwEKuY41kcXowiuhvnHWVaDTjd5-a7yvVDGK6Up666b5HJ_S7efLuo8iS4oo6CNxL0gYB7qYe5vZ97ov1rgqnQVltCXOoii02WZr99NFgdEhwQCwxSf5jQ4FJ2YPRGOuMcuNkgtfytNiEPsZ1hb_lWisdv3KZesii7S16E0-6f--aGv6_5sw-xL5Z-YqBKvnCBNbXaARFyVYnfwuq_f0GZCTOn3WkOTWIeYPlPnLTHOk2dY-ob-M9wkpIM3GXPwGo6niPwHb4ZM7KeOqKiUB4aSeCOObPvHPpLJzyT8qOc3PqWON54al82GGjHwwXVouGvtoIowczVazMwbigaOiRYFMhXMFjvL9i_UuBlt0zbITrBIFKsGXPHIrzjoFOGLO-N6fReTNZeMrTc5thA=w773-h580-no


A few years back I put in a new fence and had a few substandard boards left over, these were repurposed to make a steamer, here is the entire set up ... I have a simple top and sit the whole thing in a aluminum pan when it is operating, so the condensate doesn't run all over. I used to just use a large pot to generate steam, but this little steam unit has been worth the investment .... very slick for the purpose.

89gdfqVXqRhrAPNrtFcClp-TuSAk3gfuTVqJH2JAp05wP6Ep03mNb0crUp0pEDiQqgzL6yhVNAmfRkR1XGy-wEk0YJ4QYXCZVUoP-sHBdvBCDGmDiehN3Ff8I8SqESk2mL8s6J6Hc4PlNCdZWnXwTaO0mfK41xhMBBH9Otc3E-QXZBuoaQpl-Y8qbmbd4s6yl_jAXfre8ztsvDm0QQBh8JyaR9kBKYUEEOH0dPlfo3L4nvCgKf5svWNKVAn9EzvRmEePCEZa9r_4hx1H_jVGEwDSB64uwA33na8M7AN0WydkJD0na4G_l_w-HG96hHABjYbk-6F6Bh30RfpYnTHyUpVf9NQYah0uW3yU9idrHZqhI0OfDUfQCofBxLRxfgS3NKo_vNjtJ0-wJCa7vBpvw-eYn9IVWc4WQj7FVuJNxuSN3qne7d9y8kDgOlEr8l-qkjk8BOaaS54DqLbmTVsCegIAR_1NzUKVOSOhjcepixeNq9agUzlzvs6VobD67HYuPkZINQUan51om9i27Vg0pQKxboDqIl76zrPmrHImH5nbHeXGjfHAugEoKRiEjZ131WR5oGwiN6_UuY3EgNpaOEe-kMer4LsDGAz0N22ffQ=w773-h1031-no


I drill a hole in the ends of the strips and run a coat hanger piece through them

dlsUhk1saOs-CnBvGnD8FlUQdElWKvWyxN5JcVLuk7jrkoVb0B399phoPZuPRAMQAxlu48XurxM0nf6BNA6PjwYOX1bJ7xRbV3ZjH0JRSFMiGNZXbqgZ3Y6S3cKFoBcdeOWKhuRfe8wSVVT3kfTWSKQo0URI4hW05umOdwMzBdMhd11oymkuhJm_OYP5075ARp9vcQIlhsmCr480H2OqX7YTkPny86i32HwGcsVswvJXKNbjqq5S5qzdqUPS8qvkVRsFYBIB4hFjMJegKpUUKvOyQNhPDt48u7NHpmWd0FP99OtjsDieF7ZuFNnDzR-vr5zsho_6E4LddhV4NgULOwadNhCyVnWiTmnNkk21sn1CZA2g3HlMQ5VxiIhc8AmHmYEF-oZ8WfHcshSKMS7F4Z4LLe67Zk7AgwnHKpqZNLUvV8nDiVvOgEcwtVWvMTdFuwVN5QY2xVKbyoc_Ld9e1loWY7J7HBLBdrzGKPGizIV4F2cVJ1WDRDmFB9yEke_rf3ppycmjIAi4R24vfDKdqVwVhJDLARuE-3LsJeWvssQI06huRKnVgZc6-68NkuF5oJor8KnPhUjjtbBxroBnTaknmMcvJtt91IgT7QICWA=w773-h580-no


Then they get hung in the steamer ... a note about the coat hanger and the steamer ... you will notice the coat hanger piece is blue ... that is some sort of plastic coating ... not a good idea to use coated wire, when it heats up it goes soft, when you try to slide the wood off, it bunches up ... when you are trying to move quickly, this does tend to cause a sudden vocal outburst when it happens ... nuff said, use bare wire.

mXcc6mGg1_TelogLsHNZ4bTDBs-GqbJG8GAcszKuBac2dfYVu3cY5MKaGHDXEyNAxkcUDHtpR7Ih8GjaY43h4_ufzI0zVfwfpai6SUtA0nztSybxC08BV46v6s1GcFV8Y0n_LT0GZB9ZP60zLqIgydWzKuQwXkvbzeMH_-shim5Xt7_lmHwKW4cEBOcg9PB3ajtwMRFNOxgwp9BG_cpgUmjM61FMnLeNJgvLc5eN7JY0KEqC9YakN2DchzTtmdNJXAeelT6h3EC_71dgRoLCJzeTq-ILXwXlepwXBnlJEJnhvQXTZ4VffP8cSwoCxl8b1dKgZzoQ6s6bUl0D4eT5PI9B_fVQ_0ZTdVhLKpOuOqRKBt68ZF4Ojtb4KLMQcVkakudp1rwhoEi7JEswDfefe0fRGWMcXWDwJ6vnabWls-glUVe07Hzy4gGu1l0qB5Myd0tN7WYcqYspqeXMOnSUvD5pCQIqvN0QuRNg3pPj5wpgcwAMo7o0qI1yEgHKl9UdQuJ2t7WHK2YN_DpODHXH8cMJbQUJL0gNBohwlQI-uVZxw7s2PLsuN4YoElTcaoBX1QnwndUIH6eF6M8bWb_ovQLdZlva-oOqmMcBclhH2Q=w773-h580-no


While that is steaming, I setup the stem mold and added a few bending guides ... you can see that I use block, on the first bending guide, to hold the one end of the strips, this really saves time, as you can pretty much pull the strips, place and start bending all in one motion (unless the plastic coating interferes, then you need to swear and reheat)

DPy_zQy02WzpvbKDOyL9bAodzZcxBJ3ibWcsAQ0mNjfqUH0DvYCrKj5YMMM8gWM-VjKZL5_r7bhYeZJSf-_e9G61_lN371QKyK_Rj54k7mf67VlRDdIfQJUpiSYxh9_UCS-oXuE2ZA2-FoXOivpYo1_EbF7ZllaxaeG2rTHp1QtWQc4t6zEmK42hnH2LcAOTjfh4BDnbTkAG4gWYhwPBLTEzG5bFgv4OQb61Drv0lOHm0dMA12GE_22QxSumc6AUivioE7h7h6yGGTqttNmT-AeCyyni3Lmql93q2WlP_ej2YYCSe8fnmrOQKxB54uen95piLD9D3A5V-zowaZjNDbkDUSLqPB9P8W81HLR1RbHDfQHbRRn7-mKjyWYnmBc-6HIzK19lrY8B-OzFs8jpirYMFEcfMr9f5iIsGUgR-bHgnrl8voV_iTkebAFm_o9JJyhdWyQl4xLm2U1W_KLXmPt5f1wsOlZ11yden9O0u4xpeW1yIUkkRsNTp919S707Sse5JShs5KY3AINR2zC1-pDDXyeH1Zw9DeCkFysm_A7sQaWxF2w2eXPcL4-mqp3GFCkso2tqE8XbDtT9lDyJtOjg_D59Zg-x7SJ99l7v3Q=w773-h580-no


Bending proceeded with out hiccups (almost) and everything clamped well ... I placed alignment lines on the bent pieces, before I removed them from the clampup, so that when I did glue up, I could realign them to the same position.

7jrhPtwVnLZ86RnPCD0Llqxud6hSu2tMC4PwJEVx0B_yh7fuuQj-BKRuaQqA7-0Qnv_aWDpeIl22akphIfDrzEs0n761zcU6IJIiULu1kd30tNhmGmelPc4HR59o0KjJ3M2AUV6KoYNl2nlBe6x-foU7yhyt8JLzW8vkJ1D2AU7b6jRK-q-W9SxQvc0tSyZDix3JIiltIYAgsmxMnBEGWRmC6JQv0bbNaRJIgl7tVP3musJsZ5DVjS0OG0XW0NQuutaeiX71Ursl9FIzc9dEIvolebJPoGpsFIWxhnr5QjEqH77VT1C2Yqqt0qJvcEKyYimMtH1LN_G98g_FejqXyl76PDrcSh8U47KGjyokLQ_KY0K4UqDQnOPvfAc-pyIuRh7L9Y3Ep6lMm4BR35fnAw_07totJm6pHQG08CukGjdmjnS4nP4m22vn6QRr33yE3KK-zttgfdflQGm5QWOPGPmVXJa9nxoGGTXGiC0g-xb6eQhmBPj4Q9YMaI8LvOk4WhD-KhTdGvSazpI_uB_CJ54mil3QOBwd4qKXsXTySdEQQwPg9lUKUxwAtt3_jg6Oh008JIO3yKCDsRHQ1DzcVh4S6Bf4-bPrRhqrghhClQ=w773-h580-no


After they had a chance to dry ... a green tape separator was added to the top of the last white cedar strip. Used the same epoxy treament as the gunnel, thinned epoxy followed by a light butter of thickened epoxy, place on the stem mold, use the pencil marks to align properly ... tighten each clamp a little and move down the line and repeat till they are all snug, but not "cranked"

7jrhPtwVnLZ86RnPCD0Llqxud6hSu2tMC4PwJEVx0B_yh7fuuQj-BKRuaQqA7-0Qnv_aWDpeIl22akphIfDrzEs0n761zcU6IJIiULu1kd30tNhmGmelPc4HR59o0KjJ3M2AUV6KoYNl2nlBe6x-foU7yhyt8JLzW8vkJ1D2AU7b6jRK-q-W9SxQvc0tSyZDix3JIiltIYAgsmxMnBEGWRmC6JQv0bbNaRJIgl7tVP3musJsZ5DVjS0OG0XW0NQuutaeiX71Ursl9FIzc9dEIvolebJPoGpsFIWxhnr5QjEqH77VT1C2Yqqt0qJvcEKyYimMtH1LN_G98g_FejqXyl76PDrcSh8U47KGjyokLQ_KY0K4UqDQnOPvfAc-pyIuRh7L9Y3Ep6lMm4BR35fnAw_07totJm6pHQG08CukGjdmjnS4nP4m22vn6QRr33yE3KK-zttgfdflQGm5QWOPGPmVXJa9nxoGGTXGiC0g-xb6eQhmBPj4Q9YMaI8LvOk4WhD-KhTdGvSazpI_uB_CJ54mil3QOBwd4qKXsXTySdEQQwPg9lUKUxwAtt3_jg6Oh008JIO3yKCDsRHQ1DzcVh4S6Bf4-bPrRhqrghhClQ=w773-h580-no


Next day, removed the clamps and separated the 2 halves ... I really need to find a better tape than the green painters tape, it can be a pita some times.

ythvTjYriAKbJyFMUifwrfC7LsDfGlys2FcCNgbt00-uTlRoDTse5tGpr7ONaUV2nxGROaLplh8-XhjXHgQ7eq5i74wODTbGoqLGjkQdLtJsGIERiCUPdWT0J6_lQzkfMgOEC8PbB1SBTOu4TBycfudVdxnDbLNc4pikz8-6_DES7eIzKD_PQNAa_Nzl-i3IO73n3dPjOXjhO_qFi8EwpDjl71BlzuK65zD7cEnNU52JTqI8kO4v1q97wfbl0MnBJLqfpL_5Pk9PZkp_MMoigentual8w8CZBRbdzihVd0a5BPHsaR8pTsBvkVx9Kg33jEHjRUSDqqb5eBa3CF4ChpO7l_xE-pRjtGrUEEb3arib_zgYeFQlA3q-l05kt24szf4tIq5K5KqZkTP7F4JZ2aSJ_Kugni1PXSYImVaH3IrZzhZOvKx3ly0SEo8RtStEDbbMx9ZNwMCu0A05mywIaKcduFERqYYJYLdIxYKVydjANVdAezKM_bbyqCJF7kXQs3mZWy7u75845qt7MVvfD3Nwz6VQz5QuDfiT-DlK7hmKClNg0tnDMhZ1NnxSM8M9OOsuKvoyt0hC3fvDphJQHC7CDByQumVzuqJ1-LEW4g=w773-h580-no


These get a light scraping to get them more or less flat, then a quick sand with an 80 grit sanding block. That's all I do as most of the stems gets sanded or carved away anyway.

Ready to move on to setting up the strongback and molds .... finally.

Brian
 
That's why I go stemless.
The stems look cool, to some, but I'm to practical, to spend the time to fabricate them.

Great tutorial though !

Jim
 
The mounting blocks were all removed and repositioned on the strongback (spacing of last boat was 12", this one is 12 3/4") and then the whole strong back relocated to a couple of pieces of ducktape on the floor (it was some work finding the right spot on the first build, the tape just reminds me and saves doing the work again), which gives the best access and apparently the only 2 spots on the garage floor that are close to level and square with each other. I used a few shims and lucked out, it was all level .... yeah.

Here is the strongback is placed and aligned/leveled, the bow and stern assemblies are ready for installation

srLo_0BaFi0PwhK1wOE9he6RrkX6LRQXc4Mmm2H05GIezDNo2QNND4Ge1HvA25P5LWq-CP9YjeGLZNddhgiqddnzEaoeO7NdhZPpzo1ZudApLJRVwTwSjC-3PPW3o4Sok25Nkf0kZSH1t3N24TvRmkG2Pe3LHO47GCSvfrd_-LJXehSf3nnGX_FNxwsh8JfDEJKl6KIBvjIkI08hizHcKdAxs8Iu_yNMgiSw_HJ9NhSddXPX4nU-jXOLYDqx7VtfyltE6CMzM30HSs7R-9PA2IGkWzK6a2GuMO_sq2-lpNZkAkMO5q-4-QYpqaUHLcMRZSTDpQLBnpFOumUpf0IaZkHLwkwC_gDYEBYLahabZ9KCPM9a4AWb4kcaxvDv7VmnstArICLkeeHqLE1Aa31Pixw4fInVowmP9_CRjJ0sROWllDuqrI1UwRScXc6YtwyMWxU9dVToJ9cvRah2snnA0gvVI9xPfZnRpWjQwerH6K0YLWA7fwICZ-V80i2qi4t3kNyKV2gUvkpHnP6543izjRbeMwXnVg9gXxJPC6MsB9eB6QQUAh4NBuy17AUkThFVAy48V7RVvyNI7pcSgb9qc_dUjfJs-2Hn7G7LeQn-vA=w1015-h761-no


The stern/bow assemblies are clamped/drilled/screwed and then a pair of alignment blocks were added to keep the assembly centered.

o7Ov6z6EAdnxkqyaD5-PUfy96g5O-tN7eV0QyL-n74cXZo5e5ufkil5jgIx8NUF2ALG_jM9DYiZvjjrbLkubKZr6XrbvgICMBLiwaBSokf0pBSqUmaTHd8YtVOJNCUdxQ4AkSkXCoPNJ5Wgweop03DylDZzPJQDAbMsNAfjCTkQOgeTH6c-fSHuuuD8EFc27DYOEkfzZ94Cb_m3D56RMGhlY41tx3JqyXQqZN8cyo_8VmrUkO8azcd7Cwj1Fq-IFkqwCmUN7r5FZjVNVEP3e83nrCPGatVaXJTJ5qvaYQxsoTg8q6EE6cV-8R6IX-ERxuc_3l0hF3QNpKPb3IC_l4SwcL81hxHTWWHQ_aIQJkKznxUYj1gyYiBQh34Fu_qbvZ4zZF-pbG-KD5ugCKPBfcHncSUKaa-YM83HXAhWNpWBRs8kTcn2LWIQZJGfnwtlsL28dH0VcsjvpsfFbdEBPQfkCsFD4o8UBNB_9neqFGqfBvTDoE5krYJa_Tyh7HoSmtCB1ucJwhCel26UgBj1Rxrjy-RW7FUYwB0mO6KK_0zy4PfcFncPHSDQxrsrlC-9Yg-naSV6Cu7HwTVo1yP-uEgvppN7li7mTYpSz6Se6mg=w1015-h761-no


After the bow/stern assemblies, the alignment string was setup .... there is a center mark on the top of each form, as the forms get installed each one is adjusted so that mark aligns with the string (and bow/stern). One thing I did have to add was that little support block on the bow assembly, there isn't much wood along the bottom and I felt it was flexing too much ... this was also added to the stern.

vWESGYdkE-ODYTj6vxl58ZuLxt6jIeBM8MF3C52GMzwjmJOhDStjVrZyI_wbDA7CgUVd66FDFED_iYNi6QtruQK450ZQEkeb0ud3EScVGvhplTmB48SC52bH8CCTG1FgnubotNHVS8OUttiG2mQ0SpFnGtcAWU0GnuhqShr175sXzDxwDjgBgyH8CxWgeGV3ccv4gCd4Hfr1OTaRNSwAiAF60YwUlOl2PmBAuU17lNvs89l7UxQMXHG9P_-A-Wcxma4vywJV0wDoKpA9oSJ50UZpoAl9uGSOD6rssTFOwgecOQ05lAxtZp4neE9blGUz30GwULL4Kudq0tCAMPWizDlPd3p8Vry2TNk-evma2sLd5d9X8HI7NE0TY6PMe6xY4cmbVouV5rIyZ_YE4lrvWgWw9uM0Q48wZlpFJ6Zgk18dSrm1jCXypW20X03jifHvuhPTVvrTEpWNvKEI7rT_Q-1x7JrscodZiT2MO9nyEl5-WQhWOHLEN5QX4BS0FrNnH4ZKdwLBKGXQrd9_tIiRHpwc-mbiWhwtkBwg3z8CFkJ_85HBKh6QwzzN1V6Wyi_hqi_uxbbnJ65OFzN-q9wg0JB60Z5HBkm--EtJSMs2Ug=w1015-h761-no


Halfway through getting molds installed ...

rSF-2E7JDwJlG_nyu6jPnK8ZnfSRo-EyRAEtxTWx9KvvMLYP_b2pPg5K2KNKqWvQleykQ2uOvrrefa-L1vaA93QopOS3U0kIJFaonYaN4QCCfjFN89FTG_Pxf_swZxdmyvN3yCCaqsfK0I2Vl50m205NPkFY-9EujXm8zTzxvpHZCMGVJP2ph2cBVDpj_0ZWBpOUy5snIuAy4A3StopkB9ZI3Vcs7GH8efHbBSg18Dp0Kml5lcotzVd5IhcIcal_h1AfrDw83tW7dTG51R-Q3YwqxN7qnyPCz_mUwHPaDf8g3lIOuU7N8GxKJ4xhZJF5jbB8TE1m6V2GTpxjv-su5u6V5XfQpQfH6rkSG_09FAoeN6s-yzkmopGf_q4WnsujMw4Za1Og18Jk88TzE8zR9g52_mzywHK6GkqxNOxjEQF4svl4u91l3ZJRPzfYgUSjZk7VesGaRola3QMsOIrx6Okr5QmO8Ir4lkaiG94UKlMQHCDqEtQY0kF8lAYBm4z97F50XjEHqQTy6ythpxrVdkWbLA9B4CfxJYf8su6wdXNU7TYDqWlMb-5xQnecnbqGBcprdQAp_8bKVUXSnxAeJpJRV14ek6Yv0XZYO1TWKg=w1015-h761-no


Mold and bow/stern assembly complete ...

wyhlpuhlx3Yl5ydcpb0p0hZTR0Pix2lJzyXUUL9IkFLH2C80TEfSOLhHC2ntvTiROwEtT60cNLul7XIcDqEvOdbYxAFZOyRqARvVBsOLoHFK75QNlfdoRbtNhj4TFpPhLXVrlfMTzQy2zWdGzE_IfM5-rWTMNGK_njtD7PMtup1vaTG5Te20-QjAJjNBPXMCb0ou4P9FGQuqf6KQlUxstT9Ml_C4sCb4D0LiiNciK7THDmSkLq78aSpbmqlKp22FmmqoVQVoTYL2qcD011tXh-fFL0xr4HTrQhe_WqXo8rhM1nPUyaKkEiEH92jBLLwqO2-gYw-2Q5p0idDyCC2TirHJt-VAw3KZaDfdcimbBvcH2D0qNZyDl8rTH-SQuj1q05aad57ew5pgvAkyum2XDHBkDMH6WvgYie1H8Idt4ay5rxV_kSKId4TaOYYPek-coOj7ooW6J5m6EEpvjDFCXzVxty4NHeHWJnAmdtU8uUtgJB3SYCwsZP0nlmppezfC3lJ6K8Lz529BvC3x87fWu8OlbZACWz1M4yjB3fIIe3B_niPbDnR550oI-9LWrqr6ou2ZIr7Mz9L4NlGrl6NYU2JA8lUUs1fZvQbN89OSXg=w1015-h761-no


Next step add the bow/stern stems and do the vertical leveling of each mold. A spare strip was nailed between the bow and stern assemblies ... each mold was then checked with a level to be vertical, then a nail was placed to hold it in position.

H8bpFARZpKmkHkmvDBo3Yu41B6MHQb4UoMN7W4eMXNlgErtnaxlj-wTM9-fnyJ5K0Oa_3dDQo-iyyI7t5Jlo7ZSurWVoYPVbCRDFepTQKGy4f0wkPTWkVsEO-WL3Q9WnyPwoPdc-02I9SmgFKghHXCmmfZ927wNYH50kQYC4tOKn_JZV1QiVAmCuMrnMBQVSTWYJESidwgGCkY1c5CZYlrBcOw4u5Mc0zYW_Zddbx7U5hpEgA1NgQLm6dvnJup_NxIGBaMriKiScQNF7nBlP7q9vwIdepLcj7bXtTee67c5L7vwUm_XrHSa0jdaN1cVES20vQYvBSHgjykXP91xlim-VTo75HOs4K8Ifpk3fYPEmlhGOtxmpMjr367RBARIUKo0hnXWv347blHUFNQuX0QUFmQg8gFPGiW4_Vppxhca0uHI_TolbNkCO3qv3tmaJspYC848qqsQjd0MGTKBL6I4meN2V-SbtPx0VP_BWASBfJ2mYeGDtKevIc0jY5e_YJeKm0p5UvIXmJJTAiU640HjvMfCRhAG1m_1OzIs6Iuck81BwVBYqL64vYm-N-yS3Ky6AHadC8oBPL669ZbCQmVfyh2T7AFJrxHvxrm3cyw=w1015-h761-no


Everything is aligned, level and locked down, finally ready for strips .... woot

XaC3tW-KQO0NutFnqsPKK239zox3T_pd5HWPuZVWCFNz_oQtBvkaOSSVFsQ2fLtJ60F3W1i2ZgB-Rm3n9hWkznSU6yn99hewlHfwqWajOJPoBdsH7nWEYD_4QeuWPlRV46mT3m_aSwq0tkHjrxx_tAWI3yU66_Afv4Aijzi7_94MfKZaJnjkYNBo4IWiCJjh7kTN2chujrgdyb_DFicIHZWN-hMXB5XtKk3IHyKBJlu4k4MwmnWOr-mIdUUWGeFMHEvYGWWpHsUrmvrDC7sv97mEStoxgdW_x8IyGOaKQEy2dO8wgqXcU4pSvsnBqSWbr8o591lWH9t-4ogofYV8hJR9fopqN7SoqAx_ANs1I5lsaViMeJeOdmTPEGCVEFgloMVkZHIi84Z6wln_6iPzKi0N6hokgRDRjAHLqxaIBvwL_ap3PIqU2d5wxPeYtF1INdb6hEr0U0KDFubms2dsoLzL8RbxtitCt3lX3Q3CvpAkeOwCHKNSfttTBV-qHRI_CTGNsZ1Za3AqQS63pkbtnDoR01cYB98WbnxRTqjFl900V95M3KCcm7uXNGPpKbr7dJAYmCwMsK2-upg9JxpVBhUgWfqVuRD5W8rYHfRtsQ=w804-h1072-no


Brian
 
Finally getting some strips on ....

Since I am stripping in the winter and the shop is around 16-18C, the usual Titebond II glue will be replaced with a more temp tolerent glue, LePage Express, which is good down to 3C.

The build will be stapleless and the first strips will follow the sheer in the few middle forms and be allowed to fall fair to the bow/stern (the difference at the ends will be made up with short strips). L shaped brackets and wedges will be used for the initial stripping, to help keep the strips snuggly to the forms. A full length pieces of (48") 1/4" dowel is run along the top of the strip being glued, to protect the cove ... it is then wrapped with 3/16" shock cord to pull the strips together for a tight fit.

FrblojQ8N9zW7wC0oV23FXeWpiKXlxCWssEl0PLWdqzZFgF_neayfR1RGf8PnPkuEB_zBdxqzv7JEPqhVmXMnBAmYQwE4LT1LX8MKiH5uDy2TEJxLsFIptWUIWvl4aCBZ7Q9XWpDAGbH4R2cm-TTwN0Xp2a0V0zMk59BD0ApSJCGvjgeNAyDkPj4aOGA0V32qI9jksSlJ7-hzXJDsvyfKBawxyIqaNXOEtiuDSv14H5FRJ_OGP5M8e1W2I22HCBLuPplyMkO1h2GjV1uwyAhNjG9TzL6Q0WoAx_dT7KoQKqyLQXmk6Ec8Xan46JzQMJN3A4dagqu9y3ZtajMZt_nhGoqWJsy9OZQYumb7LmLmFoBji7AIP_fW6ycc55oQX3AChaYyQbfTtP5st4OCkAJda698LVA7Ptt45fTo37lCUCEuOfU6aoikXC3GpbvGOy-cu3jyfsrSS2UR39Or6BsvFUcixtd6hTCtRm-RiKiiNx7Tishs2S8jU0Jf6frdW60U_6V0tNlN2pfNUdg4Sy-CBQ9v5LVzkhHrcDUMG9362-g6p_pTCRgffNvNloHqr2f09MM-pOqIRh5gttyQSGHWK_oR490YcUwcJnCIaeCuw=w1438-h1078-no


There is a little extra torque on the initial strips at the stems (this is due entirely to the modifications I have made), so I needed to put together a little jig to be able to snug the strips in place. The bottom is adjusted (and clamped in place) so that the hinged piece aligns with the angles on the strip, allowing me to snug it in place with a little shock cord.

sHhnFlk_fHnXgkbI-YELP769FO_v152Mpytq6Kp5iPacvm5TQB-112ekNWaYvnmaZOTqVbnj_By94oURAelfiUkXs2YNId_Px4jtaUsPQaWRc6xOxuHUf90OJm9HkJZjPGw1KLCpNTaCnQX0DDaHxvWnWXHYpJy7leSfusuVVKT4YaEFh1fneg-zvZjUYTxXQbYXHUWAjpJtmyYcD2I7L1nShxim-mKzxWTIQMic-SY6cVREuWdVwm7XhJaP5_Jt3j4lIro8bS0MdBfCZ-6TTEgF0SftmD0HSw8MF5aqIjlm7LbxPAOrtWojqUQceLqx0l_7FqqK6R4eYrE7Ary_KD7ZWo4X_sLJd0y_ETcxJ7_g2hhtHqJVU_oltJ4GSvfxAtUaftmTP8tUO4vXYasLXREQFdD9mGWi_oXB1_wUPkiF75b9G43gmLCVPYjkvp055LBGZCW3arBkNLuOUncaVZIkQRlruaT1CmiPTeGz4vxfWly7k_KYU1ZwTrhElFz6ULFAd8UksIa7AVh0nGanI2QNHEjQJNgn_g6p69UYnDCXV82ZHZiiixZUNMNVqPlGLGfp4QgwQYbwwxFRo93FAyaX5GDU8ab26fEj9CawKg=w1438-h1078-no


To shape the stems with the right angle for the strip, I made up this little sanding strip ... just 2 lengths of strip, glued together and a strip of 60 grit sandpaper glued on ... the gap at the bottom near the bead is important if you try this.

2dPyta4fcmvQ93NW2vLMDaTQHPqFkwvL8KPxHInAQHcfEinRUmd79eUGfZZjToFhChwnJxEtiRN4NzrzHV9x389Bt1_at1moZPcNjt6qAoH_ITG9bqwX5zhoaiDFAwiTn6xMF0fqycyKXNhEI-QbYPKjseJeio6fiFzmcTwvE9brmJ7F65BmZ6CjFVaxxfZbtcthMAYheiFJZpJiJudWR2bPXQlZ1S9jyBPSGValnNbz1au-ezrvec1Yex3mDpMEt5N9QA1AVBN6K3EdJekM36SFxnJECeKgKlc-pMI4X5O3R4WNAMp2Txd3HBiX5CGbYlTIe25lk5Cvdjh5D8mLJB1YGpLzwHarDijeD7XzVv3FSwr3JbnopzeQtaRy2Gw7gpAznEvwE1HceKV6C9GamS61z7VFL5JOOeyh6nVKp4fMjqouC5d_5f27D4J7BGwoIxo3ifRyOaFeIPuAwHt_bS7fsXnUeRormaqlQjSd4fy1zt3W3CN9wiAUVlYCHe04luWU3sooT-D9uG1OwFneUDvKIvr7GIoa70Z26QWElWm2RO48NNrxQGT542DoSAzyt1VoLk8ArVtNdyqTyHY483Ois0nQSo_UJ2aBswT4iA=w1438-h1078-no


The bead of the sanding stick, fits into the cove of the previously glued strip ....when you move it back and forth ... you sand the perfect angle ... the 60 grit sands pretty quick ... if you extend the sand paper further than shown, you end up sanding into the cove ... so leave the gap

AZh9782r2D_fXs34cKMned1DjG_fD6_5Mp-gYrmoVu9sYv9HLtllD_SMrBZiBbFJDp94rLu2SXLvhp6jM6Z6EU-G9upORnC5rhNFYtH7ii_68CTslMr3_YQyNw7IF5CvcC34iz_9gXAJuTUc2x6bKkG3vCm_V5C6UKswURSIsRcobFR25njpXV5IBdoG8Xh5qOP_RP0VSns1O5FNdfNerDWqemLNczxXjjP1LpOob2kTRlUB1u7sELh944xrvRvG3RUl6yZF9CrFL1ziUFYx98iWKCmSkUlE3Pdul4WvgQd1aD87aVEWCvR-93ybqWKntrQkNDV7vwvQ7_tQcVCAevZPGzdhlnN5Z-y-WTUZhnUH5nk2Ng_18-EYZ1p9W_YENF2y10u0EBhjWvZvhPNaUTGYyOBntc2OYafO1nI-cZ0v4CS9EXHdeX_JM2_g56a65xrqFRNrTAcPflyk07x_7gCQjFrwk28DYaLrSMC6l6VX7XTafRWlrBucSClga877Hwqy8Y6NpZksWUgI-YRiPzsaHNb45dQgBIkUcgOSFZLqbmgYWDXj7pxU5o2o8_EKXiAQ5-2-MlC4DdXIUGRB67Ye_cqewAalLQLgFNCXrQ=w1438-h1078-no


Top view shows how the sanding stick follows the bead to give a perfect angle on the stem

yaIt4dZWg2ujnMB1RsIeD3dSjqlKApNA3fexLv_1PTUIhnctKpEZz6qggN4v1-hHm0Kqae_n1sufV-5Qy7WlnJdlByOY-RuXlVs61aF0Qim2k3uPloqhrEijxJtE4P5N-fmTL1sydKlmHVMO6VYAmBQpIXC49vbNhxkrfbxBc7ozUxllUKPTO9ZHpLSV5-Xo-gZTKBneXwnacaaY3DU7wrldcMtBg5cM-G6fWsVjeDNhFUIiVAmYJoL0qX2Fq8e3NwCKUolLsx_4_PfDlKsy3Nwpww3rJDE5SdFrR5ImzBHMwqgMh6a6zPNiRbgwosSeGcqt5fGRFvVmTCMyk_jDnOuiPDgKB9Bo1hb7Uy7NGQBQFrKh2Og3AkRuvR7e78JGuDPfhju8gv4eppiSvXuzY4xuptxXAHZb3hZ0QAfKsEdQUbm5jaPm7WviUuM1Hq9YR6L5bBoGOMs7nqRd9gIS9MZ4bFeNvFqTkRsRcqLuxE1NfypT9ta9w-9EuKspqyQgaJvU_Cf_UJJufNbz-wuH0pkeqNZ0oKTRlmRe4FdO-4xmlYM8d3VrXlDO_RTATOT9AzJeo4AXWRX6O7N-M4zJp-QOxMf1NYJLf6VXbncDqA=w1438-h1078-no


The bow and stern sections are pretty straightforward, but in the sections in between the tumblehome shape comes into play and the stripping requires some forethought as to how the strips will be snugged up to the forms. The L brackets handle this quite well, but they need to be adjusted to make sure the wedges can apply the pressure. If they get installed square, very wide wedges are needed, setup at an angle gives a near constant gap, that a 1 to 1 1/2" wedge can bridge. This pic is nearer the middle and you can see there is a lot of curving going on.

jPo0lzXZj3roMy4lzKFtgTNeCDUlxTMRies_akEaUr5oELr1jAiURLJWh2XBtqKie0XV8OQUWmHVQixOCvv_B5GQ5ru2YUtqmCUF0Fqmcy-akAZtM9P-_FjJxt870knBV_5MrZgt2NO9zC22Y1SMRoR21HtqUvT3ZyNTFlFrNqhzovxlLDPNfb8owPpabnwo_qHlYLlR6Omczv7vEYnxknOAbQ24_lKSmrONLASNoa9tRYmRr-wNeKlE-fQdlH1ljlxzLbN-pISkw5J-83Z7dSWpq0uhfZXC_xkjwX_mjbKY-ONbzUsX-M49p-xRt1ODK5LJ2rSg6b2PwZ_STyprWyspoDKRROsQLnqGu2cTqaKLU9g368xfftUqTu0lOVabV2ezZf9daJQbSLFsOZPdKYooKn7d3NSqcN-1G8UTv0m4mBFklbgGiPx3f8pc3Ex-8t517eLP6PZI5NFmQzWFJOXLvuWG3AM3So0GR-deOJ4sSRj8Wz7Q1OvNTsxOrSF_-ldRLbLOgn3ln2Fk8Cuoww7wAKoMvTk1r1f1pqC0yCSaU2VfPz2TFBVRYF30U9YHXSg2qn5gchDkhxvxppTsyL-HofUItmdc_lSUKyWaSg=w1438-h1078-no


The strips get applied to the top of the L brackets .... it doesn't take many strips to give a good impression of what the bow/stern shape is going to be

F6iNGBpDeG9ETe9EeqLwfs8NA9DkDS_vGQNxI3s_MXHZ7NR1jMb4UsZV9Fp4X3zGrWu9jvgwHgcVLkoCQPgNsYVWGcDbKwLD5MAzcWBx_xjnqF-EC7EMVRW5Wu5jAEpYKjhHjUQgEnLud8KdvdTrs13LQgQx7gcJrbOaJr1M_6moAVUx8k7zIjRjtXV38YL2CRnzQ9VJMjM_ooz67ud2Mg7EL_igRJwYNlZt6y-Pm7AnAq6F4DrJ2Om8Wc4VzkfrcSczKWLkbkVK6k-kve-JA9HeHiSdzCvkOSJyM1ukQhgk6pOzsno-xt5GPVGy-p2Fqr9uc-CsEn7ZQIaBAUgvb1ZoiKtagHacR5O2SS241Sf39jurx4GAv7WjSSGbIpGJIy1_rDIEKR13BQrbsQbwLmDbyHv2z7B71T316v52oID3EXfK00GuLTEGB8ricvbrdKQTQW5obzw4kIlpu9FXvcOnOARzz6mc1jHZgPvUdC_Kjqw7O63uvxxOOwWtAwfr7P0vwoEW0HN-7AsBUEGl3yGqSbGA-DIUZt1lX6Gy-Oq-WT_qlkACxrLpah6QxOg8ucKyNHAIzkP-UDnmCPT7awZfsNmy8rlzHdrqqte4xA=w1438-h1078-no


At this point there are enough strips applied that it is pretty strong and the strips cannot flex horizontally, so the L brackets will be swapped out for a buckle system .... that will be covered next.

Brian
 
On the first build I used 3/4" forms, which I decided were too thick and swapped to 1/2" (on subsequent builds), I also used nylon ties (really big ones) to hold the strips to the molds, which were swapped to cambuckle straps. This caused a little issue in that these forms are the original size, so none of the current strap jigs will fit the older forms.

Once above the tumblehome section, the wedges/woodjigs, for holding the strips to the molds, are swapped out for cambuckle strap method I currently use.

This is a pic of the current strap jigs/clips meant for 1/2" material (foreground), with the revised version for the thicker molds.

zZfs0_dzM83Fr-zyHW5x14bu_OdevnmncqGnzigcMPImEpFlV38FX32RB0NLPiPlqFBPQoNik-RqJMSH96sx97f4bDXk28Ea_seLLxhZdaHEQs1JrkHAEDBL0VBb0PibkzKmMV1qE5agOu1e_FA1UKGaRMYvtWYI_a66S2nZiMovMOV8GLAFUE6S-W_aoCmxH9ud-PIUtjXCKu0dwJ-8ZaKNRjV_ylOh77Gl-Ssg1CpjscUMbSD4GgAGC6vRu9vsjhT3z3HCmcTKGJwEEr-pLFTFO4QYieAenlo-SDBRdKapYR2GN5VOz3mdRQX1U02NQR6vAbGXsSnwDcUfLIjGIj9CX6FgS6lek9KQ5JjfE5OgbtCi_ivL0QjLLh8tfZxKRFL7nMeCfU104nW-x7cPUikTItvqCn5IONHDaveelENoguH9ozeG9RJZKHQ2Eki8d4k_QtOyV4E6cKk2Kl0HoZXRdhTfZR0RcHmu-IZFw_q5C5ZmqX6IVzK1lMxyNrIm6JgtWibH_oi9r9faPP28GT8uLWLAWGf0XnxVNuNpsbz0qK6hJ8a0fXQDSeeuQgd_QCneiY8tMmIctik1olu3r5VWNsDLa2TCmq41rTCFog=w1015-h761-no


Production ... not fancy, just getting them built.


4yGLL-j-BWlggwagKE394lKMXIlmW5H6wCbWWMEDY8j33Rqg1KVgu3BfglzT4rHYM7SJ-j6d4EQ84ScRuFQo1Nyq3xSRg4JKpwPbUS8QsRikGB0TaRBXJdwQGLO0zKVQGOigPWm80RT_EsxxnjyTuMUMhABrtNEuxKGZwYgD0p_eSzCEnZyhJI31X-BWJcGoKXLb4hNDR_ixUOQ7DcZ6HBBfsSi4j7Pmbx_KDngutvaOWOHftCz_KgYZG3HbkkafOolukBQrAmOHIvjzKBVbnRCOROyStYx9WkRu9gLLraFUAFkBUQgn3lHdZ7ljyadtG43s_yt0UcejO53-1tlZpmzD2avHR60XIniMF4AchpUp9YK0u6e5h8xlv3RZS1drCdp-m-co44_B_G0lXqSv6xSxElVRqoF1KHpklMXnhmpNw2lpuKWs5TDM2Zvu2aD8QdzQAEIsWqlwM2GFAqHx2qYwBJYWHKEn4gKG8r9il5G8FJW2ekhknxXCQdF333Lq_-avJPryFCxbPYR4FmkvIEPrcMaI_9ZzqFx9_f3K8iIiA8lee7M7f7l0PwTSIk4jymWB1w0jJ4hnCKN8Cz5rAjwVdN6rui2qfw0YhRXp7g=w1015-h761-no


And how they install on the forms

VWhlgjFFlavIvw4UYi1EGg3Pn_2sAM3SJ078OlYVuL7JHjx23AL3UQbd7Fxx6tSM1t-gVeolakcD4Vmd5AJzM25gG1VL5K9KDWjUpZ64I8npxlKLrySsehSrLAicSSrLeEeoJ1McLGg2v5SCGi706GJK8M8ciQj5U-sIob-cA-AztnM5frZE72Nq3TyiBhSquuqf9zXI7yD5vMkj24dyvLcYcPXUgQAPbUgGFeuLuCiMC8U2vB82NxK8rlqTXDNGJUjGsToURSlTt4OyXpE93d14y9EbAlISf6etzN6IUdEhLj9YFlSZfDuyrXY0jZSEC4JgjxvbDPOCW1A9ZZ3M7YhJvUFG3bMxL31KJqGEMJtMfEw-k5EFzqE7jqGOCXldrSEKpN3_GKwFcQ9dip5D4SmRt4QFCuIqwDuYamJbq8_rQbzZoT_W-1tbIbtw73VJGdGQRtCTXHVcoZ2StKutStMDxR3ga7dTSqck18d7H1LjmDjR6f4yEM50gF7PkvSlGqe7V2nKgqA__7nYgvWIS7DMdsVPGkIouMfTuj0vCg5y4Z9PGQqhRjbB_M-A50NFRHnl19r-R8HXi9ns__XVjsoaw7HhPH01VrKfN4MRug=w1015-h761-no


In practise it looks like this ...and stripping is coming along

d-xarvO7MYLnA_Qr2TTNlp_tS-C7cs_sSzS_8J_kMwgGcQBP7ZaB0kOG2fq04zQAX37mex3cVaJjY6wpksUyVZZqCGhhpY11G8XHa8medZM09hCiJtgxdYg8QzWdL5G-7Zc9Ql6y72E5uqcG6t_1IliTfVOaPzsG_79Hpl7Go3VXAtrYNkGdTOMjJEuHmPyqk-sCbyYdNTgsIsaUBQQYPt2faI5Tt2qz6Y_nKQG7QchEQFkcXbgjlkxL3JLLyED_Wf6oMD5fx5oFZMx7mNztFNworE_vB0FYkVnB-x6Sfsmo-9tZ7QN9F4F_IfW2Z1Y4YSI2mdb28xDR2hb4X03kv2qyUT2iwbBbQ7nH1iZmRy8y3s99GDDSIWxmjsAchXF3jNrQbe9AzAJyTfFarXl8lsBFMU_BKYqBgwV0Mlp88m0atSoSrM0fwSBBvLf_uWoe5QtMMIub7k2Il0uRXWsQT67dvOwoBKMA0VJIJx5IxmvbXr_SLJnbwCJGoJhTbbRtDQaAZWYqD4WuWdmaqI8IAjPaxsfWomBCDRRGp6amsCTafD2nxCEClrxpxRocl4CbNBmVqdVw_yY3QethQkHEIAWUySkUs0B8YdHGyx2bjw=w1015-h761-no


A view of the completed tumblehome section to give a better idea of the challeneges there

V8gA_qB5PmAJXAE977dSxWau7aVhuTz0gqFHmIVLhGqkDq22IovbNyCZbcEbzqvwVzrmqC7rNUs0iliXck6L_JqJYLMI1kIRoJkdPrV7lpckBp5yRfU-8l2xDhGUOk8Za-_WD6XlTn3PxiSJjVeUr441uxiJesLXpUDuwlkX6NOB1n0B5qVPq-J-sAHUaxCK765W8KdzskOXaFqyBS2zDzKj2Z83x6EHQ_0MHOkno7NjluhmjoORYjOcQixSpLoafs9EJfGA_jUA32wolSynBfE2ygGulLDOXeYOu6ELN8uXr_0MiG1FCrC0ClcZPkS57d3A5FYb9b5AO8D0wGlUIN4dFPLXiw2yQj6Aal0dIZdBIt0YjKRUdYIhVVwfZ9zWO5rCVmr23205XmWESbQZVeXpvl-d0uxTkpL2Aw-agfzFbbEFkcBJNAM4Fo5TqxHRZetal_9uWoTFQ4fEy9a864hmq93ZS3NObHnb4eMRJfMPyzQe6nEi1FV5adZnnYHiQjHtXY9n9jYwOuY866hjsDJJdUjTB8oxwYYDZXvF0zQ-nqsGKubh2Yss7pg_VklArZ32VZ0TaZ1MGu3_tksmxSCWL1hEHjc-SUrVlgfQBg=w1015-h761-no


Overall view of the stripping so far

4sIoVi9UIZrGPWZp4sLHHgzzpfFJ_YT9rdzhWhfBY9XLeCFnP30TSTYkg25PE7IBaNJY0QqoxBVt6BIEvxGw19EZY2ojfclJPYcRQGO6CJHftafNu_MFFYEzKu8JNkYRsXRI2IdHodA39_xHPbDZwOjlHJGMn6xBDjxZqU99KD_raejrJ_vYT5-2nHMxnSLw7AaF3MM0LP1GxWXKh6lUXbyCARCnaIcATw_TIsCLl2FbxZaVWTCaofbVRu5WFEN2mA5FQeFcQVa3Pu7D3BGmNk6O_NsevU9ZrSL4v0b6FMG-faESeG08mY-MrJL9QGWhT03Ii8oPcxxgFYEkQ21Hc3v4qKxvCkacOujkCIL4_CUuD4X_jz4uFH2payYWqIkQnP9tL9vOoB8PiP2VqCMsHrmfQYSAqOysbaEWtG73Ox7SZaUpMOArR-0tgN_45pGBlf3wIos5blYM8Vusyn1uuU1IFPjCfYwFlibr73Vx54u1GNdM2qShx_0pmCi-pcfn-BSYgJQO2WNxijhFNyZjt8rZtiQYQ6AIVa-k4RKj438iWWsjZgo8jPyiE8u6JtjP74HUjQEmJ9cPdvJYlmZBbhfmbjIt4by8W0yVcCibIg=w804-h1072-no


Things got bogged down some as I enjoyed the flu the better half shared with me ... so much for flu shots being effective this year.

Brian
 
Sorry you got the flu. I'd be frustrated too... just getting over a cold that hung around for two weeks.

That rig looks like it is working well for you. The pics do leave me with a few questions, though:

How long do you need to leave the cord system in place before you can add another strip?
How long does it take to "reset" for the next strip?

I'm asking because I'm not happy with my current strip-holding method, but I generally like to set multiple strips in a fairly short session.
 
Sailsman63,

Like everything else about building, take the answers with the idea that you will need to adapt to your home setup and techniques.

"How long do you need to leave the cord system in place before you can add another strip?"

I have 3 main glues I use, TB II, TB III and Lepage Express ... I will swap between them depending on what I need .. each has a different colour, strength, clamp time and chalk temperature. All three are pretty much overkill in the strength department for cedar (IMO), TB II and TB III are a bit finicky with temperature, so I picked The LePages Express for this build as it is fine down to 3C and I am stripping in the winter. The shop temp is set to 17-18C which is giving just the right amount of time to get the glue on, set the straps, apply the clamps, before the glue starts to skin. I then go back and use a 1" putty knife along the joint to lift any "squeeze out" once it skins. I find this quite a bit easier than a wet rag etc. for cleanup.
To finally answer the question ... once I do the skimming step, 10 minutes .... if it was TB II or III, it would have to be longer .... basically I just use the recommended time on the container, the Express glue is fast at 10 minutes.

"How long does it take to "reset" for the next strip?"

The short answer is that it really depends on a) what you are building b) where you are in the build and c) how comfortable you get with the system you implement.

For this build the immediate turns for the shoulder and then the sides required taking my time. At the start point in the build, there is lots of room at the top of the molds and the standoffs keep anything up there from getting crushed. I was taking 4 strips for each side and just sliding them under the straps, between the standoffs ..... this basically meant that I had 8 strips ready to be installed in about 5-6 minutes (time to move them from the racks to the canoe under the straps) .... once the clamps were released, and the shock cord removed, the next strip (either side) is just moved down over the standoffs and you are ready to repeat. Once you turn at the bilge, it gets a little crowded up there, so the number has to be cut back .... you can see the next strips cued on this pic.

1CthRUQZSGilKWigRIPZ1IpPg8vXk9lsZpJWsiq608cS-b2v3-6o1DeUAwPfs1FCH1LOAhS3634vuojYEtSHpYeHc_vlyGeelsr00JR-_gZkT-KmipSybNELtCABtxUkdY4ohNbkFi_5UG4lMyXyEr6HmiPuhiV5tJKhPWENYEl7J6PmAtDH0kNoaFniCpW24_W3DxN7Y6dtGNnw7duvqm1pNoKaTNyNbw-ONSeN_8DpKqBAhK3KkCCYNMw6Tmo2bVoFzHbSsbO1sS36rUKbHF4dGdhwpcneMjBksyBZ2k0NfHm2FHG9BwF_9C6WbzIrNsY75qtqI7ANORHi-d_gRZZroMq0PNhfvvEfSnPjKj-hRCdHbRbaznvrguwWofX0I8mQEIQeRUJ_EIiCZByF7UsAvXpH9hsYCy-w7MTuaB0ohmu2WrREfxfcnDsedxgspmH6z0A9iu4PLX6PU38DxJfteesnL9M2V4_bKx97PBosm1Ph95blm_28DhTohvKV7TPId1J4oba7K95potnUuE4CrMdq2Yo6NlyX0lzVEOsikXBnKSsBbrRrwOhtlzjit835wuquNPTZjUF_QGOGbvRxnU5Cl4SZqyaB6xo6EA=w1438-h1078-no


When I did my Kipawa, the sides are almost dead straight//flat and I was stripping in the summer, I swapped to TB II and with the extra open time applied 2-3 strips at one go ...2 isn't bad, 3 was getting a bit hectic ... you can adapt the idea a bit to suit yourself and shop as required. It is not necessarily restricted to 1 strip at a time ... you figure that out from your material selection, for me this time, I just don't have the "open time" to do multiple strips, plus the boat is pretty curvy and I am not in a race.

I started using small 1/4" dowels keepers (~3") for each cove where the wrap went .... this is a pita, the full length pieces are the way to go, no gaps, even pressure and you don't have a dowel chunks all over the place. Also, if I had a reasonable source, I would swap the 3/16" shock cord out for 3/16" surgical/latex tubing ... but I am paying $14 for a hundred feet of the cord and the latex is more than 10x that and hard to find .... the cord lasts for about 3 builds... so it is pretty cheap to use.

Hope the answers are in there, somewhere.

Brian
 
How much easier it would be to use staples ! ;)

You have this system down pat !
Timing the scraping of the squeeze out is a good trick. We see the squeeze out on the outside, but it's the inside squeeze that bothers me! It's tougher to scrape and sand the inside later !

My glue applicator is worn, leaving me with extra squeeze out. I employed the putty knife also! And changed my tip !

Great build Brian !

Jim
 
The outside is definitely easier, on the inside I swap up motions and use a pull up across the joint, it gets almost all the glue ... but near the top I get a sore neck, lol
 
Was wondering if the value of the reduced windage on the lowered bow and stern stems is sacrificing seaworthiness when punching through chop or high wind waves? I sure like the lines of the design. Man, you guys sure don't make it easy on trying to decide on a design. I do realize that your current build would probably not be advised as an entry level attempt. Just dreaming. For some reason, you guys have made tripping without canvas packs and wood canoes seem like I am missing out on the authentic experience.

Strip building wannabe here. Really enjoying seeing the process of a staple-less build.
Thank you Cruiser, for taking the time to document and explain. Well done Sir.
 
Last edited:
Boatstall,

Technically, I haven't lowered the bow/stern sections as I preserved the existing sheer line .... the sweep back should reduce some windage ( and maybe some weight), but the boat doesn't suffer from that much, in the stock verion (ceiling left in the photo is stock Solo).

The Freedom Solo doesn't punch through waves, more like it just parts them and then sneaks through ... I was careful not to alter anything below the waterline, all the changes are aesthetic. Hopefully next spring I can give a final opinion on how the new boat handles.

There is something that changes when you hit the water, look down and realize you are floating in something you built .... be forewarned, it is addictive and you may catch yourself smiling more each time you look.

Brian
 
"it just parts them and then sneaks through ..."

Really looking forward to the rest of the build and then your final opinion, but with that description it sure confirms why you preserved the existing sheer line.
If it ain't broke, don't fix it, just improve it.

And I can see how building different designs can be a huge rabbit hole that could surely be addictive, but can't think of a more satisfying addiction to suffer from.
 
Another pic, of my friends Kooteney, in the BWCA. A stemless build. 12yrs old, and been to the BWCA, almost 60 times. A real Veteran. Larry loves this canoe !


IMG_0144_zpsu16jiyrp.jpg - Click image for larger version  Name:	IMG_0144_zpsu16jiyrp.jpg Views:	1 Size:	273.8 KB ID:	74112
 
The flu slowed things down for a bit, but I have made a little progress ...

One side closed in to centerline

CxDNVYc-N6V06VINDBlVX7qZ16PQMUzw1ZFFeTF1cJlq5ButURBrnsegM9sw68gzozK1Mg4LkIG0jPJ5bBxLzj9fZ6UQbzHagQFmm3WTrkMaJDNGlEHlTc_trfW0Lab-nwrKSLkRYBJtRn-C3KONN9qdDnAAXYGd1XFnFhP0WacB-aD7azfDfVpTecx2m5FV-YgV_b5MQm0aWkT_vr6cd6ss7YRYGEraWwO7TPb0cJBCjfw9gy9HQZR49a1UemvFquKr82w8J6F0YoN7vyPmDLj56iIdG-Fnpu0c2ZnGeXralzq3ViNDc8FSnOCfjE6zh43xDTCzfzp3V5QEM_xZYlRxCJ7bN_wMphEKH6wgWLmxVeUQPFobWqcCV0n5V1RLutYF3csWPA2YaauHASkeAnXXVaefVH86I2yD8sdH3YlQDMaLYCD1DOW9iCn_N9YRSKPbQ-mbm4758a9rdiz3YXejC7Yd29fDT_4QhqdVCx8Ix_mizahUykb3jQegjZoDiVeZtgMpYzalKp0ceGjd3pQxw6O_h_6_RAiC2S8cs8FJzpe6TTpMIr6_eLmes19vzVaw7jhow3ockAU3yfQREv3j3nA9w3lTThQJLeSLBQ=w804-h1072-no


The hull profile is easy to imagine, I'm digging it so far

rW1X2k1Ke7plUIP20ShpaylUftxgEq399-KcUpp-aPp6vEj-tJIYv21bVtW7PJojmgeG_akqiyzSDM_dpFdN1emXk1Usf-l0vHvAIJxQ6FU_b4t2IQL3Z9ymIdEpMOnK_H4TBdyO9l35g0CXaDAgSwSZ-_nkjZhVNvOSC4frZAMqg-vW5VjI8_VQR42-iY7o_IeimkwokSWTQMZpaNnEwDNBvlD5dK71Ci5gYhijNyTOSGX1mowhwkv_OkleqBOVJWghqiCbC7BryVT4AekHyOUBCZJtzmYRjCGBlzhzAZMvbnfhYGGqQX40AMBxWMkBHQjxjpuAbGTnGNc-MO7Z_pADTU7TFMAhoI1AEUCl-JLL1T1BZFN-yKp3Fb4oEEUTR_i6DBTJ3Jp1OJI97OHDoNUznxK16PhmjHwLvGzQyv44yu57n9rug4TJDlZqJNurByXk6tIOZzdQw8QE-FqcL_K_QBADAvBVhN0R7M5thZ2rD6p6-I5vstYVDiRduntGM9VHmgzsWsheR8JRXkxvxJEQ1s7ntPVOy8p_4LI5b54D4lQUw4VEFsPbrVXqtSQFwB3QBFlzmMAt3AXJSPtYLreMsCkAQZT4uaEiupVZlA=w1015-h761-no


Last strips done, and all gear removed ... getting ready for center line rough cut

CTi5ixLaA-M467jpoAd4RIUQbTWIu5m8WOJpw7fqH0_I3znFEJQMxNOeg63YZwdKTNt3h9tfCkJ6W9tzCI_YAu3wS4BpHN0o4R0YOIDQMWsKg53BbJnmRcegSeNtEMwO8mJATVOh_PVI7DOdyvdUlbH_Tr-HofqzdDoy7eBj7XSJ0gy6vaO3BP83dYsSEFPYjT_Ly51inIQl-xzOSeWxWOLhyW0UFBcS4Dq_FBYQfKRMWT6mFfuZGU3JJUzYJkjJrOLobnNcUSoikQ-AHUKef_MqQ97I1kpn52V8q2V0zwHdKMAhKPNzcBCLMRNTJ5k9CBWILVlyxOyQDWkodRjNvqk5_3OwVlYj-eqdDroPq41xZ_JBjB3niK2qt0TEkBKJ7x3EAiLbtUyDfzCoae2CZuU0keoDEedDoFuBo3crlpN-10YUHahWeIMstub5L6WMC58uXww_2s2RAQbs2c3xiVimycHljmymW6BZSqK_plsfZfjAVYoJedI8k86FK4DQdcxbNiCZaqTvcPjWn_xvlBOlz7sFc89uPHAoCL6hKTk8pqh5kfsYUu5JrWOMnLY1IUBxFbBQiJjPRzifI0HUZa71C7QzUf0BphSj8xyEdw=w804-h1072-no


Rough cut completed

5SkF2xoOH4I7s7eb4UDhEXn7q_f4Zd9e3mr6UUjPVjU2JxlgaYgSMp5mtai9_ni_xDHMVP8Dld4GQZ_n2ib7Qk5C_ccKiiJPFRRy_GgETgBeXCfP_6kXI9jfGgwugOufdqrLLOGulTMYIjj93yJqtIutD-o9EtJquUzfzE6ys0c9RYngT7ypwWlNM7KX7BPJkB0Qkw8XU8LS9DhAAoCCCSTKgmznOOXW6vqSKc5plRTsE43LAhVG0QbqeCe3Oqa31heEJmwsXFwrxyw4v2XOyAw7lffcaFrjbgCon8PoDOUcr0vVRU43cfEjmuYL4a8I6mzS6joPJsV5RTx5kic42C-U0Kz8oOLocS8NuYFKIOPhg75CcE0UntPNuj2CLdFn19NX1BsKLhY_xabyY9AhJkp1QaIxq0i1VLx6H1JJp0YuUxnEmJZRPPsGdGP889e99J_JQaMBQQ6KJby_-JV5Qgtks3EgSqFT7nM9pHxS5YuOoT0ACO1bK_SKDbs7_K2KJMcoXktNzA2UF4winkXbPx-Am2Yh-1FOyP2UlYUSIXzN2VtAwTxfeBlooG1Fw0H4WgG-tpk-SMobKkWW34fAol61fx088Rt-CTH97YkjWg=w804-h1072-no


Cutting the final center line, I am a fan of getting close with a chisel and then sanding to the final line. These are a couple of the sanding sticks/tools that help keep it all straight and square.

eUWl3XbmKCJdQ11R-2wWmC2h8_dJ9payBfhdQVHLBf1TZEXvjJavmlIRUDZsgkq-tv-WbK2Xkqu9WYuELoSvsX6nK4BGzeD13zPGPw_ZJyQAZKcViU1xsPJQGHJfRJ6Gr6AVCMVB8hjYCDKtldsxOuTI66r0awq_eBUgHCcaaPk8a6SeY2iYrCky7Xr7vHiK8IdOqCIXtUU_lE0JtOH-uBP587GeEhCpZH0zBFPSJBdtc_NDyTM9ThpLt3XRAC_TdPxxL9vBti1kY4A0GeoY0ys1CcTb6VBSVHVuAEAV9rcMoUiqJ-r8vZk7gVMTUR7rMQzajzFLga_xWXfArGu85x2MMMfQpwTT_oJklbWbM8QKGgn8Ejdy6o5PCxihFiRwaEY3biZIRrlefr-YGSaNe3CG1wJeRnyfnh22WupSPfYUSkT86OnYLRePeAtPgt1cMjoTP-o-HnO1AVcC5m3noGQQL8yNJ7ccsTaiPPvCFCjNuuSb7Tcmcactdty3ee-JUXJHtSytNpwOFlKY4xaLjzxBYyuOVOXfc1XjnDhwA2IXpA7TrRwON8YJFbGNNj-1ZvD79ijp6_xrfoAJed7487wfElcp3KZ2YGJthW3mlA=w1015-h761-no


And the final cut is done ... I always sweat this cut, but it always seems to work out

PGbf5LTc44rnD3IdSilq5IVwfU28ke4_8y4jZTGY18XcDFV9FTOwcX9BXXcai29nHuOVL3HLdQeFIMu4Ht4UzJvYfs4sPQaVMGTbzgKjt98Tq0hs3V4sJE0qx0KRHDwGT6miHmqDpz0pTbvn-_GePDd4ONzmZJ--JXDxUcoNJjmDO0KJ5EWgi2Zk3zpzfeKqHy7U5MNsr9Kffy-95LqExeFhWpLMX2l9dewbLM4s8APVz1Biy4EW0HKYpzgr-gOpGR4fRnKf-Q0LOkwPvmT_pVT7CdQi8ORUd8yX5sdNiMeUhKtUcgXIezVAjjXvK6L3GxSQsc4M0mEDlaOv7M0YYC7Ph3-7HH2kzQzGio2kr2NHh5RHXLZNUdWecypM4qCQnl0SidqFyfJ_oZ2Y0CMyrNn2YjND_L5TQn4mRrQUbgn2Dgkyu4oEf7BEb4fUBJQWEEqXIJ-rvnLoIqWh5iwH2NjfXquQfkHEaXfs2nF2_8mZ_ZN5oLirnQwNxOvSPO6K1oB1uXtBAmnSEWOkn0sRIPXW4yX4M5ulq4Bb5c5J85ebNTggL0J_kabS8n_uqFV-JQNIJqL69iymSlbwY1rI8wPOIX5GZbk37h9ofED1tQ=w804-h1072-no


Last bit of closing in the football is fun, but finicky ...


Brian
 
Back
Top